使用计算机视觉和自然语言处理来为X 射线的图像生成文本描述。
什么是图像描述
图像描述是生成图像文本描述的过程。它使用自然语言处理和计算机视觉来为图像生成描述的文本字幕。一幅图像可以有很多个不同的描述,但是只要它正确地描述了图像,并且描述涵盖了图像中的大部分信息就可以说是没问题的。下面是示例图片和生成的描述文字。

放射学中的图像描述
放射学也称为诊断成像,是一系列通过拍摄身体部位的照片或图像来诊断和治疗疾病的测试。虽然有几种不同的成像检查,但最常见的包括 X 射线、MRI、超声波、CT 扫描和 PET 扫描。
放射科医生将查看这些成像测试的结果,找到评估和支持诊断的相关图像。患者完成影像学检查后,放射科医生将向临床医生提供他们的解释报告。典型的放射学报告包括以下部分:检查名称或类型、检查日期、MeSH(医学主题词库)、解释放射科医师详细信息、临床病史等,
借助深度学习和自然语言处理,我们可以通过描述 X 射线来减少放射科医生的工作量,因此在本案例研究中,我们将从 X 射线中提取结果,将相同的概念扩展到其他部分例如MeSH等,
为什么这个问题很重要?
根据美国放射学杂志和 BMJ:英国医学杂志,与特定地区的人口相比,放射科医生很少,特别是在农村和较小的社区环境中,因此医学图像解释和编目存在巨大延迟,从而影响到医疗诊断,并使患者护理面临风险。
医学图像由专业医学专业人员(放射科医师)阅读和解释,他们对每个检查区域的发现通过书面医学报告(放射学报告)进行记录和传达。 撰写医疗报告的过程通常需要 5-10 分钟左右。 一天之内,医生必须编写数以百计的医学报告,这可能会花费他们很多时间。如果我们开发的模型可以在没有放射科医生和编目员的任何干预的情况下加快医学图像解释和编目,这将有效地解决了这些问题。
用深度学习来解决这个问题!
图像和文本句子是序列信息,因此我们将在编码器-解码器等设置中使用像 LSTM 或 GRU 这样的 RNN(循环神经网络),并添加注意力机制来提高我们的模型性能。 当然使用Transformers 理论上来说会更好。
如何评价我的模特的表现呢?BLEU: Bilingual Evaluation Understudy
BLEU 是一种用于评估机器翻译文本质量的算法。BLEU 背后的中心思想是机器翻译越接近专业的人工翻译越好,它也是最早声称与人工质量判断具有高度相关性的指标之一,并且到现在仍然是最受欢迎的指标之一。
BLEU 的输出始终是一个介于 0 和 1 之间的数字。该值表示候选文本与参考文本的相似程度,接近 1 的值表示更相似。本文使用的 BLEU 是基于n-gram 精度改进的,因为它使用 n-gram 来比较和评价生成文本的质量并给出分数,它计算快速简单并且被广泛使用。
BLEU 的工作方式很简单。给定一个句子和一组参考句子的一些候选翻译,我们使用词袋方法来查看在翻译和参考句子中同时出现了多少 BOW。 BOW 是一种简单而高效的方法,可确保机器翻译包含参考翻译也包含的关键短语或单词。换句话说,BLEU 将候选翻译与人工生成的带注释的参考翻译进行比较,并比较候选句子中有多少命中。 BOW 出现次数越多,翻译效果就越好。
在了解 BLEU 之前,我们需要了解 Precision、Modified Precision 和 Brevity Penalty。
Precision:

这里 tp 和 fp 分别代表真正例和假正例。我们可以认为正例大致对应于命中或匹配的概念。换句话说正例是我们可以从给定的候选翻译中构建的单词 n-gram 包。真正例是出现在候选翻译和一些参考翻译中的 n-gram。误报是只出现在候选翻译中的那些。
Modified Precision:
如果简单的基于精度的度量计算会产生很大的问题,比如如果我们有一个候选样本,It it it it it it it it it it it it it"上面的精度计算会给出1作为输出,但它给定的候选是非常糟糕的。这是因为精确度只涉及检查是否出现了一个命中,但它不检查是否重复。因此需要修改精度,如果这些重复多次,我们将进行裁剪:

Count指的是我们分配给某个n-gram的命中次数。Mw是指在候选句子中出现n-gram的次数。Mmax,即该n-gram在任何一个参考句子中出现的最大次数。
Brevity Penalty:
Brevity Penalty惩罚短的候选翻译,从而确保只有足够长的机器翻译才能获得高分。 它的目标是找到与所的候选翻译的长度最接近的参考句子的长度。 如果该参考句子的长度大于候选句子,就会施加一些惩罚; 如果候选句子更长,则不应用任何惩罚。 处罚的具体公式如下:

BLEU:
集成上面的所有 BLEU的公式如下:

这里的N为指定单词包的大小,或N -gram,Wn表示修正后的精度pn的权重。
NLTK包中有BLEU现成的实现,我们可以直接使用
from nltk.translate.bleu_score import sentence_bleu
reference = [['this', 'is', 'small', 'test']]
candidate = ['this', 'is', 'a', 'test']
print('Cumulative 1-gram: %f' % sentence_bleu(reference, candidate, weights=(1, 0, 0, 0)))
print('Cumulative 2-gram: %f' % sentence_bleu(reference, candidate, weights=(0.5, 0.5, 0, 0)))
print('Cumulative 3-gram: %f' % sentence_bleu(reference, candidate, weights=(0.33, 0.33, 0.33, 0)))
print('Cumulative 4-gram: %f' % sentence_bleu(reference, candidate, weights=(0.25, 0.25, 0.25, 0.25)))
获取和理解和处理数据
对于这个本文的研究,我们使用来自印第安纳大学医院网络的开源数据。印第安纳大学-胸部x光片(PNG图片)
https://academictorrents.com/details/5a3a439df24931f410fac269b87b050203d9467d
图像数据的信息如下:
数据大小:1.36 GB,图像数量:7470,所有图片均为png格式,可以直接使用OpenCV处理图像。所有的图像都有相同的宽度512像素。但是高度从362 p到873 px不等。

图像中包含了FRONTAL和LATERAL两个方向的x光
XML报告数据如下:
印第安纳大学-胸部x光片(XML报告):
https://academictorrents.com/details/66450ba52ba3f83fbf82ef9c91f2bde0e845aba9
数据大小:20.7 MB,报告总数:3955,我们可以使用xml.etree.ElementTree解析XML报告,Xml包含以下重要数据,需要从Xml中提取。
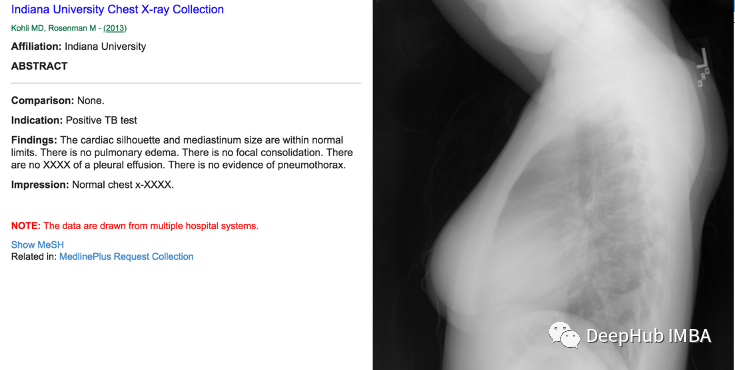
1、适应症:该数据描述了研究原因和/或适用的临床信息或诊断的简单、简洁的陈述。 对适应症的清晰理解也可以阐明研究应解决的适当临床问题。例如:结核病检测阳性、胸痛等,
2、对比:该数据描述了是否将这种新的成像检查与任何可用的先前检查进行比较。 比较通常涉及相同身体部位和检查类型的检查。
3、发现:该数据列出了放射科医生在检查中身体各个部位的观察结果。 这记录了该区域是否被认为是正常、异常或潜在异常。例如心脏大小正常。 纵隔无异常。 肺清净等,
4、 结果:该数据包含调查结果的摘要,并报告他们看到的最重要的调查结果以及这些调查结果的可能原因。 本节提供了最重要的决策信息。例如无急性病、清肺等,
整合上面的2个信息简单的可视化如下:
EDA(探索性数据分析)
使用XML库,我们从每个患者XML报告中提取“发现”、图像路径和患者id信息,并与它们形成一个数据集。
images = []
patient_ids = []
img_findings = []
for filename in tqdm(os.listdir(os.getcwd()+'/reports/ecgen-radiology')):
    if filename.endswith(".xml"):
        f = os.path.join(os.getcwd()+'/reports/ecgen-radiology',filename)
        tree = ET.parse(f)
        root = tree.getroot()
        for child in root:
            if child.tag == 'uId':
              patient = child.attrib['id']
            if child.tag == 'MedlineCitation':
                for attr in child:
                    if attr.tag == 'Article':
                        for i in attr:
                            if i.tag == 'Abstract':
                                for name in i:
                                    if name.get('Label') == 'FINDINGS':
                                        findings=name.text
        for p_image in root.findall('parentImage'):
            patient_ids.append(patient)
            images.append(p_image.get('id'))
            img_findings.append(findings)
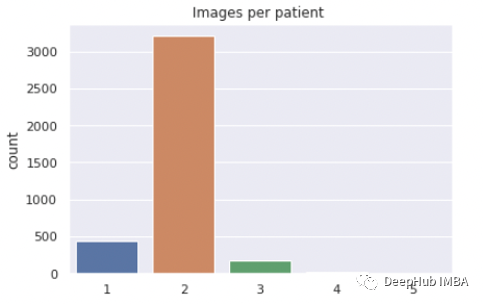
总共有3851名患者:
- 1张图像患者:446例
- 2张图像患者:3208例
- 3张图像患者:181例
- 4张图像患者15例
- 5张图像患者:1例.
为了捕获大部分信息,我们将两个图像的输入提供给模型,规则如下
如果患者有一张与报告相关的 X 射线图像,我们将相同的图像复制两次作为 image1 和 image2。
如果患者有两张与报告相关的 X 射线图像,我们将第一张图像做为 image1,第二张做为 image2。
如果患者有两个以上的 X 射线与报告相关联,我们随机选择 2 个 作为 image1 和 image2。
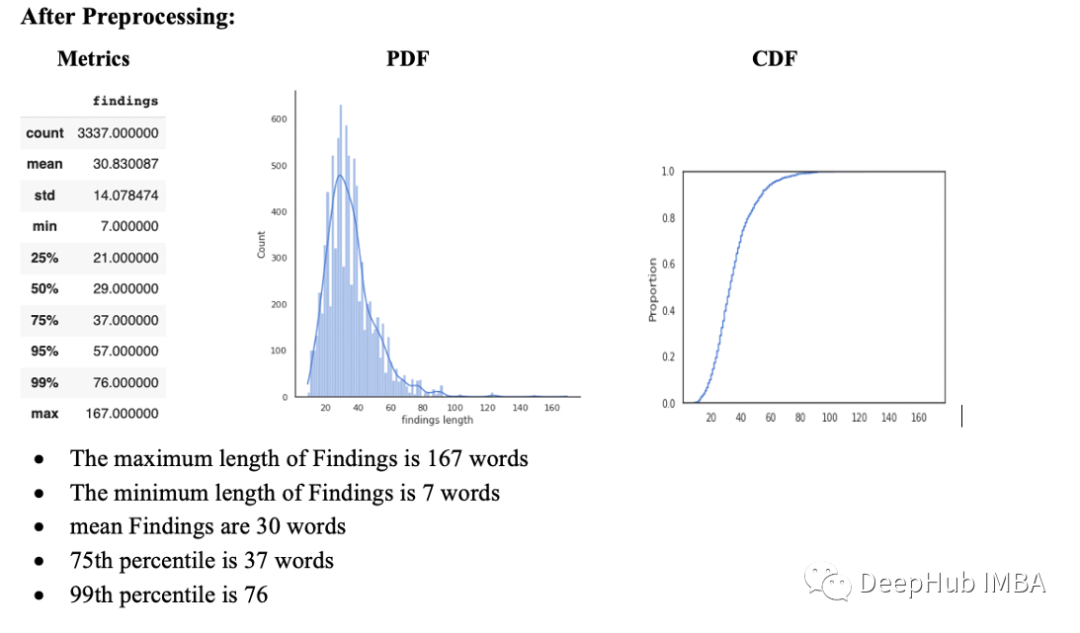
针对于“发现列”的数据处理
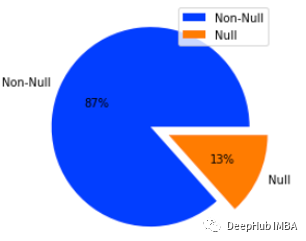
在发现列中大约有13%的空值。我们将删除在结果列中具有空值的行,因为没法用随机的结果填充空值。并将其转换为小写,删除垃圾词
image_findings_dataset['findings'] = image_findings_dataset.loc[:,('findings')].str.lower()

#https://stackoverflow.com/questions/19790188/expanding-english-language-contractions-in-python
def decontracted(row):
  # specific
  row = str(row)
  row = re.sub(r"won\'t", "will not", row)
  row = re.sub(r"can\'t", "can not", row)
  # general
  row = re.sub(r"n\'t", " not", row)
  row = re.sub(r"\'re", " are", row)
  row = re.sub(r"\'s", " is", row)
  row = re.sub(r"\'d", " would", row)
  row = re.sub(r"\'ll", " will", row)
  row = re.sub(r"\'t", " not", row)
  row = re.sub(r"\'ve", " have", row)
  row = re.sub(r"\'m", " am", row)
  row = re.sub('xxxx','',row) #occurs many times in text may be private information which isn't useful
  return str(row)

  def preprocessing(row):
  row = str(row)
  row = re.sub(r'xx*','',row) # Removing XXXX
  row = re.sub(r'\d','',row) # Removing numbers
  temp = ""
  for i in row.split(" "): #Removing 2 letter words
    if i!= 'no' or i!='ct':
      temp = temp + ' ' + i
  temp = re.sub(' {2,}', ' ',temp) #Replacing double space with single space
  temp = re.sub(r'\.+', ".", temp) #Replacing double . with single .
  temp = temp.lstrip() #Removing space at the beginning
  temp = temp.rstrip() #Removing space at the end
  return temp

image_findings_dataset['findings']= image_findings_dataset['findings'].apply(preprocessing)
理解统计结果
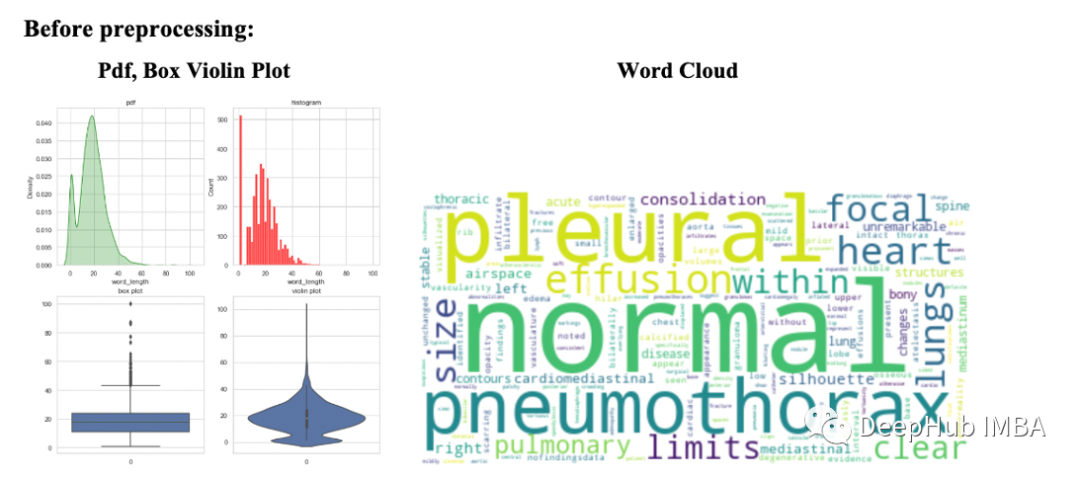
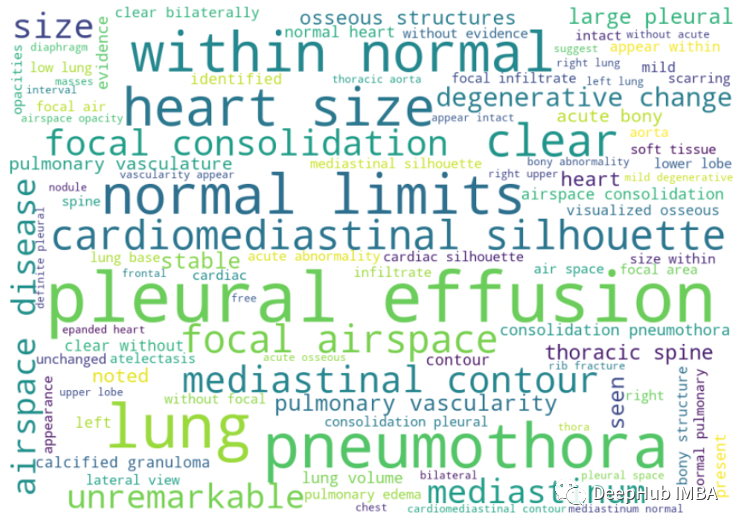
我们可以看到像胸腔积液(pleural effusion),气胸(pneumothora),心脏纵隔轮廓( cardiomediastnal silhouette),yi一般情况下我们认为这些词不是正常词,但这些是医学领域特有的,并且出现的频率很大,说明预处理后看起来很干净。
数据拆分和标记

如果仔细观察结果列,可以看到结果列中的数据偏向于非疾病数据(数据不平衡),并且由于我们的数据非常少,大约 3300 条记录,这根本不足以用于深度学习方法,所以这里将尝试使用重新采样的方法处理数据使数据平衡(我们尝试了多种方法,下面的方法是最好的)
在结果列中重复了很多数据,让我们采用一种策略来训练更好的模型。
第 1 步:让我们把数据集分成两部分
1、发现列出现次数超过 25 次。
2、发现列少于或等于 5 次。
第 2 步:用 test_size = 0.1 划分训练测试集以获得大于 5 的结果。
第 3 步:将 20% 样本大小的训练测试集划分为小于或等于 5 的结果。然后添加该样本测试并使用剩下的进行训练
第 4 步:上采样少数点,下采样多数点
通过这样做,可以减少数据集中在发现方面的不平衡
findings_gt_5 = image_findings_dataset[image_findings_dataset['findings_count']>5]
findings_lte_5 = image_findings_dataset[image_findings_dataset['findings_count']<=5]
train,test = train_test_split(findings_gt_5,stratify = findings_gt_5['findings'].values,test_size = 0.1,random_state = 420)
test_findings_lte_5_sample = findings_lte_5.sample(int(0.2*findings_lte_5.shape[0]),random_state = 420)
findings_lte_5 = findings_lte_5.drop(test_findings_lte_5_sample.index,axis=0)
test = test.append(test_findings_lte_5_sample)
test = test.reset_index(drop=True)
train = train.append(findings_lte_5)
train = train.reset_index(drop=True)
train.shape[0],test.shape[0]

image_findings_dataset_majority = train[train['findings_count']>=25] #having value counts >=25
image_findings_dataset_minority = train[train['findings_count']<=5] #having value counts <=5
image_findings_dataset_other = train[(train['findings_count']>5)&(train['findings_count']<25)] #value counts between 5 and 25
n1 = image_findings_dataset_minority.shape[0]
n2 = image_findings_dataset_majority.shape[0]
n3 = image_findings_dataset_other.shape[0]
image_findings_dataset_minority_upsampled = resample(image_findings_dataset_minority,
                                 replace = True,
                                 n_samples = 4*n1,
                                 random_state = 420)
image_findings_dataset_majority_downsampled = resample(image_findings_dataset_majority,
                                 replace = False,
                                 n_samples = n2//5,
                                 random_state = 420)
image_findings_dataset_other_downsampled = resample(image_findings_dataset_other,
                                 replace = False,
                                 n_samples = n3//3,
                                 random_state = 420)

train = pd.concat([image_findings_dataset_majority_downsampled ,image_findings_dataset_minority_upsampled,image_findings_dataset_other_downsampled])
train = train.reset_index(drop=True)
train.shape
在分别对少数和多数样本进行上采样和下采样后,得到的训练数据有 8795 条记录,测试数据有 604 条记录,在医学这种不平衡数据中这个过程是必须的的。
创建令牌标记
tokenizer = Tokenizer(filters = '',oov_token = '<unk>') #setting filters to none
tokenizer.fit_on_texts(train.findings_total.values)
train_captions = tokenizer.texts_to_sequences(train.findings_total)
test_captions = tokenizer.texts_to_sequences(test.findings_total)
vocab_size = len(tokenizer.word_index)
caption_len = np.array([len(i) for i in train_captions])
start_index = tokenizer.word_index['<start>'] #tokened value of <start>
end_index = tokenizer.word_index['<end>'] #tokened value of <end>
现在数据集已准备好进行建模了

构建图像描述模型
在建立模型之前,让我们先了解一些注意力在基于的编码器-解码器模型中使用的概念。
**ChexNet **
ChexNet 是一种深度学习算法,可以从胸部 X 光图像中检测和定位 14 种疾病。 在 ChestX-ray14 数据集上训练了一个 121 层的卷积神经网络,该数据集包含来自 30,805 名独特患者的 112,120 张正面视图 X 射线图像。 结果非常好超过了执业放射科医生的表现。
我们使用 ChexNet 预训练的权重来使用迁移学习获得 X 射线的嵌入。 由于 ChexNet 权重在 ChestX-ray14 数据集上的疾病分类等任务中得到了很好的收敛。
论文:https://arxiv.org/pdf/1711.05225v3.pdf
权重文件:https://www.kaggle.com/datasets/theewok/chexnet-keras-weights
ChexNet 使用与主干类似的架构是 DenseNet121,下面是 DenseNet 架构。

GloVe
GloVe 是一种用于获取单词向量表示的无监督学习算法。 对来自语料库的聚合全局词-词共现统计进行训练,得到的表示展示了词向量空间的线性子结构。
GloVe 本质上是一个具有加权最小二乘目标的对数双线性模型。 该模型的主要理论是简单的观察,即单词-单词共现概率的比率有可能编码某种形式的含义。
我们使用预训练的词向量将词转换为嵌入,GloVe 提供多维重新训练的词向量,其中我们使用 300 维的词向量进行词嵌入转换。
资料来源:https://nlp.stanford.edu/projects/glove/
Glove300d.zip:https://nlp.stanford.edu/data/glove.6B.zip
LSTM
简单的RNN不能很好地处理长期依赖关系。lstm被明确设计为避免长期依赖问题。

lstm有三个输入和两个输出,能够向单元状态中删除或添加信息,也可以不加修改地传递信息。
注意力机制
注意力模型也称为注意力机制,是一种深度学习技术,用于提供对特定组件的额外关注。注意力模型的目的是将更大、更复杂的任务简化为更小、更易于管理的注意力区域,以便按顺序理解和处理。
注意力模型的最初目的是帮助改善计算机视觉和基于编码器-解码器的神经机器翻译系统。该系统使用自然语言处理 (NLP) 并依赖于具有复杂功能的庞大数据库。使用注意力模型有助于创建固定长度向量的映射以生成翻译和理解。
注意力模型可以简单的分为3类:
自注意力模型
全局注意力模型
局部注意力模型
本文中我们将使用 Bahdanau 和 Loung 建议的论文中使用全局注意力模型(Global Attention Model)。
该模型基于与源位置和先前生成的目标词相关联的上下文向量来预测目标词。具有注意机制的Seq2Seq模型由编码器、解码器和注意层组成。
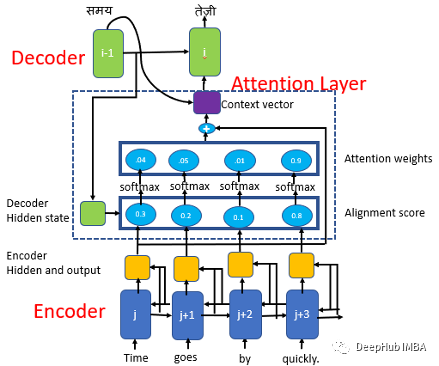
模型编码实现
通过加载和下载的权重来实现ChexNet,为了进行微调将ChexNet模型的可训练参数设置为false,因为我们希望每次都使用相同的权重,并且不想在反向传播中更新这些权重。
def create_chexnet(chexnet_weights = chexnet_weights,input_size = input_size):
  """
  chexnet_weights: weights value in .h5 format of chexnet
  creates a chexnet model with preloaded weights present in chexnet_weights file
  """
  model = tf.keras.applications.DenseNet121(include_top=False,input_shape = input_size+(3,)) #importing densenet the last layer will be a relu activation layer

  #we need to load the weights so setting the architecture of the model as same as the one of the chexnet
  x = model.output #output from chexnet
  x = GlobalAveragePooling2D()(x)
  x = Dense(14, activation="sigmoid", name="chexnet_output")(x) #here activation is sigmoid as seen in research paper

  chexnet = tf.keras.Model(inputs = model.input,outputs = x)
  chexnet.load_weights(chexnet_weights)
  chexnet = tf.keras.Model(inputs = model.input,outputs = chexnet.layers[-3].output)  #we will be taking the 3rd last layer (here it is layer before global avgpooling)
  #since we are using attention here
  return chexnet
下载并使用了300维预训练的GloVe向量。
glove = {}
with open('/content/drive/MyDrive/Project_on_Drive/glove/glove.6B.300d.txt',encoding='utf-8') as f: #taking 300 dimesions
  for line in tqdm(f):
    word = line.split() #it is stored as string like this "'the': '.418 0.24968 -0.41242 0.1217 0.34527 -0.044457 -0.4"
    glove[word[0]] = np.asarray(word[1:], dtype='float32')

embedding_dim = 300
# create a weight matrix for words in training docs for embedding purpose
embedding_matrix = np.zeros((vocab_size+1, embedding_dim)) #https://www.tensorflow.org/api_docs/python/tf/keras/layers/Embedding

for word, i in tqdm(tokenizer.word_index.items()):
  embedding_vector = glove.get(word)
  if embedding_vector is not None: #if the word is found in glove vectors
      embedding_matrix[i] = embedding_vector[:embedding_dim]
创建数据处理管道它将在图像和文本上执行任务,并使它们准备好被模型使用。
- 将图像调整为255x255像素。
- 将文本结果向量化,并将所有结果填充到相同的长度。
- 这里使用的图像增强技术是在水平方向和垂直方向以均匀概率翻转图像。如果概率小于33%,则水平翻转,如果介于33和66%之间,则垂直翻转,否则不进行图像增强。
- 还进行了数据打乱的操作
class Dataset():
  #here we will get the images converted to vector form and the corresponding captions
  def __init__(self,df,input_size,tokenizer = tokenizer, augmentation = True,max_pad = max_pad):
    """
    df  = dataframe containing image_1,image_2 and findings
    """
    self.image1 = df.image1
    self.image2 = df.image2
    self.caption = df.decoder_ip     #inp
    self.caption1 = df.decoder_op  #output
    self.input_size = input_size #tuple ex: (512,512)
    self.tokenizer = tokenizer
    self.augmentation = augmentation
    self.max_pad = max_pad

    #image augmentation
    #https://imgaug.readthedocs.io/en/latest/source/overview/flip.html?highlight=Fliplr
    self.aug1 = iaa.Fliplr(1) #flip images horizaontally
    self.aug2 = iaa.Flipud(1) #flip images vertically

    # https://imgaug.readthedocs.io/en/latest/source/overview/convolutional.html?highlight=emboss#emboss
    # self.aug3 = iaa.Emboss(alpha=(1), strength=1) #embosses image

    # #https://imgaug.readthedocs.io/en/latest/source/api_augmenters_convolutional.html?highlight=sharpen#imgaug.augmenters.convolutional.Sharpen
    # self.aug4 = iaa.Sharpen(alpha=(1.0), lightness=(1.5)) #sharpens the image and apply some lightness/brighteness 1 means fully sharpened etc

  def __getitem__(self,i):
    #gets the datapoint at i th index, we will extract the feature vectors of images after resizing the image  and apply augmentation
    image1 = cv2.imread(self.image1[i],cv2.IMREAD_UNCHANGED)/255
    image2 = cv2.imread(self.image2[i],cv2.IMREAD_UNCHANGED)/255 #here there are 3 channels
    image1 = cv2.resize(image1,self.input_size,interpolation = cv2.INTER_NEAREST)
    image2 = cv2.resize(image2,self.input_size,interpolation = cv2.INTER_NEAREST)
    if image1.any()==None:
      print("%i , %s image sent null value"%(i,self.image1[i]))
    if image2.any()==None:
      print("%i , %s image sent null value"%(i,self.image2[i]))


    #tokenizing and padding
    caption = self.tokenizer.texts_to_sequences(self.caption[i:i+1]) #the input should be an array for tokenizer ie [self.caption[i]]

    caption = pad_sequences(caption,maxlen = self.max_pad,padding = 'post') #opshape:(input_length,)
    caption = tf.squeeze(caption,axis=0) #opshape = (input_length,) removing unwanted axis if present

    caption1 = self.tokenizer.texts_to_sequences(self.caption1[i:i+1]) #the input should be an array for tokenizer ie [self.caption[i]]

    caption1 = pad_sequences(caption1,maxlen = self.max_pad,padding = 'post') #opshape: (input_length,)
    caption1 = tf.squeeze(caption1,axis=0) #opshape = (input_length,) removing unwanted axis if present


    if self.augmentation: #we will not apply augmentation that crops the image
          a = np.random.uniform()
          if a<0.333:
              image1 = self.aug1.augment_image(image1)
              image2 = self.aug1.augment_image(image2)
          elif a<0.667:
              image1 = self.aug2.augment_image(image1)
              image2 = self.aug2.augment_image(image2)
          else: #applying no augmentation
            pass;


    return image1,image2,caption,caption1


  def __len__(self):
    return len(self.image1)


class Dataloader(tf.keras.utils.Sequence):     #for batching
    def __init__(self, dataset, batch_size=1, shuffle=True):
        self.dataset = dataset
        self.batch_size = batch_size
        self.shuffle = shuffle
        self.indexes = np.arange(len(self.dataset))

    def __getitem__(self, i):

        # collect batch data
        start = i * self.batch_size
        stop = (i + 1) * self.batch_size
        indexes = [self.indexes[j] for j in range(start,stop)] #getting the shuffled index values
        data = [self.dataset[j] for j in indexes] #taken from Data class (calls __getitem__ of Data) here the shape is batch_size*3, (image_1,image_2,caption)

        batch = [np.stack(samples, axis=0) for samples in zip(*data)] #here the shape will become batch_size*input_size(of image)*3,batch_size*input_size(of image)*3
                                                                      #,batch_size*1*max_pad


        return tuple([[batch[0],batch[1],batch[2]],batch[3]]) #here [image1,image2, caption(without <END>)],caption(without <CLS>) (op)

    def __len__(self): #returns total number of batches in an epoch
        return len(self.indexes) // self.batch_size

    def on_batch_end(self): #it runs at the end of epoch
        if self.shuffle:
            np.random.shuffle(self.indexes) #in-place shuffling takes place
编码器层使用 ChexNet 权重对输入 X 射线进行编码,
class Image_encoder(tf.keras.layers.Layer):
  """
  This layer will output image backbone features after passing it through chexnet
  here chexnet will be not be trainable
  """
  def __init__(self,
               name = "image_encoder_block"
               ):
    super().__init__()
    self.chexnet = create_chexnet()
    self.chexnet.trainable = False
    self.avgpool = AveragePooling2D()

  def call(self,data):
    op = self.chexnet(data) #op shape: (None,7,7,1024)
    op = self.avgpool(op) #op shape (None,3,3,1024)
    op = tf.reshape(op,shape = (-1,op.shape[1]*op.shape[2],op.shape[3])) #op shape: (None,9,1024)
    return op


 def encoder(image1,image2,dense_dim = dense_dim,dropout_rate = dropout_rate):
  """
  Takes image1,image2
  gets the final encoded vector of these
  """
  #image1
  im_encoder = Image_encoder()
  bkfeat1 = im_encoder(image1) #shape: (None,9,1024)
  bk_dense = Dense(dense_dim,name = 'bkdense',activation = 'relu') #shape: (None,9,512)
  bkfeat1 = bk_dense(bkfeat1)

  #image2
  bkfeat2 = im_encoder(image2) #shape: (None,9,1024)
  bkfeat2 = bk_dense(bkfeat2) #shape: (None,9,512)


  #combining image1 and image2
  concat = Concatenate(axis=1)([bkfeat1,bkfeat2]) #concatenating through the second axis shape: (None,18,1024)
  bn = BatchNormalization(name = "encoder_batch_norm")(concat)
  dropout = Dropout(dropout_rate,name = "encoder_dropout")(bn)
  return dropout
注意力层:
class global_attention(tf.keras.layers.Layer):
  """
  calculate global attention
  """
  def __init__(self,dense_dim = dense_dim):
    super().__init__()
    # Intialize variables needed for Concat score function here
    self.W1 = Dense(units = dense_dim) #weight matrix of shape enc_units*dense_dim
    self.W2 = Dense(units = dense_dim) #weight matrix of shape dec_units*dense_dim
    self.V = Dense(units = 1) #weight matrix of shape dense_dim*1
      #op (None,98,1)


  def call(self,encoder_output,decoder_h): #here the encoded output will be the concatted image bk features shape: (None,98,dense_dim)
    decoder_h = tf.expand_dims(decoder_h,axis=1) #shape: (None,1,dense_dim)
    tanh_input = self.W1(encoder_output) + self.W2(decoder_h) #ouput_shape: batch_size*98*dense_dim
    tanh_output =  tf.nn.tanh(tanh_input)
    attention_weights = tf.nn.softmax(self.V(tanh_output),axis=1) #shape= batch_size*98*1 getting attention alphas
    op = attention_weights*encoder_output#op_shape: batch_size*98*dense_dim  multiply all aplhas with corresponding context vector
    context_vector = tf.reduce_sum(op,axis=1) #summing all context vector over the time period ie input length, output_shape: batch_size*dense_dim


    return context_vector,attention_weights
单步解码器:
将input_to_decoder传递给嵌入层,然后获得输出(batch_size,1, embedding_dim)
使用encoder_output和解码器隐藏状态,计算上下文向量。
连接上下文向量与步骤A输出
将Step-C输出传递给LSTM/GRU,并获得解码器输出和状态(隐藏和单元状态)
将解码器输出传递到致密层(词汇表大小),并将结果存储到输出中。
返回Step-D的状态,Step-E的输出,Step-B的注意权重
class One_Step_Decoder(tf.keras.layers.Layer):
  """
  decodes a single token
  """
  def __init__(self,vocab_size = vocab_size, embedding_dim = embedding_dim, max_pad = max_pad, dense_dim = dense_dim ,name = "onestepdecoder"):
    # Initialize decoder embedding layer, LSTM and any other objects needed
    super().__init__()
    self.dense_dim = dense_dim
    self.embedding = Embedding(input_dim = vocab_size+1,
                                output_dim = embedding_dim,
                                input_length=max_pad,
                                weights = [embedding_matrix],
                                mask_zero=True,
                                name = 'onestepdecoder_embedding'
                              )
    self.LSTM = GRU(units=self.dense_dim,return_sequences=True,return_state=True,name = 'onestepdecoder_LSTM')
    self.LSTM1 = GRU(units=self.dense_dim,return_sequences=False,return_state=True,name = 'onestepdecoder_LSTM1')
    self.attention = global_attention(dense_dim = dense_dim)
    self.concat = Concatenate(axis=-1)
    self.dense = Dense(dense_dim,name = 'onestepdecoder_embedding_dense',activation = 'relu')
    self.final = Dense(vocab_size+1,activation='softmax')
    self.concat = Concatenate(axis=-1)
    self.add =Add()
  @tf.function
  def call(self,input_to_decoder, encoder_output, decoder_h):#,decoder_c):
    '''
        One step decoder mechanisim step by step:
      A. Pass the input_to_decoder to the embedding layer and then get the output(batch_size,1,embedding_dim)
      B. Using the encoder_output and decoder hidden state, compute the context vector.
      C. Concat the context vector with the step A output
      D. Pass the Step-C output to LSTM/GRU and get the decoder output and states(hidden and cell state)
      E. Pass the decoder output to dense layer(vocab size) and store the result into output.
      F. Return the states from step D, output from Step E, attention weights from Step -B
      here state_h,state_c are decoder states
    '''
    embedding_op = self.embedding(input_to_decoder) #output shape = batch_size*1*embedding_shape (only 1 token)


    context_vector,attention_weights = self.attention(encoder_output,decoder_h) #passing hidden state h of decoder and encoder output
    #context_vector shape: batch_size*dense_dim we need to add time dimension
    context_vector_time_axis = tf.expand_dims(context_vector,axis=1)
    #now we will combine attention output context vector with next word input to the lstm here we will be teacher forcing
    concat_input = self.concat([context_vector_time_axis,embedding_op])#output dimension = batch_size*input_length(here it is 1)*(dense_dim+embedding_dim)

    output,decoder_h = self.LSTM(concat_input,initial_state = decoder_h)
    output,decoder_h = self.LSTM1(output,initial_state = decoder_h)
    #output shape = batch*1*dense_dim and decoder_h,decoder_c has shape = batch*dense_dim
    #we need to remove the time axis from this decoder_output


    output = self.final(output)#shape = batch_size*decoder vocab size
    return output,decoder_h,attention_weights
解码器层负责解码编码器输出和标题。解码器迭代所有的时间步,直到最大填充值,并一个一个地生成每个单词。
class decoder(tf.keras.Model):
  """
  Decodes the encoder output and caption
  """
  def __init__(self,max_pad = max_pad, embedding_dim = embedding_dim,dense_dim = dense_dim,score_fun='general',batch_size = batch_size,vocab_size = vocab_size):
    super().__init__()
    self.onestepdecoder = One_Step_Decoder(vocab_size = vocab_size, embedding_dim = embedding_dim, max_pad = max_pad, dense_dim = dense_dim)
    self.output_array = tf.TensorArray(tf.float32,size=max_pad)
    self.max_pad = max_pad
    self.batch_size = batch_size
    self.dense_dim =dense_dim

  @tf.function
  def call(self,encoder_output,caption):#,decoder_h,decoder_c): #caption : (None,max_pad), encoder_output: (None,dense_dim)
    decoder_h, decoder_c = tf.zeros_like(encoder_output[:,0]), tf.zeros_like(encoder_output[:,0]) #decoder_h, decoder_c
    output_array = tf.TensorArray(tf.float32,size=max_pad)
    for timestep in range(self.max_pad): #iterating through all timesteps ie through max_pad
      output,decoder_h,attention_weights = self.onestepdecoder(caption[:,timestep:timestep+1], encoder_output, decoder_h)
      output_array = output_array.write(timestep,output) #timestep*batch_size*vocab_size

    self.output_array = tf.transpose(output_array.stack(),[1,0,2]) #.stack :Return the values in the TensorArray as a stacked Tensor.)
        #shape output_array: (batch_size,max_pad,vocab_size)
    return self.output_array
这里我们还将一些比较常见的训练技巧加入到了训练中,例如早停机制,学习率计划和使用tensorboard展示
loss_func = tf.keras.losses.SparseCategoricalCrossentropy()

def custom_loss(y_true, y_pred):
    #getting mask value to not consider those words which are not present in the true caption
    mask = tf.math.logical_not(tf.math.equal(y_true, 0))

    #y_pred = y_pred+10**-7 #to prevent loss becoming null

    #calculating the loss
    loss_ = loss_func(y_true, y_pred)

    #converting mask dtype to loss_ dtype
    mask = tf.cast(mask, dtype=loss_.dtype)

    #applying the mask to loss
    loss_ = loss_*mask

    #returning mean over all the values
    return tf.reduce_mean(loss_)

tf.keras.backend.clear_session()
tb_filename = 'Encoder_Decoder_global_attention/'
tb_file = os.path.join('/content/drive/MyDrive/Project_on_Drive',tb_filename)
model_filename = 'Encoder_Decoder_global_attention.h5'
model_save = os.path.join('/content/drive/MyDrive/Project_on_Drive',model_filename)
my_callbacks = [
    tf.keras.callbacks.EarlyStopping(patience = 5,
                                     verbose = 2
                                     ),
    tf.keras.callbacks.ModelCheckpoint(filepath=model_save,
                                       save_best_only = True,
                                      save_weights_only = True,
                                       verbose = 2
                                       ),
    tf.keras.callbacks.TensorBoard(histogram_freq=1,
                                   log_dir=tb_file),
    tf.keras.callbacks.ReduceLROnPlateau(monitor='val_loss', factor=0.1,
                              patience=2, min_lr=10**-7, verbose = 2)

] #from keras documentation
我们的模型结构如下:
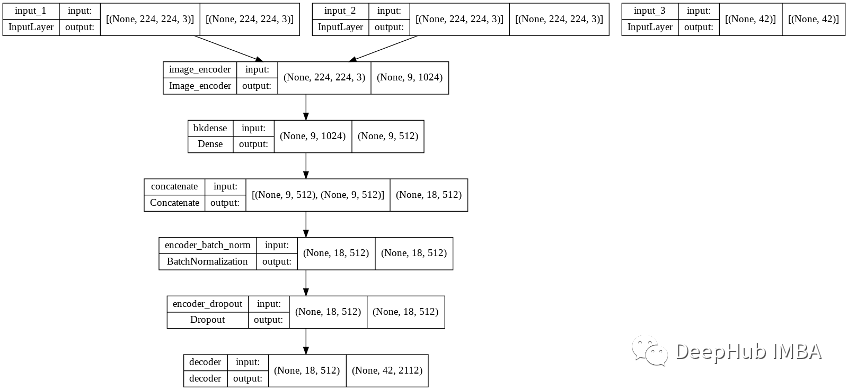
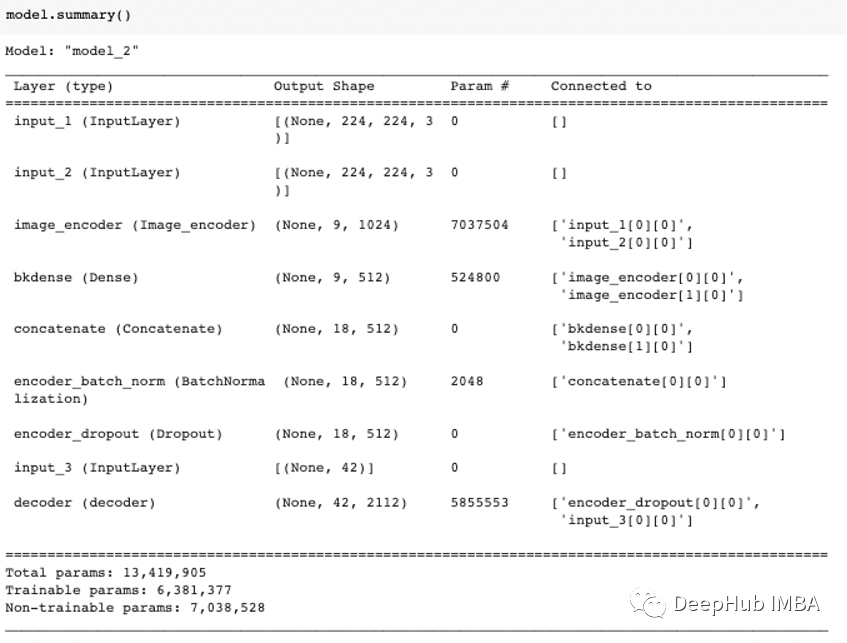
训练的参数如下:
batch_size = 100
embedding_dim = 300
dense_dim = 512
lstm_units = dense_dim
dropout_rate = 0.2
lr (Learning Rate) = 10**-2
number of epochs = 10
min_lr (Minimum Learning rate) =10**-7
模型训练了10轮,可以看到损失为0.5577,精度为0.8466,验证损失和精度分别为1.4386和0.6907,如果我们继续运行模型,可以得到更好的损失和精度,但看起来模型是过拟合的,因为得到了10轮的最佳结果。
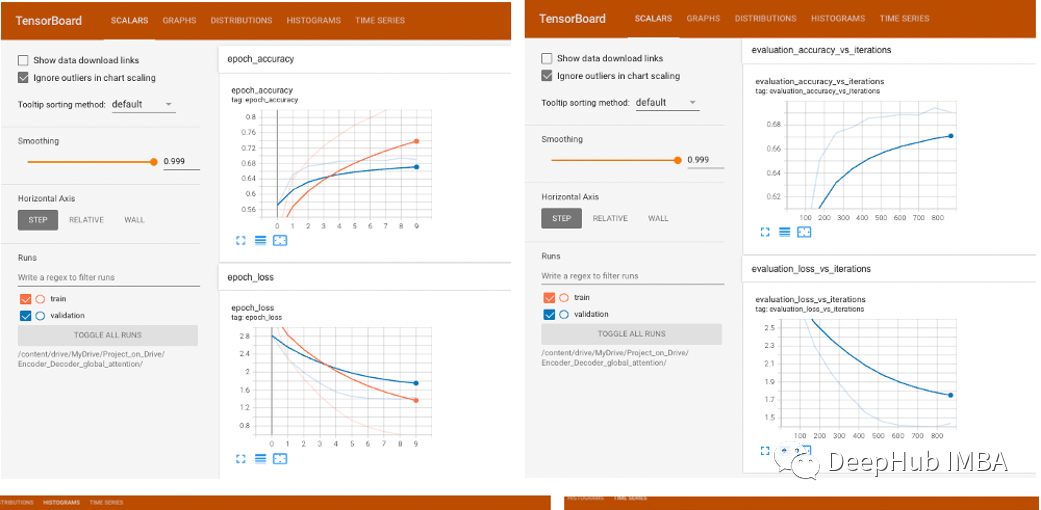

可视化可以看到,评估精度随着迭代次数的增加而增加,评估损失随着迭代次数的增加而减少,这是一个很好的迹象,表明权重正在收敛,所有导数都在良好的范围内,没有爆炸或消失的梯度。
使用Greedy Search测试标题预测和BLEU评分
我们决定使用Greedy Search:是因为正在预测文本,并且希望在每个单词之后预测下一个最佳单词的概率,并且Greedy Search的计算成本并不高,因为我们尝试了一些启发式搜索算法,例如beam search,结果证明它们的计算成本很高。
def greedy_search_predict(image1,image2,model = model1):
  """
  Given paths to two x-ray images predicts the findings part of the x-ray in a greedy search algorithm
  """
  image1 = cv2.imread(image1,cv2.IMREAD_UNCHANGED)/255
  image2 = cv2.imread(image2,cv2.IMREAD_UNCHANGED)/255
  image1 = tf.expand_dims(cv2.resize(image1,input_size,interpolation = cv2.INTER_NEAREST),axis=0) #introduce batch and resize
  image2 = tf.expand_dims(cv2.resize(image2,input_size,interpolation = cv2.INTER_NEAREST),axis=0)
  image1 = model.get_layer('image_encoder')(image1)
  image2 = model.get_layer('image_encoder')(image2)
  image1 = model.get_layer('bkdense')(image1)
  image2 = model.get_layer('bkdense')(image2)

  concat = model.get_layer('concatenate')([image1,image2])
  enc_op = model.get_layer('encoder_batch_norm')(concat)
  enc_op = model.get_layer('encoder_dropout')(enc_op) #this is the output from encoder


  decoder_h,decoder_c = tf.zeros_like(enc_op[:,0]),tf.zeros_like(enc_op[:,0])
  a = []
  pred = []
  for i in range(max_pad):
    if i==0: #if first word
      caption = np.array(tokenizer.texts_to_sequences(['<start>'])) #shape: (1,1)
    output,decoder_h,attention_weights = model.get_layer('decoder').onestepdecoder(caption,enc_op,decoder_h)#,decoder_c) decoder_c,

    #prediction
    max_prob = tf.argmax(output,axis=-1)  #tf.Tensor of shape = (1,1)
    caption = np.array([max_prob]) #will be sent to onstepdecoder for next iteration
    if max_prob==np.squeeze(tokenizer.texts_to_sequences(['<end>'])):
      break;
    else:
      a.append(tf.squeeze(max_prob).numpy())
  return tokenizer.sequences_to_texts([a])[0]

为什么只有28.3%的BLEU得分。这时深度学习需要大量的数据,但我们提供给模型的数据非常少,即使在大量重采样之后,也会偏向于非疾病数据,因此这个BLEU评分对于我们使用的数据来说已经很好了,如果我们有大量的数据,那么相同的模型将表现得非常好,并给出更好的结果。
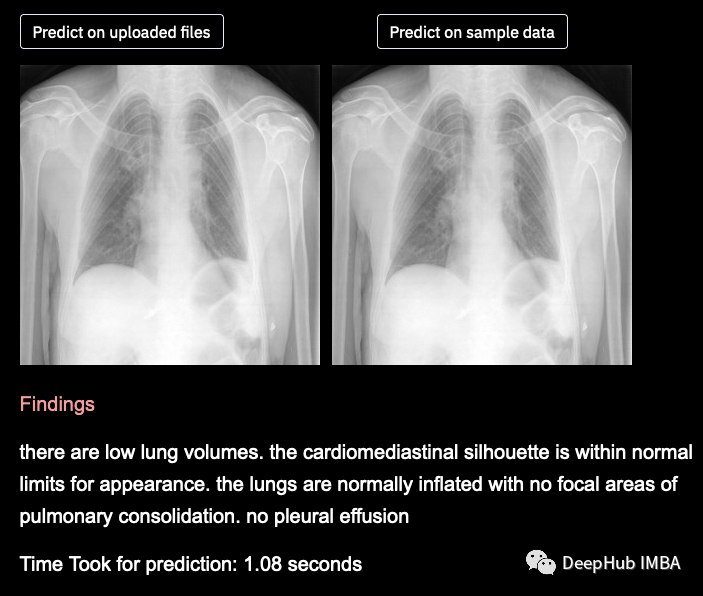
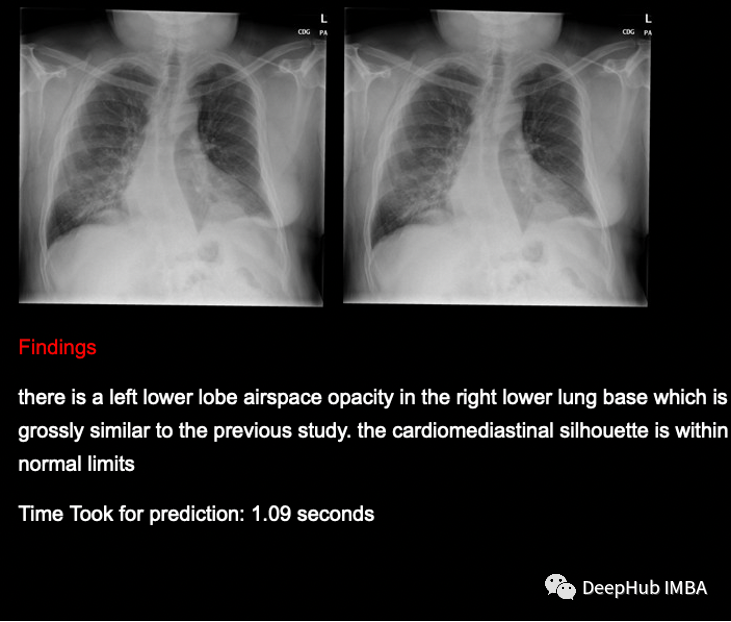
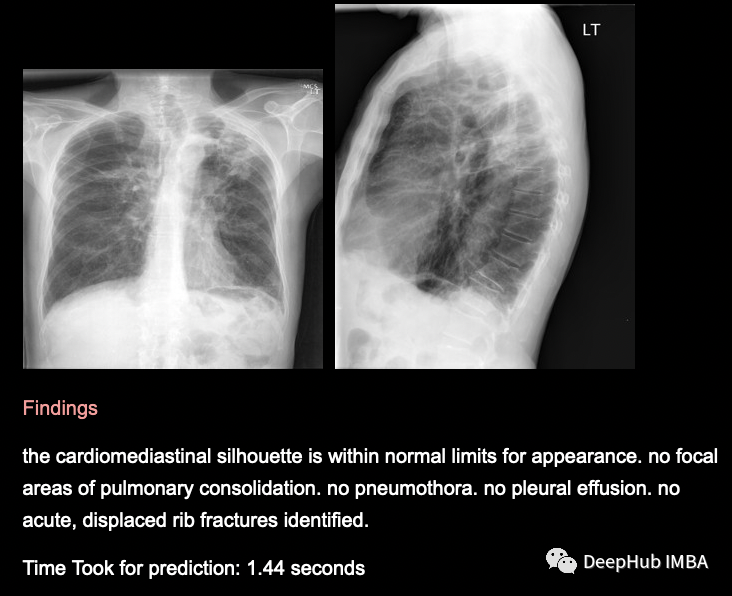
预测是有意义的,模型能够预测疾病和非疾病数据。为了提高模型的性能,我们需要更多的数据,以便我们的模型训练得更好,给出更好的输出。
总结
我们能够成功地为x射线图像生成标题(发现),并能够通过带有GRUs的基于全局注意力的编码器-解码器模型实现约28.3%的BLEU评分。由于我们拥有的数据非常少,而且偏向于非患病数据,我们无法获得非常好的BLEU得分,但如果我们有大量平衡的数据,那么同一段代码可以非常好地预测图像的标题。
改进:
可以使用BERT来获得标题嵌入,也可以使用BERT或者在解码器中使用GPT-2或GPT-3来生成标题,可以使用Transformer来代替基于注意力的编码器-解码器架构,获取更多有疾病的x光图像,因为该数据集中可获得的大多数数据属于“无疾病”类别。
本文的代码如下:
https://github.com/skurnapally/Medical_Image_Captioning_on_Chest_X-Rays
作者:Santhosh Kurnapally