
一、项目效果:
学校宿舍今天搬家,累麻了,突然发现展示处理的也很粗糙,就这样吧嘿嘿~~~
二、核心流程:
1、openCV读取视频流、在每一帧图片上画一个矩形。
2、使用mediapipe获取手指关键点坐标。
3、根据手指坐标位置和矩形的坐标位置,判断手指点是否在矩形上,如果在则矩形跟随手指移动。
三、代码流程:
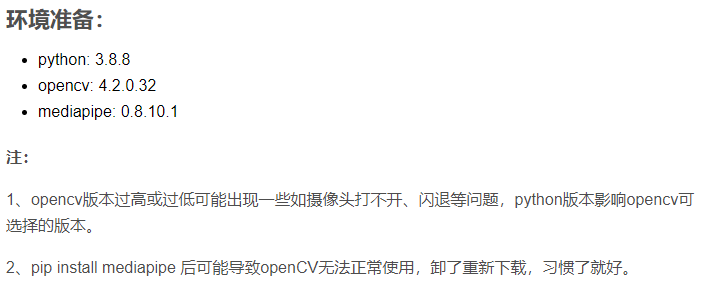
环境准备:
- python: 3.8.8
- opencv: 4.2.0.32
- mediapipe: 0.8.10.1
注:
1、opencv版本过高或过低可能出现一些如摄像头打不开、闪退等问题,python版本影响opencv可选择的版本。
2、pip install mediapipe 后可能导致openCV无法正常使用,卸了重新下载,习惯了就好。
1. 读取摄像头视频,画矩形:
import cv2
import time
import numpy as np

# 调用摄像头 0 默认摄像头
cap = cv2.VideoCapture(0)

# 初始方块数据
x = 100
y = 100
w = 100
h = 100

# 读取一帧帧照片
while True:
    # 返回frame图片
    rec,frame = cap.read()

    # 镜像
    frame = cv2.flip(frame,1)

    # 画矩形
    cv2.rectangle(frame, (x, y), (x + w, y + h), (255, 0, 255), -1)

    # 显示画面
    cv2.imshow('frame',frame)

    # 退出条件
    if cv2.waitKey(1) & 0xFF == ord('q'):
        break

cap.release()
cv2.destroyAllWindows()
这是很基础的一步操作,此时我们运行这段代码,摄像头打开,我们会惊讶地看到自己英俊的脸庞,且左上角有个100*100的紫色矩形。
2. 导入mediapipe处理手指坐标
pip install mediapipe
此时可能出现一些问题,比如openCV突然用不了了,没关系,卸载了重新下。
mediapipe详细信息:Hands - mediapipe (google.github.io)
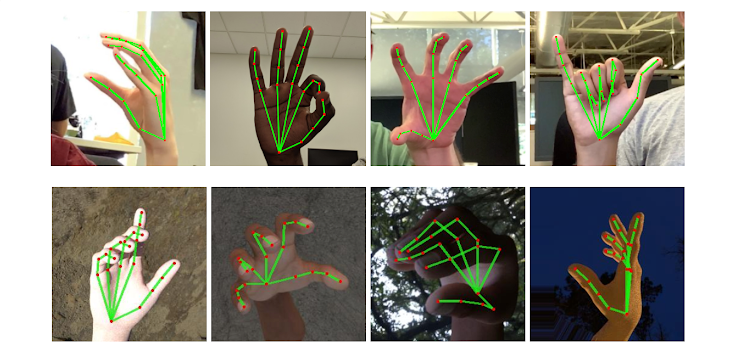
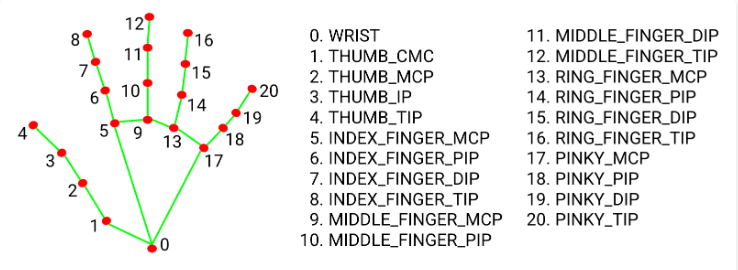
简单来说,它会返回给我们21个手指关键点的坐标,即它在视频画面的位置比例( 0~1 ),我们乘以对应画面的宽高,就能得到手指对应的坐标了。
本次用到食指和中指指尖,也就是8号和12号。
2.1 配置一些基础信息:
import cv2
import time
import numpy as np
import mediapipe as mp

mp_drawing = mp.solutions.drawing_utils
mp_drawing_styles = mp.solutions.drawing_styles
mp_hands = mp.solutions.hands

hands =  mp_hands.Hands(
    static_image_mode=True,
    max_num_hands=2,
    min_detection_confidence=0.5)
2.2 在处理每一帧图像时,加入:
    frame.flags.writeable = False
    frame = cv2.cvtColor(frame, cv2.COLOR_BGR2RGB)
    # 返回结果
    results = hands.process(frame)

    frame.flags.writeable = True
    frame = cv2.cvtColor(frame, cv2.COLOR_RGB2BGR)
当我们在视频流中读取每一帧图片时,将其从BGR转为RGB供给mediapipe生成的hands对象读取,它会返回这张图片中手指关键点的信息,我们只需要继续对其作画,画在每一帧图片上。
    # 如果结果不为空
    if results.multi_hand_landmarks:

        # 遍历双手(根据读取顺序,一只只手遍历、画画)
        for hand_landmarks in results.multi_hand_landmarks:
            mp_drawing.draw_landmarks(
                frame,
                hand_landmarks,
                mp_hands.HAND_CONNECTIONS,
                mp_drawing_styles.get_default_hand_landmarks_style(),
                mp_drawing_styles.get_default_hand_connections_style())
2.3 至此步骤完整代码
import cv2
import time
import numpy as np
import mediapipe as mp

mp_drawing = mp.solutions.drawing_utils
mp_drawing_styles = mp.solutions.drawing_styles
mp_hands = mp.solutions.hands

hands =  mp_hands.Hands(
    static_image_mode=True,
    max_num_hands=2,
    min_detection_confidence=0.5)

# 调用摄像头 0 默认摄像头
cap = cv2.VideoCapture(0)

# 方块初始数组
x = 100
y = 100
w = 100
h = 100

# 读取一帧帧照片
while True:
    # 返回frame图片
    rec,frame = cap.read()

    # 镜像
    frame = cv2.flip(frame,1)


    frame.flags.writeable = False
    frame = cv2.cvtColor(frame, cv2.COLOR_BGR2RGB)
    # 返回结果
    results = hands.process(frame)

    frame.flags.writeable = True
    frame = cv2.cvtColor(frame, cv2.COLOR_RGB2BGR)


    # 如果结果不为空
    if results.multi_hand_landmarks:

        # 遍历双手(根据读取顺序,一只只手遍历、画画)
        # results.multi_hand_landmarks n双手
        # hand_landmarks 每只手上21个点信息
        for hand_landmarks in results.multi_hand_landmarks:
            mp_drawing.draw_landmarks(
                frame,
                hand_landmarks,
                mp_hands.HAND_CONNECTIONS,
                mp_drawing_styles.get_default_hand_landmarks_style(),
                mp_drawing_styles.get_default_hand_connections_style())


    # 画矩形
    cv2.rectangle(frame, (x, y), (x + w, y + h), (255, 0, 255), -1)

    # 显示画面
    cv2.imshow('frame',frame)

    # 退出条件
    if cv2.waitKey(1) & 0xFF == ord('q'):
        break

cap.release()
cv2.destroyAllWindows()
此时我们运行看一下还挺有意思的:
3. 位置计算
我们这个实验要求拖动方块,那肯定也有不拖动的时候,因此不妨根据上一步获取**食指(8)和中指(12)**指尖的位置,如果这俩离得近,我们就在他与方块重合的时候,根据手指的位置改变方块的坐标。
完整代码:
import cv2
import time
import math
import numpy as np
import mediapipe as mp

# mediapipe配置
mp_drawing = mp.solutions.drawing_utils
mp_drawing_styles = mp.solutions.drawing_styles
mp_hands = mp.solutions.hands
hands =  mp_hands.Hands(
    static_image_mode=True,
    max_num_hands=2,
    min_detection_confidence=0.5)

# 调用摄像头 0 默认摄像头
cap = cv2.VideoCapture(0)

# cv2.namedWindow("frame", 0)
# cv2.resizeWindow("frame", 960, 640)

# 获取画面宽度、高度
width = int(cap.get(cv2.CAP_PROP_FRAME_WIDTH))
height = int(cap.get(cv2.CAP_PROP_FRAME_HEIGHT))

# 方块初始数组
x = 100
y = 100
w = 100
h = 100

L1 = 0
L2 = 0

on_square = False
square_color = (0, 255, 0)

# 读取一帧帧照片
while True:
    # 返回frame图片
    rec,frame = cap.read()

    # 镜像
    frame = cv2.flip(frame,1)


    frame.flags.writeable = False
    frame = cv2.cvtColor(frame, cv2.COLOR_BGR2RGB)
    # 返回结果
    results = hands.process(frame)

    frame.flags.writeable = True
    frame = cv2.cvtColor(frame, cv2.COLOR_RGB2BGR)


    # 如果结果不为空
    if results.multi_hand_landmarks:

        # 遍历双手(根据读取顺序,一只只手遍历、画画)
        # results.multi_hand_landmarks n双手
        # hand_landmarks 每只手上21个点信息
        for hand_landmarks in results.multi_hand_landmarks:
            mp_drawing.draw_landmarks(
                frame,
                hand_landmarks,
                mp_hands.HAND_CONNECTIONS,
                mp_drawing_styles.get_default_hand_landmarks_style(),
                mp_drawing_styles.get_default_hand_connections_style())

            # 记录手指每个点的x y 坐标
            x_list = []
            y_list = []
            for landmark in hand_landmarks.landmark:
                x_list.append(landmark.x)
                y_list.append(landmark.y)


            # 获取食指指尖
            index_finger_x, index_finger_y = int(x_list[8] * width),int(y_list[8] * height)

            # 获取中指
            middle_finger_x,middle_finger_y = int(x_list[12] * width), int(y_list[12] * height)

            # 计算两指尖距离
            finger_distance = math.hypot((middle_finger_x - index_finger_x), (middle_finger_y - index_finger_y))

            # 如果双指合并(两之间距离近)
            if finger_distance < 60:

                # X坐标范围 Y坐标范围
                if (index_finger_x > x and index_finger_x < (x + w)) and (
                        index_finger_y > y and index_finger_y < (y + h)):

                    if on_square == False:
                        L1 = index_finger_x - x
                        L2 = index_finger_y - y
                        square_color = (255, 0, 255)
                        on_square = True

            else:
                # 双指不合并/分开
                on_square = False
                square_color = (0, 255, 0)

            # 更新坐标
            if on_square:
                x = index_finger_x - L1
                y = index_finger_y - L2


    # 图像融合 使方块不遮挡视频图片
    overlay = frame.copy()
    cv2.rectangle(frame, (x, y), (x + w, y + h), square_color, -1)
    frame = cv2.addWeighted(overlay, 0.5, frame, 1 - 0.5, 0)


    # 显示画面
    cv2.imshow('frame',frame)

    # 退出条件
    if cv2.waitKey(1) & 0xFF == ord('q'):
        break

cap.release()
cv2.destroyAllWindows()
本文转载自: https://blog.csdn.net/suic009/article/details/126534975
版权归原作者 老师我作业忘带了 所有, 如有侵权,请联系我们删除。
版权归原作者 老师我作业忘带了 所有, 如有侵权,请联系我们删除。