
1 模型说明
含义:CLIP(Contrastive Language-Image Pre-training)
git地址:https://github.com/openai/CLIP
paper:https://arxiv.org/abs/2103.00020
安装:pip install git+https://github.com/openai/CLIP.git
或者使用另一个开源复现:pip install open_clip_torch
CLIP模型用4亿对来自网络的图文数据对,将文本作为图像标签,使用NLP监督预训练图像分类器,使用256个GPU训练两周。模型为350M,通过蒸馏转为48M,后续又转为24M。
1.1 训练过程
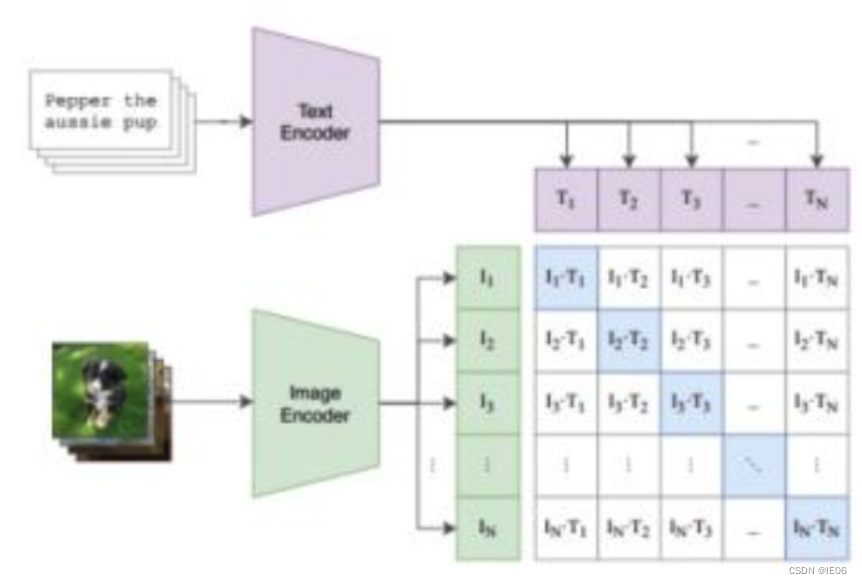
- 2个encoder分别处理文本和图片数据,text encoder使用Transformer,image encoder用了2种模型,ResNet和Vision Transformer(ViT);
- encoder representation直接线性投影到multi-modal embedding space;这里包含了所有需要学习的参数
- 计算2模态之间的cosine similarity,让N个匹配的图文对相似度最大,不匹配的图文对相似度最小;具体来说,是横着计算一遍交叉熵,再竖着计算一遍交叉熵,然后取平均值。
伪代码如下:T_f和I_f是编码结果,W_i和W_t是embedding参数,T_e和I_e就是多模态结果,两者相乘得到的logits就是上图的矩阵,然后和对角矩阵计算交叉熵损失。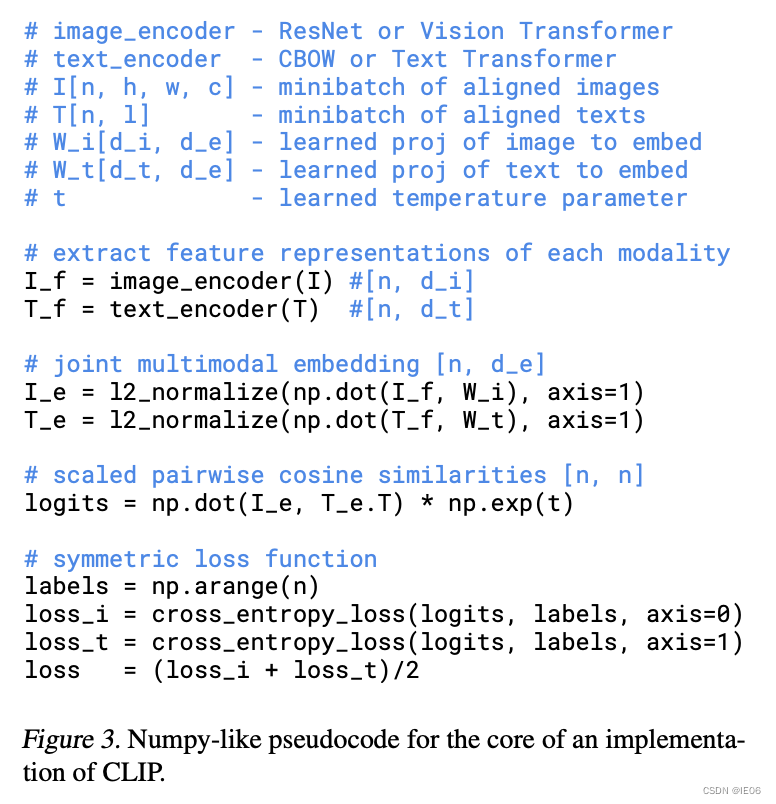
1.2 api调用
模型的使用方法如下:首先将需要分类的图像经过编码器得到特征,然后对于目标任务数据集的每一个标签,或者你自己定义的标签,都构造一段对应的文本,如上图中的 dog 会改造成 “A photo of a dog”,以此类推。然后经过编码器得到文本和图像特征,接着将文本特征与图像特征做内积,内积最大对应的标签就是图像的分类结果。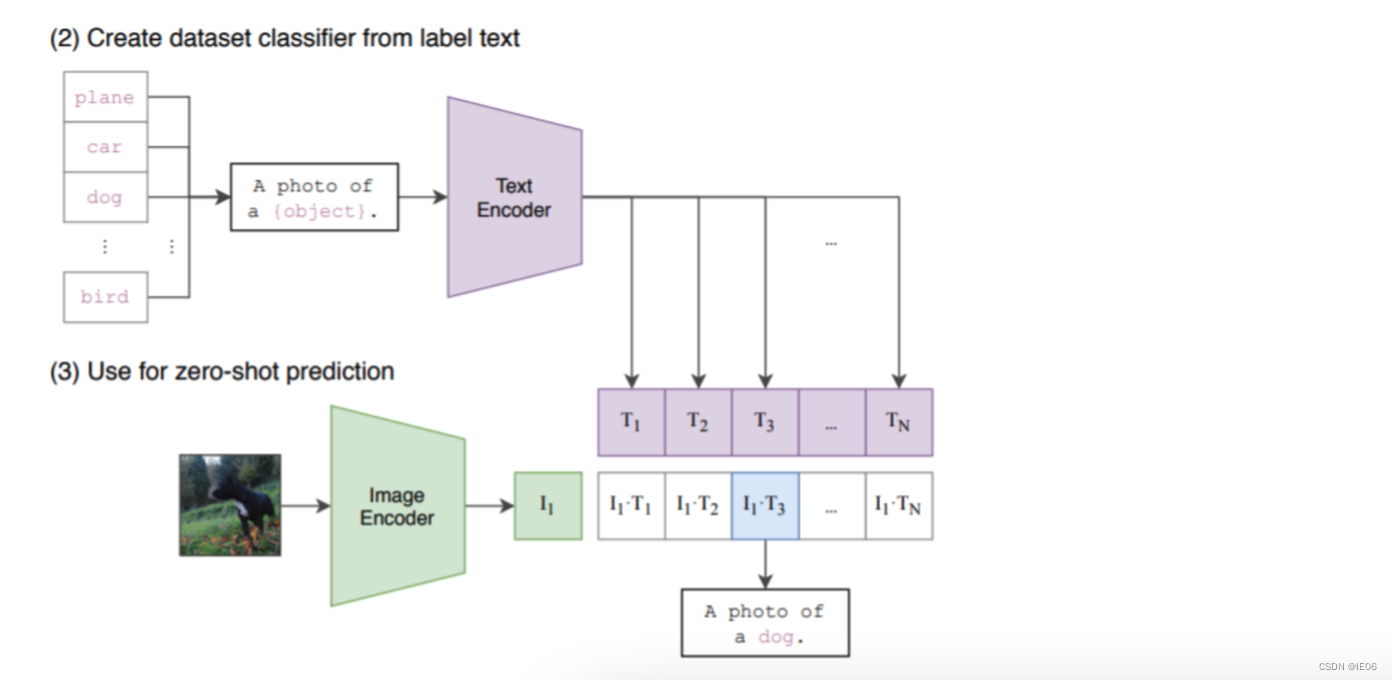
clip函数支持的方法:
clip.available_models()
clip.load(name, device=…, jit=False)
clip.tokenize(text: Union[str, List[str]], context_length=77)
加载进来的模型支持的方法:
model.encode_image(image: Tensor)
model.encode_text(text: Tensor)
model(image: Tensor, text: Tensor):计算余弦相似度
2. 使用样例
一般的流程是:
- 通过调用clip.load(模型名称),获取model, preprocess
- 调用clip.tokenize向量化文字,然后调用model.encode_text转为text_feature
- 调用preprocess处理图片,然后调用model.encode_image转为image_feature
- 将两个feature标准化后,计算余弦相似度
2.1 skimage自带图像与描述文字的相似度
import numpy as np
import torch
from pkg_resources import packaging
import clip

# 导入数据
model, preprocess = clip.load("ViT-B/32") # 加载模型
model.cuda().eval()
input_resolution = model.visual.input_resolution
context_length = model.context_length
vocab_size = model.vocab_size
# Model parameters: 151,277,313
# Input resolution: 224
# Context length: 77
# Vocab size: 49408

import os
import skimage
import IPython.display
import matplotlib.pyplot as plt
from PIL import Image
import numpy as np

from collections import OrderedDict
import torch

# 描述文字
descriptions = {
    "page": "a page of text about segmentation",
    "chelsea": "a facial photo of a tabby cat",
    "astronaut": "a portrait of an astronaut with the American flag",
    "rocket": "a rocket standing on a launchpad",
    "motorcycle_right": "a red motorcycle standing in a garage",
    "camera": "a person looking at a camera on a tripod",
    "horse": "a black-and-white silhouette of a horse",
    "coffee": "a cup of coffee on a saucer"
}
original_images = []
images = []
texts = []

for filename in [filename for filename in os.listdir(skimage.data_dir) if filename.endswith(".png") or filename.endswith(".jpg")]:
    name = os.path.splitext(filename)[0]
    if name not in descriptions:
        continue

    image = Image.open(os.path.join(skimage.data_dir, filename)).convert("RGB")
    original_images.append(image)
    images.append(preprocess(image))
    texts.append(descriptions[name])

image_input = torch.tensor(np.stack(images)).cuda()
text_tokens = clip.tokenize(["This is " + desc for desc in texts]).cuda() # shape: 8*77

# 512 dimension
with torch.no_grad():
    image_features = model.encode_image(image_input).float()
    text_features = model.encode_text(text_tokens).float()

image_features /= image_features.norm(dim=-1, keepdim=True)
text_features /= text_features.norm(dim=-1, keepdim=True)
similarity = text_features.cpu().numpy() @ image_features.cpu().numpy().T
输出如下图: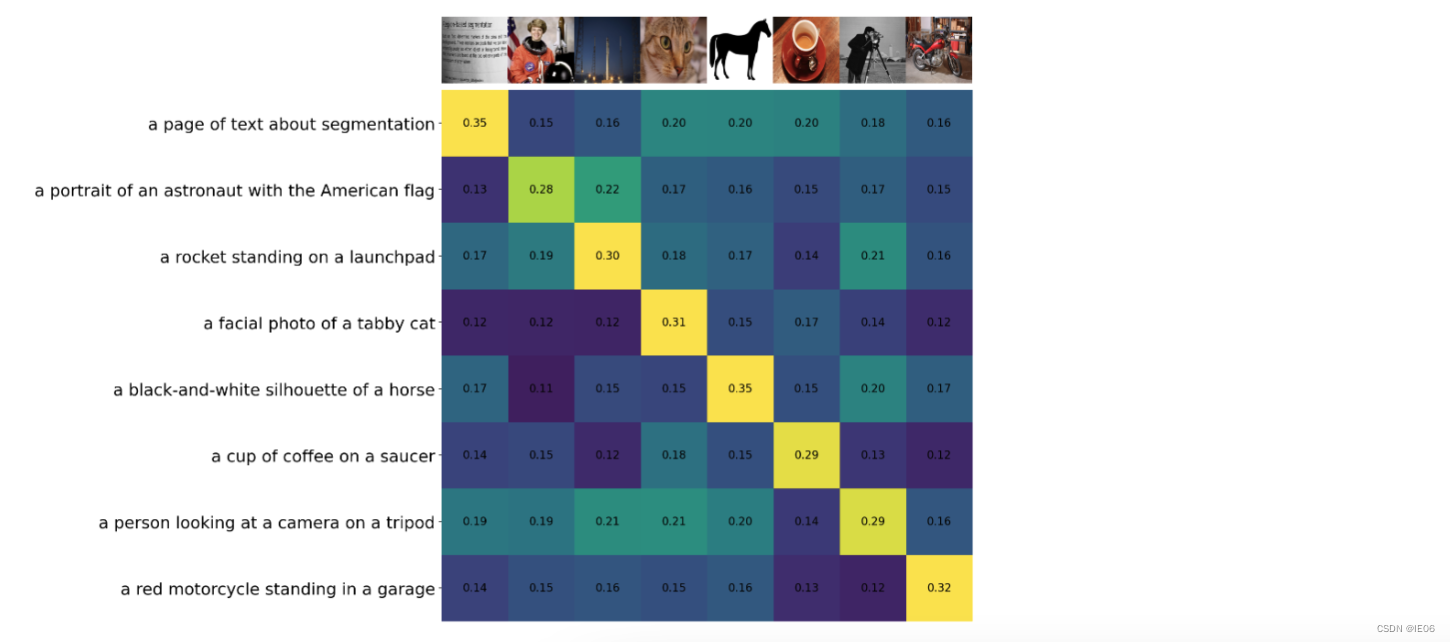
2.2 上述图片使用cifer100的标签分类
# 加载数据
from torchvision.datasets import CIFAR100
cifar100 = CIFAR100(os.path.expanduser("~/.cache"), transform=preprocess, download=True)

# 描述文字
text_descriptions = [f"This is a photo of a {label}" for label in cifar100.classes]
text_tokens = clip.tokenize(text_descriptions).cuda()
with torch.no_grad():
    text_features = model.encode_text(text_tokens).float()
    text_features /= text_features.norm(dim=-1, keepdim=True)

# 展示概率最高的top5分类
text_probs = (100.0 * image_features @ text_features.T).softmax(dim=-1)
top_probs, top_labels = text_probs.cpu().topk(5, dim=-1)
结果如下: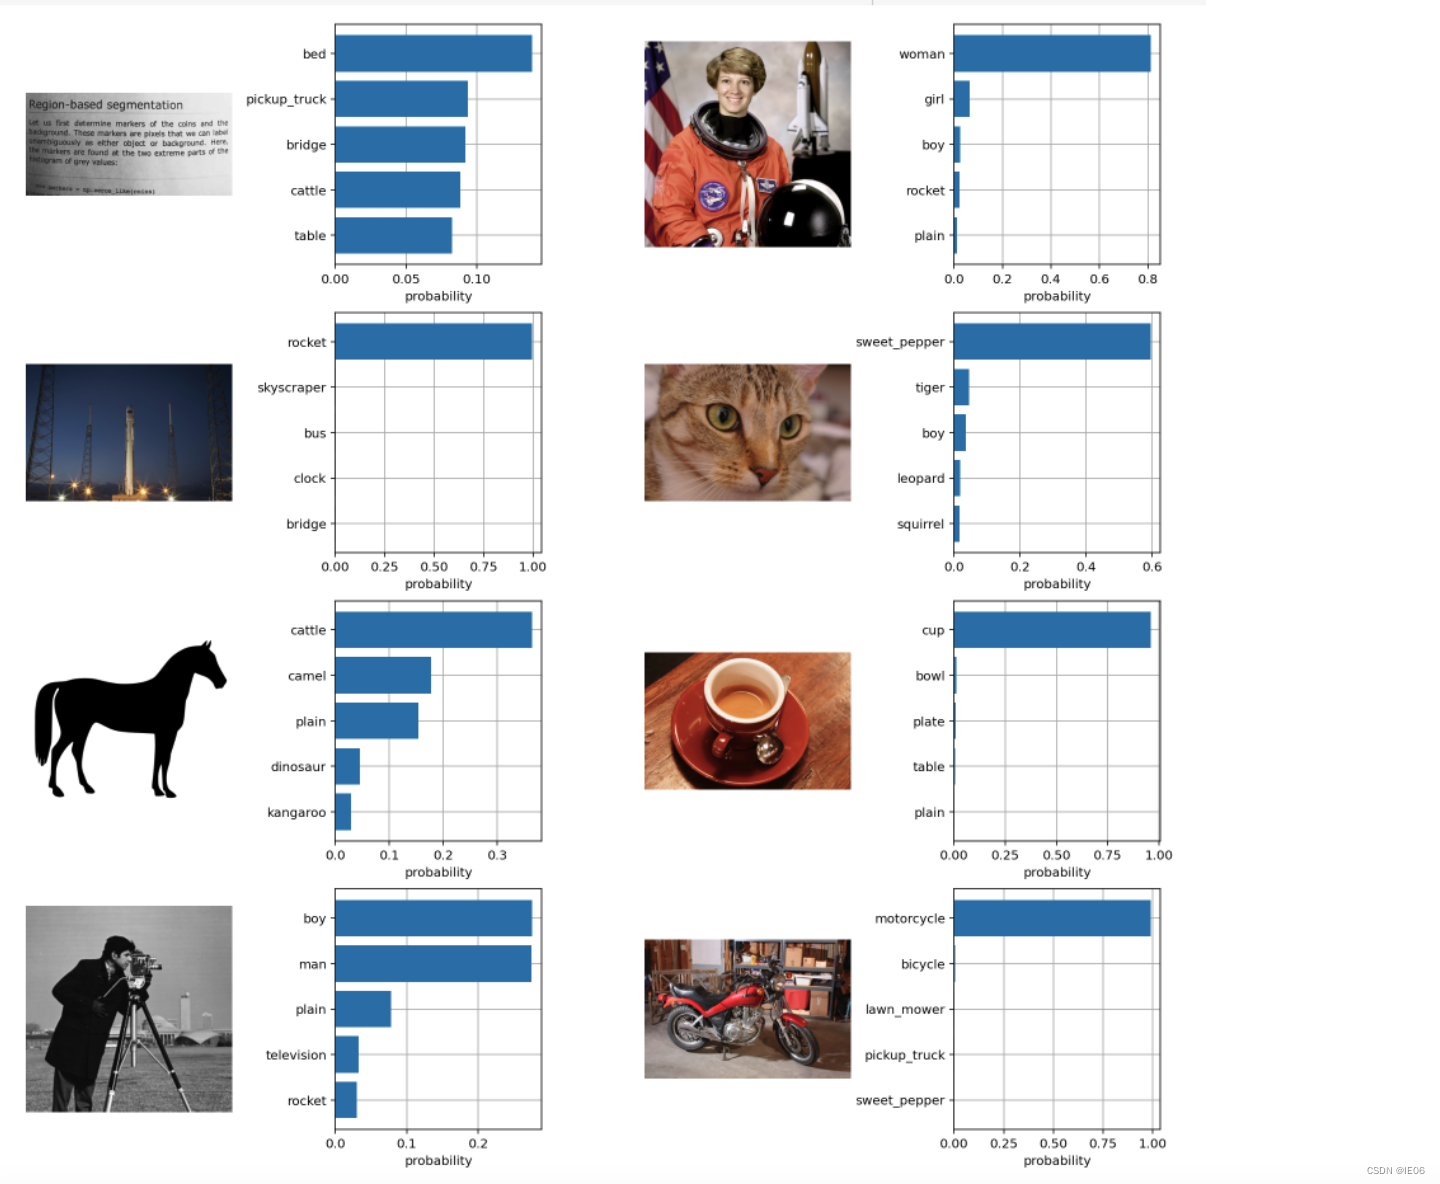
2.3 判断性别
classes = ['man', 'woman']
image_input = preprocess(Image.open('man.jpg')).unsqueeze(0)
text_inputs = torch.cat([clip.tokenize(f"a photo of a {c}") for c in classes])

#特征编码
with torch.no_grad():
    image_features = model.encode_image(image_input)
    text_features = model.encode_text(text_inputs)

#选取参数最高的标签
image_features /= image_features.norm(dim=-1, keepdim=True)
text_features /= text_features.norm(dim=-1, keepdim=True)
similarity = (100.0 * image_features @ text_features.T).softmax(dim=-1)
values, indices = similarity[0].topk(1)

#输出结果
print("\nTop predictions:\n")
print('classes:{} score:{:.2f}'.format(classes[indices.item()], values.item()))
3. 迁移训练
参考如下代码。
其中image_caption_dataset用来加载图像文字对,load_data调用image_caption_dataset来包装训练数据对。
load_pretrian_model用于加载训练用的模型,jit需要设置为False。
通过logits_per_image, logits_per_text = model(images, texts)可以得到预测结果,与torch.arange(N)计算交叉熵进行优化
from PIL import Image
import os

device = 'cuda' if torch.cuda.is_available() else 'cpu'

class image_caption_dataset(Dataset):
    def __init__(self, df, preprocess):
        self.images = df["image"]
        self.caption = df["caption"]
        self.preprocess = preprocess

    def __len__(self):
        return len(self.caption)

    def __getitem__(self, idx):
        images = self.preprocess(Image.open(self.images[idx]))
        caption = self.caption[idx]
        return images, caption

def load_data(cup_path, cupnot_path, batch_size, preprocess):
    df = {'image': [], 'caption':[]}
    cup_list = os.listdir(cup_path)
    cupnot_list = os.listdir(cupnot_path)

    caption = cup_path.split('/')[-1]
    for img in cup_list:
        img_path = os.path.join(cup_path, img)
        df['image'].append(img_path)
        df['caption'].append(caption)

    caption = cupnot_path.split('/')[-1]
    for img in cupnot_list:
        img_path = os.path.join(cupnot_path, img)
        df['image'].append(img_path)
        df['caption'].append(caption)

    dataset = image_caption_dataset(df, preprocess)
    train_dataloader = DataLoader(dataset, batch_size=batch_size)
    return train_dataloader

def convert_models_to_fp32(model):
    for p in model.parameters():
        p.data = p.data.float()
        p.grad.data = p.grad.data.float()

def load_pretrian_model(model_path):
    model, preprocess = clip.load(model_path, device=device, jit=False)  # 训练时 jit必须设置为false
    if device == "cpu":
        model.float()
    else:
        clip.model.convert_weights(model)
    return model, preprocess

def train(epoch, batch_size, learning_rate, cup_path, cupnot_path):
    # 加载模型
    model, preprocess = load_pretrian_model('ViT-B/32')

    #加载数据集
    train_dataloader = load_data(cup_path, cupnot_path, batch_size, preprocess)

    #设置参数
    loss_img = nn.CrossEntropyLoss().to(device)
    loss_txt = nn.CrossEntropyLoss().to(device)
    optimizer = optim.Adam(model.parameters(), lr=learning_rate, betas=(0.9, 0.98), eps=1e-6, weight_decay=0.2)

    for i in range(epoch):
        for batch in train_dataloader:
            list_image, list_txt = batch
            texts = clip.tokenize(list_txt).to(device)
            images = list_image.to(device)

            logits_per_image, logits_per_text = model(images, texts)
            if device == "cpu":
                ground_truth = torch.arange(batch_size).long().to(device)
            else:
                ground_truth = torch.arange(batch_size, dtype=torch.long, device=device)

            #反向传播
            total_loss = (loss_img(logits_per_image, ground_truth) + loss_txt(logits_per_text, ground_truth)) / 2
            optimizer.zero_grad()
            total_loss.backward()
            if device == "cpu":
                optimizer.step()
            else:
                convert_models_to_fp32(model)
                optimizer.step()
                clip.model.convert_weights(model)

        print('[%d] loss: %.3f' %(i + 1, total_loss))
    torch.save(model, './model/model1.pkl')

def main():
    epoch = 100
    batch_size = 6
    learning_rate = 5e-5
    cup_path = './data/It is photo with cup'
    cupnot_path = './data/It is photo without cup'
    train(epoch, batch_size, learning_rate, cup_path, cupnot_path)

if __name__ == '__main__':
    main()
版权归原作者 IE06 所有, 如有侵权,请联系我们删除。