
基于opencv的车牌识别系统(UI界面采用tkinter设计)
本系统采用python语言搭配opencv进行开发,在传统的车牌识别项目上进行改进,开发独特的GUI界面,方便使用者的使用。
需要源码的朋友点赞、关注我、再私信我获取源码,如果未能及时回复可以留下邮箱耐心等待奥
先上运行截图(下图分别为图片识别和摄像头识别结果)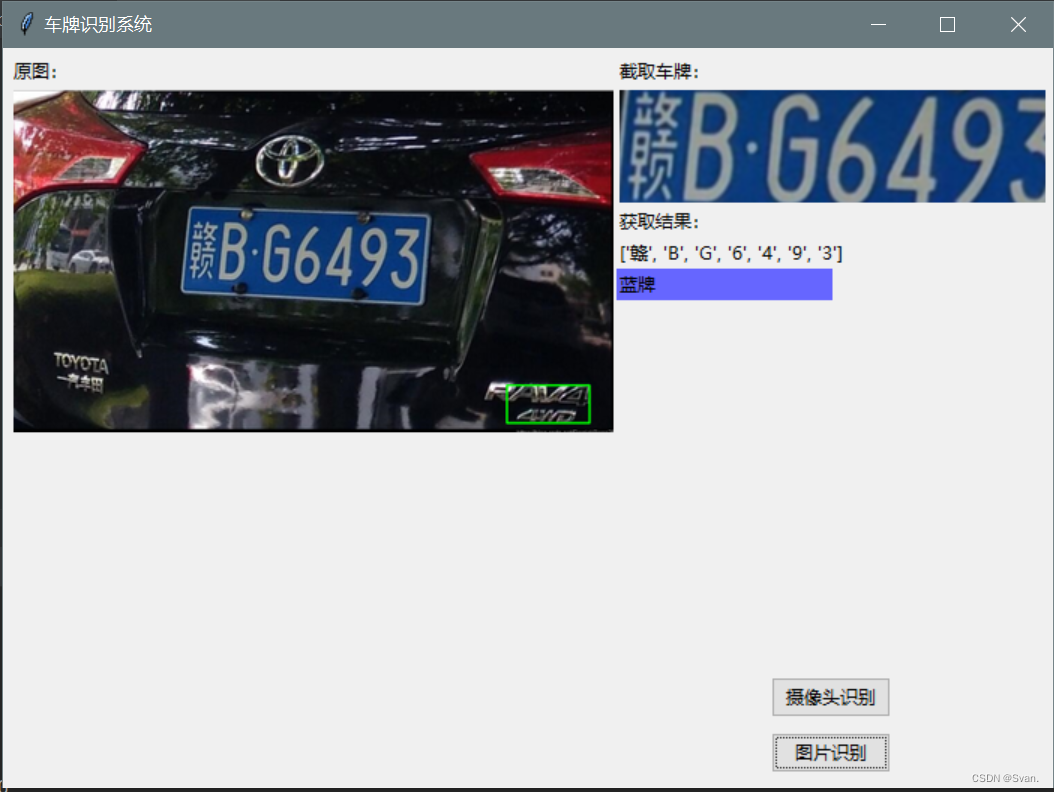

项目结构
项目结构很简单主要由以下三种文件构成:
- predict.py
- surface.py
- svmchinese.dat(用于存放训练好的模型)
其余文件还包括用于训练和测试的图片数据集,这里就不一一列举了
项目实现的流程
利用tkinter设计UI界面包括主窗口、按钮(button)、摄像头界面,识别结果的可视化等控件。
classSurface(ttk.Frame):
    pic_path =""
    viewhigh =400#摄像头
    viewwide =400
    update_time =0
    thread =None
    thread_run =False
    camera =None
    color_transform ={"green":("绿牌","#55FF55"),"yello":("黄牌","#FFFF00"),"blue":("蓝牌","#6666FF")}def__init__(self, win):
        ttk.Frame.__init__(self, win)
        frame_left = ttk.Frame(self)
        frame_right1 = ttk.Frame(self)
        frame_right2 = ttk.Frame(self)
        win.title("车牌识别系统")
        win.geometry('700x500')
        self.pack(fill=tk.BOTH, expand=tk.YES, padx="5", pady="5")
        frame_left.pack(side=LEFT,expand=1,fill=BOTH)
        frame_right1.pack(side=TOP,expand=1,fill=tk.Y)
        frame_right2.pack(side=RIGHT,expand=0.5)
        ttk.Label(frame_left, text='原图:').pack(anchor="nw")
        ttk.Label(frame_right1, text='截取车牌:').grid(column=0, row=0, sticky=tk.W)

        from_pic_ctl = ttk.Button(frame_right2, text="图片识别", width=10, command=self.from_pic)
        from_vedio_ctl = ttk.Button(frame_right2, text="摄像头识别", width=10, command=self.from_vedio)
        self.image_ctl = ttk.Label(frame_left)
        self.image_ctl.pack(anchor="nw")

        self.roi_ctl = ttk.Label(frame_right1)
        self.roi_ctl.grid(column=0, row=1, sticky=tk.W)
        ttk.Label(frame_right1, text='获取结果:').grid(column=0, row=2, sticky=tk.W)
        self.r_ctl = ttk.Label(frame_right1, text="")
        self.r_ctl.grid(column=0, row=3, sticky=tk.W)
        self.color_ctl = ttk.Label(frame_right1, text="", width="20")
        self.color_ctl.grid(column=0, row=4, sticky=tk.W)
        from_vedio_ctl.pack(anchor="se", pady="5")
        from_pic_ctl.pack(anchor="se", pady="5")
        self.predictor = predict.CardPredictor()
        self.predictor.train_svm()
打开识别图片的按钮点击事件的设计
defget_imgtk(self, img_bgr):
        img = cv2.cvtColor(img_bgr, cv2.COLOR_BGR2RGB)
        im = Image.fromarray(img)
        imgtk = ImageTk.PhotoImage(image=im)
        wide = imgtk.width()
        high = imgtk.height()if wide > self.viewwide or high > self.viewhigh:
            wide_factor = self.viewwide / wide
            high_factor = self.viewhigh / high
            factor =min(wide_factor, high_factor)

            wide =int(wide * factor)if wide <=0: wide =1
            high =int(high * factor)if high <=0: high =1
            im=im.resize((wide, high), Image.ANTIALIAS)
            imgtk = ImageTk.PhotoImage(image=im)return imgtk
打开摄像头识别按钮点击事件的设计
deffrom_vedio(self):if self.thread_run:returnif self.camera isNone:
            self.camera = cv2.VideoCapture(0)ifnot self.camera.isOpened():
                mBox.showwarning('警告','摄像头打开失败!')
                self.camera =Nonereturn
        self.thread = threading.Thread(target=self.vedio_thread, args=(self,))
        self.thread.setDaemon(True)
        self.thread.start()
        self.thread_run =True
打开摄像头或者图片识别,按识别的方式采用不同方法对捕捉到的画面结果进行识别:
deffrom_pic(self):
        self.thread_run =False
        self.pic_path = askopenfilename(title="选择识别图片", filetypes=[("jpg图片","*.jpg")])if self.pic_path:
            img_bgr = predict.imreadex(self.pic_path)
            self.imgtk = self.get_imgtk(img_bgr)
            self.image_ctl.configure(image=self.imgtk)
            resize_rates =(1,0.9,0.8,0.7,0.6,0.5,0.4)for resize_rate in resize_rates:print("resize_rate:", resize_rate)
                r, roi, color = self.predictor.predict(img_bgr, resize_rate)if r:break
            self.show_roi(r, roi, color)@staticmethoddefvedio_thread(self):
        self.thread_run =True
        predict_time = time.time()while self.thread_run:
            _, img_bgr = self.camera.read()
            self.imgtk = self.get_imgtk(img_bgr)
            self.image_ctl.configure(image=self.imgtk)if time.time()- predict_time >2:
                r, roi, color = self.predictor.predict(img_bgr)
                self.show_roi(r, roi, color)
                predict_time = time.time()print("run end")
最后设计关闭窗口的事件:
defclose_window():print("destroy")if surface.thread_run :
        surface.thread_run =False
        surface.thread.join(2.0)
    win.destroy()
预测模型的设计
预测模型设计思路为:
1、训练设计所需图片数据的尺寸,并读取图片数据;
2、根据设定的阈值和图片直方图,找出波峰,用于分隔字符;
3、根据找出的波峰,分隔图片,从而得到逐个字符图片;
4、将来自opencv的sample,用于svm训练;
5、训练svm、字符识别;
6、高斯去噪、去掉图像中不会是车牌的区域、找到图像边缘、使用开运算和闭运算让图像边缘成为一个整体;
7、查找图像边缘整体形成的矩形区域,可能有很多,车牌就在其中一个矩形区域中、矩形区域可能是倾斜的矩形,需要矫正,以便使用颜色定位、识别到的字符、定位的车牌图像、车牌颜色;
classCardPredictor:def__init__(self):#车牌识别的部分参数保存在js中,便于根据图片分辨率做调整
        f =open('config.js')
        j = json.load(f)#读取文件for c in j["config"]:if c["open"]:
                self.cfg = c.copy()breakelse:raise RuntimeError('没有设置有效配置参数')def__del__(self):
        self.save_traindata()deftrain_svm(self):
        self.model = SVM(C=1, gamma=0.5)#识别英文字母和数字,c表示容忍度,c越高,说明越不能容忍出现误差
        self.modelchinese = SVM(C=1, gamma=0.5)#识别中文if os.path.exists("svm.dat"):
            self.model.load("svm.dat")else:
            chars_train =[]
            chars_label =[]for root, dirs, files in os.walk("train\\chars2"):iflen(os.path.basename(root))>1:continue
                root_int =ord(os.path.basename(root))for filename in files:
                    filepath = os.path.join(root,filename)
                    digit_img = cv2.imread(filepath)
                    digit_img = cv2.cvtColor(digit_img, cv2.COLOR_BGR2GRAY)
                    chars_train.append(digit_img)
                    chars_label.append(root_int)

            chars_train =list(map(deskew, chars_train))
            chars_train = preprocess_hog(chars_train)#chars_train = chars_train.reshape(-1, 20, 20).astype(np.float32)
            chars_label = np.array(chars_label)
            self.model.train(chars_train, chars_label)if os.path.exists("svmchinese.dat"):
            self.modelchinese.load("svmchinese.dat")else:
            chars_train =[]
            chars_label =[]for root, dirs, files in os.walk("train\\charsChinese"):ifnot os.path.basename(root).startswith("zh_"):continue
                pinyin = os.path.basename(root)
                index = provinces.index(pinyin)+ PROVINCE_START +1#1是拼音对应的汉字for filename in files:
                    filepath = os.path.join(root,filename)
                    digit_img = cv2.imread(filepath)
                    digit_img = cv2.cvtColor(digit_img, cv2.COLOR_BGR2GRAY)
                    chars_train.append(digit_img)#chars_label.append(1)
                    chars_label.append(index)
            chars_train =list(map(deskew, chars_train))
            chars_train = preprocess_hog(chars_train)#chars_train = chars_train.reshape(-1, 20, 20).astype(np.float32)
            chars_label = np.array(chars_label)print(chars_train.shape)
            self.modelchinese.train(chars_train, chars_label)defsave_traindata(self):ifnot os.path.exists("svm.dat"):
            self.model.save("svm.dat")ifnot os.path.exists("svmchinese.dat"):
            self.modelchinese.save("svmchinese.dat")defaccurate_place(self, card_img_hsv, limit1, limit2, color):
        row_num, col_num = card_img_hsv.shape[:2]
        xl = col_num
        xr =0
        yh =0
        yl = row_num
        #col_num_limit = self.cfg["col_num_limit"]
        row_num_limit = self.cfg["row_num_limit"]
        col_num_limit = col_num *0.8if color !="green"else col_num *0.5#绿色有渐变for i inrange(row_num):
            count =0for j inrange(col_num):
                H = card_img_hsv.item(i, j,0)
                S = card_img_hsv.item(i, j,1)
                V = card_img_hsv.item(i, j,2)if limit1 < H <= limit2 and34< S and46< V:
                    count +=1if count > col_num_limit:if yl > i:
                    yl = i
                if yh < i:
                    yh = i
        for j inrange(col_num):
            count =0for i inrange(row_num):
                H = card_img_hsv.item(i, j,0)
                S = card_img_hsv.item(i, j,1)
                V = card_img_hsv.item(i, j,2)if limit1 < H <= limit2 and34< S and46< V:
                    count +=1if count > row_num - row_num_limit:if xl > j:
                    xl = j
                if xr < j:
                    xr = j
        return xl, xr, yh, yl

    defpredict(self, car_pic, resize_rate=1):iftype(car_pic)==type(""):
            img = imreadex(car_pic)else:
            img = car_pic
        pic_hight, pic_width = img.shape[:2]if pic_width > MAX_WIDTH:
            pic_rate = MAX_WIDTH / pic_width
            img = cv2.resize(img,(MAX_WIDTH,int(pic_hight*pic_rate)), interpolation=cv2.INTER_LANCZOS4)if resize_rate !=1:
            img = cv2.resize(img,(int(pic_width*resize_rate),int(pic_hight*resize_rate)), interpolation=cv2.INTER_LANCZOS4)
            pic_hight, pic_width = img.shape[:2]print("h,w:", pic_hight, pic_width)
        blur = self.cfg["blur"]#高斯去噪if blur >0:
            img = cv2.GaussianBlur(img,(blur, blur),0)#图片分辨率调整
        oldimg = img
        img = cv2.cvtColor(img, cv2.COLOR_BGR2GRAY)#equ = cv2.equalizeHist(img)#img = np.hstack((img, equ))#去掉图像中不会是车牌的区域
        kernel = np.ones((20,20), np.uint8)
        img_opening = cv2.morphologyEx(img, cv2.MORPH_OPEN, kernel)
        img_opening = cv2.addWeighted(img,1, img_opening,-1,0);#找到图像边缘
        ret, img_thresh = cv2.threshold(img_opening,0,255, cv2.THRESH_BINARY + cv2.THRESH_OTSU)
        img_edge = cv2.Canny(img_thresh,100,200)#使用开运算和闭运算让图像边缘成为一个整体
        kernel = np.ones((self.cfg["morphologyr"], self.cfg["morphologyc"]), np.uint8)
        img_edge1 = cv2.morphologyEx(img_edge, cv2.MORPH_CLOSE, kernel)
        img_edge2 = cv2.morphologyEx(img_edge1, cv2.MORPH_OPEN, kernel)#查找图像边缘整体形成的矩形区域,可能有很多,车牌就在其中一个矩形区域中try:
            contours, hierarchy = cv2.findContours(img_edge2, cv2.RETR_TREE, cv2.CHAIN_APPROX_SIMPLE)except ValueError:
            image, contours, hierarchy = cv2.findContours(img_edge2, cv2.RETR_TREE, cv2.CHAIN_APPROX_SIMPLE)
        contours =[cnt for cnt in contours if cv2.contourArea(cnt)> Min_Area]print('len(contours)',len(contours))#一一排除不是车牌的矩形区域
        car_contours =[]for cnt in contours:
            rect = cv2.minAreaRect(cnt)
            area_width, area_height = rect[1]if area_width < area_height:
                area_width, area_height = area_height, area_width
            wh_ratio = area_width / area_height
            #print(wh_ratio)#要求矩形区域长宽比在2到5.5之间,2到5.5是车牌的长宽比,其余的矩形排除if wh_ratio >2and wh_ratio <5.5:
                car_contours.append(rect)
                box = cv2.boxPoints(rect)
                box = np.int0(box)#oldimg = cv2.drawContours(oldimg, [box], 0, (0, 0, 255), 2)#cv2.imshow("edge4", oldimg)#cv2.waitKey(0)print(len(car_contours))print("精确定位")
        card_imgs =[]#矩形区域可能是倾斜的矩形,需要矫正,以便使用颜色定位for rect in car_contours:if rect[2]>-1and rect[2]<1:#创造角度,使得左、高、右、低拿到正确的值
                angle =1else:
                angle = rect[2]
            rect =(rect[0],(rect[1][0]+5, rect[1][1]+5), angle)#扩大范围,避免车牌边缘被排除

            box = cv2.boxPoints(rect)
            heigth_point = right_point =[0,0]
            left_point = low_point =[pic_width, pic_hight]for point in box:if left_point[0]> point[0]:
                    left_point = point
                if low_point[1]> point[1]:
                    low_point = point
                if heigth_point[1]< point[1]:
                    heigth_point = point
                if right_point[0]< point[0]:
                    right_point = point

            if left_point[1]<= right_point[1]:#正角度
                new_right_point =[right_point[0], heigth_point[1]]
                pts2 = np.float32([left_point, heigth_point, new_right_point])#字符只是高度需要改变
                pts1 = np.float32([left_point, heigth_point, right_point])
                M = cv2.getAffineTransform(pts1, pts2)
                dst = cv2.warpAffine(oldimg, M,(pic_width, pic_hight))
                point_limit(new_right_point)
                point_limit(heigth_point)
                point_limit(left_point)
                card_img = dst[int(left_point[1]):int(heigth_point[1]),int(left_point[0]):int(new_right_point[0])]
                card_imgs.append(card_img)#cv2.imshow("card", card_img)#cv2.waitKey(0)elif left_point[1]> right_point[1]:#负角度

                new_left_point =[left_point[0], heigth_point[1]]
                pts2 = np.float32([new_left_point, heigth_point, right_point])#字符只是高度需要改变
                pts1 = np.float32([left_point, heigth_point, right_point])
                M = cv2.getAffineTransform(pts1, pts2)
                dst = cv2.warpAffine(oldimg, M,(pic_width, pic_hight))
                point_limit(right_point)
                point_limit(heigth_point)
                point_limit(new_left_point)
                card_img = dst[int(right_point[1]):int(heigth_point[1]),int(new_left_point[0]):int(right_point[0])]
                card_imgs.append(card_img)#cv2.imshow("card", card_img)#cv2.waitKey(0)
创作不易,走过路过不要错过,点个赞再走吧,需要源码的朋友可以点赞关注我,再私信我获取源码!!!!
本文转载自: https://blog.csdn.net/weixin_51141489/article/details/128588475
版权归原作者 Svan. 所有, 如有侵权,请联系我们删除。
版权归原作者 Svan. 所有, 如有侵权,请联系我们删除。