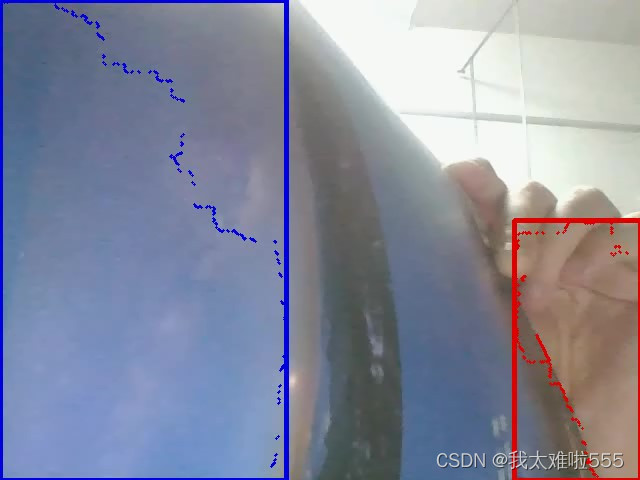
摄像头识别红色和蓝色并框选,当该颜色为摄像头屏幕上大多数颜色时打印出该颜色的名称
新手学习笔记,第一次写博客,若有错误还请指出( _ )
1.调包
import cv2
import numpy as np
from matplotlib import pyplot as plt
2.初始设置
lower_red = np.array([0, 50, 100])        #为红色和蓝色设置阈值用来为之后处理图像准备
upper_red = np.array([10, 255, 255])      #该阈值是在HSV颜色空间下
lower_blue = np.array([100,50,100])
upper_blue = np.array([124, 255, 255])

red = (0,0,225)                           #设置红色和蓝色在BGR颜色空间下的数值元组
blue = (225,0,0)

cv2.namedWindow('video', cv2.WINDOW_AUTOSIZE)#设置窗口'video',大小为自适应模式
cv2.resizeWindow('video',640,480)            #为窗口设置宽度(640)和高度(480)
3.图像处理,提取颜色
def img_process(img,lower,upper):
    """根据阈值处理图像,提取阈值内的颜色。返回处理后只留下指定颜色的图像(其余为黑色)
        img:原图像;lower:最低阈值;upper:最高阈值"""
    kernel = np.ones((35, 35), np.uint8)                #创建一个35x35卷积核,卷积核内元素全为1
    hsv = cv2.cvtColor(img, cv2.COLOR_BGR2HSV)          #将BGR图像转化为HSV图像,方便颜色提取
    Open = cv2.morphologyEx(hsv,cv2.MORPH_OPEN,kernel)  #用卷积核对图像进行形态学开运算操作,去除噪声
    mask = cv2.inRange(Open, lower, upper)              #开运算得到的图像用阈值进行二值化处理(处理后的结果为在阈值内的部分变为白色,不在阈值内的部分为黑色)
    res = cv2.bitwise_and(img, img, mask = mask)        #二值化处理后的图像与原图进行位与运算(处理后在阈值内的颜色变为原颜色,不在阈值内的部分仍为黑色)
    return res                                          #该函数的返回值为位与运算之后的图像,此图像只保留了在阈值内的图像,其余部分为黑色
4.轮廓绘制
def cnts_draw(img,res,color):
    """在原图像上绘出指定颜色的轮廓。无返回值
        img:原图像;res:只剩某颜色的位与运算后的图像;color:轮廓的颜色"""
    canny = cv2.Canny(res,100,200)#Canny边缘检测算法,用来描绘图像中物体的边缘,(100,200为此函数的两个阈值,该阈值越小轮廓的细节越丰富)
    contours, hierarchy=cv2.findContours(canny,cv2.RETR_EXTERNAL,cv2.CHAIN_APPROX_SIMPLE)#寻找图像轮廓的函数,这里先用Canny算法得到只保留轮廓的图像方便轮廓的找寻
    if len(contours) == 0:#传递到max函数中的轮廓不能为空
        cv2.imshow('video',img)
        return
    else:
        max_cnt = max(contours , key = cv2.contourArea)#找到轮廓中最大的一个
        cv2.drawContours(img, max_cnt,-1,color,2)#在原图上绘制这个最大轮廓
        (x,y,w,h) = cv2.boundingRect(max_cnt)#找到这个最大轮廓的最大外接矩形,返回的(x,y)为这个矩形右下角的顶点,w为宽度,h为高度
        cv2.rectangle(img,(x,y),(x+w,y+h),color,3)#在原图上绘制这个矩形
        cv2.imshow('video', img)#展示原图
5.颜色识别
def colorfind(img):
    """找到原图像最多的颜色,当该颜色为红色或蓝色时打印出来该颜色的名称,无返回值
        img:原图像"""
    kernel = np.ones((35, 35), np.uint8)
    hsv = cv2.cvtColor(img, cv2.COLOR_BGR2HSV)
    Open = cv2.morphologyEx(hsv,cv2.MORPH_OPEN,kernel)#以上为图像处理
    hist = cv2.calcHist([Open],[0],None,[180],[0,180])#对Open图像的H通道进行直方图统计
    hist_max = np.where(hist == np.max(hist))#找到直方图hist中列方向最大的点hist_max
    if 0 < hist_max[0] < 10:#hist_max[0]为hist_max的行方向的值,即H的值,H在0~10为红色
        print('red')
    elif 100 < hist_max[0] < 124:#H在100~124为蓝色
        print('blue')
    else :                       #H不在前两者之间跳出函数
        return
#可以添加对H的判断来识别更多的颜色
下面是OpenCV中HSV空间颜色对照表

6.程序主体
if __name__ == "__main__":
    cap = cv2.VideoCapture(0)#打开摄像头(0代表打开默认摄像头,若有两个摄像头可用1表示打开另一个摄像头)
    while cap.isOpened():#判断摄像头是否正常打开
        flag, frame = cap.read()#读取摄像头返回两个参数,flag是布尔类型代表摄像头是否正常读取,frame是从摄像头读取的图像
        if not flag:            #若无法读取则跳出循环
            print("无法读取摄像头!")
            break
        else:
            if frame is not None: #判断摄像头有无画面
                res_blue = img_process(frame,lower_blue,upper_blue)
                res_red = img_process(frame,lower_red,upper_red)
                cnts_draw(frame,res_blue,blue)
                cnts_draw(frame,res_red,red)
                colorfind(frame)
                key = cv2.waitKey(10)
                if key == 27:
                    break
            else:
                print("无画面")
                break

    cap.release()#释放资源,停止读取摄像头
    cv2.destroyAllWindows()#关闭所有窗口
完整源代码
import cv2
import numpy as np
from matplotlib import pyplot as plt

lower_red = np.array([0, 50, 100])
upper_red = np.array([10, 255, 255])
lower_blue = np.array([100,50,100])
upper_blue = np.array([124, 255, 255])     #若绘制轮廓与自己期望的识别结果相差较大,可通过调整阈值来改变识别结果
red = (0,0,225)
blue = (225,0,0)

cv2.namedWindow('video', cv2.WINDOW_AUTOSIZE)
cv2.resizeWindow('video',640,480)

def img_process(img,lower,upper):
    """根据阈值处理图像,提取阈值内的颜色。返回处理后只留下指定颜色的图像(其余为黑色)
        img:原图像;lower:最低阈值;upper:最高阈值"""
    kernel = np.ones((35, 35), np.uint8)
    hsv = cv2.cvtColor(img, cv2.COLOR_BGR2HSV)
    Open = cv2.morphologyEx(hsv,cv2.MORPH_OPEN,kernel)
    mask = cv2.inRange(Open, lower, upper)
    res = cv2.bitwise_and(img, img, mask = mask)
    return res

def cnts_draw(img,res,color):
    """在原图像上绘出指定颜色的轮廓。无返回值
        img:原图像;res:只剩某颜色的位与运算后的图像;color:轮廓的颜色"""
    canny = cv2.Canny(res,100,200)
    contours, hierarchy=cv2.findContours(canny,cv2.RETR_EXTERNAL,cv2.CHAIN_APPROX_SIMPLE)
    if len(contours) == 0:
        cv2.imshow('video',img)
        return
    else:
        max_cnt = max(contours , key = cv2.contourArea)
        cv2.drawContours(img, max_cnt,-1,color,2)
        (x,y,w,h) = cv2.boundingRect(max_cnt)
        cv2.rectangle(img,(x,y),(x+w,y+h),color,3)
        cv2.imshow('video', img)


def colorfind(img):
    """找到原图像最多的颜色,当该颜色为红色或蓝色时打印出来该颜色的名称,无返回值
        img:原图像"""
    kernel = np.ones((35, 35), np.uint8)
    hsv = cv2.cvtColor(img, cv2.COLOR_BGR2HSV)
    Open = cv2.morphologyEx(hsv,cv2.MORPH_OPEN,kernel)
    hist = cv2.calcHist([Open],[0],None,[180],[0,180])
    hist_max = np.where(hist == np.max(hist))
    if 0 < hist_max[0] < 10:
        print('red')
    elif 100 < hist_max[0] < 124:
        print('blue')
    else :
        return

if __name__ == "__main__":
    cap = cv2.VideoCapture(0)
    while cap.isOpened():
        flag, frame = cap.read()
        if not flag:
            print("无法读取摄像头!")
            break
        else:
            if frame is not None:
                res_blue = img_process(frame,lower_blue,upper_blue)
                res_red = img_process(frame,lower_red,upper_red)
                cnts_draw(frame,res_blue,blue)
                cnts_draw(frame,res_red,red)
                colorfind(frame)
                key = cv2.waitKey(10)
                if key == 27:
                    break
            else:
                print("无画面")
                break

    cap.release()
    cv2.destroyAllWindows()
下面是程序运行的实例


本文转载自: https://blog.csdn.net/qq_74999830/article/details/130450173
版权归原作者 我太难啦555 所有, 如有侵权,请联系我们删除。
版权归原作者 我太难啦555 所有, 如有侵权,请联系我们删除。