一、定义
1、介绍
本项目是世界上最强大、简洁的人脸识别库,你可以使用Python和命令行工具提取、识别、操作人脸。
本项目的人脸识别是基于业内领先的C++开源库dlib中的深度学习模型,用Labeled Faces in the Wild人脸数据集进行测试,有高达99.38%的准确率。但对小孩和亚洲人脸的识别准确率尚待提升。
Labeled Faces in the Wild是美国麻省大学安姆斯特分校(University of Massachusetts Amherst)制作的人脸数据集,该数据集包含了从网络收集的13,000多张面部图像。
github和官网网址:
https://github.com/ageitgey/face_recognition/blob/master/README_Simplified_Chinese.md
https://face-recognition.readthedocs.io/en/latest/face_recognition.html
2、人脸识别步骤:
1)人脸检测
要想识别人脸,首先需要在图像或者视频帧中找到所有人脸的位置,并将人脸部分的图像切割出来。

可以使用方向梯度直方图(HOG)来检测人脸位置。先将图片灰度化,因为色彩对于找到人脸位置并无明显作用,接着计算图像中各像素的梯度。

通过将图像变换为HOG形式,我们就可以提取图像的特征,从而获取人脸位置。
2)人脸对齐
一张图片中的人脸可能是倾斜的,或者仅仅是侧脸。为了方便给人脸编码,需要将人脸对齐成同一种标准的形状。

人脸对齐的第一步就是人脸是特征点估计。Dlib有专门的函数和模型,能够实现人脸68个特征点的定位。

找到特征点后,就可以通过图像的几何变换(仿射、旋转、缩放),使各个特征点对齐(将眼睛、嘴等部位移到相同位置)。
3)人脸编码

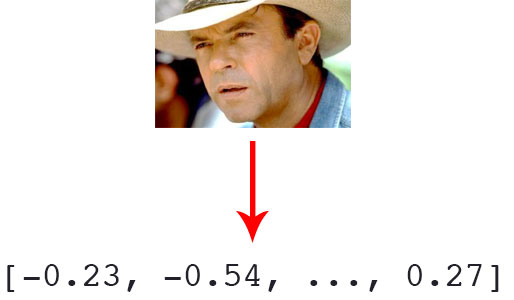
训练一个神经网络,将输入的脸部图像生成为128维的预测值。
训练的大致过程为:将同一人的两张不同照片和另一人的照片一起喂入神经网络,不断迭代训练,使同一人的两张照片编码后的预测值接近,不同人的照片预测值拉远。也就是减小类内距离,增大类间距离。具体算法参考facenet[3]。

4)识别身份
预先将所有人的连放入人脸库中,全部用上述的神经网络编码为128维并保存。识别时,将人脸预测为128维的向量后,与人脸库中的数据进行比对。
比对方法有很多种,可以直接找出阈值范围内欧氏距离最小的人脸,或者训练一个末端的SVM或者knn分类器,直接生成人的代号(身份)。
knn分类器构建方法可参考这个代码。

整体的使用python实现人脸识别的代码可以参考使用OpenCV,Python和深度学习进行人脸识别。
二、通过python代码实现
1、安装
1)windows系统 python3.10下安装 dlib
Steins-Gate-Divergence-Meter-Clock-VisitorCounter/dlib-19.22.99-cp310-cp310-win_amd64.whl at main · longsongline/Steins-Gate-Divergence-Meter-Clock-VisitorCounter · GitHub
2)安装 face_recognition 库
pip3 install face_recognition
2、代码案例
# coding=utf-8
import sys
import cv2
from PIL import Image,ImageDraw,ImageFont
import numpy as np
import face_recognition

# 加载已知人脸图像
known_image = face_recognition.load_image_file("know_img.jpg")

# 提取已知人脸的编码
known_face_encoding = face_recognition.face_encodings(known_image)[0]

# 初始化摄像头
video_capture = cv2.VideoCapture(0)

def cv2AddChineseText(frame, name, position, fill):
    font = ImageFont.truetype('simsun.ttc', 30)
    img_pil = Image.fromarray(frame)
    draw = ImageDraw.Draw(img_pil)
    draw.text(position, name, font=font, fill=fill)
    return np.array((img_pil))

while True:
    # 读取摄像头中的图像
    ret, frame = video_capture.read()

    # 将图像转换为RGB格式
    rgb_frame = frame[:, :, ::-1]

    # 检测图像中的人脸
    face_locations = face_recognition.face_locations(rgb_frame)
    face_encodings = face_recognition.face_encodings(rgb_frame, face_locations)

    # 在图像中标记人脸位置
    for (top, right, bottom, left), face_encoding in zip(face_locations, face_encodings):
        # 判断检测到的人脸是否和已知人脸匹配
        matches = face_recognition.compare_faces([known_face_encoding], face_encoding, tolerance=0.38)

        # 如果匹配,则标记人脸为已知人脸
        name = "unknow"
        if True in matches:
            name = "know"

        # 在图像中标记人脸位置和姓名
        cv2.rectangle(frame, (left, top), (right, bottom), (0, 0, 255), 2)
        # cv2.putText(frame, name, (left + 6, bottom - 6), cv2.FONT_HERSHEY_SIMPLEX, 1.0, (0, 0, 255), 1)
        frame = cv2AddChineseText(frame, name, (left, top - 38), (0, 0, 255))


    # 显示图像
    cv2.imshow('Video', frame)

    # 按下q键退出程序
    if cv2.waitKey(1) & 0xFF == ord('q'):
        break

# 释放摄像头
video_capture.release()

# 关闭所有窗口
cv2.destroyAllWindows()
版权归原作者 m0_68949064 所有, 如有侵权,请联系我们删除。