
这里演示使用 Apache Spark 和 Databricks 平台进行企鹅物种预测的完整机器学习流程。首先,通过 Databricks 笔记本下载关于企鹅的特征数据,包括岛屿、喙的长度和深度、鳍状肢长度、体重和种类。然后进行数据清洗,包括删除缺失数据和数据类型转换。随后,数据被分为70%的训练集和30%的测试集,以便于后续的模型训练和评估。
在对机器学习的特征工程部分包括了对分类特征的编码和数值特征的规范化处理。我们将使用逻辑回归算法训练分类模型。然后对模型进行测试和评估,我们使用多类分类评估器来计算模型的准确度、精确度、召回率和 F1 分数。
最后使用 Pipeline 来封装数据准备和模型训练步骤,并换一种决策树算法。演示保存训练好的模型,并使用它对新的企鹅观测数据进行种类推理预测。
一、下载机器学习训练数据
如何启动Azure Data Bricks 并使用免费资源,参考如下链接:
利用 Azure Data Bricks的免费资源学习云上大数据-CSDN博客
下面在DataBricks工作区中启动笔记本,执行以下语句来下载试验用数据:
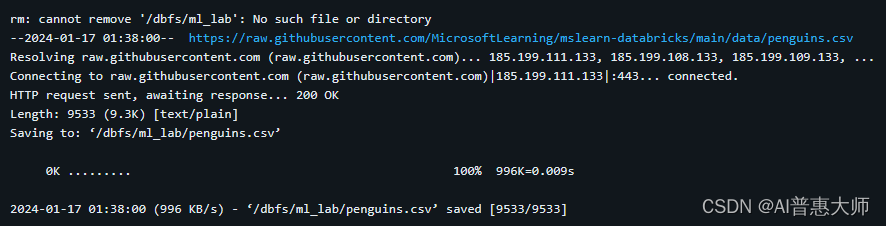
 %sh
 rm -r /dbfs/ml_lab
 mkdir /dbfs/ml_lab
 wget -O /dbfs/ml_lab/penguins.csv https://raw.githubusercontent.com/MicrosoftLearning/mslearn-databricks/main/data/penguins.csv
执行结果:
执行以下命令来查看训练用数据:
df = spark.read.format("csv").option("header", "true").load("/ml_lab/penguins.csv")
display(df)
执行结果:

数据字段说明:
Island: 在南极洲观察到企鹅的岛屿。
CulmenLength: 企鹅的疙瘩(喙)的长度(以毫米为单位)。
CulmenDepth: 企鹅洞的深度(以毫米为单位)。
FlipperLength: 企鹅鳍状肢的长度(以毫米为单位)。
BodyMass: 企鹅的体重(以克为单位)。
Species: 表示企鹅种类的整数值:
- 0: Adelie
- 1: Gentoo
- 2: Chinstrap
我们在这个项目中的目标是利用观察到的企鹅特征(其特征)来预测其物种(在机器学习术语中,我们称之为标签)
请注意,某些观测值包含某些要素的空值或“缺失”数据值。引入的原始源数据出现此类问题的情况并不少见,因此机器学习项目的第一阶段通常是彻底探索数据并对其进行清理,使其更适合训练机器学习模型。
二、数据清洗工作
使用dropna方法删除数据不完整的行,并使用带有 col 和astype函数的select方法将适当的数据类型应用于数据
from pyspark.sql.types import *
from pyspark.sql.functions import *

data = df.dropna().select(col("Island").astype("string"),
                           col("CulmenLength").astype("float"),
                          col("CulmenDepth").astype("float"),
                          col("FlipperLength").astype("float"),
                          col("BodyMass").astype("float"),
                          col("Species").astype("int")
                          )
display(data)
执行结果:

三、训练数据拆分
因为我们将预测的业务目标特定的类别(企鹅的物种),所以我们需要训练的机器学习模型类型是分类模型。分类(以及用于预测数值的回归)是一种形式或监督式机器学习,我们使用的训练数据包含我们想要预测的标签的已知值。训练模型的过程实际上只是将算法拟合到数据中,以计算特征值与已知标签值的相关性。然后,我们可以将经过训练的模型应用于我们只知道特征值的新观测值,并让它预测标签值。
为了确保我们对训练的模型有信心,典型的方法是仅使用一些数据来训练模型,并保留一些具有已知标签值的数据,这些数据可用于测试经过训练的模型并查看其预测的准确性。为了实现这个目标,我们将把完整的数据集分成两个随机的子集。我们将使用 70% 的数据进行训练,并保留 30% 的数据进行测试。
执行以下代码来拆分数据
splits = data.randomSplit([0.7, 0.3])
train = splits[0]
test = splits[1]
print ("Training Rows:", train.count(), " Testing Rows:", test.count())
执行结果:

四、特征工程
清理原始数据后,通常需要一些额外的工作来为模型训练做好准备。此过程通常称为特征工程,涉及迭代优化训练数据集中的特征以生成最佳模型。所需的特定特征修改取决于数据和所需的模型
1、对分类要素进行编码
运行以下代码,将Island分类列值编码为数值索引
from pyspark.ml.feature import StringIndexer

indexer = StringIndexer(inputCol="Island", outputCol="IslandIdx")
indexedData = indexer.fit(train).transform(train).drop("Island")
display(indexedData)
执行结果:

在结果中,现在每行都有一个IslandIdx列,而不是岛屿名称,该列具有一个整数值,表示记录观测值的岛屿
2、规范化(缩放)数值特征
现在让我们把注意力转向数据中的数值。这些值(CulmenLength、CulmenDepth、FlipperLength和BodyMass)都表示一种或另一种类型的度量值,但它们的比例不同。在训练模型时,测量单位并不像不同观测值之间的相对差异那么重要,并且由较大数字表示的特征通常会主导模型训练算法,从而在计算预测时扭曲特征的重要性。为了缓解这种情况,通常对数值特征值进行规范化,使它们都处于相同的相对比例上(例如,介于 0.0 和 1.0 之间的十进制值)。
下面要执行此操作的代码比我们之前所做的分类编码更复杂一些。我们需要同时缩放多个列值,因此我们使用的技术是创建一个包含所有数值特征的向量(本质上是一个数组)的列,然后应用缩放器以生成具有等效规范化值的新向量列。
from pyspark.ml.feature import VectorAssembler, MinMaxScaler

# Create a vector column containing all numeric features
numericFeatures = ["CulmenLength", "CulmenDepth", "FlipperLength", "BodyMass"]
numericColVector = VectorAssembler(inputCols=numericFeatures, outputCol="numericFeatures")
vectorizedData = numericColVector.transform(indexedData)

# Use a MinMax scaler to normalize the numeric values in the vector
minMax = MinMaxScaler(inputCol = numericColVector.getOutputCol(), outputCol="normalizedFeatures")
scaledData = minMax.fit(vectorizedData).transform(vectorizedData)

# Display the data with numeric feature vectors (before and after scaling)
compareNumerics = scaledData.select("numericFeatures", "normalizedFeatures")
display(compareNumerics)
执行结果如下:

结果中的numericFeatures列包含每行的向量。该向量包括四个未缩放的数值(企鹅的原始测量值)
normalizedFeatures列还包含每个企鹅观测值的向量,但这次向量中的值将根据每个测量值的最小值和最大值归一化为相对刻度。
五、准备用于训练的特征和标签
下面将所有内容放在一起,创建一个包含所有特征(编码的分类岛屿名称和归一化企鹅测量值)的列,以及另一个包含我们想要训练模型进行预测的类标签(企鹅物种)的列
featVect = VectorAssembler(inputCols=["IslandIdx", "normalizedFeatures"], outputCol="featuresVector")
preppedData = featVect.transform(scaledData)[col("featuresVector").alias("features"), col("Species").alias("label")]
display(preppedData)
执行结果:

六、训练模型
训练数据已准备好,可以使用它来训练模型。模型使用尝试在特征和标签之间建立关系的算法进行训练。由于在这种情况下,需要训练一个预测类类别的模型, 因此需要使用分类算法。有许多用于分类的算法 - 让我们从一种成熟的算法开始:逻辑回归,它迭代地尝试在逻辑计算中找到可应用于特征数据的最佳系数,以预测每个类标签值的概率。要训练模型,需要将逻辑回归算法拟合到训练数据。
from pyspark.ml.classification import LogisticRegression

lr = LogisticRegression(labelCol="label", featuresCol="features", maxIter=10, regParam=0.3)
model = lr.fit(preppedData)
print ("Model trained!")
执行结果:

大多数算法都支持参数,这些参数使你能够对模型的训练方式进行一些控制。在这种情况下,逻辑回归算法要求您识别包含特征向量的列和包含已知标签的列;此外,还可以指定为找到逻辑计算的最佳系数而执行的最大迭代次数,以及用于防止模型过度拟合的正则化参数。
七、测试模型
有了经过训练的模型,可以使用保留的数据对其进行测试。在执行此操作之前,您需要对测试数据执行与应用于训练数据相同的特征工程转换。然后,您可以使用该模型来预测测试数据中要素的标注,并将预测的标注与实际的已知标注进行比较。
# Prepare the test data
indexedTestData = indexer.fit(test).transform(test).drop("Island")
vectorizedTestData = numericColVector.transform(indexedTestData)
scaledTestData = minMax.fit(vectorizedTestData).transform(vectorizedTestData)
preppedTestData = featVect.transform(scaledTestData)[col("featuresVector").alias("features"), col("Species").alias("label")]
# Get predictions
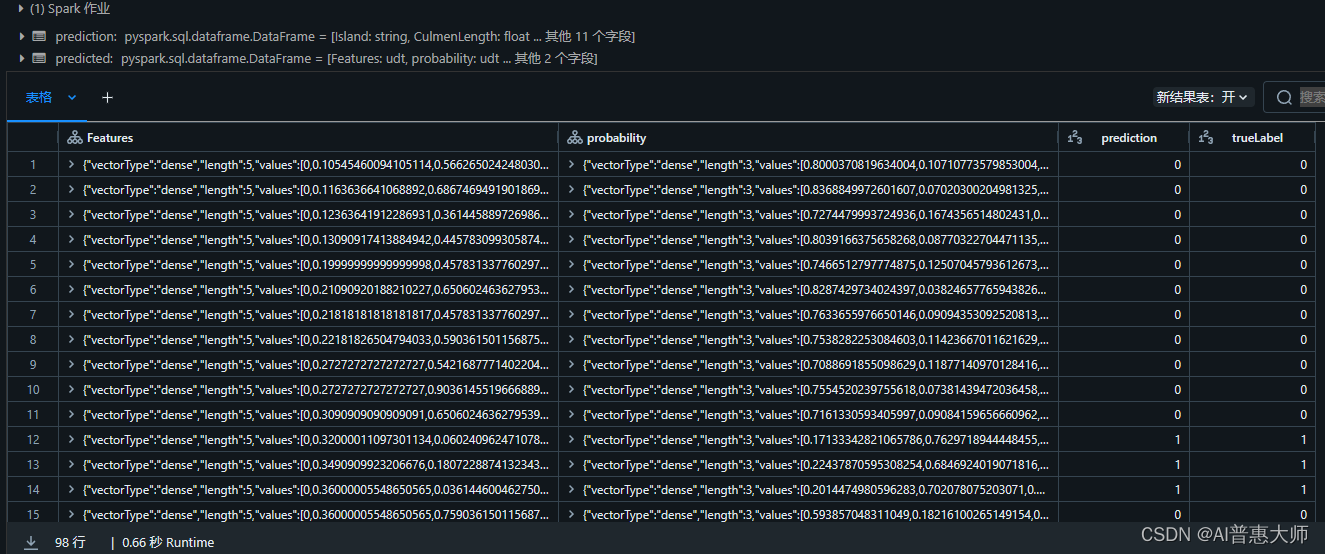
prediction = model.transform(preppedTestData)
predicted = prediction.select("features", "probability", col("prediction").astype("Int"), col("label").alias("trueLabel"))
display(predicted)
执行结果:

输出字段说明:
features: 来自测试数据集的准备好的特征数据。
probability: 模型为每个类计算的概率。它由一个包含三个概率值的向量组成(因为有三个类别),这些概率值加起来总共为 1.0(假设企鹅属于 三个物种类别之一的概率为 100%)。
prediction: 预测的类标签(概率最高的类)。
trueLabel: 测试数据中实际的已知标签值。
要评估模型的有效性,只需比较这些结果中的预测标签和真实标签即可。但是,可以使用模型赋值器(在本例中为多类(因为有多个可能的类标签)分类赋值器来获取更有意义的指标。
使用以下代码根据测试数据的结果获取分类模型的评估指标
from pyspark.ml.evaluation import MulticlassClassificationEvaluator

evaluator = MulticlassClassificationEvaluator(labelCol="label", predictionCol="prediction")

# Simple accuracy
accuracy = evaluator.evaluate(prediction, {evaluator.metricName:"accuracy"})
print("Accuracy:", accuracy)

# Individual class metrics
labels = [0,1,2]
print("\nIndividual class metrics:")
for label in sorted(labels):
    print ("Class %s" % (label))

    # Precision
    precision = evaluator.evaluate(prediction, {evaluator.metricLabel:label,
                                                evaluator.metricName:"precisionByLabel"})
    print("\tPrecision:", precision)

    # Recall
    recall = evaluator.evaluate(prediction, {evaluator.metricLabel:label,
                                             evaluator.metricName:"recallByLabel"})
    print("\tRecall:", recall)

    # F1 score
    f1 = evaluator.evaluate(prediction, {evaluator.metricLabel:label,
                                         evaluator.metricName:"fMeasureByLabel"})
    print("\tF1 Score:", f1)

# Weighted (overall) metrics
overallPrecision = evaluator.evaluate(prediction, {evaluator.metricName:"weightedPrecision"})
print("Overall Precision:", overallPrecision)
overallRecall = evaluator.evaluate(prediction, {evaluator.metricName:"weightedRecall"})
print("Overall Recall:", overallRecall)
overallF1 = evaluator.evaluate(prediction, {evaluator.metricName:"weightedFMeasure"})
print("Overall F1 Score:", overallF1)
执行结果:

为多类分类计算的评估指标包括:
Accuracy: 总体预测正确率的比例。
Per-class metrics:
** Precision**: 此类预测正确的比例。
** Recall**: 正确预测的此类实际实例的比例。
** F1 score**: 精确率和召回率的综合指标
所有类的组合(加权)精确率、召回率和 F1 指标
八、使用Pipeline来训练模型
1、使用Pipeline封装训练过程
生成和使用模型的更有效方法是封装用于准备数据的转换器和用于在管道中训练数据的模型。
下面我们使用以下代码创建封装数据准备和模型训练步骤的管道:
from pyspark.ml import Pipeline
from pyspark.ml.feature import StringIndexer, VectorAssembler, MinMaxScaler
from pyspark.ml.classification import LogisticRegression

catFeature = "Island"
numFeatures = ["CulmenLength", "CulmenDepth", "FlipperLength", "BodyMass"]

# Define the feature engineering and model training algorithm steps
catIndexer = StringIndexer(inputCol=catFeature, outputCol=catFeature + "Idx")
numVector = VectorAssembler(inputCols=numFeatures, outputCol="numericFeatures")
numScaler = MinMaxScaler(inputCol = numVector.getOutputCol(), outputCol="normalizedFeatures")
featureVector = VectorAssembler(inputCols=["IslandIdx", "normalizedFeatures"], outputCol="Features")
algo = LogisticRegression(labelCol="Species", featuresCol="Features", maxIter=10, regParam=0.3)

# Chain the steps as stages in a pipeline
pipeline = Pipeline(stages=[catIndexer, numVector, numScaler, featureVector, algo])

# Use the pipeline to prepare data and fit the model algorithm
model = pipeline.fit(train)
print ("Model trained!")
执行结果:

由于特征工程步骤现在封装在管道训练的模型中,因此可以将模型与测试数据一起使用,而无需应用每个转换(模型将自动应用它们)
2、测试模型
使用以下代码将管道应用于测试数据:
prediction = model.transform(test)
predicted = prediction.select("Features", "probability", col("prediction").astype("Int"), col("Species").alias("trueLabel"))
display(predicted)
执行结果:
3、尝试另一个算法
运行以下代码以创建使用决策树算法的管道:管道包含与之前相同的特征准备阶段,但使用决策树算法来训练模型。
from pyspark.ml import Pipeline
from pyspark.ml.feature import StringIndexer, VectorAssembler, MinMaxScaler
from pyspark.ml.classification import DecisionTreeClassifier

catFeature = "Island"
numFeatures = ["CulmenLength", "CulmenDepth", "FlipperLength", "BodyMass"]

# Define the feature engineering and model steps
catIndexer = StringIndexer(inputCol=catFeature, outputCol=catFeature + "Idx")
numVector = VectorAssembler(inputCols=numFeatures, outputCol="numericFeatures")
numScaler = MinMaxScaler(inputCol = numVector.getOutputCol(), outputCol="normalizedFeatures")
featureVector = VectorAssembler(inputCols=["IslandIdx", "normalizedFeatures"], outputCol="Features")
algo = DecisionTreeClassifier(labelCol="Species", featuresCol="Features", maxDepth=10)

# Chain the steps as stages in a pipeline
pipeline = Pipeline(stages=[catIndexer, numVector, numScaler, featureVector, algo])

# Use the pipeline to prepare data and fit the model algorithm
model = pipeline.fit(train)
print ("Model trained!")
运行以下代码,将新管道与测试数据配合使用:
# Get predictions
prediction = model.transform(test)
predicted = prediction.select("Features", "probability", col("prediction").astype("Int"), col("Species").alias("trueLabel"))

# Generate evaluation metrics
from pyspark.ml.evaluation import MulticlassClassificationEvaluator

evaluator = MulticlassClassificationEvaluator(labelCol="Species", predictionCol="prediction")

# Simple accuracy
accuracy = evaluator.evaluate(prediction, {evaluator.metricName:"accuracy"})
print("Accuracy:", accuracy)

# Class metrics
labels = [0,1,2]
print("\nIndividual class metrics:")
for label in sorted(labels):
    print ("Class %s" % (label))

    # Precision
    precision = evaluator.evaluate(prediction, {evaluator.metricLabel:label,
                                                    evaluator.metricName:"precisionByLabel"})
    print("\tPrecision:", precision)

    # Recall
    recall = evaluator.evaluate(prediction, {evaluator.metricLabel:label,
                                             evaluator.metricName:"recallByLabel"})
    print("\tRecall:", recall)

    # F1 score
    f1 = evaluator.evaluate(prediction, {evaluator.metricLabel:label,
                                         evaluator.metricName:"fMeasureByLabel"})
    print("\tF1 Score:", f1)

# Weighed (overall) metrics
overallPrecision = evaluator.evaluate(prediction, {evaluator.metricName:"weightedPrecision"})
print("Overall Precision:", overallPrecision)
overallRecall = evaluator.evaluate(prediction, {evaluator.metricName:"weightedRecall"})
print("Overall Recall:", overallRecall)
overallF1 = evaluator.evaluate(prediction, {evaluator.metricName:"weightedFMeasure"})
print("Overall F1 Score:", overallF1)
执行结果:

九、保存模型
我们会迭代尝试使用不同的算法(和参数)训练模型,以找到最适合你的数据的模型。我们可以保存它,以便我们以后可以将其用于一些新的企鹅观察。
model.save("/models/penguin.model")
十、模型推理
使用模型从新数据生成预测称为推理,如果发现一只新企鹅时,我们可以加载保存的模型,并根据您对企鹅特征的测量来使用它来预测企鹅的物种。
运行以下代码以加载模型,并使用它来预测新企鹅观测的物种:
from pyspark.ml.pipeline import PipelineModel

persistedModel = PipelineModel.load("/models/penguin.model")

newData = spark.createDataFrame ([{"Island": "Biscoe",
                                  "CulmenLength": 47.6,
                                  "CulmenDepth": 14.5,
                                  "FlipperLength": 215,
                                  "BodyMass": 5400}])


predictions = persistedModel.transform(newData)
display(predictions.select("Island", "CulmenDepth", "CulmenLength", "FlipperLength", "BodyMass", col("prediction").alias("PredictedSpecies")))
执行结果:

以上就是利用Azure Data Bricks 平台和Python进行的机器学习训练模型的简单过程,希望能对大家的工作有所帮助。
版权归原作者 AI普惠大师 所有, 如有侵权,请联系我们删除。