
文章目录
1.关键点检测
https://mydreamambitious.blog.csdn.net/article/details/125542337
2.算法实现的核心点
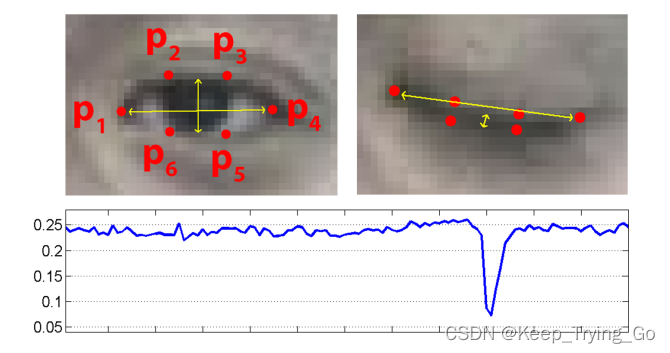

其中纵横比表示衡量是否眨眼;p1,p2,p3,p4,p5,p6为人眼的关键点坐标,||p2-p6||表示两个关键点之间的欧式距离。其实你只要看懂上面的图和公式即可。
论文地址
http://vision.fe.uni-lj.si/cvww2016/proceedings/papers/05.pdf
参考理论详解
https://blog.csdn.net/uncle_ll/article/details/117999920
3.算法实现
注:这个代码看起来有点多(复杂),但是读者不要“害怕”,这个思路非常的清晰,只要一步一步的来就很容易明白其中实现的过程(不难理解)。
(1)人脸的关键点集合
#对于68个检测点,将人脸的几个关键点排列成有序,便于后面的遍历
shape_predictor_68_face_landmark=OrderedDict([('mouth',(48,68)),('right_eyebrow',(17,22)),('left_eye_brow',(22,27)),('right_eye',(36,42)),('left_eye',(42,48)),('nose',(27,36)),('jaw',(0,17))])
(2)加载人脸检测库和人脸关键点检测库
# 加载人脸检测与关键点定位
#http://dlib.net/python/index.html#dlib_pybind11.get_frontal_face_detector
detector = dlib.get_frontal_face_detector()#http://dlib.net/python/index.html#dlib_pybind11.shape_predictor
criticPoints = dlib.shape_predictor("shape_predictor_68_face_landmarks.dat")
(3)绘制人脸检测的框
#绘制人脸画矩形框
def drawRectangle(detected,frame):
    margin =0.2
    img_h,img_w,_=np.shape(frame)iflen(detected)>0:for i, locate in enumerate(detected):
            x1, y1, x2, y2, w, h = locate.left(), locate.top(), locate.right()+1, locate.bottom()+1, locate.width(), locate.height()

            xw1 =max(int(x1 - margin * w),0)
            yw1 =max(int(y1 - margin * h),0)
            xw2 =min(int(x2 + margin * w), img_w -1)
            yw2 =min(int(y2 + margin * h), img_h -1)

            cv2.rectangle(frame,(x1, y1),(x2, y2),(0,255,0),2)

            face = frame[yw1:yw2 +1, xw1:xw2 +1,:]
            cv2.putText(frame,'Person',(locate.left(), locate.top()-10),
            cv2.FONT_HERSHEY_SIMPLEX,1.2,(255,0,0),3)return frame
(4)对检测之后的人脸关键点坐标进行转换
#对检测之后获取的人脸关键点坐标进行转换
def predict2Np(predict):
    # 创建68*2关键点的二维空数组[(x1,y1),(x2,y2)……]
    dims=np.zeros(shape=(predict.num_parts,2),dtype=np.int)
    #遍历人脸的每个关键点获取二维坐标
    length=predict.num_parts
    for i in range(0,length):
        dims[i]=(predict.part(i).x,predict.part(i).y)return dims
(5)计算欧式距离
#计算欧式距离
def Euclidean(PointA,PointB):
    x=math.fabs(PointA[0]-PointB[0])
    y=math.fabs(PointA[1]-PointB[1])
    Ear=math.sqrt(x*x+y*y)return Ear
(6)计算眼睛的纵横比
#计算是否眨眼的距离
def ComputeCloseEye(left_eye):
    #计算P2与P6,P3与P5
    P1=Euclidean(left_eye[1],left_eye[5])
    P2=Euclidean(left_eye[2],left_eye[4])
    #计算P1与P4
    P3=Euclidean(left_eye[0],left_eye[3])
    #计算P
    P=(P1+P2)/(2*P3)return P
(7)对人脸关键点绘制点
#获取左眼和右眼的关键点坐标值
avg_Ear=0.0
def draw_left_and_right_eye(detected,frame):
    global avg_Ear
    for(step,locate) in enumerate(detected):
        #获取人眼的关键点
        dims=criticPoints(frame,locate)
        #将得到的坐标值转换为二维
        dims=predict2Np(dims)
        #获取左眼的关键点坐标值列表
        left_eye=dims[42:48]
        # 获取右眼的关键点坐标值列表
        right_eye=dims[36:42]
        #绘制左眼的点
        for(x, y) in left_eye:
            cv2.circle(img=frame, center=(x, y),
                       radius=2, color=(0,255,0), thickness=-1)
        #绘制右眼的点
        for(x, y) in right_eye:
            cv2.circle(img=frame, center=(x, y),
                       radius=2, color=(0,255,0), thickness=-1)
        #计算距离
        earLeft=ComputeCloseEye(left_eye)
        earRight=ComputeCloseEye(right_eye)
        #计算左眼和右眼的平均纵横比
        avg_Ear=(earRight+earLeft)/2
        cv2.putText(img=frame,text='CloseEyeDist: '+str(round(avg_Ear,2)),org=(20,50),
                    fontFace=cv2.FONT_HERSHEY_SIMPLEX,fontScale=1.0,
                    color=(0,255,0),thickness=2)return frame,avg_Ear
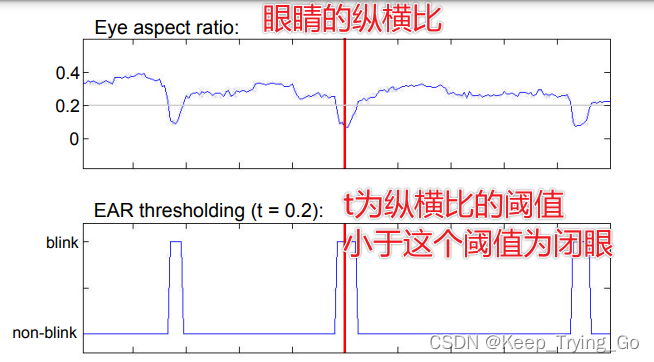
(8)设置相关的阈值
#设置纵横比的阈值
Ear_Threshod=0.2
#眨眼动作是一个快速闭合的过程,眨眼持续差不多为100-400ms
#设置当连续3帧的纵横比都小于阈值则表示眨眼
Ear_frame_Threshold=3
#一次任务中的总的眨眼次数
ToClose_Eye=0
(9)实时的人脸关键点检测
#实时的人脸关键点检测
def detect_time():
cap=cv2.VideoCapture(0)
#记录连续眨眼的次数
count=0
global ToClose_Eye
while cap.isOpened():
#记录开始时间
statime=time.time()
ret,frame=cap.read()
#检测人脸位置
detected =detector(frame)
#利用定位到的人脸进行人脸关键点检测
frame =drawRectangle(detected, frame)
frame,avg_Ear=draw_left_and_right_eye(detected,frame)if avg_Ear<Ear_Threshod:
count+=1if count>=Ear_frame_Threshold:
ToClose_Eye+=1
count=0
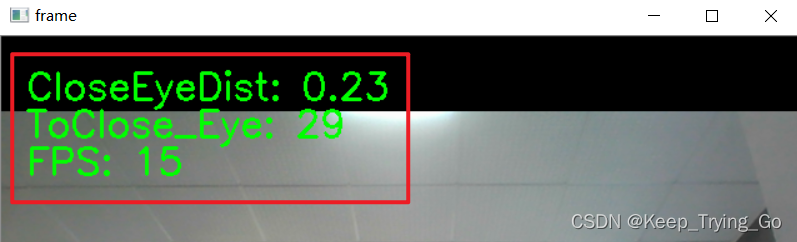
cv2.putText(img=frame,text='ToClose_Eye: '+str(ToClose_Eye),org=(20,80),fontFace=cv2.FONT_HERSHEY_SIMPLEX,
fontScale=1.0,color=(0,255,0),thickness=2)
#记录结束时间
endtime=time.time()
FPS=1/(endtime-statime)
cv2.putText(img=frame, text='FPS: '+str(int(FPS)), org=(20,110), fontFace=cv2.FONT_HERSHEY_SIMPLEX,
fontScale=1.0, color=(0,255,0), thickness=2)
cv2.imshow('frame', frame)
key=cv2.waitKey(1)if key==27:break
cap.release()
cv2.destroyAllWindows()
(10)整体代码
importosimportcv2importdlibimporttimeimportmathimportnumpy as np
from collections importOrderedDict

#对于68个检测点,将人脸的几个关键点排列成有序,便于后面的遍历
shape_predictor_68_face_landmark=OrderedDict([('mouth',(48,68)),('right_eyebrow',(17,22)),('left_eye_brow',(22,27)),('right_eye',(36,42)),('left_eye',(42,48)),('nose',(27,36)),('jaw',(0,17))])

# 加载人脸检测与关键点定位
#http://dlib.net/python/index.html#dlib_pybind11.get_frontal_face_detector
detector = dlib.get_frontal_face_detector()#http://dlib.net/python/index.html#dlib_pybind11.shape_predictor
criticPoints = dlib.shape_predictor("shape_predictor_68_face_landmarks.dat")

#绘制人脸画矩形框
def drawRectangle(detected,frame):
    margin =0.2
    img_h,img_w,_=np.shape(frame)iflen(detected)>0:for i, locate in enumerate(detected):
            x1, y1, x2, y2, w, h = locate.left(), locate.top(), locate.right()+1, locate.bottom()+1, locate.width(), locate.height()

            xw1 =max(int(x1 - margin * w),0)
            yw1 =max(int(y1 - margin * h),0)
            xw2 =min(int(x2 + margin * w), img_w -1)
            yw2 =min(int(y2 + margin * h), img_h -1)

            cv2.rectangle(frame,(x1, y1),(x2, y2),(0,255,0),2)

            face = frame[yw1:yw2 +1, xw1:xw2 +1,:]
            cv2.putText(frame,'Person',(locate.left(), locate.top()-10),
            cv2.FONT_HERSHEY_SIMPLEX,1.2,(255,0,0),3)return frame

#对检测之后获取的人脸关键点坐标进行转换
def predict2Np(predict):
    # 创建68*2关键点的二维空数组[(x1,y1),(x2,y2)……]
    dims=np.zeros(shape=(predict.num_parts,2),dtype=np.int)
    #遍历人脸的每个关键点获取二维坐标
    length=predict.num_parts
    for i in range(0,length):
        dims[i]=(predict.part(i).x,predict.part(i).y)return dims

#计算欧式距离
def Euclidean(PointA,PointB):
    x=math.fabs(PointA[0]-PointB[0])
    y=math.fabs(PointA[1]-PointB[1])
    Ear=math.sqrt(x*x+y*y)return Ear
#计算是否眨眼的距离
def ComputeCloseEye(left_eye):
    #计算P2与P6,P3与P5
    P1=Euclidean(left_eye[1],left_eye[5])
    P2=Euclidean(left_eye[2],left_eye[4])
    #计算P1与P4
    P3=Euclidean(left_eye[0],left_eye[3])
    #计算P
    P=(P1+P2)/(2*P3)return P

#获取左眼和右眼的关键点坐标值
avg_Ear=0.0
def draw_left_and_right_eye(detected,frame):
    global avg_Ear
    for(step,locate) in enumerate(detected):
        #获取人眼的关键点
        dims=criticPoints(frame,locate)
        #将得到的坐标值转换为二维
        dims=predict2Np(dims)
        #获取左眼的关键点坐标值列表
        left_eye=dims[42:48]
        # 获取右眼的关键点坐标值列表
        right_eye=dims[36:42]
        #绘制左眼的点
        for(x, y) in left_eye:
            cv2.circle(img=frame, center=(x, y),
                       radius=2, color=(0,255,0), thickness=-1)
        #绘制右眼的点
        for(x, y) in right_eye:
            cv2.circle(img=frame, center=(x, y),
                       radius=2, color=(0,255,0), thickness=-1)
        #计算距离
        earLeft=ComputeCloseEye(left_eye)
        earRight=ComputeCloseEye(right_eye)
        #计算左眼和右眼的平均纵横比
        avg_Ear=(earRight+earLeft)/2
        cv2.putText(img=frame,text='CloseEyeDist: '+str(round(avg_Ear,2)),org=(20,50),
                    fontFace=cv2.FONT_HERSHEY_SIMPLEX,fontScale=1.0,
                    color=(0,255,0),thickness=2)return frame,avg_Ear

#设置纵横比的阈值
Ear_Threshod=0.2
#眨眼动作是一个快速闭合的过程,眨眼持续差不多为100-400ms
#设置当连续3帧的纵横比都小于阈值则表示眨眼
Ear_frame_Threshold=3
#一次任务中的总的眨眼次数
ToClose_Eye=0

#实时的人脸关键点检测
def detect_time():
    cap=cv2.VideoCapture(0)
    #记录连续眨眼的次数
    count=0
    global ToClose_Eye

    while cap.isOpened():
        #记录开始时间
        statime=time.time()
        ret,frame=cap.read()
        #检测人脸位置
        detected =detector(frame)
        #利用定位到的人脸进行人脸关键点检测
        frame =drawRectangle(detected, frame)
        frame,avg_Ear=draw_left_and_right_eye(detected,frame)if avg_Ear<Ear_Threshod:
            count+=1if count>=Ear_frame_Threshold:
                ToClose_Eye+=1
                count=0
        cv2.putText(img=frame,text='ToClose_Eye: '+str(ToClose_Eye),org=(20,80),fontFace=cv2.FONT_HERSHEY_SIMPLEX,
                    fontScale=1.0,color=(0,255,0),thickness=2)

        #记录结束时间
        endtime=time.time()
        FPS=1/(endtime-statime)
        cv2.putText(img=frame, text='FPS: '+str(int(FPS)), org=(20,110), fontFace=cv2.FONT_HERSHEY_SIMPLEX,
                    fontScale=1.0, color=(0,255,0), thickness=2)
        cv2.imshow('frame', frame)
        key=cv2.waitKey(1)if key==27:break
    cap.release()
    cv2.destroyAllWindows()if __name__ =='__main__':print('Pycharm')detect_time()
本文转载自: https://blog.csdn.net/Keep_Trying_Go/article/details/125559342
版权归原作者 Keep_Trying_Go 所有, 如有侵权,请联系我们删除。
版权归原作者 Keep_Trying_Go 所有, 如有侵权,请联系我们删除。