
OpenCV-Python实战(21)——OpenCV人脸检测项目在Web端的部署
0. 前言
将
OpenCV
计算机视觉项目部署在
Web
端一个有趣的话题,部署在
Web
端的优势之一是不需要安装任何应用,只需要访问地址就可以访问应用。在本文中,我们使用
Python Web
框架创建并部署一个完整的
Web
人脸检测应用程序,在项目中我们将学习到如何处理来自浏览器的不同请求方式(例如
GET
和
POST
等),以及如何实战使用
OpenCV
和
Flask
创建
Web
人脸检测
API
。
1. OpenCV 人脸检测项目在 Web 端的部署
本节中将使用
Python Web
框架创建并部署一个完整的
Web
人脸检测应用程序,此程序不仅可以处理本地图片(利用
request.files['image']
),同时也可以用于处理来自网络中的图片(利用
request.args.get('url')
)。
1.1 解析请求并构建响应
在此实战中,我们将看到如何使用
OpenCV
和
Flask
创建一个
Web
人脸检测
API
,我们将项目命名为
face_detection
,项目目录结构如下所示:
face_detection
    |——server
    |    ├─face_detection.py
    |    └─face_processing.py
    └─client
        ├─request_test.py
        ├─request_and_draw_rectangle.py
        └─test_example.png
其中
face_detection.py
脚本负责解析请求并构建对客户端的响应:
# face_detection.py# 导入所需包from flask import Flask, request, jsonify
import urllib.request
from face_processing import FaceProcessing

app = Flask(__name__)
fc = FaceProcessing()@app.errorhandler(400)defbad_request(e):# 返回代码错误 return jsonify({"status":'Not ok',"message":"This server could not understand your request"}),[email protected](404)defnot_found(e):# 返回代码错误return jsonify({"status":'Not found',"message":"Route not found"}),[email protected](500)definternal_error(e):# 返回代码错误return jsonify({"status":"Internal Error","message":"Internal error occurred in server"}),[email protected]('/detect', methods=['GET','POST','PUT'])defdetect_human_faces():if request.method =='GET':if request.args.get('url'):with urllib.request.urlopen(request.args.get('url'))as url:return jsonify({"status":"Ok","result": fc.face_detection(url.read())}),200else:return jsonify({"status":"Bad request","message":"Parameter url is not present"}),400elif request.method =='POST':if request.files.get('image'):return jsonify({"status":"Ok","result": fc.face_detection(request.files['image'].read())}),200else:return jsonify({"status":"Bad request","message":"Parameter image is not present"}),400else:return jsonify({"status":"Failure","message":"PUT method not supported for API"}),405if __name__ =='__main__':
    app.run(host='0.0.0.0')
如上所示,使用
jsonify()
函数来创建给定参数的
JSON
表示,以返回
application/json MIME
类型。
JSON
是信息交换的事实标准,此项目将返回
JSON
响应,在项目的最后我们将了解如何对其进行修改以返回图像,此
Web
人脸检测
API
支持
GET
和
POST
请求;此外,在
face_detection
脚本中,我们还通过使用
errorhandler()
装饰函数来注册错误处理程序,用来响应出错时向客户端返回设置的错误代码。
人脸检测程序与负责响应的程序进行了分离,人脸检测程序在
face_processing.py
脚本中执行,其中编写了
FaceProcessing()
类:
# face_processing.pyimport cv2
import numpy as np
import os
classFaceProcessing(object):def__init__(self):
        self.file= os.path.join(os.path.join(os.path.dirname(__file__),"data"),"haarcascade_frontalface_alt.xml")
        self.face_cascade = cv2.CascadeClassifier(self.file)defface_detection(self, image):# 将图像转换为 OpenCV 格式
        image_array = np.asarray(bytearray(image), dtype=np.uint8)
        img_opencv = cv2.imdecode(image_array,-1)
        output =[]# 检测人脸并构建返回值
        gray = cv2.cvtColor(img_opencv, cv2.COLOR_BGR2GRAY)
        faces = self.face_cascade.detectMultiScale(gray, scaleFactor=1.1, minNeighbors=5, minSize=(25,25))for face in faces:# 返回检测框坐标
            x, y, w, h = face.tolist()
            face ={"box":[x, y, x + w, y + h]}
            output.append(face)print(face)# 返回结果return output
face_detection()
方法使用
OpenCV
的
detectMultiScale()
函数执行人脸检测,获得每个检测到的人脸的坐标
(x, y, w, h)
,并通过合适的格式对检测结果进行编码来构建返回检测框:
face ={"box":[x, y, x + w, y + h]}
最后,我们将编码完成的人脸检测框添加到
output
数组中,将所有检测到的人脸检测框都添加到
output
数组后,将其返回:
output.append(face)
1.2 构建请求进行测试
为了使用
Web
人脸检测 API,我们可以从浏览器执行
GET
请求;同时,此
API
还支持
POST
请求。接下来,我们构建测试脚本测试此
API
,此脚本可以执行
GET
和
POST
请求,以了解如何与人脸
API
进行交互,更具体的讲,测试脚本将对人脸
API
发送多个请求,以获得不同的响应,并查看错误处理的工作原理。
首先使用不正确的
URL
执行
GET
请求:
# request_test.pyimport requests

FACE_DETECTION_REST_API_URL ="http://localhost:5000/detect"
FACE_DETECTION_REST_API_URL_WRONG ="http://localhost:5000/process"
IMAGE_PATH ="test_example.png"
URL_IMAGE ="https://imgs.mmkk.me/wmnv/img/20190625073459-5d11cea35c407.png"# 提交 GET 请求
r = requests.get(FACE_DETECTION_REST_API_URL_WRONG)# 查看响应print("status code: {}".format(r.status_code))print("headers: {}".format(r.headers))print("content: {}".format(r.json()))
打印响应信息,可以看到:
status code: 404
headers: {'Content-Type':'application/json', 'Content-Length':'51', 'Server':'Werkzeug/1.0.1 Python/3.7.7', 'Date':'Sat, 02 Oct 2021 01:45:19 GMT'}
content: {'message':'Route not found', 'status':'Not found'}
状态码
404
表示客户端可以与服务器通信,但服务器找不到请求的内容。这是因为请求的
URL
(http://localhost:5000/process) 不正确。
执行的第二个请求是正确的
GET
请求:
# 提交 GET 请求
payload ={'url': URL_IMAGE}
r = requests.get(FACE_DETECTION_REST_API_URL, params=payload)# 查看响应print("status code: {}".format(r.status_code))print("headers: {}".format(r.headers))print("content: {}".format(r.json()))
打印响应信息,可以看到:
status code: 200
headers: {'Content-Type':'application/json', 'Content-Length':'52', 'Server':'Werkzeug/1.0.1 Python/3.7.7', 'Date':'Sat, 02 Oct 2021 01:54:31 GMT'}
content: {'result':[{'box':[233, 77, 356, 252]}], 'status':'Ok'}
状态码
200
表示请求已成功执行,还可以看到已检测到与人脸相对应的检测框坐标。
接下来执行缺少有效负载的 GET 请求:
# 提交 GET 请求
r = requests.get(FACE_DETECTION_REST_API_URL)# 查看响应print("status code: {}".format(r.status_code))print("headers: {}".format(r.headers))print("content: {}".format(r.json()))
打印响应信息,可以看到:
status code: 400
headers: {'Content-Type':'application/json', 'Content-Length':'66', 'Server':'Werkzeug/1.0.1 Python/3.7.7', 'Date':'Sat, 02 Oct 2021 01:58:00 GMT'}
content: {'message':'Parameter url is not present', 'status':'Bad request'}
状态代码
400
表示错误请求,这是由于其缺少
url
参数。
接下来执行的第四个请求是具有正确负载的
POST
请求:
# 加载图像并构建有效负载
image =open(IMAGE_PATH,"rb").read()
payload ={"image": image}# 提交 POST 请求
r = requests.post(FACE_DETECTION_REST_API_URL, files=payload)# 查看响应print("status code: {}".format(r.status_code))print("headers: {}".format(r.headers))print("content: {}".format(r.json()))
打印响应信息,可以看到:
status code: 200
headers: {'Content-Type':'application/json', 'Content-Length':'52', 'Server':'Werkzeug/1.0.1 Python/3.7.7', 'Date':'Sat, 02 Oct 2021 02:03:26 GMT'}
content: {'result':[{'box':[193, 92, 355, 292]}], 'status':'Ok'}
最后我们构造
PUT
请求:
# 提交 PUT 请求
r = requests.put(FACE_DETECTION_REST_API_URL, files=payload)# 查看响应print("status code: {}".format(r.status_code))print("headers: {}".format(r.headers))print("content: {}".format(r.json()))
打印响应信息,可以看到:
status code: 405
headers: {'Content-Type':'application/json', 'Content-Length':'66', 'Server':'Werkzeug/1.0.1 Python/3.7.7', 'Date':'Sat, 02 Oct 2021 02:05:54 GMT'}
content: {'message':'PUT method not supported for API', 'status':'Failure'}
这是由于我们的
API
不支持
PUT
方法,仅支持 GET 和 POST 方法,因此返回状态码
405
。
2. 根据获得的响应信息在客户端绘制检测框
当请求成功执行时,将检测到的人脸作为
JSON
数据返回,接下来我们将编写程序了解如何解析响应并绘制检测到的人脸:
# request_and_draw_rectangle.pyimport cv2
import numpy as np
import requests
from matplotlib import pyplot as plt
defshow_img_with_matplotlib(color_img, title, pos):
img_RGB = color_img[:,:,::-1]
ax = plt.subplot(1,1, pos)
plt.imshow(img_RGB)
plt.title(title, fontsize=10)
plt.axis('off')
FACE_DETECTION_REST_API_URL ="http://localhost:5000/detect"
IMAGE_PATH ="test_example.png"# 加载图像构造有效负载
image =open(IMAGE_PATH,'rb').read()
payload ={'image': image}
r = requests.post(FACE_DETECTION_REST_API_URL, files=payload)# 打印响应信息print("status code: {}".format(r.status_code))print("headers: {}".format(r.headers))print("content: {}".format(r.json()))# 解析响应信息
json_data = r.json()
result = json_data['result']
image_array = np.asarray(bytearray(image), dtype=np.uint8)
img_opencv = cv2.imdecode(image_array,-1)# 绘制检测框for face in result:
left, top, right, bottom = face['box']
cv2.rectangle(img_opencv,(left, top),(right, bottom),(0,255,255),2)
cv2.circle(img_opencv,(left, top),5,(0,0,255),-1)
cv2.circle(img_opencv,(right, bottom),5,(255,0,0),-1)# 可视化
fig = plt.figure(figsize=(8,6))
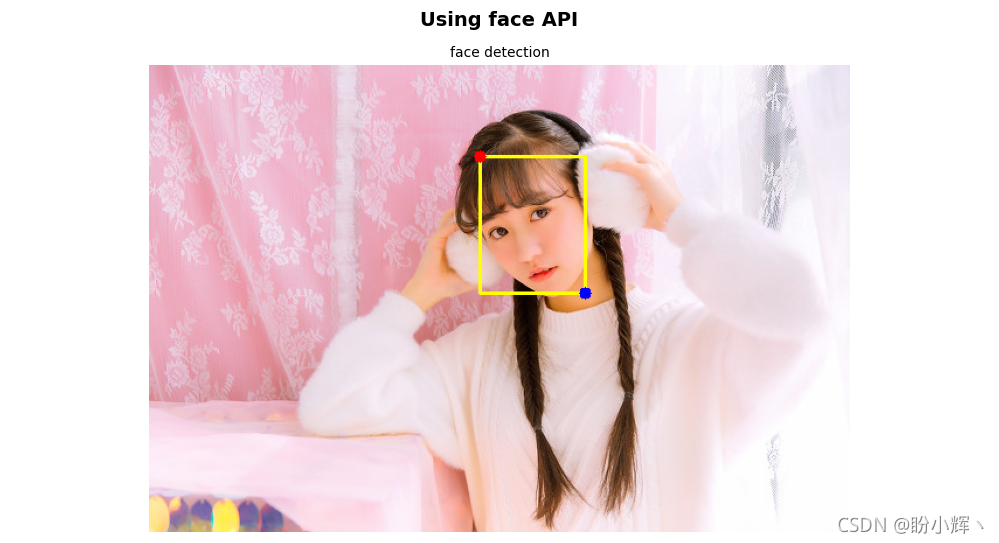
plt.suptitle("Using face API", fontsize=14, fontweight='bold')
show_img_with_matplotlib(img_opencv,"face detection",1)
plt.show()
在上示代码中,首先加载图像并构建有效负载,然后,执行 POST 请求,从响应中获取
JSON
数据并进行解析:
# 解析响应信息
json_data = r.json()
result = json_data['result']
接下来,就可以利用返回的信息绘制检测到的人脸:
# 绘制检测框for face in result:
    left, top, right, bottom = face['box']
    cv2.rectangle(img_opencv,(left, top),(right, bottom),(0,255,255),2)
    cv2.circle(img_opencv,(left, top),5,(0,0,255),-1)
    cv2.circle(img_opencv,(right, bottom),5,(255,0,0),-1)
对于每个检测到的人脸,绘制矩形检测框以及左上角和右下角的点:
3. 在服务器端绘制检测框并返回
我们也可以直接在服务器端在图像中绘制检测框,然后将结果图像返回(相关讲解可以在《OpenCV计算机视觉项目在Web端的部署》中查看),我们需要做的仅仅是修改
face_detection.py
,这就是代码分离的优势之一:
# 这里仅修改 GET 请求,对于 POST 的修改也是类似的,可以自行探索@app.route('/detect', methods=['GET','POST','PUT'])defdetect_human_faces():if request.method =='GET':if request.args.get('url'):with urllib.request.urlopen(request.args.get('url'))as url:
                image = url.read()
            result = fc.face_detection(image)
            image_array = np.asarray(bytearray(image), dtype=np.uint8)
            img_opencv = cv2.imdecode(image_array,-1)for face in result:
                left, top, right, bottom = face['box']

                cv2.rectangle(img_opencv,(left, top),(right, bottom),(0,255,255),2)
                cv2.circle(img_opencv,(left, top),5,(0,0,255),-1)
                cv2.circle(img_opencv,(right, bottom),5,(255,0,0),-1)
            retval,buffer= cv2.imencode('.jpg', img_opencv)
            response = make_response(buffer.tobytes())
            response.headers['Content-Type']='image'return response
        else:return jsonify({"status":"Bad request","message":"Parameter url is not present"}),400elif request.method =='POST':if request.files.get('image'):return jsonify({"status":"Ok","result": fc.face_detection(request.files['image'].read())}),200else:return jsonify({"status":"Bad request","message":"Parameter image is not present"}),400else:return jsonify({"status":"Failure","message":"PUT method not supported for API"}),405
修改之后,我们就可以通过 GET 请求来查看程序效果:
http://10.140.12.255:5000/detect?url=https://imgs.mmkk.me/wmnv/img/20190625073459-5d11cea35c407.png

小结
在本文中,我们使用
Python Web
框架创建并部署了一个完整的
Web
人脸检测应用程序,同时在项目中我们处理了来自浏览器的不同请求方式(例如
GET
和
POST
等),并通过实战使用
OpenCV
和
Flask
创建
Web
人脸检测
API
,同时我们还使用了两种不同类型的响应结果提供不同的请求结果。
系列链接
OpenCV-Python实战(1)——OpenCV简介与图像处理基础
OpenCV-Python实战(2)——图像与视频文件的处理
OpenCV-Python实战(3)——OpenCV中绘制图形与文本
OpenCV-Python实战(4)——OpenCV常见图像处理技术
OpenCV-Python实战(5)——OpenCV图像运算
OpenCV-Python实战(6)——OpenCV中的色彩空间和色彩映射
OpenCV-Python实战(7)——直方图详解
OpenCV-Python实战(8)——直方图均衡化
OpenCV-Python实战(9)——OpenCV用于图像分割的阈值技术
OpenCV-Python实战(10)——OpenCV轮廓检测
OpenCV-Python实战(11)——OpenCV轮廓检测相关应用
OpenCV-Python实战(12)——一文详解AR增强现实
OpenCV-Python实战(13)——OpenCV与机器学习的碰撞
OpenCV-Python实战(14)——人脸检测详解
OpenCV-Python实战(15)——面部特征点检测详解
OpenCV-Python实战(16)——人脸追踪详解
OpenCV-Python实战(17)——人脸识别详解
OpenCV-Python实战(18)——深度学习简介与入门示例
OpenCV-Python实战(19)——OpenCV与深度学习的碰撞
OpenCV-Python实战(20)——OpenCV计算机视觉项目在Web端的部署
版权归原作者 盼小辉丶 所有, 如有侵权,请联系我们删除。