
数据集准备
从bert-base-chinese下载预训练语言模型及其他词表,由于使用的是pytorch,因此下载
pytorch_model.bin
即可。
如果要使用英文模型,就下载能区分大小写的或者是不能区分大小写的,对于uncased,初始化时必须要把lower设为true。
特殊符号
BERT在执行分词任务时会生成以下几种特殊符号:
- [CLS]:第一个句子的首位,如果要对整个句子进行分类,通常会取其对应的输出向量作为句子的表示(认为它融合了整个句子的信息,所以它对应的单词不是start而是classification)
- [SEP]:两个句子的分隔符
- [UNK]:未知字符
- [PAD]:不足长度的字符填充,也就是padding操作
- [MASK]:字符遮掩
直观理解
在深入模型细节之前,我们先用一个简单的例子看一看BertTokenizerFast究竟是用来干什么的,需要什么样的输入,又会给出怎样的输出。
tokenizer = BertTokenizerFast.from_pretrained("./bert-base-chinese/",
                                              do_lower_case=True)
text ="hello,世界"
text2 ="你好,world"
tokens = tokenizer.tokenize(text)
tokens2 = tokenizer.tokenize(text2)
encodes = tokenizer.encode_plus([tokens, tokens2],
                                add_special_tokens=True,
                                return_offsets_mapping=True,
                                max_length=16,
                                truncation=True,
                                padding="max_length",
                                is_split_into_words=True,
                                return_tensors="np")

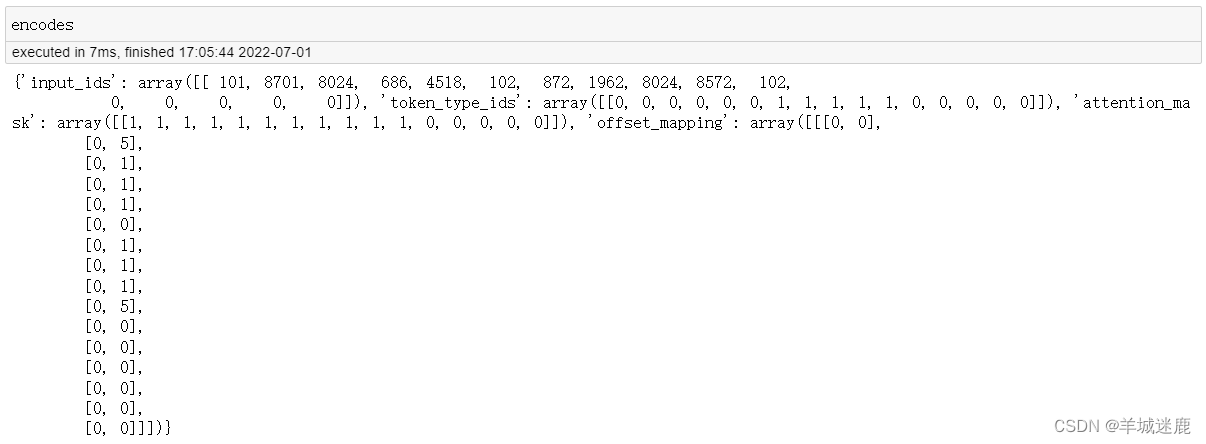
- tokens很简单,就是对文本进行分词,可以看到对中英文混合的情况处理得非常好
- input_ids也很好理解,就是根据词表建立起了分出的token到id的映射,101对应[CLS],只在开头出现一次;102对应[SEP],会出现两次;由于max_length是16,因此最后要补五个0对应的[PAD];其他就很简单了,比如8701对应着"hello",这意味着如果你打开vocab.txt这个文件,可以在第8702行找到它。
- token_type_ids用于标识当前token属于哪一个句向量,前六个就是第一句,后五个就是第二句,其他就是0
- attention_mask:[PAD]对应0,其他对应1,其实就是反映了句子的实际长度
- offset_mapping:每一个token具体占了几个char,中文都是一个char,英文就看单词的长度,[PAD]全都是0
from_pretrained方法
关于cls
在源码中经常可以看到@classmethod和cls的联合使用,这是python的一种高级用法。一般来说,要使用某个类的方法,需要先实例化一个对象再调用方法。这样可以不需要实例化,直接类名.方法名()来调用。用起来的效果跟@staticmethod差不多,但函数第一个参数需要是表示自身类的cls。另外二者在调用类其它函数的场景下有些区别。
这个方法的入口在
tokenization_utils_base.py
中,首先从函数中解析参数
cache_dir = kwargs.pop("cache_dir",None)
force_download = kwargs.pop("force_download",False)
resume_download = kwargs.pop("resume_download",False)
proxies = kwargs.pop("proxies",None)
local_files_only = kwargs.pop("local_files_only",False)
use_auth_token = kwargs.pop("use_auth_token",None)
revision = kwargs.pop("revision",None)
subfolder = kwargs.pop("subfolder",None)
from_pipeline = kwargs.pop("_from_pipeline",None)
from_auto_class = kwargs.pop("_from_auto",False)
然后获取真实的文件地址,函数末尾调用
_from_pretrained
函数
for file_id, file_name in vocab_files_target.items():if os.path.isdir(pretrained_model_name_or_path):if subfolder isnotNone:
            full_file_name = os.path.join(pretrained_model_name_or_path, subfolder, file_name)else:
            full_file_name = os.path.join(pretrained_model_name_or_path, file_name)ifnot os.path.exists(full_file_name):
            logger.info(f"Didn't find file {full_file_name}. We won't load it.")
            full_file_name =Noneelse:
        full_file_name = hf_bucket_url(
            pretrained_model_name_or_path,
            filename=file_name,
            subfolder=subfolder,
            revision=revision,
            mirror=None,)

    vocab_files[file_id]= full_file_name
读取config
config = AutoConfig.from_pretrained(
    pretrained_model_name_or_path,
    use_auth_token=use_auth_token,
    cache_dir=cache_dir,)...if model_type isnotNone:
    config_tokenizer_class, config_tokenizer_class_fast = TOKENIZER_MAPPING_NAMES.get(
        model_type,(None,None))if config_tokenizer_class isNone:
        config_tokenizer_class = config_tokenizer_class_fast
实例化tokenizer,其实就是读了一下config的参数
def__init__(self,**kwargs):# inputs and kwargs for saving and re-loading (see ``from_pretrained`` and ``save_pretrained``)
    self.init_inputs =()
    self.init_kwargs = copy.deepcopy(kwargs)
    self.name_or_path = kwargs.pop("name_or_path","")
    self._processor_class = kwargs.pop("processor_class",None)# For backward compatibility we fallback to set model_max_length from max_len if provided
    model_max_length = kwargs.pop("model_max_length", kwargs.pop("max_len",None))
    self.model_max_length = model_max_length if model_max_length isnotNoneelse VERY_LARGE_INTEGER

    # Padding and truncation side are right by default and overridden in subclasses. If specified in the kwargs, it# is changed.
    self.padding_side = kwargs.pop("padding_side", self.padding_side)if self.padding_side notin["right","left"]:raise ValueError(f"Padding side should be selected between 'right' and 'left', current value: {self.padding_side}")

    self.truncation_side = kwargs.pop("truncation_side", self.truncation_side)if self.truncation_side notin["right","left"]:raise ValueError(f"Padding side should be selected between 'right' and 'left', current value: {self.truncation_side}")

    self.model_input_names = kwargs.pop("model_input_names", self.model_input_names)

    self.deprecation_warnings =({})# Use to store when we have already noticed a deprecation warning (avoid overlogging).super().__init__(**kwargs)
最后加入额外的token
# If there is a complementary special token map, load it
special_tokens_map_file = resolved_vocab_files.pop("special_tokens_map_file",None)if special_tokens_map_file isnotNone:withopen(special_tokens_map_file, encoding="utf-8")as special_tokens_map_handle:
        special_tokens_map = json.load(special_tokens_map_handle)for key, value in special_tokens_map.items():if key in kwargs and kwargs[key]:# This value has already been redefined by the kwargs# We keep this new value and ignore the one stored in the special_tokens_map_filecontinueifisinstance(value,dict):
            value = AddedToken(**value)elifisinstance(value,list):
            value =[AddedToken(**token)ifisinstance(token,dict)else token for token in value]setattr(tokenizer, key, value)# Add supplementary tokens.
        special_tokens = tokenizer.all_special_tokens
        if added_tokens_file isnotNone:withopen(added_tokens_file, encoding="utf-8")as added_tokens_handle:
                added_tok_encoder = json.load(added_tokens_handle)...
tokenize方法
这个方法的入口在
tokenization_utils_fast.py
文件中,不过它其实调用了
tokenization_utils_base.py
中的encode_plus方法,然后这个方法具体由
tokenization_utils_fast.py
中的_encode_plus函数实现,既然如此,那我们不如直接研究一下_encode_plus。
deftokenize(self, text:str, pair: Optional[str]=None, add_special_tokens:bool=False,**kwargs)-> List[str]:return self.encode_plus(text=text, text_pair=pair, add_special_tokens=add_special_tokens,**kwargs).tokens()
第一步,是获取模型的文本输入
batched_input =[(text, text_pair)]if text_pair else[text]

第二步,是获得模型的输出,这已经和我们想要的结果很接近了
batched_output = self._batch_encode_plus(
    batched_input,
    is_split_into_words=is_split_into_words,
    add_special_tokens=add_special_tokens,
    padding_strategy=padding_strategy,
    truncation_strategy=truncation_strategy,
    max_length=max_length,
    stride=stride,
    pad_to_multiple_of=pad_to_multiple_of,
    return_tensors=return_tensors,
    return_token_type_ids=return_token_type_ids,
    return_attention_mask=return_attention_mask,
    return_overflowing_tokens=return_overflowing_tokens,
    return_special_tokens_mask=return_special_tokens_mask,
    return_offsets_mapping=return_offsets_mapping,
    return_length=return_length,
    verbose=verbose,**kwargs,)

最后一步是转换一下输出的格式
if return_tensors isNoneandnot return_overflowing_tokens:
    batched_output = BatchEncoding({
            key: value[0]iflen(value)>0andisinstance(value[0],list)else value
            for key, value in batched_output.items()},
        batched_output.encodings,)
self._eventual_warn_about_too_long_sequence(batched_output["input_ids"], max_length, verbose)
_batch_encode_plus方法
最核心的还是先获取编码
encodings = self._tokenizer.encode_batch(
  batch_text_or_text_pairs,
  add_special_tokens=add_special_tokens,
  is_pretokenized=is_split_into_words,)
然后做做后处理
tokens_and_encodings =[
    self._convert_encoding(
        encoding=encoding,
        return_token_type_ids=return_token_type_ids,
        return_attention_mask=return_attention_mask,
        return_overflowing_tokens=return_overflowing_tokens,
        return_special_tokens_mask=return_special_tokens_mask,
        return_offsets_mapping=return_offsets_mapping,
        return_length=return_length,
        verbose=verbose,)for encoding in encodings
]
encode_batch
这时候你就能发现了,哎,最核心的编码结果怎么是这个函数搞出来的。不过它是在tokenizers里面定义的,很遗憾里面没有给出具体的方法实现,我猜是在cpython.so这个文件里面。
本文转载自: https://blog.csdn.net/jining11/article/details/125557677
版权归原作者 羊城迷鹿 所有, 如有侵权,请联系我们删除。
版权归原作者 羊城迷鹿 所有, 如有侵权,请联系我们删除。