
几天前,LangChain正式宣布了名为LangGraph的新库,LangGraph建立在LangChain之上,简化了创建和管理Agent及其运行时的过程。
在这篇文章中,我们将全面介绍langGraph,什么是代理和代理运行时?Langgraph的特点是什么,以及如何在Langgraph中构建一个代理执行器,我们将探讨Langgraph中的聊天代理执行器以及如何在人类循环和聊天中修改Langgraph中的聊天agent执行器。
一、什么是代理和代理运行时?
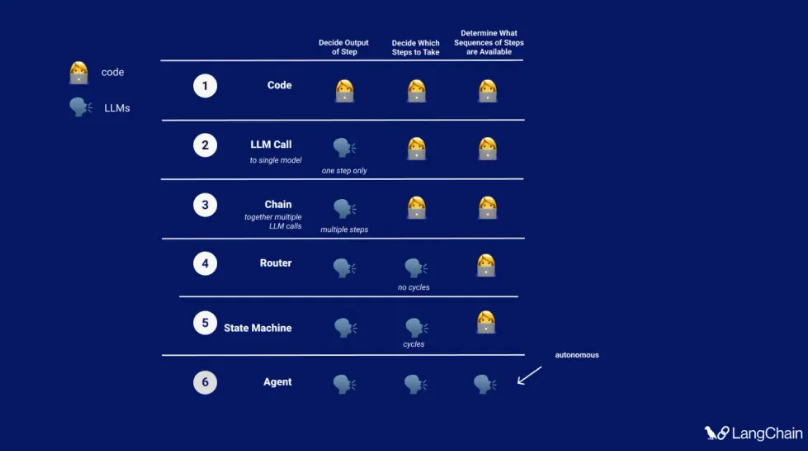
   在LangChain中,代理是一个由语言模型驱动的系统,它对要采取的操作做出决策。代理运行时使该系统保持运行,不断决定操作,记录观察结果,并维护此循环,直到代理的任务完成。

   LangChain通过其表达语言简化了代理定制,LangGraph对代理运行时提供了更灵活和动态自定义功能。传统的代理运行时是AgentEX类,但现在有了LangGraph,它有了更多的多样性和适应性。
二、关键功能
LangGraph的一个关键特性是向代理运行时添加了循环,这种循环对代理操作来说非常重要。
我们以LangGraph中的两个主要代理运行时开始介绍LangGraph:
- Agent Executor与LangChain类似,但在LangGraph中需要重建;
- Chat Agent Executor以消息列表的形式处理代理状态,非常适合使用消息进行功能调用和响应的基于聊天的模型。
三、如何构建代理执行器
   在LangGraph中构建一个代理执行器,类似于LangChain中的代理执行器。这个过程非常简单,让我们深入了解一下!

  首先,我们需要通过安装几个包来设置我们的环境:LangChain、LangChain OpenAI和Tavily Python。这些将帮助我们利用现有的LangChain代理类,为我们的代理提供OpenAI的语言模型,并使用Tavily Python包实现搜索功能。
!pip install --quiet -U langchain langchain_openai tavily-python
接下来,我们将为OpenAI、Tavilly和LangSmith设置API密钥。LangSmith对日志记录和可观察性特别重要,但它目前处于私人测试阶段。如果您需要访问,请随时联系他们。
import osimport getpassos.environ["OPENAI_API_KEY"] = getpass.getpass("OpenAI API Key:")os.environ["TAVILY_API_KEY"] = getpass.getpass("Tavily API Key:")os.environ["LANGCHAIN_TRACING_V2"] = "true"os.environ["LANGCHAIN_API_KEY"] = getpass.getpass("LangSmith API Key:")
我们在笔记本电脑上的第一步是创建一个LangChain代理。这包括选择一个语言模型,创建一个搜索工具,以及建立我们的代理。有关这方面的详细信息,您可以参考LangChain文档。
from langchain import hubfrom langchain.agents import create_openai_functions_agentfrom langchain_openai.chat_models import ChatOpenAIfrom langchain_community.tools.tavily_search import TavilySearchResultstools = [TavilySearchResults(max_results=1)]# Get the prompt to use - you can modify this!prompt = hub.pull("hwchase17/openai-functions-agent")# Choose the LLM that will drive the agentllm = ChatOpenAI(model="gpt-3.5-turbo-1106", streaming=True)# Construct the OpenAI Functions agentagent_runnable = create_openai_functions_agent(llm, tools, prompt)
然后,我们定义图形的状态,它跟踪随时间的变化。这种状态允许图中的每个节点更新整体状态,从而省去了不断传递的麻烦。我们还将决定如何应用这些更新,无论是覆盖现有数据还是添加到其中。
from typing import TypedDict, Annotated, List, Unionfrom langchain_core.agents import AgentAction, AgentFinishfrom langchain_core.messages import BaseMessageimport operatorclass AgentState(TypedDict): # The input string input: str # The list of previous messages in the conversation chat_history: list[BaseMessage] # The outcome of a given call to the agent # Needs `None` as a valid type, since this is what this will start as agent_outcome: Union[AgentAction, AgentFinish, None] # List of actions and corresponding observations # Here we annotate this with `operator.add` to indicate that operations to # this state should be ADDED to the existing values (not overwrite it) intermediate_steps: Annotated[list[tuple[AgentAction, str]], operator.add]
  设置好状态后,我们将重点定义图中的节点和边。我们需要两个主节点:一个用于运行代理,另一个用于根据代理的决策执行工具。图中的边有两种类型:条件边和普通边。条件边允许基于先前的结果来分支路径,而普通边表示固定的动作序列。

   我们将研究一些细节,如调用代理的“run agent”节点和执行代理选择的工具的“execute tools”函数。我们还将添加一个“should continue”函数来确定下一步行动。
from langchain_core.agents import AgentFinishfrom langgraph.prebuilt.tool_executor import ToolExecutor# This a helper class we have that is useful for running tools# It takes in an agent action and calls that tool and returns the resulttool_executor = ToolExecutor(tools)# Define the agentdef run_agent(data): agent_outcome = agent_runnable.invoke(data) return {"agent_outcome": agent_outcome}# Define the function to execute toolsdef execute_tools(data): # Get the most recent agent_outcome - this is the key added in the `agent` above agent_action = data['agent_outcome'] output = tool_executor.invoke(agent_action) return {"intermediate_steps": [(agent_action, str(output))]}# Define logic that will be used to determine which conditional edge to go downdef should_continue(data): # If the agent outcome is an AgentFinish, then we return `exit` string # This will be used when setting up the graph to define the flow if isinstance(data['agent_outcome'], AgentFinish): return "end" # Otherwise, an AgentAction is returned # Here we return `continue` string # This will be used when setting up the graph to define the flow else: return "continue"
最后,构造我们的图。定义图,添加节点,设置一个入口点,并建立我们的边——条件边和普通边。编译完图形后,它就可以像任何LangChain可运行程序一样使用了。
from langgraph.graph import END, StateGraph# Define a new graphworkflow = StateGraph(AgentState)# Define the two nodes we will cycle betweenworkflow.add_node("agent", run_agent)workflow.add_node("action", execute_tools)# Set the entrypoint as `agent`# This means that this node is the first one calledworkflow.set_entry_point("agent")# We now add a conditional edgeworkflow.add_conditional_edges( # First, we define the start node. We use `agent`. # This means these are the edges taken after the `agent` node is called. "agent", # Next, we pass in the function that will determine which node is called next. should_continue, # Finally we pass in a mapping. # The keys are strings, and the values are other nodes. # END is a special node marking that the graph should finish. # What will happen is we will call `should_continue`, and then the output of that # will be matched against the keys in this mapping. # Based on which one it matches, that node will then be called. { # If `tools`, then we call the tool node. "continue": "action", # Otherwise we finish. "end": END })# We now add a normal edge from `tools` to `agent`.# This means that after `tools` is called, `agent` node is called next.workflow.add_edge('action', 'agent')# Finally, we compile it!# This compiles it into a LangChain Runnable,# meaning you can use it as you would any other runnableapp = workflow.compile()
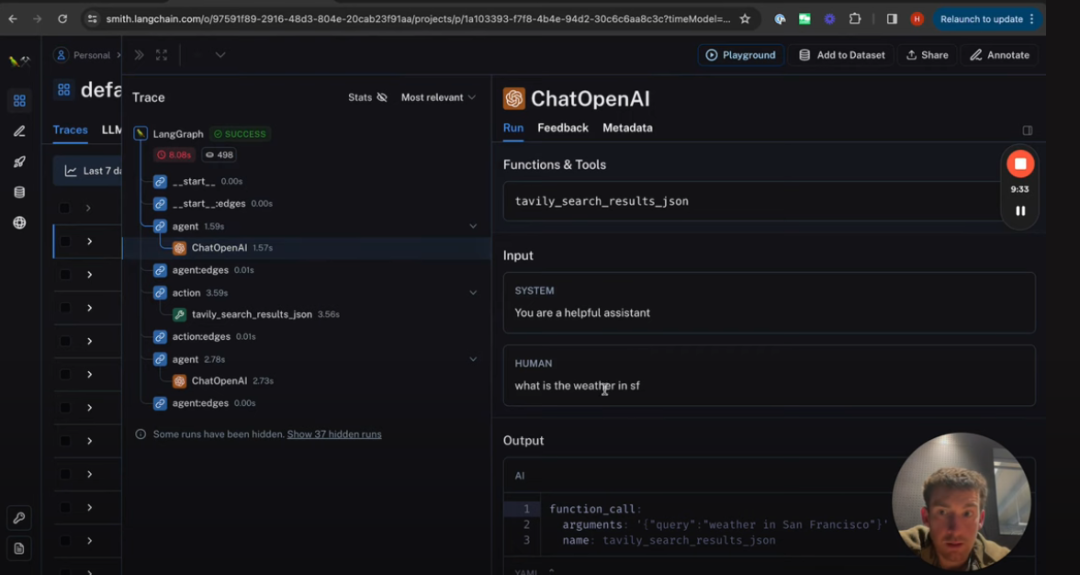
我们将使用一些输入数据来运行我们的executor,以查看我们的执行器的操作。这个过程包括流式传输每个节点的结果,使我们能够观察代理的决策、执行的工具以及每个步骤的总体状态。
inputs = {"input": "what is the weather in sf", "chat_history": []}for s in app.stream(inputs): print(list(s.values())[0]) print("----")
为了更直观地理解,我们可以在LangSmith中探索这些过程,它提供了每个步骤的详细视图,包括执行中涉及的提示和响应。
{'agent_outcome': AgentActionMessageLog(tool='tavily_search_results_json', tool_input={'query': 'weather in San Francisco'}, log="\nInvoking: `tavily_search_results_json` with `{'query': 'weather in San Francisco'}`\n\n\n", message_log=[AIMessage(content='', additional_kwargs={'function_call': {'arguments': '{"query":"weather in San Francisco"}', 'name': 'tavily_search_results_json'}})])}----{'intermediate_steps': [(AgentActionMessageLog(tool='tavily_search_results_json', tool_input={'query': 'weather in San Francisco'}, log="\nInvoking: `tavily_search_results_json` with `{'query': 'weather in San Francisco'}`\n\n\n", message_log=[AIMessage(content='', additional_kwargs={'function_call': {'arguments': '{"query":"weather in San Francisco"}', 'name': 'tavily_search_results_json'}})]), "[{'url': 'https://www.whereandwhen.net/when/north-america/california/san-francisco-ca/january/', 'content': 'Best time to go to San Francisco? Weather in San Francisco in january 2024 How was the weather last january? Here is the day by day recorded weather in San Francisco in january 2023: Seasonal average climate and temperature of San Francisco in january 8% 46% 29% 12% 8% Evolution of daily average temperature and precipitation in San Francisco in januaryWeather in San Francisco in january 2024. The weather in San Francisco in january comes from statistical datas on the past years. You can view the weather statistics the entire month, but also by using the tabs for the beginning, the middle and the end of the month. ... 16-01-2023 45°F to 52°F. 17-01-2023 45°F to 54°F. 18-01-2023 47°F to ...'}]")]}
这就是在LangGraph中创建代理执行器的方式,和LangChain的执行器功能类似。我们将进一步探讨状态图的接口以及返回结果的不同流式传输方法。
四、探索聊天代理执行器
我们将在LangGraph中探索聊天代理执行器,这是一个设计用于处理基于聊天的模型的工具。此执行器是唯一的,因为它完全根据输入消息的列表进行操作,通过向该列表中添加新消息来随着时间的推移更新代理的状态。
让我们深入了解设置过程:
4.1 安装软件包:
同样需要LangChain软件包,LangChain OpenAI用于模型,Tavily软件包用于搜索工具,并为这些服务设置API密钥。
!pip install --quiet -U langchain langchain_openai tavily-python
import osimport getpassos.environ["OPENAI_API_KEY"] = getpass.getpass("OpenAI API Key:")os.environ["TAVILY_API_KEY"] = getpass.getpass("Tavily API Key:")os.environ["LANGCHAIN_TRACING_V2"] = "true"os.environ["LANGCHAIN_API_KEY"] = getpass.getpass("LangSmith API Key:")
4.2 设置工具和模型:
我们将使用Tavily Search作为我们的工具,并设置一个工具执行器来调用这些工具。对于模型,我们将使用LangChain集成中的Chat OpenAI模型,确保其在启用流式进行初始化。这使我们能够流式返回tokens,并附加我们希望模型调用的函数。
from langchain_community.tools.tavily_search import TavilySearchResultsfrom langchain_openai import ChatOpenAIfrom langgraph.prebuilt import ToolExecutorfrom langchain.tools.render import format_tool_to_openai_functiontools = [TavilySearchResults(max_results=1)]tool_executor = ToolExecutor(tools)# We will set streaming=True so that we can stream tokens# See the streaming section for more information on this.model = ChatOpenAI(temperature=0, streaming=True)functions = [format_tool_to_openai_function(t) for t in tools]model = model.bind_functions(functions)
4.3 定义代理状态:
代理状态是一个简单的字典,其中包含消息列表的键。我们将使用“add to”标记,这样随着时间的推移,节点对此消息列表的任何更新都会累积。
from typing import TypedDict, Annotated, Sequenceimport operatorfrom langchain_core.messages import BaseMessageclass AgentState(TypedDict): messages: Annotated[Sequence[BaseMessage], operator.add]
4.4 创建节点和边:
节点表示具体的工作任务,边连接节点。我们需要一个代理节点来调用语言模型并获得响应,一个操作节点来查看是否有任何工具需要调用,以及一个函数来确定我们是否应该继续调用工具或完成。
from langgraph.prebuilt import ToolInvocationimport jsonfrom langchain_core.messages import FunctionMessage# Define the function that determines whether to continue or notdef should_continue(state): messages = state['messages'] last_message = messages[-1] # If there is no function call, then we finish if "function_call" not in last_message.additional_kwargs: return "end" # Otherwise if there is, we continue else: return "continue"# Define the function that calls the modeldef call_model(state): messages = state['messages'] response = model.invoke(messages) # We return a list, because this will get added to the existing list return {"messages": [response]}# Define the function to execute toolsdef call_tool(state): messages = state['messages'] # Based on the continue condition # we know the last message involves a function call last_message = messages[-1] # We construct an ToolInvocation from the function_call action = ToolInvocation( tool=last_message.additional_kwargs["function_call"]["name"], tool_input=json.loads(last_message.additional_kwargs["function_call"]["arguments"]), ) # We call the tool_executor and get back a response response = tool_executor.invoke(action) # We use the response to create a FunctionMessage function_message = FunctionMessage(content=str(response), name=action.tool) # We return a list, because this will get added to the existing list return {"messages": [function_message]}
4.5 构建图:
我们创建一个具有代理状态的图,为代理和动作添加节点,并将入口点设置为代理节点。条件边是根据代理应该继续还是结束来添加的,并且正常边总是在动作后返回到代理。
from langgraph.graph import StateGraph, END# Define a new graphworkflow = StateGraph(AgentState)# Define the two nodes we will cycle betweenworkflow.add_node("agent", call_model)workflow.add_node("action", call_tool)# Set the entrypoint as `agent`# This means that this node is the first one calledworkflow.set_entry_point("agent")# We now add a conditional edgeworkflow.add_conditional_edges( # First, we define the start node. We use `agent`. # This means these are the edges taken after the `agent` node is called. "agent", # Next, we pass in the function that will determine which node is called next. should_continue, # Finally we pass in a mapping. # The keys are strings, and the values are other nodes. # END is a special node marking that the graph should finish. # What will happen is we will call `should_continue`, and then the output of that # will be matched against the keys in this mapping. # Based on which one it matches, that node will then be called. { # If `tools`, then we call the tool node. "continue": "action", # Otherwise we finish. "end": END })# We now add a normal edge from `tools` to `agent`.# This means that after `tools` is called, `agent` node is called next.workflow.add_edge('action', 'agent')# Finally, we compile it!# This compiles it into a LangChain Runnable,# meaning you can use it as you would any other runnableapp = workflow.compile()
4.6 编译和使用图:
编译图形后,我们创建一个带有消息键的输入字典。运行图形将处理这些消息,将AI响应、功能结果和最终输出添加到消息列表中。
from langchain_core.messages import HumanMessageinputs = {"messages": [HumanMessage(content="what is the weather in sf")]}app.invoke(inputs)
4.7 观察执行过程:
使用LangSmith,我们可以看到我们的代理所采取的详细步骤,包括对OpenAI的调用和由此产生的输出。

流式功能:LangGraph还提供流式功能。
五、如何在循环中修改humans操作
   让我们修改LangGraph中的聊天代理执行器,使其包含一个“human in the loop”组件,这样在执行工具操作之前可以进行人工验证。

  ** 设置**:初始设置保持不变。不需要额外安装。我们将创建我们的工具,设置工具执行器,准备我们的模型,将工具绑定到模型,并定义代理状态——所有这些都与我们在前一个会话中所做的一样。

  ** 关键修改——调用工具功能**:主要的变化来自调用工具功能。我们添加了一个步骤,系统在交互式IDE中提示用户(即您!),询问是否继续执行特定操作。如果用户响应“否”,则会引发错误,进程将停止。这是我们的人工验证步骤。
# Define the function to execute toolsdef call_tool(state): messages = state['messages'] # Based on the continue condition # we know the last message involves a function call last_message = messages[-1] # We construct an ToolInvocation from the function_call action = ToolInvocation( tool=last_message.additional_kwargs["function_call"]["name"], tool_input=json.loads(last_message.additional_kwargs["function_call"]["arguments"]), ) response = input(prompt=f"[y/n] continue with: {action}?") if response == "n": raise ValueError # We call the tool_executor and get back a response response = tool_executor.invoke(action) # We use the response to create a FunctionMessage function_message = FunctionMessage(content=str(response), name=action.tool) # We return a list, because this will get added to the existing list return {"messages": [function_message]}
**使用修改的执行器**:当我们运行这个修改的执行程序时,它会在执行任何工具操作之前请求批准。如果我们同意说“是”,它将正常进行。然而,如果我们说“不”,则会引发错误并停止该过程。
utput from node 'agent':---{'messages': [AIMessage(content='', additional_kwargs={'function_call': {'arguments': '{\n "query": "weather in San Francisco"\n}', 'name': 'tavily_search_results_json'}})]}------------------------------------------------------------------------------ValueError Traceback (most recent call last)Cell In[10], line 4 1 from langchain_core.messages import HumanMessage 3 inputs = {"messages": [HumanMessage(content="what is the weather in sf")]}----> 4 for output in app.stream(inputs): 5 # stream() yields dictionaries with output keyed by node name 6 for key, value in output.items(): 7 print(f"Output from node '{key}':")
这是一个基本的实现。在现实世界中,您可能希望用更复杂的响应来代替错误,并使用更用户友好的界面,而不是Jupyter笔记本。但这让您清楚地了解了如何将一个简单而有效的人工循环组件添加到LangGraph代理中。
六、修改管理代理步骤
   让我们来看看在LangGraph中修改聊天代理执行器,以在处理消息时操纵代理的内部状态。

   本教程建立在基本的聊天代理执行程序设置的基础上,因此,如果您还没有在基本笔记本中完成初始设置,请先完成。我们在这里只关注新的修改。

   **关键修改——过滤消息**:我们引入的主要更改是过滤传递给模型的消息的方法。现在,您可以自定义代理考虑的消息。例如:
def call_model(state): messages = state['messages'][-5:] response = model.invoke(messages) # We return a list, because this will get added to the existing list return {"messages": [response]}
仅选择最近的五条消息。
包括系统消息加上五条最新消息。
总结比最近五条消息旧的消息。
 此修改是一个小而强大的添加,允许您控制代理如何与其消息历史进行交互,并改进其决策过程。

** 使用修改的执行器**:实现非常简单。仅有一条输入消息不同,但重要的是,您希望应用于代理步骤的任何逻辑都可以插入到这个新的修改部分。

 此方法非常适合修改聊天代理执行器,但如果使用标准代理执行器时,同样的原理也适用。
七、强制调用工具
   我们将对LangGraph中的聊天代理执行器进行简单但有效的修改,确保始终首先调用一个工具。这是建立在基本的聊天代理执行器笔记本上的,所以请确保您已经检查了背景信息。

   **关键修改——强制工具调用优先**:我们这里的重点是设置聊天代理调用特定工具作为其第一个操作。为此,我们将添加一个新节点,并将其命名为“first model node”。该节点将被编程为返回一条消息,指示代理调用特定工具,如“Tavil search results Json”工具,并将最新的消息内容作为查询。
# This is the new first - the first call of the model we want to explicitly hard-code some actionfrom langchain_core.messages import AIMessageimport jsondef first_model(state): human_input = state['messages'][-1].content return { "messages": [ AIMessage( content="", additional_kwargs={ "function_call": { "name": "tavily_search_results_json", "arguments": json.dumps({"query": human_input}) } } ) ] }
**更新图**:我们将修改现有的图,将这个新的“first agent”节点作为入口点。这样可以确保始终首先调用第一个代理节点,然后调用动作节点。我们设置了一个从代理到动作或结束的条件节点,以及一个从动作回到代理的直接节点。关键的添加是从第一个代理到操作的一个新节点,确保工具调用一开始就发生。
from langgraph.graph import StateGraph, END# Define a new graphworkflow = StateGraph(AgentState)# Define the new entrypointworkflow.add_node("first_agent", first_model)# Define the two nodes we will cycle betweenworkflow.add_node("agent", call_model)workflow.add_node("action", call_tool)# Set the entrypoint as `agent`# This means that this node is the first one calledworkflow.set_entry_point("first_agent")# We now add a conditional edgeworkflow.add_conditional_edges( # First, we define the start node. We use `agent`. # This means these are the edges taken after the `agent` node is called. "agent", # Next, we pass in the function that will determine which node is called next. should_continue, # Finally we pass in a mapping. # The keys are strings, and the values are other nodes. # END is a special node marking that the graph should finish. # What will happen is we will call `should_continue`, and then the output of that # will be matched against the keys in this mapping. # Based on which one it matches, that node will then be called. { # If `tools`, then we call the tool node. "continue": "action", # Otherwise we finish. "end": END })# We now add a normal edge from `tools` to `agent`.# This means that after `tools` is called, `agent` node is called next.workflow.add_edge('action', 'agent')# After we call the first agent, we know we want to go to actionworkflow.add_edge('first_agent', 'action')# Finally, we compile it!# This compiles it into a LangChain Runnable,# meaning you can use it as you would any other runnableapp = workflow.compile()
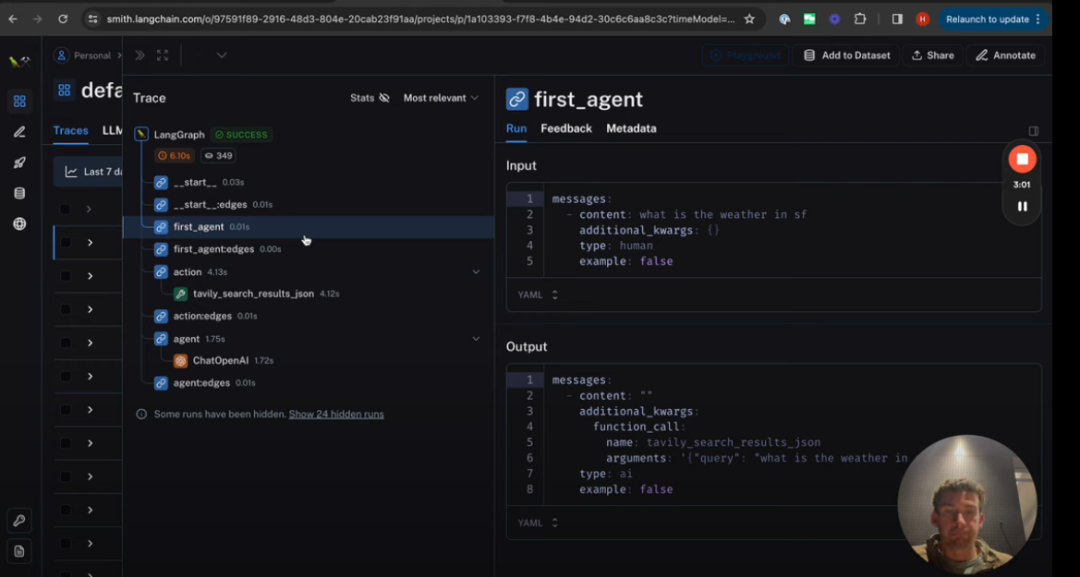
**使用修改的执行器**:当我们运行这个更新的执行器时,第一个结果会很快返回,因为我们绕过了初始的语言模型调用,直接调用该工具。通过观察LangSmith中的过程可以证实这一点,在LangSmith中,我们可以看到工具是第一个被调用的东西,然后是最后的语言模型调用。
这种修改是一种简单而强大的方法,可以确保在聊天代理的工作流程中立即使用特定的工具。
参考文献:
[1] https://camunda.com/blog/2023/02/orchestration-vs-choreography/
[2] https://medium.com/@rajib76.gcp/langgraph-agent-orchestrator-9cb4da8179c3
[3] https://levelup.gitconnected.com/langgraph-create-a-hyper-ai-agent-0e74c61238cc
[4] https://python.langchain.com/docs/langgraph
[5] https://github.com/langchain-ai/langgraph/blob/main/examples/agent_executor/base.ipynb
本文转载自: https://blog.csdn.net/wshzd/article/details/136026172
版权归原作者 wshzd 所有, 如有侵权,请联系我们删除。
版权归原作者 wshzd 所有, 如有侵权,请联系我们删除。