
放置物体功能
效果:

功能:
- 自定义物体占用区域的大小
- 一键调整占用区域
- 调整旋转度数,分四个挡位: - NoRotation:该物体不能调整旋转。- MaximumAngle:每次转动90°。- NormalAngle:每次转动45°,效果最好。- MinimumAngle:每次转动22.5°,很细的调整,如果想要转动到某一个想要的角度比较花时间,但也不是不行。
- 禁止垂直旋转(比如花盆,只能进行水平旋转,放置在地上时不能倒立在地上对吧~)
- 当物体放置到区域内可自动调整吸附点(六个方位使用的吸附点不同,保证不会出穿模)
- 单独设置物体的吸附点(比如凳子,可以调整为只能吸附在下方,不能放置在墙上或者天花板)
- 可单独管理一个物体或者管理一组物体,互不影响
- 直观可调整的视觉效果
文章中RoomReferenceFrame 的具体功能参考自定义房间区域功能
核心功能——MultiMeshAreaCalculator
计算和处理多个网格的区域,用于房间系统的几何管理
我们要在编辑器模式下存储这个物体占用区域的数据,而且至少要保存一个区域数据
- 得到Renderer的bounds
- 获得bounds的区域并存储
- 后续手动调整区域大小,包括旋转矩阵变换

初始化并保存区域数据
如果构造函数的AUTO 为True,就是自动调整区域数据,renderer的bounds数据是以世界坐标得到的,无论当前物体的旋转是什么,我们都要变为默认旋转再保存数据,然后再把旋转重置为最开始的样子,既保存了标准数据又不影响物体数据🤪
[System.Serializable]publicclassAreaData{public Vector3[] corners =newVector3[8];// 构造函数,根据 overallBounds 初始化八个角的位置publicAreaData(Renderer renderer , bool AUTO=true){
         Quaternion _Rotation = Quaternion.identity;if(AUTO){
             _Rotation = renderer.transform.rotation;
             renderer.transform.rotation = Quaternion.identity;}
         Vector3 boundsMin = renderer.bounds.min;
         Vector3 boundsMax = renderer.bounds.max;// 计算八个角的位置信息
         corners[0]=newVector3(boundsMin.x , boundsMin.y , boundsMin.z);
         corners[1]=newVector3(boundsMin.x , boundsMin.y , boundsMax.z);
         corners[2]=newVector3(boundsMin.x , boundsMax.y , boundsMin.z);
         corners[3]=newVector3(boundsMin.x , boundsMax.y , boundsMax.z);
         corners[4]=newVector3(boundsMax.x , boundsMin.y , boundsMin.z);
         corners[5]=newVector3(boundsMax.x , boundsMin.y , boundsMax.z);
         corners[6]=newVector3(boundsMax.x , boundsMax.y , boundsMin.z);
         corners[7]=newVector3(boundsMax.x , boundsMax.y , boundsMax.z);if(AUTO)
             renderer.transform.rotation = _Rotation;}a
 }
旋转或缩放时要进行矩阵变换,使用一个数据来保存偏移量并在构造时更新数据,当物体移动或旋转时调用UpdateAreaData
[HideInInspector]public Vector3[] cornersInverseTransformPoint =newVector3[8];[HideInInspector]public Transform location;[HideInInspector]public Renderer renderer;publicAreaData(Renderer renderer , bool AUTO=true){//省略this.renderer = renderer;this.location = renderer.transform;for(int i =0; i < cornersInverseTransformPoint.Length; i++)
        cornersInverseTransformPoint[i]= location.InverseTransformPoint(corners[i]);UpdateAreaData();}publicvoidUpdateAreaData(){if(renderer ==null)return;// 获取对象的旋转和缩放
    Quaternion rotation = location.rotation;
    Vector3 scale = location.lossyScale;// 使用 lossyScale 获取物体在世界空间的缩放for(int i =0; i < corners.Length; i++){// 对角度偏移应用对象的缩放、旋转和位置
        Vector3 scaledOffset = Vector3.Scale(cornersInverseTransformPoint[i], scale);// 应用世界空间的缩放
        corners[i]=( location.position + rotation * scaledOffset );}}
OK了,我们只需要在MultiMeshAreaCalculator中保存数据,在需要的时候赋值就行了
[HideInInspector]public List<AreaData> ListOverallBounds =newList<AreaData>();[HideInInspector]public Renderer[] renderers;//渲染器数组。表示当前子物体有多少物体可以占用空间publicvoidAutoFindChildData(bool AUTO=true){
    renderers = GetComponentsInChildren<Renderer>();UpdateChildAreaData(AUTO);UpdateData();}voidUpdateChildAreaData(bool AUTO=true){if(renderers.Length >0){
        ListOverallBounds.Clear();foreach(Renderer renderer in renderers){if(renderer.GetComponentInParent<MultiMeshAreaCalculator>()==this)
                ListOverallBounds.Add(newAreaData(renderer ,AUTO));}}}voidUpdateData(){foreach(var item in ListOverallBounds){
        item.UpdateAreaData();}}
有了区域,我们要找到区域的最边缘的六个点(相对于某个坐标系的上下左右前后)当作放置点,保证放置时不会穿模
UpdateAreaData() 方法更新当前 MultiMeshAreaCalculator 实例(以及递归更新所有子 MultiMeshAreaCalculator 实例)的区域数据。这主要是通过更新各个 AreaData 实例的数据来实现的,包括根据当前的物体变换(位置、旋转、缩放)重新计算对象的边界框角点位置。聚合了所有子对象边界点之后,调用 UpdateBoundary 方法更新整个系统的边界信息。使用所有子对象的边界点计算一个总的边界框。
这样就实现了无论是放置一个或者是一组物体都不影响边缘点的更新
[HideInInspector]public RoomReferenceFrame roomReferenceFrame;//房间参考框架[HideInInspector]public MultiMeshAreaCalculator[] childData =null;//子区域数据。子物体是否包含此组件[HideInInspector]public bool IsMainArea =false;//是否为主区域。如果父物体有此组件,那么当前组件将不参与管理。private Vector3 front, back, right, left, top, bottom, center, lastLocation = Vector3.zero, lastDir = Vector3.zero;voidInitialize(){
    IsMainArea = GetComponentsInParent<MultiMeshAreaCalculator>().Length <2;if(IsMainArea){
        childData = GetComponentsInChildren<MultiMeshAreaCalculator>();
        childData = System.Array.FindAll(childData ,r=> r.gameObject != gameObject);}}voidUpdateAreaData(){
    List<Vector3> centerList =newList<Vector3>();foreach(var multiMeshAreaCalculator in GetComponentsInChildren<MultiMeshAreaCalculator>()){foreach(var item in multiMeshAreaCalculator.ListOverallBounds){
            centerList.AddRange(item.GetCorners());}}if(centerList.Count >0&& roomReferenceFrame)UpdateBoundary(roomReferenceFrame.transform , centerList.ToArray());}voidUpdateBoundary(Transform angle , Vector3[] corners){// 初始化累加器
    Vector3 sum = Vector3.zero;// 遍历 corners 数组foreach(Vector3 corner in corners){// 将每个角落点的坐标添加到累加器
        sum += corner;}// 计算平均值,即 corners 数组的中心点
    Vector3 center = sum / corners.Length;// 获取 angle 的正前方方向
    Vector3 forwardDirection = angle.forward;
    Vector3 rightDirection = angle.right;
    Vector3 upDirection = angle.up;

    Vector3 front = Vector3.zero;
    Vector3 back = Vector3.zero;// 初始化最远和最近的投影点
    Vector3 right = Vector3.zero;
    Vector3 left = Vector3.zero;
    Vector3 top = Vector3.zero;
    Vector3 bottom = Vector3.zero;// 初始化投影长度
    float maxProjectionLengthFront = float.MinValue;
    float minProjectionLengthFront = float.MaxValue;
    float maxProjectionLengthRight = float.MinValue;
    float minProjectionLengthRight = float.MaxValue;
    float maxProjectionLengthUp = float.MinValue;
    float minProjectionLengthUp = float.MaxValue;// 遍历 corners 数组foreach(Vector3 corner in corners){// 将角落点投影到 angle.right 方向线上
        Vector3 projectedFrontPoint =ProjectPointOntoLine(center , forwardDirection , corner);
        float projectionLengthFront = Vector3.Dot(projectedFrontPoint - center , forwardDirection);// 更新最远和最近的右投影点if(projectionLengthFront > maxProjectionLengthFront){
            maxProjectionLengthFront = projectionLengthFront;
            front = projectedFrontPoint;}if(projectionLengthFront < minProjectionLengthFront){
            minProjectionLengthFront = projectionLengthFront;
            back = projectedFrontPoint;}// 将角落点投影到 angle.right 方向线上
        Vector3 projectedRightPoint =ProjectPointOntoLine(center , rightDirection , corner);
        float projectionLengthRight = Vector3.Dot(projectedRightPoint - center , rightDirection);// 更新最远和最近的右投影点if(projectionLengthRight > maxProjectionLengthRight){
            maxProjectionLengthRight = projectionLengthRight;
            right = projectedRightPoint;}if(projectionLengthRight < minProjectionLengthRight){
            minProjectionLengthRight = projectionLengthRight;
            left = projectedRightPoint;}// 将角落点投影到 angle.up 方向线上
        Vector3 projectedUpPoint =ProjectPointOntoLine(center , upDirection , corner);
        float projectionLengthUp = Vector3.Dot(projectedUpPoint - center , upDirection);// 更新最远和最近的上投影点if(projectionLengthUp > maxProjectionLengthUp){
            maxProjectionLengthUp = projectionLengthUp;
            top = projectedUpPoint;}if(projectionLengthUp < minProjectionLengthUp){
            minProjectionLengthUp = projectionLengthUp;
            bottom = projectedUpPoint;}}SetLocalCoordinates(front , back , right , left , top , bottom , center);}voidSetLocalCoordinates(Vector3 front , Vector3 back , Vector3 right , Vector3 left , Vector3 top , Vector3 bottom , Vector3 center){this.front = front;this.back = back;this.right = right;this.left = left;this.top = top;this.bottom = bottom;this.center = center;}
Vector3 ProjectPointOntoLine(Vector3 origin , Vector3 direction , Vector3 point){// 计算方向向量的归一化向量
    Vector3 normalizedDirection = direction.normalized;// 计算点与线起点之间的向量
    Vector3 toPoint = point - origin;// 计算点在方向上的投影长度
    float projectionLength = Vector3.Dot(toPoint , normalizedDirection);// 计算投影点的位置return origin + projectionLength * normalizedDirection;}
接下来我们要存储此物体可被使用的方向的功能,此功能是要在编辑器模式下设定并保存,我准备存到字典中,但是字典无法被序列化,只能自己写一个序列化字典的功能。
- 将字典数据存储到字符串中
- 序列化这个字符串
- 使用字典时读取字符串数据并转化为字典

🤨可真是个好主意!
定义基本属性
默认状态下,物体的六个方向都是允许被使用的
[HideInInspector]public string UsableDirectionJson ="";//可用方向的JSON字符串。主要用于序列化字典public Dictionary<SnapDirection , bool> UsableDirection =newDictionary<SnapDirection , bool>{{ SnapDirection.Top ,true},{ SnapDirection.Bottom ,true},{ SnapDirection.Front ,true},{ SnapDirection.Back ,true},{ SnapDirection.Left ,true},{ SnapDirection.Right ,true}};
序列化字典
[System.Serializable]publicclassSerializableDictionary<TKey, TValue>{public List<TKey> keys =newList<TKey>();public List<TValue> values =newList<TValue>();publicSerializableDictionary(Dictionary<TKey , TValue> dict){foreach(var kvp in dict){
            keys.Add(kvp.Key);
            values.Add(kvp.Value);}}public Dictionary<TKey , TValue>ToDictionary(){
        Dictionary<TKey , TValue> dict =newDictionary<TKey , TValue>();for(int i =0; i < keys.Count; i++){
            dict.Add(keys[i], values[i]);}return dict;}}
使用这个功能
字典序列化为JSON
UsableDirectionJson = JsonUtility.ToJson(newSerializableDictionary<SnapDirection , bool>(UsableDirection));JSON转化为字典
SerializableDictionary<SnapDirection , bool> serializedDict = JsonUtility.FromJson<SerializableDictionary<SnapDirection , bool>>(UsableDirectionJson);if(serializedDict !=null)
    UsableDirection = serializedDict.ToDictionary();
有了区域数据、边缘数据,有了可使用的方向,我们还缺少放置物体的功能
根据位置和方向向量,结合当前可用的吸附方向,计算并更新位置。
- 计算目标方向以此推断出要使用哪个方向的吸附点
- 检查可用方向
- 定位和吸附
[HideInInspector]public SnapDirection currentSnap = SnapDirection.None;//当前吸附方向。private Vector3 front, back, right, left, top, bottom, center, lastLocation = Vector3.zero, lastDir = Vector3.zero;publicvoidSetLocation(Vector3 location , Vector3 dir){
    lastLocation = location;
    lastDir = dir;UpdateData();

    Vector3 Dir =CalculateDirection(dir);if(!CheckUsableDirection())return;
    location = roomReferenceFrame.SnapToGrid(location , currentSnap);
    transform.position = location +( transform.position - Dir );}publicenum SnapDirection
{
    None,
    Top,
    Bottom,
    Front,
    Back,
    Left,
    Right
}
CalculateDirection - 利用传入的方向向量,CalculateDirection确定对象应当吸附的方向(前、后、左、右、上、下之一)。它通过计算传入向量与每个预设方向之间的余弦相似度,选出相似度最高的方向作为目标方向,并更新currentSnap至该方向。
Vector3 CalculateDirection(Vector3 dir){// 使用 CalculateCosineSimilarity 方法计算 dir 与每个方向向量之间的余弦相似度
    float similarityFront =CalculateCosineSimilarity(front - center , dir);
    float similarityBack =CalculateCosineSimilarity(back - center , dir);
    float similarityRight =CalculateCosineSimilarity(right - center , dir);
    float similarityLeft =CalculateCosineSimilarity(left - center , dir);
    float similarityTop =CalculateCosineSimilarity(top - center , dir);
    float similarityBottom =CalculateCosineSimilarity(bottom - center , dir);// 初始化最高相似度和目标方向
    float maxSimilarity = similarityFront;
    Vector3 targetDirection = back;
    currentSnap = SnapDirection.Back;// 找到与 dir 最相似的方向if(similarityBack > maxSimilarity){
        maxSimilarity = similarityBack;
        targetDirection = front;
        currentSnap = SnapDirection.Front;}if(similarityRight > maxSimilarity){
        maxSimilarity = similarityRight;
        targetDirection = left;
        currentSnap = SnapDirection.Left;}if(similarityLeft > maxSimilarity){
        maxSimilarity = similarityLeft;
        targetDirection = right;
        currentSnap = SnapDirection.Right;}if(similarityTop > maxSimilarity){
        maxSimilarity = similarityTop;
        targetDirection = bottom;
        currentSnap = SnapDirection.Bottom;}if(similarityBottom > maxSimilarity){
        maxSimilarity = similarityBottom;
        targetDirection = top;
        currentSnap = SnapDirection.Top;}return targetDirection;}
float CalculateCosineSimilarity(Vector3 vectorA , Vector3 vectorB){
    float dotProduct = Vector3.Dot(vectorA , vectorB);// 计算两个向量的点积
    float magnitudeA = vectorA.magnitude;// 计算向量 A 的欧几里德范数(长度)
    float magnitudeB = vectorB.magnitude;// 计算向量 B 的欧几里德范数(长度)// 计算余弦相似度
    float cosineSimilarity = dotProduct /( magnitudeA * magnitudeB );return cosineSimilarity;}
CheckUsableDirection - 确定当前的吸附方向(currentSnap)是否在UsableDirection字典中标记为true(即可用)。
bool CheckUsableDirection(){
    bool IsUsable =false;foreach(KeyValuePair<SnapDirection , bool> pair in UsableDirection){if(pair.Key == currentSnap && pair.Value){returntrue;}}return IsUsable;}
接下来是旋转,要保证每次旋转都会重新更新边缘位置并重新吸附在正确的位置
思考:
一个物体有三个旋转轴,操作者应该如何高效的旋转一个物体?
想实现将物体旋转到任意角度的话就要控制三个轴,如何既实现这个功能而且把操作简化?
这让我想起了一个名字叫“天”的游戏:塞尔达传说-王国之泪。
游戏里使用究极手来操作物体旋转,可以说是想旋转到什么角度就能旋转到什么角度,而且使用两个轴就可以了。
我决定复刻究极手的旋转功能!
通过枚举RotateDirection接受传入的旋转指令,然后基于预设的旋转角度更新对象的旋转状态。完成旋转后,调用SetLocation设置对象位置。
publicenum RotateDirection
{
    Reset,
    Top,
    Bottom,
    Left,
    Right
}public bool DisableYAxisRotation =false;//禁用垂直旋转。publicvoidSetRotate(RotateDirection rotateDirection){if(rotateDirection == RotateDirection.Reset)
        transform.rotation = roomReferenceFrame.transform.rotation;else{if(DisableYAxisRotation &&( rotateDirection == RotateDirection.Top || rotateDirection == RotateDirection.Bottom )|| rotationAngle == RotationAngle.NoRotation)return;
        int rotateInterval =4;switch(rotationAngle){case RotationAngle.MaximumAngle:
                rotateInterval *=1;break;case RotationAngle.NormalAngle:
                rotateInterval *=2;break;case RotationAngle.MinimumAngle:
                rotateInterval *=4;break;}// 计算旋转中心点
        Vector3 pivot = roomReferenceFrame.transform.position;//根据这个坐标轴,如果是VR模式就是手柄或者人物的坐标轴// 根据不同的方向进行旋转switch(rotateDirection){case RotateDirection.Top:
                transform.RotateAround(pivot , roomReferenceFrame.transform.right ,-360/ rotateInterval);break;case RotateDirection.Bottom:
                transform.RotateAround(pivot , roomReferenceFrame.transform.right ,360/ rotateInterval);break;case RotateDirection.Left:
                transform.RotateAround(pivot , roomReferenceFrame.transform.up ,-360/ rotateInterval);break;case RotateDirection.Right:
                transform.RotateAround(pivot , roomReferenceFrame.transform.up ,360/ rotateInterval);break;}SetLocation(lastLocation , lastDir);}}
这样是可以实现旋转,但是由于旋转的轴是自身的,而定位的位置却不是自身的,看起来会卡一下,稍微优化一下
在旋转前隐藏自己,在下一帧显示,这样就没问题了,这个解决方法有点奇怪🤔,以后再改进吧。
publicvoidSetRotate(RotateDirection rotateDirection){if(rotateDirection == RotateDirection.Reset)
        transform.rotation = roomReferenceFrame.transform.rotation;else{// 隐藏物体foreach(var item inGetItemData()){
            item.renderer.enabled =false;}StartCoroutine(DelaySetLocation());}}
IEnumerator DelaySetLocation(){// 等待直到下一帧yieldreturnnull;// 在下一帧执行SetLocation,并恢复显示SetLocation(lastLocation , lastDir);foreach(var item inGetItemData()){
        item.renderer.enabled =true;}}public List<AreaData>GetItemData(){
    List<AreaData> AreaDates =newList<AreaData>();if(ListOverallBounds.Count !=0){
        AreaDates.AddRange(ListOverallBounds);}if(childData !=null){foreach(var item in childData){if(item.ListOverallBounds.Count !=0){
                AreaDates.AddRange(item.ListOverallBounds);}}}return AreaDates;}
基本功能已经完成了,目前已经实现基本需求,不过到应用还差很多
视觉效果——网格显示
根据数据画线就行了
privatevoidOnDrawGizmosSelected(){if(renderers ==null)return;UpdateData();if(IsMainArea)DrawCenter();foreach(var item in ListOverallBounds){DrawChildArea(item.GetCorners());}}voidDrawCenter()//绘制哪个方向可以被放置{
    Gizmos.color = adsorptionLocation;//绘制吸附点边框
    resolution = resolution <1?1: resolution;if(UsableDirection[SnapDirection.Front])DrawDirPeripheral(front);if(UsableDirection[SnapDirection.Back])DrawDirPeripheral(back);if(UsableDirection[SnapDirection.Right])DrawDirPeripheral(right);if(UsableDirection[SnapDirection.Left])DrawDirPeripheral(left);if(UsableDirection[SnapDirection.Top])DrawDirPeripheral(top);if(UsableDirection[SnapDirection.Bottom])DrawDirPeripheral(bottom);}voidDrawDirPeripheral(Vector3 dir){
    Gizmos.DrawLine(dir , center);
    Gizmos.DrawSphere(dir ,0.02f);DrawPeripheralPoint(dir , dir - center , boundarySize , resolution);}voidDrawPeripheralPoint(Vector3 origin , Vector3 normal , float radius , int resolution){
    normal.Normalize();
    Vector3 reference;
    reference = Mathf.Abs(Vector3.Dot(normal , Vector3.up))>0.999f ? Vector3.forward : Vector3.up;
    Vector3 right = Vector3.Cross(normal , reference).normalized;
    Vector3 up = Vector3.Cross(right , normal).normalized;
    Vector3[] circleVertices =newVector3[resolution];// 修改角度计算方式
    float angleIncrement = 360f / resolution;for(int i =0; i < resolution; i++){
        float angle = i * angleIncrement * Mathf.Deg2Rad;// 弧度制
        float x = Mathf.Cos(angle)* radius;
        float y = Mathf.Sin(angle)* radius;
        circleVertices[i]= origin + right * x + up * y;}// 绘制连接顶点的线来组成圆for(int i =0; i < resolution; i++){
        int nextIndex =( i +1)% resolution;
        Gizmos.DrawLine(circleVertices[i], circleVertices[nextIndex]);}}voidDrawChildArea(Vector3[] corners)//绘制子区域{if(corners.Length !=8)return;// 设置绘制颜色(可根据需求调整颜色)
    Gizmos.color = areaColor;// 绘制前面正方形
    Gizmos.DrawLine(corners[0], corners[1]);
    Gizmos.DrawLine(corners[1], corners[3]);
    Gizmos.DrawLine(corners[3], corners[2]);
    Gizmos.DrawLine(corners[2], corners[0]);// 绘制后面正方形
    Gizmos.DrawLine(corners[4], corners[5]);
    Gizmos.DrawLine(corners[5], corners[7]);
    Gizmos.DrawLine(corners[7], corners[6]);
    Gizmos.DrawLine(corners[6], corners[4]);// 连接前后面的相对应的角,形成立方体
    Gizmos.DrawLine(corners[0], corners[4]);
    Gizmos.DrawLine(corners[1], corners[5]);
    Gizmos.DrawLine(corners[2], corners[6]);
    Gizmos.DrawLine(corners[3], corners[7]);}
视觉效果——Editor_MultiMeshAreaCalculator
Editor_MultiMeshAreaCalculator 是一个自定义编辑器类,用于在 Unity 编辑器中扩展 MultiMeshAreaCalculator 组件的功能,使其更易于在场景中调整和可视化。
场景视图中绘制控制柄
直观的可视化工具,使用户可以在场景视图中通过拖动控制柄来调整区域的大小和位置。
privatevoidOnSceneGUI(){if(multiMeshAreaCalculator.useHandle){
        Color color = multiMeshAreaCalculator.areaColor;
        color.a =0.5f;
        Handles.color = color;
        Handles.CapFunction capFunction = Handles.ConeHandleCap;for(int i =0; i < multiMeshAreaCalculator.ListOverallBounds.Count; i++){
            AreaData areaDate = multiMeshAreaCalculator.ListOverallBounds[i];
            Vector3[] faceCenters = areaDate.GetFaceCenters();for(int j =0; j < faceCenters.Length; j++){
                Vector3 SliderOffset = Vector3.Normalize(faceCenters[j]- areaDate.GetCorner())*(multiMeshAreaCalculator.handleSize /2);
                Vector3 newFaceCenter = Handles.Slider(faceCenters[j]+ SliderOffset, faceCenters[j]- areaDate.GetCorner(), multiMeshAreaCalculator.handleSize, capFunction, 1f)- SliderOffset;if(newFaceCenter != faceCenters[j]){
                    Vector3 offset = newFaceCenter - faceCenters[j];UpdateCorners(areaDate, j, offset);}}}}}voidUpdateCorners(AreaData areaDate, int faceIndex, Vector3 offset){
    Vector3[] corners = areaDate.GetCorners();switch(faceIndex){case0:// 前面
            corners[0]+= offset;
            corners[1]+= offset;
            corners[2]+= offset;
            corners[3]+= offset;break;case1:// 后面
            corners[4]+= offset;
            corners[5]+= offset;
            corners[6]+= offset;
            corners[7]+= offset;break;case2:// 左面
            corners[0]+= offset;
            corners[2]+= offset;
            corners[4]+= offset;
            corners[6]+= offset;break;case3:// 右面
            corners[1]+= offset;
            corners[3]+= offset;
            corners[5]+= offset;
            corners[7]+= offset;break;case4:// 顶面
            corners[2]+= offset;
            corners[3]+= offset;
            corners[6]+= offset;
            corners[7]+= offset;break;case5:// 底面
            corners[0]+= offset;
            corners[1]+= offset;
            corners[4]+= offset;
            corners[5]+= offset;break;}

    areaDate.SetCorners(corners);}
AreaData类要添加对应的功能
得到点位,设置点位等功能
publicvoidSetCorners(Vector3[] temp){if(temp.Length != cornersInverseTransformPoint.Length){
        Debug.LogError("新的角点数组长度必须与原始角点数组长度相同!");return;}

    Vector3[] newCornersInverseTransformPoint =newVector3[temp.Length];// 获取对象的旋转的逆矩阵
    Quaternion rotationInverse = Quaternion.Inverse(location.rotation);
    Vector3 scale = location.lossyScale;for(int i =0; i < temp.Length; i++){// 对应角点位置的偏移
        Vector3 offsetAdjusted = temp[i]+ offset - location.position;// 逆向应用对象的缩放、旋转和位置
        Vector3 scaledOffset =newVector3(offsetAdjusted.x / scale.x , offsetAdjusted.y / scale.y , offsetAdjusted.z / scale.z);
        newCornersInverseTransformPoint[i]= rotationInverse * scaledOffset;}

    cornersInverseTransformPoint = newCornersInverseTransformPoint;UpdateAreaData();}/// <summary>/// 得到六个面的中心点/// </summary>/// <returns></returns>public Vector3[]GetCorners(){return corners;}public Vector3 GetCorner(){
    Vector3 Corner = Vector3.zero;foreach(var item inGetCorners()){
        Corner += item;}return Corner/GetCorners().Length;}public Vector3[]GetFaceCenters(){
    Vector3[] faceCenters =newVector3[6];
    faceCenters[0]=( corners[0]+ corners[1]+ corners[2]+ corners[3])/4;
    faceCenters[1]=( corners[4]+ corners[5]+ corners[6]+ corners[7])/4;
    faceCenters[2]=( corners[0]+ corners[2]+ corners[4]+ corners[6])/4;
    faceCenters[3]=( corners[1]+ corners[3]+ corners[5]+ corners[7])/4;
    faceCenters[4]=( corners[2]+ corners[3]+ corners[6]+ corners[7])/4;
    faceCenters[5]=( corners[0]+ corners[1]+ corners[4]+ corners[5])/4;return faceCenters;}
美化面板
- 自动查找子物体功能: 通过按钮触发,自动查找并保存子物体的渲染器数据。
- 手动调整区域功能: 提供按钮和滑块来调整区域的尺寸和位置。
- 视觉效果调整: 提供调整颜色、吸附点分辨率和尺寸的选项。
- 旋转控制: 允许用户设置旋转角度和锁定 Y 轴旋转。
- 吸附方向设置: 提供界面来设置和保存吸附方向。
- 区域重置和测试功能: 提供按钮来重置区域和添加/移除测试区域。
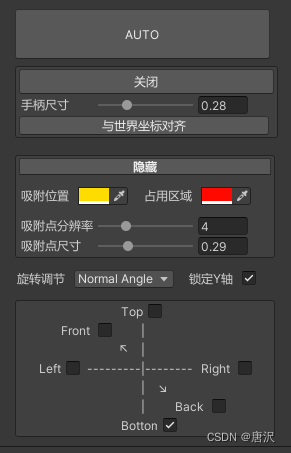
public override voidOnInspectorGUI(){
    GUILayout.Space(5);if(GUILayout.Button(newGUIContent("AUTO","寻找子物体的Render并保存边框数据\n自动情况下的原理是将Render物体的旋转重置,保存数据后恢复旋转"), GUILayout.Width(255), GUILayout.Height(50))){
        multiMeshAreaCalculator.AutoFindChildData();}
    GUILayout.Space(5);

    EditorGUILayout.BeginVertical("HelpBox", GUILayout.Width(260));
    GUILayout.BeginHorizontal();
    string btnName = multiMeshAreaCalculator.useHandle ?"关闭":"手动调整占用区域";if(GUILayout.Button(newGUIContent(btnName,"点击打开调整面板"), GUILayout.Width(255), GUILayout.Height(25))){
        multiMeshAreaCalculator.useHandle =!multiMeshAreaCalculator.useHandle;}
    GUILayout.EndHorizontal();if(multiMeshAreaCalculator.useHandle){
        GUILayout.BeginHorizontal();
        GUILayout.Label("手柄尺寸", GUILayout.Width(75));
        multiMeshAreaCalculator.handleSize = EditorGUILayout.Slider(multiMeshAreaCalculator.handleSize,0,1, GUILayout.Width(150));
        GUILayout.EndHorizontal();if(GUILayout.Button(newGUIContent("与世界坐标对齐","寻找子物体的Render并保存边框数据\n自动调整对不齐的情况使用,调整Render的边框直至到合适的边框大小"), GUILayout.Width(250))){
            multiMeshAreaCalculator.AutoFindChildData(false);}}
    EditorGUILayout.EndVertical();
    GUILayout.Space(15);

    EditorGUILayout.BeginVertical("HelpBox", GUILayout.Width(260));if(ChangeControl){if(GUILayout.Button("隐藏","prebutton"))
            ChangeControl =!ChangeControl;}else{if(GUILayout.Button("调整视觉效果","prebutton"))
            ChangeControl =!ChangeControl;}if(ChangeControl){
        GUILayout.Space(10);
        GUILayout.BeginHorizontal();
        GUILayout.Label("吸附位置", GUILayout.Width(55));
        multiMeshAreaCalculator.adsorptionLocation = EditorGUILayout.ColorField(multiMeshAreaCalculator.adsorptionLocation, GUILayout.Width(50));
        GUILayout.Space(10);
        GUILayout.Label("占用区域", GUILayout.Width(55));
        multiMeshAreaCalculator.areaColor = EditorGUILayout.ColorField(multiMeshAreaCalculator.areaColor, GUILayout.Width(50));
        GUILayout.EndHorizontal();

        GUILayout.Space(10);
        GUILayout.BeginHorizontal();
        GUILayout.Label("吸附点分辨率", GUILayout.Width(75));
        multiMeshAreaCalculator.resolution = EditorGUILayout.IntSlider(multiMeshAreaCalculator.resolution,0,15, GUILayout.Width(150));
        GUILayout.EndHorizontal();

        GUILayout.BeginHorizontal();
        GUILayout.Label("吸附点尺寸", GUILayout.Width(75));
        multiMeshAreaCalculator.boundarySize = EditorGUILayout.Slider(multiMeshAreaCalculator.boundarySize,0,1, GUILayout.Width(150));
        GUILayout.EndHorizontal();}
    EditorGUILayout.EndVertical();

    GUILayout.Space(10);
    GUILayout.BeginHorizontal();
    GUILayout.Label(newGUIContent("旋转调节","分为四个挡位:"+"\nNoRotation:该物体不能调整旋转。"+"\nMaximumAngle:每次转动90°。"+"\nNormalAngle:每次转动45°,效果最好。"+"\nMinimumAngle:每次转动22.5°,很细的调整,如果想要转动到某一个想要的角度比较花时间,但也不是不行。"), GUILayout.Width(55));
    multiMeshAreaCalculator.rotationAngle =(RotationAngle)EditorGUILayout.EnumPopup(multiMeshAreaCalculator.rotationAngle, GUILayout.Width(100));
    GUILayout.Label("   锁定Y轴", GUILayout.Width(60));
    multiMeshAreaCalculator.DisableYAxisRotation = GUILayout.Toggle(multiMeshAreaCalculator.DisableYAxisRotation,"", GUILayout.Width(70));
    GUILayout.EndHorizontal();

    GUILayout.Space(10);

    EditorGUILayout.BeginVertical("HelpBox", GUILayout.Width(260));

    SerializableDictionary<SnapDirection, bool> serializedDict = JsonUtility.FromJson<SerializableDictionary<SnapDirection, bool>>(multiMeshAreaCalculator.UsableDirectionJson);if(serializedDict !=null)
        multiMeshAreaCalculator.UsableDirection = serializedDict.ToDictionary();

    GUILayout.BeginHorizontal();
    GUILayout.Space(100);
    GUILayout.Label("Top", GUILayout.Width(25));
    multiMeshAreaCalculator.UsableDirection[SnapDirection.Top]= GUILayout.Toggle(multiMeshAreaCalculator.UsableDirection[SnapDirection.Top],"", GUILayout.Width(70));
    GUILayout.EndHorizontal();

    GUILayout.BeginHorizontal();
    GUILayout.Space(40);
    GUILayout.Label("Front", GUILayout.Width(35));
    multiMeshAreaCalculator.UsableDirection[SnapDirection.Front]= GUILayout.Toggle(multiMeshAreaCalculator.UsableDirection[SnapDirection.Front],"", GUILayout.Width(37));
    GUILayout.Label("|", GUILayout.Width(5));
    GUILayout.Label("Back", GUILayout.Width(35));
    multiMeshAreaCalculator.UsableDirection[SnapDirection.Back]= GUILayout.Toggle(multiMeshAreaCalculator.UsableDirection[SnapDirection.Back],"", GUILayout.Width(37));
    GUILayout.EndHorizontal();

    GUILayout.BeginHorizontal();
    GUILayout.Label("Left", GUILayout.Width(40));
    multiMeshAreaCalculator.UsableDirection[SnapDirection.Left]= GUILayout.Toggle(multiMeshAreaCalculator.UsableDirection[SnapDirection.Left],"", GUILayout.Width(40));
    GUILayout.Label("|", GUILayout.Width(5));
    GUILayout.Label("Right", GUILayout.Width(40));
    multiMeshAreaCalculator.UsableDirection[SnapDirection.Right]= GUILayout.Toggle(multiMeshAreaCalculator.UsableDirection[SnapDirection.Right],"", GUILayout.Width(40));
    GUILayout.EndHorizontal();

    GUILayout.BeginHorizontal();
    GUILayout.Space(100);
    GUILayout.Label("Bottom", GUILayout.Width(45));
    multiMeshAreaCalculator.UsableDirection[SnapDirection.Bottom]= GUILayout.Toggle(multiMeshAreaCalculator.UsableDirection[SnapDirection.Bottom],"", GUILayout.Width(70));
    GUILayout.EndHorizontal();if(GUILayout.Button("保存设置", GUILayout.Width(255))){
        SerializableDictionary<SnapDirection, bool> serializableDictionary =newSerializableDictionary<SnapDirection, bool>(multiMeshAreaCalculator.UsableDirection);
        multiMeshAreaCalculator.UsableDirectionJson = JsonUtility.ToJson(serializableDictionary);}

    EditorGUILayout.EndVertical();
    GUILayout.Space(20);if(GUILayout.Button("Reset Area", GUILayout.Width(255))){
        multiMeshAreaCalculator.ResetArea();}

    GUILayout.Space(20);
    GUILayout.BeginHorizontal();if(GUILayout.Button("TEST AddArea", GUILayout.Width(125))){
        multiMeshAreaCalculator.AddArea();}if(GUILayout.Button("TEST RemoveArea", GUILayout.Width(125))){
        multiMeshAreaCalculator.RemoveArea();}
    GUILayout.EndHorizontal();

    GUILayout.Space(20);DrawDefaultInspector();}
MultiMeshAreaCalculator要添加对应的属性
[HideInInspector]public TransformChangedEvent transformChangedEvent;//监听变换事件的组件。当物体移动或者旋转时触发public Color adsorptionLocation = Color.green;//吸附位置颜色。-编辑器扩展使用public Color areaColor = Color.black;//区域颜色。-编辑器扩展使用[Range(1,36)]public int resolution =4;//边缘显示框分辨率。-编辑器扩展使用public float boundarySize =0.5f;//边界边缘显示框尺寸。-编辑器扩展使用public float handleSize =0.5f;//调整区域控制柄的尺寸。-编辑器扩展使用public bool useHandle =false;//是否使用控制柄。public RotationAngle rotationAngle = RotationAngle.NormalAngle;//每次旋转角度。
为什么这么设计?
- 用户友好性: 提供直观的 GUI 界面,使得用户可以轻松调整和配置 MultiMeshAreaCalculator 组件。
- 高效开发: 自动化查找和保存子物体的渲染器数据,减少手动操作,提高开发效率。
- 丰富的功能: 提供多种调整选项,包括手柄调整、视觉效果设置、吸附方向设置等,满足不同的需求。
- 可维护性强: 代码结构清晰,逻辑分明,便于维护和扩展。
- 实时反馈: 在场景视图中提供控制柄,使用户能够实时预览调整效果,提升用户体验。
如何使用这个功能
做一个案例来测试
public LayerMask raycastLayers;// 存储要检测的层public RoomReferenceFrame roomReferenceFrame;
MultiMeshAreaCalculator multiMeshAreaCalculator;
bool activate =false;privatevoidOnValidate(){
    roomReferenceFrame=roomReferenceFrame==null? FindObjectOfType<RoomReferenceFrame>(): roomReferenceFrame;}voidUpdate(){// 检查鼠标左键是否被按下if(Input.GetMouseButton(0)){
        Ray ray = Camera.main.ScreenPointToRay(Input.mousePosition);
        RaycastHit hit;// 使用 LayerMask 来指定要检测的层if(Physics.Raycast(ray , out hit , Mathf.Infinity, raycastLayers)){
            activate=true;if(multiMeshAreaCalculator!=null){
                multiMeshAreaCalculator.SetLocation(hit.point , hit.normal);}}else{// 如果没有击中任何物体,则输出射线未命中
            Debug.Log("射线未命中");}}if(Input.GetKeyDown(KeyCode.A)){if(multiMeshAreaCalculator)
            multiMeshAreaCalculator.SetRotate(RotateDirection.Left);}if(Input.GetKeyDown(KeyCode.D)){if(multiMeshAreaCalculator)
            multiMeshAreaCalculator.SetRotate(RotateDirection.Right);}if(Input.GetKeyDown(KeyCode.W)){if(multiMeshAreaCalculator)
            multiMeshAreaCalculator.SetRotate(RotateDirection.Top);}if(Input.GetKeyDown(KeyCode.S)){if(multiMeshAreaCalculator)
            multiMeshAreaCalculator.SetRotate(RotateDirection.Bottom);}if(Input.GetKeyDown(KeyCode.Space)){if(multiMeshAreaCalculator&&activate){if(multiMeshAreaCalculator.Place()){
                multiMeshAreaCalculator=null;
                activate=false;}}}if(Input.GetKeyDown(KeyCode.Alpha1)){CreateRoomItem("一盆花");}if(Input.GetKeyDown(KeyCode.Alpha2)){CreateRoomItem("凳子");}if(Input.GetKeyDown(KeyCode.Alpha3)){CreateRoomItem("吊灯");}if(Input.GetKeyDown(KeyCode.Alpha4)){CreateRoomItem("微波炉");}if(Input.GetKeyDown(KeyCode.Alpha5)){CreateRoomItem("毛巾");}if(Input.GetKeyDown(KeyCode.Alpha6)){CreateRoomItem("电视");}if(Input.GetKeyDown(KeyCode.Alpha7)){CreateRoomItem("家具组1");}}voidCreateRoomItem(string path){if(multiMeshAreaCalculator)return;
    GameObject item = Resources.Load<GameObject>(path);
    multiMeshAreaCalculator=Instantiate(item).GetComponent<MultiMeshAreaCalculator>();
    multiMeshAreaCalculator.SetRotate( RotateDirection.Reset);}
MultiMeshAreaCalculator添加对应的功能
public bool Place(){
    bool IsPlace = roomReferenceFrame.IsOverlapping(this, out List<Renderer> renders);if(IsPlace)
        roomReferenceFrame.AddRoomItem(this);return IsPlace;}
嚯!~ 到底了!
量太大了?
没事哥们,慢慢消化
点击下载👉Demo~
本文转载自: https://blog.csdn.net/CTangZe/article/details/139328258
版权归原作者 唐沢 所有, 如有侵权,请联系我们删除。
版权归原作者 唐沢 所有, 如有侵权,请联系我们删除。