往期文章分享
- 点击跳转=>《导航贴》- Unity手册,系统实战学习
- 点击跳转=>《导航贴》- Android手册,重温移动开发
本文约8千字,新手阅读需要20分钟,复习需要12分钟 【收藏随时查阅不再迷路】
👉关于作者
众所周知,人生是一个漫长的流程,不断克服困难,不断反思前进的过程。在这个过程中会产生很多对于人生的质疑和思考,于是我决定将自己的思考,经验和故事全部分享出来,以此寻找共鸣 !!!
专注于Android/Unity和各种游戏开发技巧,以及各种资源分享(网站、工具、素材、源码、游戏等)
有什么需要欢迎私我,交流群让学习不再孤单。

👉前提
这是小空坚持写的Unity新手向系列,欢迎品尝。
小空为了方便更多的人(新手)看明白,使用的汉字,真实项目尽量使用英文规则昂。
新手(√√√)
大佬(√)
👉实践过程

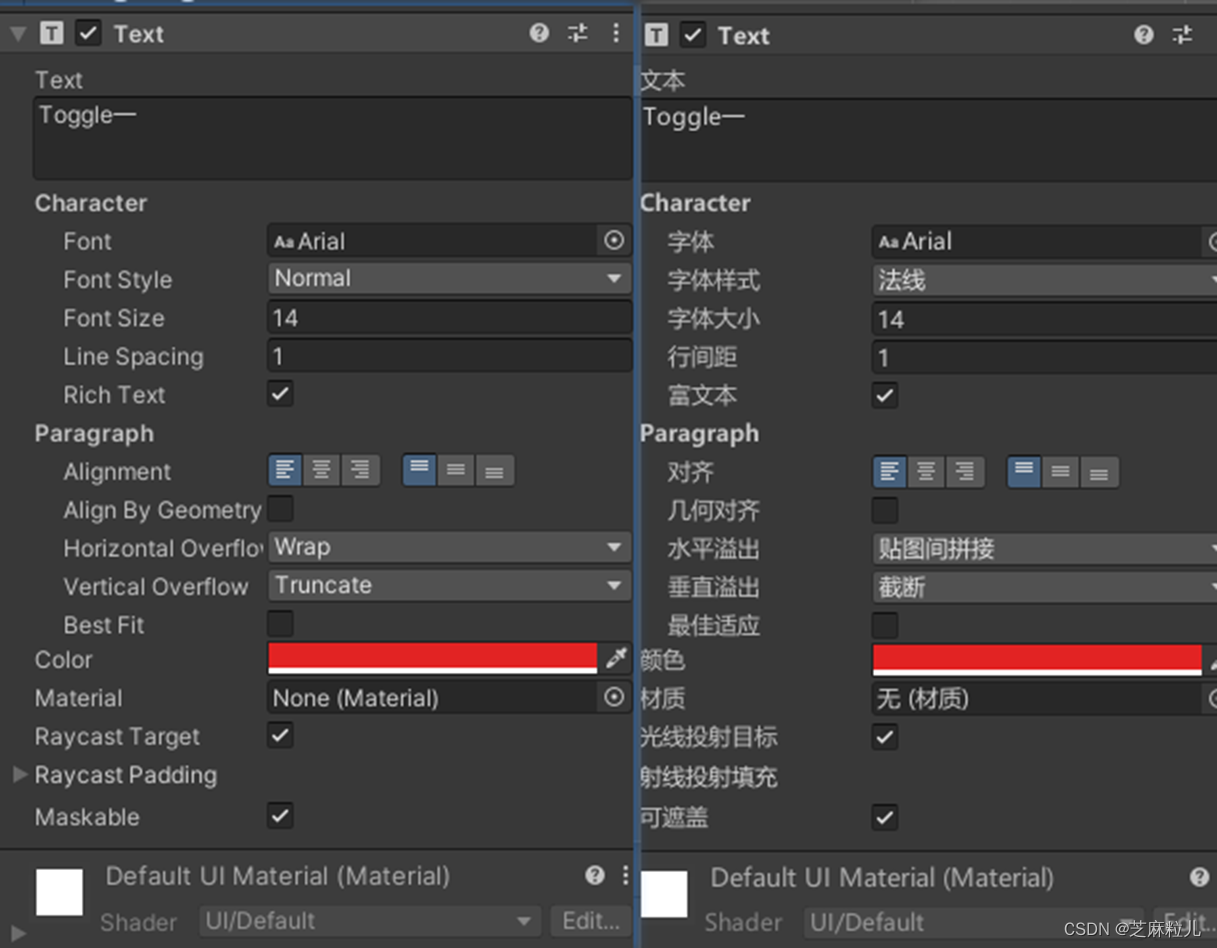
从图中看Text的属性并不多,最开始的输入框就是你想让Text显示的内容,英文显示,但中文以及中文的某些符号受字体文件的影响。
Font:指定字体文件,ttf后缀的那种。
Font Style:字体样式,有四个选项:Normal(正常)、Bold(加粗)、Italic(斜体)、BoldAnd Italic(加粗和斜体)
Font Size:字体大小设置,注意当你的字体大小超出了Text控件的宽高,可能不会显示文本。
Line Spacing:设置行间距,扩大行与行之间的距离。
Rich Text:设置是否支持富文本,也就是Html标记语言。可以实现一句话里面字字体大小和颜色何不相同,目前支持下面几个标签:加粗 、倾斜、<color=#ff0000>颜色、<size=80>大小。
Alignment:设置对齐方式,居左还是居右,居上还是居下,或者居中
Align By Geometry:使用区段的字形几何执行水平对齐,可以导致更好的拟合左和右对齐,但可能会导致不正确的定位。说白了,就是开启后紧贴Text组件的边框更近了。
Horizontal Overflow:控制超出宽度后的文字变化,有两个值Wrap(是控制在没有输入回车的情况下,当超过宽度时候文本自动换行),Overflow(当超过宽度的时候,文本还会继续显示,显示在宽度外面)
Vertical Overflow:控制超出高度后的文字变化,,有两个值Truncate(当超过高度时候文本不再显示),Overflow(当超过高度的时候,文本还会继续显示,显示在高度外面)
Best Fit:最佳适应,默认不勾选,勾选后会让你输入最大字大小和最小字体大小,控件会根据文本的多少自动调整大小。
Color:设置文本颜色
Material:设置材质
Raycast Target:设置是否受到射线的检测,关闭后当鼠标经过该控件射线检测代码不会触发。
😜代码中修改属性
publicclassTextgai:MonoBehaviour{//UI中你的Text控件publicText yourText;voidStart(){//字体大小
        yourText.fontSize =15;//文字格式正常,斜体,粗斜,加粗
        yourText.fontStyle = FontStyle.Normal;//.Italic.BoldAndItalic.Bold;//行间距
        yourText.lineSpacing =1.2f;//是否支持富文本
        yourText.supportRichText =true;
        yourText.alignment = TextAnchor.LowerCenter;//使用字形几何范围来执行水平对齐,而不是使用音质度量。
        yourText.alignByGeometry =false;//水平竖直模式 ==》 Overflow:溢出模式【不考虑文本的width或者height的限制,显示全部文本内容】//Wrap 或者 Truncate 在文本width或者height区域内显示,超出部分被隐藏【包括字体大小超出】
        yourText.horizontalOverflow = HorizontalWrapMode.Overflow;
        yourText.verticalOverflow = VerticalWrapMode.Truncate;//应该允许文本自动调整大小。
        yourText.resizeTextForBestFit =true;//设置 BestFit 为True后//当前文本区域显示不开后,内容会自动缩小字号;  【会忽略原字体大小】
        yourText.resizeTextMinSize =10;
        yourText.resizeTextMaxSize =40;//文本颜色 【有渐变色时,此属性不起作用】
        yourText.color =newColor32(0,0,0,0);//文本材质 path:是Resources下面材质目录
        yourText.material = Resources.Load("path",typeof(Material))asMaterial;//是否进行射线检测
        yourText.raycastTarget =false;}}
😜空格问题
因为文本有自动换行,所以可能造成这个问题,就是换行了,因为Unity是国外英语开发的,所以空格单词放不下换行还算合理(单词没那么长),而中文一句话可能不短,这时候换行就不合适了。

解决这个问题需要“\u3000”字符来替换,直接在组件上输入时,将输入法调成全角然后输入空格即可实现,如果是代码中修改,获取文本然后利用字符串替换即可(字符串.Replace(" ", “\u3000”);)
😜打字特效
如果你用了DOTween插件,那么很方便:
publicText yourText;//获取Text组件//您要显示文本内容string temp_content ="这是一个逐字出现的效果,利用了DOTween插件实现的";
yourText.DOText(temp_content,6);//带回调的方式//mText.DOText(temp_content, 6).OnComplete(()=> {//    Debug.Log("逐字显示完成的回调");//});//添加Ease枚举中设定的缓动动画//mText.DOText(temp_content, 6).SetEase(Ease.InBack).OnComplete(() => {//    Debug.Log("逐字显示完成的回调");//});
如果是其他方式,可以在Update中不断取字符串之后给text赋值即可。
其次,打字效果如果是在代码中设置,需要额外写脚本,脚本来源于新发大佬的文章:
https://blog.csdn.net/linxinfa/article/details/115461154
publicclassRichText:MonoBehaviour{publicdelegatevoidOnComplete();[SerializeField]privatefloat _defaultSpeed =0.05f;privateText label;privatestring _currentText;privatestring _finalText;privateCoroutine _typeTextCoroutine;privatestaticreadonlystring[] _uguiSymbols ={"b","i"};privatestaticreadonlystring[] _uguiCloseSymbols ={"b","i","size","color"};privateOnComplete _onCompleteCallback;privatevoidInit(){if(label ==null)
            label =GetComponent<Text>();}publicvoidAwake(){Init();}publicvoidSetText(string text,float speed =-1){Init();

        _defaultSpeed = speed >0? speed : _defaultSpeed;
        _finalText =ReplaceSpeed(text);
        label.text ="";if(_typeTextCoroutine !=null){StopCoroutine(_typeTextCoroutine);}

        _typeTextCoroutine =StartCoroutine(TypeText(text));}publicvoidSkipTypeText(){if(_typeTextCoroutine !=null)StopCoroutine(_typeTextCoroutine);
        _typeTextCoroutine =null;

        label.text = _finalText;if(_onCompleteCallback !=null)_onCompleteCallback();}publicIEnumeratorTypeText(string text){
        _currentText ="";var len = text.Length;var speed = _defaultSpeed;var tagOpened =false;var tagType ="";for(var i =0; i < len; i++){if(text[i]=='['&& i +6< len && text.Substring(i,7).Equals("[speed=")){var parseSpeed ="";for(var j = i +7; j < len; j++){if(text[j]==']')break;
                    parseSpeed += text[j];}if(!float.TryParse(parseSpeed,out speed))
                    speed =0.05f;

                i +=8+ parseSpeed.Length -1;continue;}// ngui color tagif(text[i]=='['&& i +7< len && text[i +7]==']'){
                _currentText += text.Substring(i,8);
                i +=8-1;continue;}var symbolDetected =false;for(var j =0; j < _uguiSymbols.Length; j++){var symbol =string.Format("<{0}>", _uguiSymbols[j]);if(text[i]=='<'&& i +(1+ _uguiSymbols[j].Length)< len &&
                    text.Substring(i,2+ _uguiSymbols[j].Length).Equals(symbol)){
                    _currentText += symbol;
                    i +=(2+ _uguiSymbols[j].Length)-1;
                    symbolDetected =true;
                    tagOpened =true;
                    tagType = _uguiSymbols[j];break;}}if(text[i]=='<'&& i +(1+15)< len && text.Substring(i,2+6).Equals("<color=#")&&
                text[i +16]=='>'){
                _currentText += text.Substring(i,2+6+8);
                i +=(2+14)-1;
                symbolDetected =true;
                tagOpened =true;
                tagType ="color";}if(text[i]=='<'&& i +5< len && text.Substring(i,6).Equals("<size=")){var parseSize ="";var size =(float) label.fontSize;for(var j = i +6; j < len; j++){if(text[j]=='>')break;
                    parseSize += text[j];}if(float.TryParse(parseSize,out size)){
                    _currentText += text.Substring(i,7+ parseSize.Length);
                    i +=(7+ parseSize.Length)-1;
                    symbolDetected =true;
                    tagOpened =true;
                    tagType ="size";}}// exit symbolfor(var j =0; j < _uguiCloseSymbols.Length; j++){var symbol =string.Format("</{0}>", _uguiCloseSymbols[j]);if(text[i]=='<'&& i +(2+ _uguiCloseSymbols[j].Length)< len &&
                    text.Substring(i,3+ _uguiCloseSymbols[j].Length).Equals(symbol)){
                    _currentText += symbol;
                    i +=(3+ _uguiCloseSymbols[j].Length)-1;
                    symbolDetected =true;
                    tagOpened =false;break;}}if(symbolDetected)continue;

            _currentText += text[i];
            label.text = _currentText +(tagOpened ?string.Format("</{0}>", tagType):"");yieldreturnnewWaitForSeconds(speed);}

        _typeTextCoroutine =null;if(_onCompleteCallback !=null)_onCompleteCallback();}privatestringReplaceSpeed(string text){var result ="";var len = text.Length;for(var i =0; i < len; i++){if(text[i]=='['&& i +6< len && text.Substring(i,7).Equals("[speed=")){var speedLength =0;for(var j = i +7; j < len; j++){if(text[j]==']')break;
                    speedLength++;}

                i +=8+ speedLength -1;continue;}

            result += text[i];}return result;}publicboolIsSkippable(){return _typeTextCoroutine !=null;}publicvoidSetOnComplete(OnComplete onComplete){
        _onCompleteCallback = onComplete;}}publicstaticclassTypeTextComponentUtility{publicstaticvoidTypeText(thisText label,string text,float speed =0.05f,RichText.OnComplete onComplete =null){var typeText = label.GetComponent<RichText>();if(typeText ==null){
            typeText = label.gameObject.AddComponent<RichText>();}

        typeText.SetText(text, speed);
        typeText.SetOnComplete(onComplete);}publicstaticboolIsSkippable(thisText label){var typeText = label.GetComponent<RichText>();if(typeText ==null){
            typeText = label.gameObject.AddComponent<RichText>();}return typeText.IsSkippable();}publicstaticvoidSkipTypeText(thisText label){var typeText = label.GetComponent<RichText>();if(typeText ==null){
            typeText = label.gameObject.AddComponent<RichText>();}

        typeText.SkipTypeText();}}
使用方式,UI中的Text组件挂载上面的脚本
privatevoidStart(){
        myText =GetComponent<Text>();

        scripts.Enqueue("叮!\n");
        scripts.Enqueue("发现宿主发现宿主发现宿主发现宿主\n");
        scripts.Enqueue("开始<b>绑定系统</b>开始<b>绑定系统</b>开始<b>绑定系统</b>开始<b>绑定系统</b>开始<b>绑定系统</b>开始<b>绑定系统</b>开始<b>绑定系统</b>开始<b>绑定系统</b>开始<b>绑定系统</b>开始<b>绑定系统</b>开始<b>绑定系统</b>\n");
        scripts.Enqueue("系统<size=40>绑定中</size>系统<size=40>绑定中</size>系统<size=40>绑定中</size>\n");
        scripts.Enqueue("恭喜,主人\n");
        scripts.Enqueue("您已穿越到勇者世界\n");
        scripts.Enqueue("请开始您的大冒险吧!\n");// myText.TypeText(scripts.Dequeue(), onComplete: () => Debug.Log("文本显示完毕了"));}voidUpdate(){//按下空格键 再调用 该方法   Input.GetKeyUp()  Input.GetKeyDown()if(Input.GetKeyDown(KeyCode.Space)){if(scripts.Count <=0){return;}
            myText.TypeText(scripts.Dequeue(),onComplete:()=> Debug.Log("文本显示完毕了"));// isStart = true;}if(Input.GetKeyDown(KeyCode.A)){
            myText.SkipTypeText();//刷新布局,所有需要设置的都需要刷新// LayoutRebuilder.ForceRebuildLayoutImmediate(transform.parent.GetComponent<RectTransform>());}}
😜实现轮廓和阴影
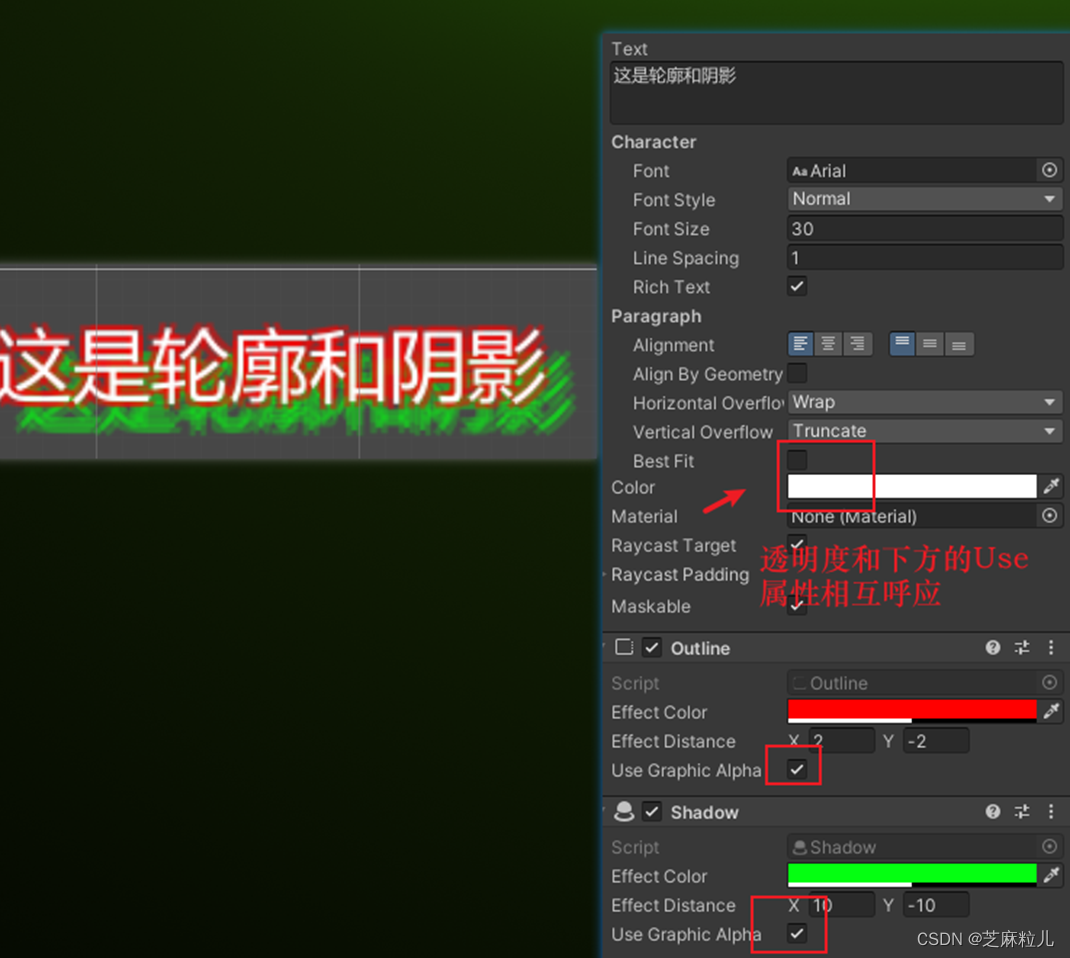
只需要继承Unity内置的Outlinse脚本即可,只有三个个属性很简单,Effect Color表示轮廓颜色,Effect Distance表示阴影偏移位置,Use Graphic Alpha表示是否受透明度影响,默认是勾选的,勾选文本的透明度变化的话,轮廓阴影也对应变化,进而保持一个良好的效果,不勾选则不变化。
😜渐变
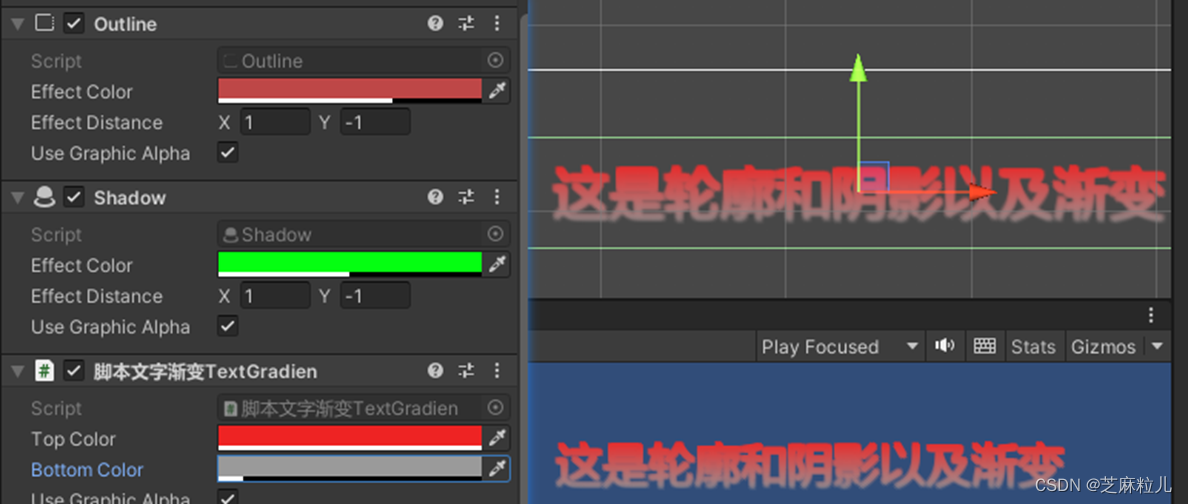
渐变需要单独自定义脚本实现。
/// <summary>/// 渐变字体,并且添加到Inspector的快捷Add Component中/// </summary>[AddComponentMenu("UI/Effects/TextGradien")]publicclassTextGradien:BaseMeshEffect{publicColor32 topColor = Color.white;publicColor32 bottomColor = Color.black;publicbool useGraphicAlpha =true;publicoverridevoidModifyMesh(VertexHelper vh){if(!IsActive()){return;}var count = vh.currentVertCount;if(count ==0)return;var vertexs =newList<UIVertex>();for(var i =0; i < count; i++){var vertex =newUIVertex();
            vh.PopulateUIVertex(ref vertex, i);
            vertexs.Add(vertex);}var topY = vertexs[0].position.y;var bottomY = vertexs[0].position.y;for(var i =1; i < count; i++){var y = vertexs[i].position.y;if(y > topY){
                topY = y;}elseif(y < bottomY){
                bottomY = y;}}var height = topY - bottomY;for(var i =0; i < count; i++){var vertex = vertexs[i];var color = Color32.Lerp(bottomColor, topColor,(vertex.position.y - bottomY)/ height);

            vertex.color = color;

            vh.SetUIVertex(vertex, i);}}}
挂载在Text上即可。
👉其他
📢作者:小空和小芝中的小空
📢转载说明-务必注明来源:https://zhima.blog.csdn.net/
📢这位道友请留步☁️,我观你气度不凡,谈吐间隐隐有王者霸气💚,日后定有一番大作为📝!!!旁边有点赞👍收藏🌟今日传你,点了吧,未来你成功☀️,我分文不取,若不成功⚡️,也好回来找我。
温馨提示:点击下方卡片获取更多意想不到的资源。
版权归原作者 芝麻粒儿 所有, 如有侵权,请联系我们删除。