
结果
对比了两种INT8量化, 熵校准的量化有更高的速度,但是吧…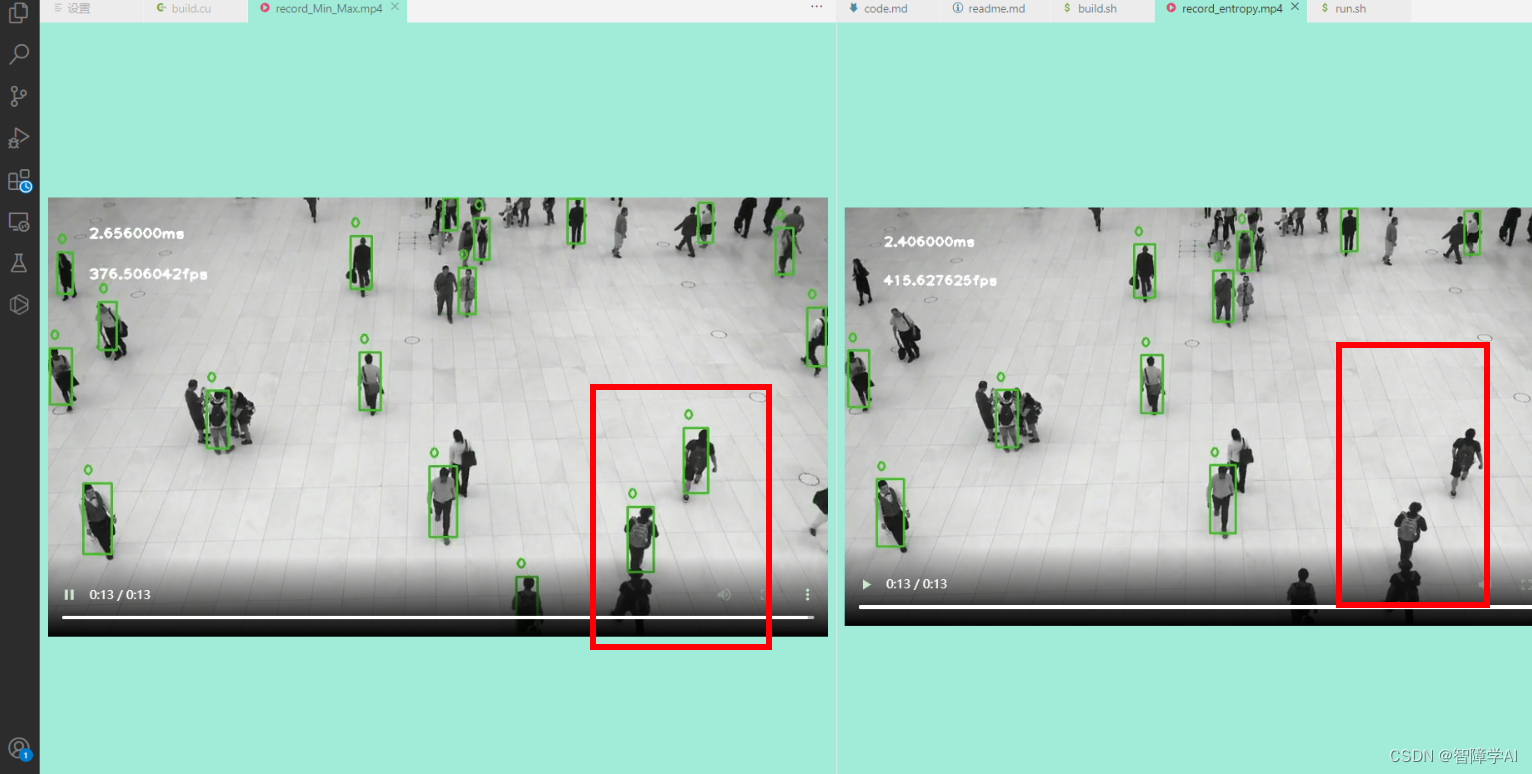
1. TensorRT下的INT8量化: 最小最大值校准 (Min-Max Calibration)
最大最小值校准是一种 INT8 校准算法。在最大最小值校准中,
需要使用一组代表性的校准数据来生成量化参数,
首先将推理中的数据进行统计,计算数据的最小值和最大值,然后根据这些值来计算量化参数。具体步骤如下:
- 准备一组代表性的校准数据集合,大小通常在 500-1000 之间。这些数据应该是真实推理数据的一个子集,并且要包含来自所有分类或数据分布的数据点。
- 执行推理操作,对于每个输入张量中的每个元素,记录最大值和最小值。
- 图像的最大最小值就是输入图像像素的最大最小
- 根据上述步骤中收集的最小值和最大值,计算范围和比例因子,以获得在 INT8 上的量化值。
- 将图像的范围限定在最大最小区间内(计算范围),再将数据类型从浮点型转换为8位整型,就可以达到模型压缩和运算加速的目的。
- 这个最大最小区间可以通过统计输入数据的最小值和最大值得到,然后将所有的数据映射到这个区间内。
- 计算范围和缩放因子是TensorRT执行INT8量化的时候自动生成的
- 通过最大最小值校准方法,我们可以得到每个权重参数和激活函数所需的量化参数,以实现INT8精度量化。
2. TensorRT下的INT8量化: 熵校准 (Entropy Calibration)
- 熵校准是一种动态校准算法,它使用 KL 散度(KL Divergence)来度量推理数据和校准数据之间的分布差异。KL 散度是一种测量两个概率分布之间差异的方法,它通常被用于度量模型的质量和精度,而在 INT8 量化中,我们使用它来比较校准数据和推理数据之间的分布。
- 相对于最大最小法,熵校准在量化时需要进行动态的计算,因此在计算量上会稍微慢一些。但是,熵校准可以更好地反映实际推理数据的分布,因此通常可以获得更好的量化效果。所以,选择使用哪种方法主要取决于具体的应用场景和需求。
3. TensorRT下的FP16量化:
- 相比于INT8量化,FP16量化不需要进行校准,因为FP16在浮点数表示中的精度比INT8更高。因此,FP16量化可以在不牺牲太多精度的情况下,显著减少存储和计算成本。在TensorRT中,可以通过设置相应的标志来启用FP16量化。
- FP16量化不需要校准的原因是它不会改变权重和偏置的数据类型,而只是减小了它们的存储精度。在FP16量化中,权重和偏置仍然被表示为16位浮点数,但是它们的范围被缩小了,从而减少了存储空间的使用和计算时的延迟。因此,FP16量化不需要执行校准过程来确定量化参数。
4. Build.cu文件的中的校准器
4.1 构造函数
- 实例化对象的时候定义传入文件路径, 分割好的文件名列表, batchSize
- 通过参数列表定义成员变量mDataDir, mBatchSize, mImgSize缓存文件名字
- 设置网络输入尺寸{batch, channels, mImgSize}
- 计算全部的tensor数量(mInputCount) = batchSize x {1x3x640x640}
- cuda_preprocess_init() 需要足够的内存处理每一帧的图像
- cudaMalloc(device指针, size) 开辟内存 size = input_height * input_width * 3
- 加载校准数据集的文件列表, 把全部文件名存入mFileNames()
- mBatchCount: 每一个batch处理多少条文件
CalibrationDataReader(const std::string &dataDir,const std::string &list,int batchSize =1):mDataDir(dataDir),mCacheFileName("weights/calibration.cache"),mBatchSize(batchSize),mImgSize(kInputH * kInputW){
        mInputDims ={1,3, kInputH, kInputW};// 设置网络输入尺寸
        mInputCount = mBatchSize * samplesCommon::volume(mInputDims);// 将全部维度相乘获得tensor的总数cuda_preprocess_init(mImgSize);// 获得足够的内存处理每一帧数据// 开辟内存cudaMalloc(&mDeviceBatchData, kInputH * kInputW *3*sizeof(float));// 加载校准数据集的文件列表
        std::ifstream infile(list);// 创建一个文件输入流
        std::string line;// 用于读取每一行文件名while(std::getline(infile, line))// 用于逐行读取文件列表中的文件名{// std::getline() 每次读完都会自动到换行符或者stream的结尾
            sample::gLogInfo << line << std::endl;// 打印读取到的文件名
            mFileNames.push_back(line);// mFileNames  vector<string> }// 计算mBatchCount
        mBatchCount = mFileNames.size()/ mBatchSize;
        std::cout <<"CalibrationDataReader: "<< mFileNames.size()<<" images, "<< mBatchCount <<" batches."<< std::endl;}
4.2 getBatchSize()
拿到BatchSize()
int32_tgetBatchSize()constnoexceptoverride{return mBatchSize;}
4.3 getBatch()
getBatch() 函数用于提供一批校准数据,并将数据绑定到 TensorRT 引擎的输入张量上。在该函数中,校准器需要将当前批次的校准数据读取到内存中,并将其复制到设备内存中,然后将数据指针传递给 TensorRT 引擎,以供后续的校准计算使用。getBatch() 函数是由 TensorRT 引擎在执行校准时自动调用的。
boolgetBatch(void*bindings[],constchar*names[],int nbBindings)noexceptoverride{// 如果当前批次已经大于总批次数, 返回falseif(mCurBatch +1> mBatchCount){returnfalse;}// offset 指针在Device上面的偏移量int offset = kInputH * kInputW *3*sizeof(float);for(int i =0; i < mBatchSize; i++){int idx = mCurBatch * mBatchSize + i;// 获取索引在List里面
            std::string fileName = mDataDir +"/"+ mFileNames[idx];// 获取输入样本的文件名
            cv::Mat img = cv::imread(fileName);// 读取图片int new_image_size = img.cols * img.rows;// size// 如果图片大了要重新分配内存的if(new_image_size > mImgSize){
                mImgSize = new_image_size;cuda_preprocess_destroy();cuda_preprocess_init(mImgSize);}// 输入预处理process_input_gpu(img, mDeviceBatchData + i * offset);}/*
        这里就是绑定bindings跟name, 一一对应
        bindings 是 TensorRT 引擎绑定数据所使用的指针数组,用于将输入和输出张量分配到对应的位置,同时也可以用来传递批量数据。
        name是bindings对应的名字
        */for(int i =0; i < nbBindings; i++){if(!strcmp(names[i], kInputTensorName)){
                bindings[i]= mDeviceBatchData + i * offset;}}
        mCurBatch++;returntrue;}
4.4 readCalibrationCache()
读取存储在文件中的量化校准表,将其存储在缓存中,并返回缓存的指针和大小。函数首先清空了存储在成员变量 mCalibrationCache 中的量化校准表缓存,然后从文件流中读取缓存数据并存储到 mCalibrationCache 中,最后将缓存的指针和大小返回。如果读取失败或者缓存大小为0,则返回nullptr。这个函数在 CalibrationDataReader 中被实现,并在量化推理引擎中用于加载量化校准表。 也是在engine执行校准的时候自动调用的
constvoid*readCalibrationCache(std::size_t &length)noexceptoverride{// 清空缓存
        mCalibrationCache.clear();// 输入文件流: 路径名
        std::ifstream input(mCacheFileName, std::ios::binary);
        input >> std::noskipws;// 设置输入流, 不忽略空白字符if(input.good()){// 把输入流的中读取的所有字符都复制mCalibrationCache中
           std::copy(std::istream_iterator<char>(input), std::istream_iterator<char>(), std::back_inserter(mCalibrationCache));}

        length = mCalibrationCache.size();return length ? mCalibrationCache.data():nullptr;}
4.5 writeCalibrationCache()
writeCalibrationCache 方法也是在 TensorRT 引擎执行 INT8 校准过程中自动调用的,用于将校准结果写入到缓存文件中,以便下次使用时可以直接读取缓存,避免重新执行校准过程,提高了性能。具体来说,writeCalibrationCache 方法会将缓存数据指针和缓存数据的大小传递给文件输出流,并将其写入到缓存文件中。
// 用于将校准缓存写入到缓存文件中。在该方法中,需要将缓存数据指针和缓存数据的大小传递给文件输出流,并将其写入到缓存文件中。voidwriteCalibrationCache(constvoid*cache, std::size_t length)noexceptoverride{
        std::ofstream output(mCacheFileName, std::ios::binary);
        output.write(reinterpret_cast<constchar*>(cache), length);}
5. build.cu
1. builder: 创建builder
2. builder->network;
    - network->parsed
    - network->Input

3. builder->config;
    config<- (builder->profile(Input))
    config<- (profileStream)
    config<- (setFlag)4. builder->engine(*network, *config)
- 先创建builder
- 通过builder创建一个空network
- 通过onnx解析器给网络添加网络的输入、输出、层等节点,以及设置各个节点之间的连接关系
- onnx解析器通过日志等级查看是否能被解析, 如果能的话就走下去
- 通过添加好的网络拿到第一个Input节点
- builder->config(配置参数)
- config设置优化配置profile, 这里只优化输入尺寸
- config设置量化精度
- config设置profileStream
- config设置最大workspace
- build设置最大的batch size
- engine(*network, *config)
- 序列化保存engine
intmain(int argc,char**argv){if(argc <4){
        std::cerr <<"Usage: ./build [onnx_path] [calib_dir] [calib_list_file]"<< std::endl;return-1;}// 命令行获取: onnx path, 校准文件路径, 校准数据列表文件char*onnx_file_path = argv[1];char*calib_dir = argv[2];char*calib_list_file = argv[3];// ============1. 创建Builder===============auto builder = std::unique_ptr<nvinfer1::IBuilder>(nvinfer1::createInferBuilder(sample::gLogger.getTRTLogger()));if(!builder){
        std::cerr <<"builder not created"<< std::endl;return-1;}// ============2. builder->network ================auto network = std::unique_ptr<nvinfer1::INetworkDefinition>(builder->createNetworkV2(1));if(!network){
        std::cerr <<"network not created"<< std::endl;return-1;}// ============3. 解析onnx, 看看能不能解析这个onxx文件 ===============auto parser = std::unique_ptr<nvonnxparser::IParser>(nvonnxparser::createParser(*network, sample::gLogger.getTRTLogger()));auto parsed = parser->parseFromFile(onnx_file_path,static_cast<int>(sample::gLogger.getReportableSeverity()));if(!parsed){

        std::cerr <<"could not parse ONNX file: "<< onnx_file_path << std::endl;return-1;}// 配置网络参数, 告诉TensorRT可以怎么去优化网络, auto input = network->getInput(0);// 拿到第一个输入的节点// profile是TensorRT中的优化配置,这里只使用输入大小配置auto profile = builder->createOptimizationProfile();
    profile->setDimensions(input->getName(), nvinfer1::OptProfileSelector::kMIN, nvinfer1::Dims4{1,3,640,640});
    profile->setDimensions(input->getName(), nvinfer1::OptProfileSelector::kMAX, nvinfer1::Dims4{1,3,640,640});
    profile->setDimensions(input->getName(), nvinfer1::OptProfileSelector::kOPT, nvinfer1::Dims4{1,3,640,640});// ============4. builder->config: 配置============================auto config = std::unique_ptr<nvinfer1::IBuilderConfig>(builder->createBuilderConfig());if(!config){
        std::cerr <<"create config failed"<< std::endl;return-1;}// 把profile加进config
    config->addOptimizationProfile(profile);// 设置精度, 设备不支持就FP16量化if(!builder->platformHasFastInt8()){
        sample::gLogInfo <<"设备不支持int 8"<< std::endl;
        config->setFlag(nvinfer1::BuilderFlag::kFP16);}else// INT8量化{// 设置calibrator量化校准器auto calibrator =newCalibrationDataReader(calib_dir, calib_list_file);
        config->setFlag(nvinfer1::BuilderFlag::kINT8);
        config->setInt8Calibrator(calibrator);}// 设置最大的Batch Size, workspace
    builder->setMaxBatchSize(1);
    config->setMemoryPoolLimit(nvinfer1::MemoryPoolType::kWORKSPACE,1<<30);// 创建profileStream, 设置profileauto profileStream = samplesCommon::makeCudaStream();if(!profileStream){
        std::cerr <<"No profile stream"<< std::endl;return-1;}// profileStream 加进 config
    config->setProfileStream(*profileStream);// 5. builder->Engineauto plan = std::unique_ptr<nvinfer1::IHostMemory>(builder->buildSerializedNetwork(*network,*config));if(!plan){
        std::cerr <<"Failed to build plan"<< std::endl;return-1;}// ==========6. 序列化保存engine====================
    std::ofstream engine_file("./weights/my_yolov5.engine", std::ios::binary);assert(engine_file.is_open()&&"Failed to open engine file");
    engine_file.write((char*)plan->data(), plan->size());// 不用释放资源
    std::cout <<"Engine Build Sucess!"<< std::endl;return0;}
6. runtime.cu
解析看这篇帖子,这里几乎没有变化(https://blog.csdn.net/bobchen1017/article/details/129900569)
#include"NvInfer.h"#include"NvOnnxParser.h"#include"logger.h"#include"common.h"#include"buffers.h"#include"utils/preprocess.h"#include"utils/postprocess.h"#include"utils/types.h"// 加载模型文件
std::vector<unsignedchar>load_engine_file(const std::string &file_name){
    std::vector<unsignedchar> engine_data;
    std::ifstream engine_file(file_name, std::ios::binary);assert(engine_file.is_open()&&"Unable to load engine file.");
    engine_file.seekg(0, engine_file.end);int length = engine_file.tellg();
    engine_data.resize(length);
    engine_file.seekg(0, engine_file.beg);
    engine_file.read(reinterpret_cast<char*>(engine_data.data()), length);return engine_data;}intmain(int argc,char**argv){if(argc <4){
        std::cerr <<"用法: "<< argv[0]<<" <engine_file> <input_path_path> <mode>"<< std::endl;return-1;}auto engine_file = argv[1];// 模型文件auto input_video_path = argv[2];// 输入视频文件auto mode = std::stoi(argv[3]);// 模式// ========= 1. 创建推理运行时runtime =========auto runtime = std::unique_ptr<nvinfer1::IRuntime>(nvinfer1::createInferRuntime(sample::gLogger.getTRTLogger()));if(!runtime){
        std::cout <<"runtime create failed"<< std::endl;return-1;}// ======== 2. 反序列化生成engine ==========// 加载模型文件auto plan =load_engine_file(engine_file);// 反序列化生成engineauto mEngine = std::shared_ptr<nvinfer1::ICudaEngine>(runtime->deserializeCudaEngine(plan.data(), plan.size()));if(!mEngine){return-1;}// ======== 3. 创建执行上下文context =========auto context = std::unique_ptr<nvinfer1::IExecutionContext>(mEngine->createExecutionContext());if(!context){
        std::cout <<"context create failed"<< std::endl;return-1;}// ========== 4. 创建输入输出缓冲区 =========
    samplesCommon::BufferManager buffers(mEngine);auto cap = cv::VideoCapture(input_video_path);int width =int(cap.get(cv::CAP_PROP_FRAME_WIDTH));int height =int(cap.get(cv::CAP_PROP_FRAME_HEIGHT));int fps =int(cap.get(cv::CAP_PROP_FPS));// 写入MP4文件,参数分别是:文件名,编码格式,帧率,帧大小
    cv::VideoWriter writer("./output/record.mp4", cv::VideoWriter::fourcc('H','2','6','4'), fps, cv::Size(width, height));

    cv::Mat frame;int frame_index{0};int img_size = width * height;cuda_preprocess_init(img_size);// 申请cuda内存while(cap.isOpened()){// 统计运行时间auto start = std::chrono::high_resolution_clock::now();

        cap >> frame;if(frame.empty()){
            std::cout <<"文件处理完毕"<< std::endl;break;}
        frame_index++;// 选择预处理方式if(mode ==0){// 使用CPU做letterbox、归一化、BGR2RGB、NHWC to NCHWprocess_input_cpu(frame,(float*)buffers.getDeviceBuffer(kInputTensorName));}elseif(mode ==1){// 使用CPU做letterbox,GPU做归一化、BGR2RGB、NHWC to NCHWprocess_input_cv_affine(frame,(float*)buffers.getDeviceBuffer(kInputTensorName));}elseif(mode ==2){// 使用cuda预处理所有步骤process_input_gpu(frame,(float*)buffers.getDeviceBuffer(kInputTensorName));}// ========== 5. 执行推理 =========
        context->executeV2(buffers.getDeviceBindings().data());// 拷贝回host
        buffers.copyOutputToHost();// 从buffer manager中获取模型输出int32_t*num_det =(int32_t*)buffers.getHostBuffer(kOutNumDet);// 检测到的目标个数int32_t*cls =(int32_t*)buffers.getHostBuffer(kOutDetCls);// 检测到的目标类别float*conf =(float*)buffers.getHostBuffer(kOutDetScores);// 检测到的目标置信度float*bbox =(float*)buffers.getHostBuffer(kOutDetBBoxes);// 检测到的目标框// 执行nms(非极大值抑制),得到最后的检测框
        std::vector<Detection> bboxs;yolo_nms(bboxs, num_det, cls, conf, bbox, kConfThresh, kNmsThresh);// 结束时间auto end = std::chrono::high_resolution_clock::now();// microseconds 微秒,milliseconds 毫秒,seconds 秒,1微妙=0.001毫秒 = 0.000001秒auto elapsed = std::chrono::duration_cast<std::chrono::microseconds>(end - start).count()/1000.f;auto time_str = std::to_string(elapsed)+"ms";auto fps =1000.0f/ elapsed;auto fps_str = std::to_string(fps)+"fps";// 遍历检测结果for(size_t j =0; j < bboxs.size(); j++){
            cv::Rect r =get_rect(frame, bboxs[j].bbox);
            cv::rectangle(frame, r, cv::Scalar(0x27,0xC1,0x36),2);
            cv::putText(frame, std::to_string((int)bboxs[j].class_id), cv::Point(r.x, r.y -10), cv::FONT_HERSHEY_PLAIN,1.2, cv::Scalar(0x27,0xC1,0x36),2);}
        cv::putText(frame, time_str, cv::Point(50,50), cv::FONT_HERSHEY_PLAIN,1.2, cv::Scalar(0xFF,0xFF,0xFF),2);
        cv::putText(frame, fps_str, cv::Point(50,100), cv::FONT_HERSHEY_PLAIN,1.2, cv::Scalar(0xFF,0xFF,0xFF),2);// cv::imshow("frame", frame);// 写入视频文件
        writer.write(frame);
        std::cout <<"处理完第"<< frame_index <<"帧"<< std::endl;if(cv::waitKey(1)==27)break;}// ========== 6. 释放资源 =========// 因为使用了unique_ptr,所以不需要手动释放return0;}
版权归原作者 智障学AI 所有, 如有侵权,请联系我们删除。