
0、项目介绍
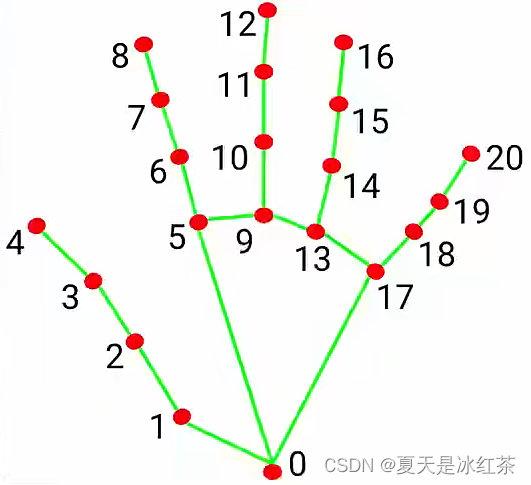
你可以根据下面进行对应观察。
  WRIST = 0
  THUMB_CMC = 1
  THUMB_MCP = 2
  THUMB_IP = 3
  THUMB_TIP = 4
  INDEX_FINGER_MCP = 5
  INDEX_FINGER_PIP = 6
  INDEX_FINGER_DIP = 7
  INDEX_FINGER_TIP = 8
  MIDDLE_FINGER_MCP = 9
  MIDDLE_FINGER_PIP = 10
  MIDDLE_FINGER_DIP = 11
  MIDDLE_FINGER_TIP = 12
  RING_FINGER_MCP = 13
  RING_FINGER_PIP = 14
  RING_FINGER_DIP = 15
  RING_FINGER_TIP = 16
  PINKY_MCP = 17
  PINKY_PIP = 18
  PINKY_DIP = 19
  PINKY_TIP = 20
这是一个比较基础的项目,我们将在后面对它进行一个拓展,有很多的计算机视觉的游戏都可以根据这个来创立,比如贪吃蛇、水果忍者、虚拟拖拽等
1、效果展示
基础的手指识别展现
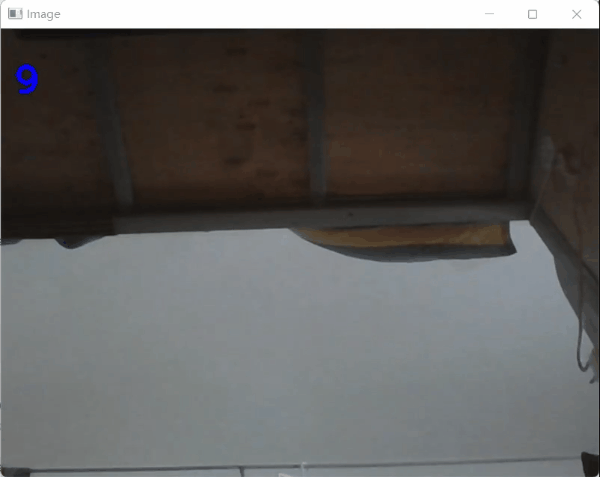
可以看到左上角的帧速率还是挺不错的,大致在20左右。
2、项目搭建
没有下这个mediapipe的包的,pip命令下载就好。
pip install mediapipe
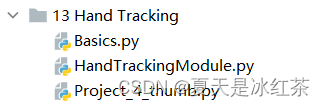
上图是你需要搭建的
3、项目的代码
基础的手指识别
import cv2
import mediapipe as mp
import time

cap = cv2.VideoCapture(0)

mpHands = mp.solutions.hands
hands = mpHands.Hands()
mpDraw = mp.solutions.drawing_utils

pTime = 0  #previous time
cTime = 0  #current time

while True:
    success, img = cap.read()
    imgRGB = cv2.cvtColor(img, cv2.COLOR_BGR2RGB)
    results = hands.process(imgRGB)
    # print(results.multi_hand_landmarks)

    if results.multi_hand_landmarks:
        for handLms in results.multi_hand_landmarks:
            for id, lm in enumerate(handLms.landmark):
                print(id, lm)
                h, w, c = img.shape
                cx, cy = int(lm.x * w), int(lm.y * h)
                print(id, cx, cy)
                # if id == 8:
                cv2.circle(img, (cx, cy), 12, (255, 0, 100), cv2.FILLED)

            mpDraw.draw_landmarks(img, handLms, mpHands.HAND_CONNECTIONS)

    cTime = time.time()
    fps = 1 / (cTime - pTime)
    pTime = cTime

    cv2.putText(img, str(int(fps)), (12, 70), cv2.FONT_HERSHEY_PLAIN, 3,
                (255, 0, 0), 3)

    cv2.imshow("Image", img)
    k=cv2.waitKey(1)
    if k==27:
        break
1,我们先来看while循环之外的,mediapipe的solutions函数你可以理解为它是一种形式,它的具体作用并没有给出,下面是打开了Hands的函数,里面被__init__隐藏了,参数的大概意思是静态图像模式为False,不然它的检测速度将会很慢,识别最多的手指数为2,模型的复杂度为1,检测与追踪的置信度为0.5。所以这里最好的就是默认即可。
  def __init__(self,
               static_image_mode=False,
               max_num_hands=2,
               model_complexity=1,
               min_detection_confidence=0.5,
               min_tracking_confidence=0.5):
在这下面是Mediapipe的一些API命令,我们用到了下面的第二个,绘图实用程序。
import mediapipe.python.solutions.drawing_styles
import mediapipe.python.solutions.drawing_utils
import mediapipe.python.solutions.face_detection
import mediapipe.python.solutions.face_mesh
import mediapipe.python.solutions.face_mesh_connections
import mediapipe.python.solutions.hands
import mediapipe.python.solutions.hands_connections
import mediapipe.python.solutions.holistic
import mediapipe.python.solutions.objectron
import mediapipe.python.solutions.pose
import mediapipe.python.solutions.selfie_segmentation
2、再来看看循环之中的,这里有一步BGR—>RGB的步骤,是因为下面hands.py文件中,process方法只处理RGB图像并返回每个检测到的手的手标志和手的惯用度。我们使用multi_hand_landmarks,打印出来后,我们来看看我提取的一小部分。
None
None
None
None
None
landmark {
  x: 0.21002258360385895
  y: 0.5776774883270264
  z: -0.034888774156570435
}
landmark {
  x: 0.2889356315135956
  y: 0.5564149618148804
  z: -0.047251101583242416
}
landmark {
  x: 0.3520330786705017
  y: 0.5242205262184143
  z: -0.05719052627682686
}
这里意思就是没有检测到手,打印出的None,检测到手后,打印出来你就会得到一个数组,很好,这样我们就可以据此来写条件语句,用enumerate函数获得ID以及landmark中的数值。我们来看看控制台中:
10 x: 0.4111193120479584
y: 0.4475841224193573
z: -0.006161178927868605

11 x: 0.4441204369068146
y: 0.5238251090049744
z: -0.019978130236268044
这里在x前面就是Id,它这个Id共有21,从0到20,这对应于我们手掌上的信息。而地表信息都是小素,这个是按像素为单位的,那么只要用窗口的大小对应相乘,这样就可以获得我们想要的坐标信息,这里draw_landmarks是循环外绘图实用程序的一个函数,我们用它来链接点,这里用到了一些数学知识,我们可以跳过。由于每个点较小,我们可以通过画圆来方便我们观察。
3、最后,我们将fps,帧速率打印出来,显示图像以及窗口退出的程序。
制作为追踪手指的类
import cv2
import mediapipe as mp
import time

class handDetector():
    def __init__(self, mode=False, maxHands=2, complexity=1,detectionCon=0.5, trackCon=0.5):
        self.mode = mode
        self.maxHands = maxHands
        self.complexity=complexity
        self.detectionCon = detectionCon
        self.trackCon = trackCon

        self.mpHands = mp.solutions.hands
        self.hands = self.mpHands.Hands(self.mode, self.maxHands,self.complexity,
                                        self.detectionCon, self.trackCon)
        self.mpDraw = mp.solutions.drawing_utils

    def findHands(self, img, draw=True):
        imgRGB = cv2.cvtColor(img, cv2.COLOR_BGR2RGB)
        self.results = self.hands.process(imgRGB)
        # print(results.multi_hand_landmarks)

        if self.results.multi_hand_landmarks:
            for handLms in self.results.multi_hand_landmarks:
                if draw:
                    self.mpDraw.draw_landmarks(img, handLms,
                                               self.mpHands.HAND_CONNECTIONS)
        return img

    def findPosition(self, img, handNo=0, draw=True):

        lmList = []
        if self.results.multi_hand_landmarks:
            myHand = self.results.multi_hand_landmarks[handNo]
            for id, lm in enumerate(myHand.landmark):
                # print(id, lm)
                h, w, c = img.shape
                cx, cy = int(lm.x * w), int(lm.y * h)
                # print(id, cx, cy)
                lmList.append([id, cx, cy])
                if draw:
                    cv2.circle(img, (cx, cy), 10, (255, 0, 100), cv2.FILLED)

        return lmList

def main():
    pTime = 0
    cTime = 0
    cap = cv2.VideoCapture(0)
    detector = handDetector()
    while True:
        success, img = cap.read()
        img = detector.findHands(img)
        lmList = detector.findPosition(img)
        if len(lmList) != 0:
            print(lmList[4])

        cTime = time.time()
        fps = 1 / (cTime - pTime)
        pTime = cTime

        cv2.putText(img, str(int(fps)), (12, 70), cv2.FONT_HERSHEY_PLAIN, 3,
                    (255, 0, 0), 3)

        cv2.imshow("Image", img)
        k = cv2.waitKey(1)
        if k == 27:
            break

if __name__ == "__main__":
    main()
从最上面的图中,我们可以看到索引4是指大拇指,之后我们可以可以根据这个做很多有趣的项目。
项目的展示(大拇指)
import cv2
import mediapipe as mp
import time
import HandTrackingModule as htm

pTime = 0
cTime = 0
cap = cv2.VideoCapture(0)
detector = htm.handDetector()
while True:
    success, img = cap.read()
    img = detector.findHands(img, draw=True )
    lmList = detector.findPosition(img, draw=False)
    if len(lmList) != 0:
        print(lmList[4])

    cTime = time.time()
    fps = 1 / (cTime - pTime)
    pTime = cTime

    #cv2.putText(img, str(int(fps)), (12, 70), cv2.FONT_HERSHEY_PLAIN, 3,
    #                (255, 0, 0), 3)

    cv2.imshow("Image", img)
    k=cv2.waitKey(1)
    if k==27:
        break
以下是控制台中的信息。
[4, 210, 30]
[4, 211, 30]
[4, 216, 32]
[4, 227, 32]
[4, 228, 32]
[4, 228, 33]
[4, 240, 33]
[4, 239, 35]
[4, 252, 35]
[4, 262, 33]
[4, 259, 32]
[4, 268, 32]
[4, 275, 33]
[4, 276, 34]
[4, 294, 32]
[4, 325, 22]
[4, 325, 22]
可以看到这是我移动大拇指的信息。
4、项目的资源
GitHub:Opencv-project-training/Opencv project training/13 Hand Tracking at main · Auorui/Opencv-project-training · GitHub
如果大家觉得有用可以点击这里,谢谢大家的支持。

5、项目的总结
上周由于事情较多,所以没有更新,而且最近的学校里的功课也要做,所以很抱歉,今天的这个项目我觉得很有用,就比如在这之后的一些项目也会用到,到时候可以做很多有趣的项目。
版权归原作者 夏天是冰红茶 所有, 如有侵权,请联系我们删除。