
DETR(detection transformer)简介
DETR是Facebook AI的研究者提出的Transformer的视觉版本,是CNN和transformer的融合,实现了端到端的预测,主要用于目标检测和全景分割。
DETR的Github地址:https://github.com/facebookresearch/detr
DETR的论文地址:https://arxiv.org/pdf/2005.12872.pdf
DETR训练自己数据集
数据准备
DETR需要coco数据集才可以进行训练,需要将数据标签和图片保存为如下格式: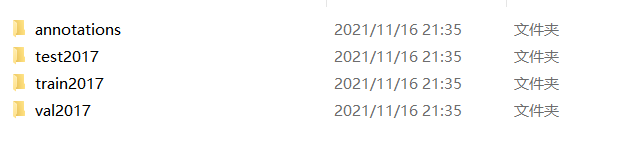
其中,annotations是如下json文件,
test、train和val2017存储的只有图片。
那么要如何得到coco数据集格式的文件呢,接下来我提供两种方法:
coco数据集获取
1、labelme打好json文件后转换为coco格式数据集
2、roboflow标注后直接生成coco格式数据集(需要连外网,需要的联系我可以免费给你提供好用的外网扩展程序)。roboflow网址:https://app.roboflow.com/
然后介绍如何用labelme转换数据集,首先在cmd python环境或者在pycharm终端输入pip install labelme,下载好后输入labelme进入打标签页面,打好标签后生成json文件,再运行如下脚本:
import argparse
import json
import matplotlib.pyplot as plt
import skimage.io as io
from labelme import utils
import numpy as np
import glob
import PIL.Image

classMyEncoder(json.JSONEncoder):defdefault(self, obj):ifisinstance(obj, np.integer):returnint(obj)elifisinstance(obj, np.floating):returnfloat(obj)elifisinstance(obj, np.ndarray):return obj.tolist()else:returnsuper(MyEncoder, self).default(obj)classlabelme2coco(object):def__init__(self, labelme_json=[], save_json_path='./tran.json'):
        self.labelme_json = labelme_json
        self.save_json_path = save_json_path
        self.images =[]
        self.categories =[]
        self.annotations =[]# self.data_coco = {}
        self.label =[]
        self.annID =1
        self.height =0
        self.width =0

        self.save_json()defdata_transfer(self):for num, json_file inenumerate(self.labelme_json):withopen(json_file,'r')as fp:
                data = json.load(fp)# 加载json文件
                self.images.append(self.image(data, num))for shapes in data['shapes']:
                    label = shapes['label']if label notin self.label:
                        self.categories.append(self.categorie(label))
                        self.label.append(label)
                    points = shapes['points']# 这里的point是用rectangle标注得到的,只有两个点,需要转成四个点
                    points.append([points[0][0], points[1][1]])
                    points.append([points[1][0], points[0][1]])
                    self.annotations.append(self.annotation(points, label, num))
                    self.annID +=1defimage(self, data, num):
        image ={}
        img = utils.img_b64_to_arr(data['imageData'])# 解析原图片数据# img=io.imread(data['imagePath']) # 通过图片路径打开图片# img = cv2.imread(data['imagePath'], 0)
        height, width = img.shape[:2]
        img =None
        image['height']= height
        image['width']= width
        image['id']= num +1
        image['file_name']= data['imagePath'].split('/')[-1]

        self.height = height
        self.width = width
        return image

    defcategorie(self, label):
        categorie ={}
        categorie['supercategory']='Cancer'
        categorie['id']=len(self.label)+1# 0 默认为背景
        categorie['name']= label
        return categorie

    defannotation(self, points, label, num):
        annotation ={}
        annotation['segmentation']=[list(np.asarray(points).flatten())]
        annotation['iscrowd']=0
        annotation['image_id']= num +1# annotation['bbox'] = str(self.getbbox(points)) # 使用list保存json文件时报错(不知道为什么)# list(map(int,a[1:-1].split(','))) a=annotation['bbox'] 使用该方式转成list
        annotation['bbox']=list(map(float, self.getbbox(points)))
        annotation['area']= annotation['bbox'][2]* annotation['bbox'][3]# annotation['category_id'] = self.getcatid(label)
        annotation['category_id']= self.getcatid(label)# 注意,源代码默认为1
        annotation['id']= self.annID
        return annotation

    defgetcatid(self, label):for categorie in self.categories:if label == categorie['name']:return categorie['id']return1defgetbbox(self, points):# img = np.zeros([self.height,self.width],np.uint8)# cv2.polylines(img, [np.asarray(points)], True, 1, lineType=cv2.LINE_AA)  # 画边界线# cv2.fillPoly(img, [np.asarray(points)], 1)  # 画多边形 内部像素值为1
        polygons = points
        mask = self.polygons_to_mask([self.height, self.width], polygons)return self.mask2box(mask)defmask2box(self, mask):'''从mask反算出其边框
        mask:[h,w]  0、1组成的图片
        1对应对象,只需计算1对应的行列号(左上角行列号,右下角行列号,就可以算出其边框)
        '''# np.where(mask==1)
        index = np.argwhere(mask ==1)
        rows = index[:,0]
        clos = index[:,1]# 解析左上角行列号
        left_top_r = np.min(rows)# y
        left_top_c = np.min(clos)# x# 解析右下角行列号
        right_bottom_r = np.max(rows)
        right_bottom_c = np.max(clos)# return [(left_top_r,left_top_c),(right_bottom_r,right_bottom_c)]# return [(left_top_c, left_top_r), (right_bottom_c, right_bottom_r)]# return [left_top_c, left_top_r, right_bottom_c, right_bottom_r]  # [x1,y1,x2,y2]return[left_top_c, left_top_r, right_bottom_c - left_top_c,
                right_bottom_r - left_top_r]# [x1,y1,w,h] 对应COCO的bbox格式defpolygons_to_mask(self, img_shape, polygons):
        mask = np.zeros(img_shape, dtype=np.uint8)
        mask = PIL.Image.fromarray(mask)
        xy =list(map(tuple, polygons))
        PIL.ImageDraw.Draw(mask).polygon(xy=xy, outline=1, fill=1)
        mask = np.array(mask, dtype=bool)return mask

    defdata2coco(self):
        data_coco ={}
        data_coco['images']= self.images
        data_coco['categories']= self.categories
        data_coco['annotations']= self.annotations
        return data_coco

    defsave_json(self):
        self.data_transfer()
        self.data_coco = self.data2coco()# 保存json文件
        json.dump(self.data_coco,open(self.save_json_path,'w'), indent=4, cls=MyEncoder)# indent=4 更加美观显示

labelme_json = glob.glob(r'./*.json')# labelme_json=['./1.json']
labelme2coco(labelme_json,'.\\instances_val2017.json')
这个脚本是我之前在别人CSDN找的,比较好用。
预训练文件下载
有了数据集后,为了加快学习速度,可以去官网下载预训练模型,官网提供的有resnet_50和resnet_101两个预训练版本,下载后得到pth文件。下载如下: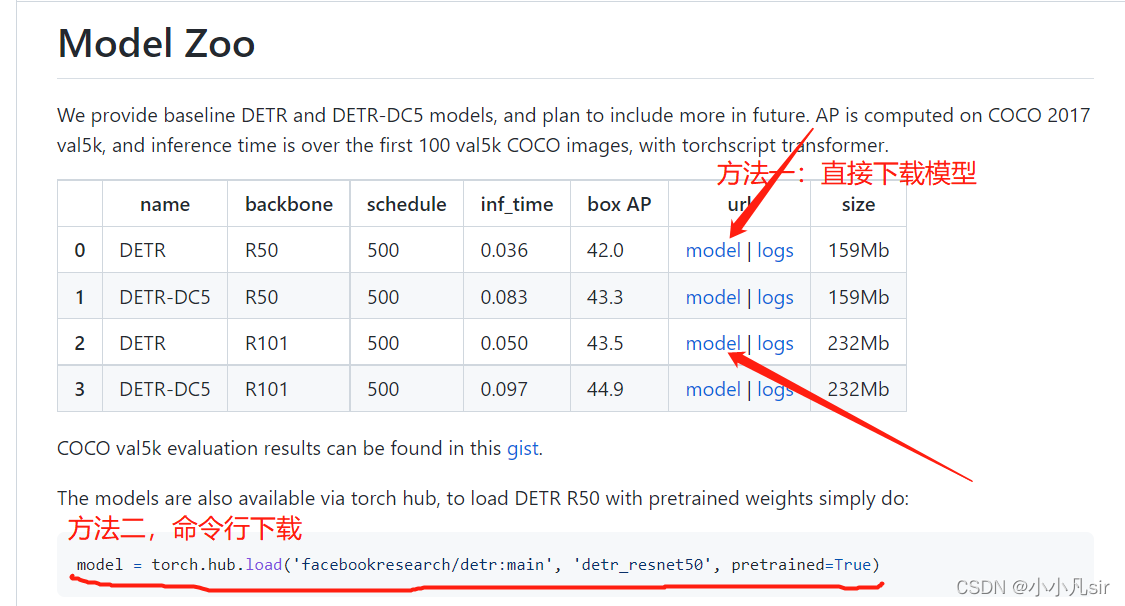
修改detr-main文件的一些配置
因为detr是针对的是91(数字可能错了,不是记得了)个目标进行预测,所以我们在进行预测的时候,需要把目标预测数目改为自己的需要检测目标的数目。首先需要修改上一步下载好的pth文件,运行如下脚本:
import torch
model1  = torch.load('detr-r101-2c7b67e5.pth')

num_class =2#我只需要检测一个物体,所以是2(检测个数+background)
model1["model"]["class_embed.weight"].resize_(num_class+1,256)
model1["model"]["class_embed.bias"].resize_(num_class+1)
torch.save(model1,"detr-r50_test_%d.pth"%num_class)
然后还需要修改detr.py文件夹下的num_classes,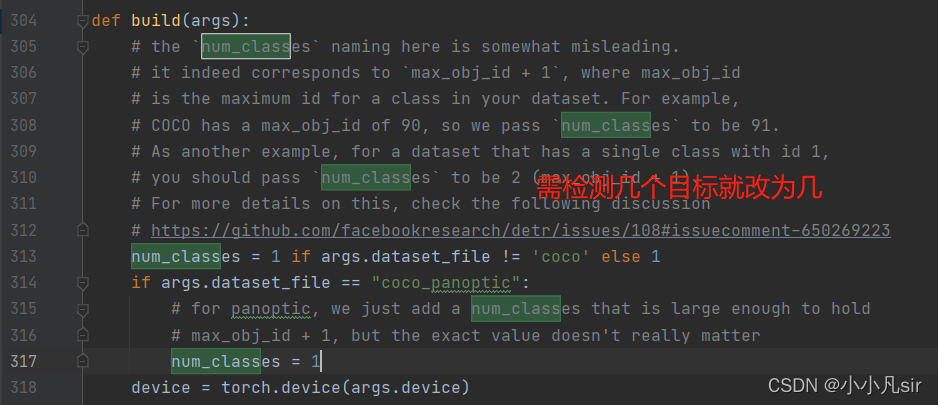
训练模型
训练模型这块,可以直接执行命令行,或者在main.py里面修改好参数后运行,
官方提供的命令行如下:
python -m torch.distributed.launch --nproc_per_node=8--use_env main.py --coco_path /path/to/coco
结束语
我觉得在训练那块还是改main.py文件比较好,需要改的地方挺多,我觉得需要修改的主要有–epoch(轮次)、–num_workers(主要看你电脑性能怎么样,好点可以调高些)、–output_dir(输出的模型权重,pth文件)、–dataset_file(数据存放位置)、–coco_path(coco数据集的位置)和–resume(预训练权重文件位置)。
还一点就是官方只提供了训练脚本,但是没预测脚本,其实预测脚本也挺简单的,就是加载模型,加载权重参数,然后传入图片预处理什么的,代码挺多的,放上来内容太多了,我写了两个预测脚本,需要的可以联系我,或者不会运行的可以问我,其实也挺简单的,多玩几次就会了~~
最后展示下效果吧,预测的还是挺准的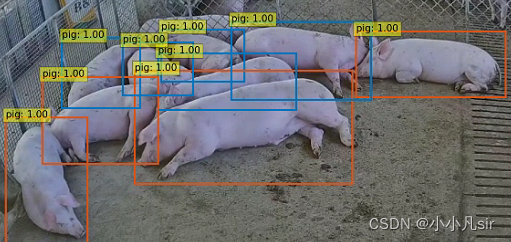
版权归原作者 小小凡sir 所有, 如有侵权,请联系我们删除。