- 💡统一使用 YOLOv5 代码框架,结合不同模块来构建不同的YOLO目标检测模型。
- 🌟本项目包含大量的改进方式,降低改进难度,改进点包含
【Backbone特征主干】、【Neck特征融合】、【Head检测头】、【注意力机制】、【IoU损失函数】、【NMS】、【Loss计算方式】、【自注意力机制】、【数据增强部分】、【标签分配策略】、【激活函数】等各个部分
本篇是《BoTNet Transformer结构🚀》的修改 演示
文章目录
BoTNet理论部分
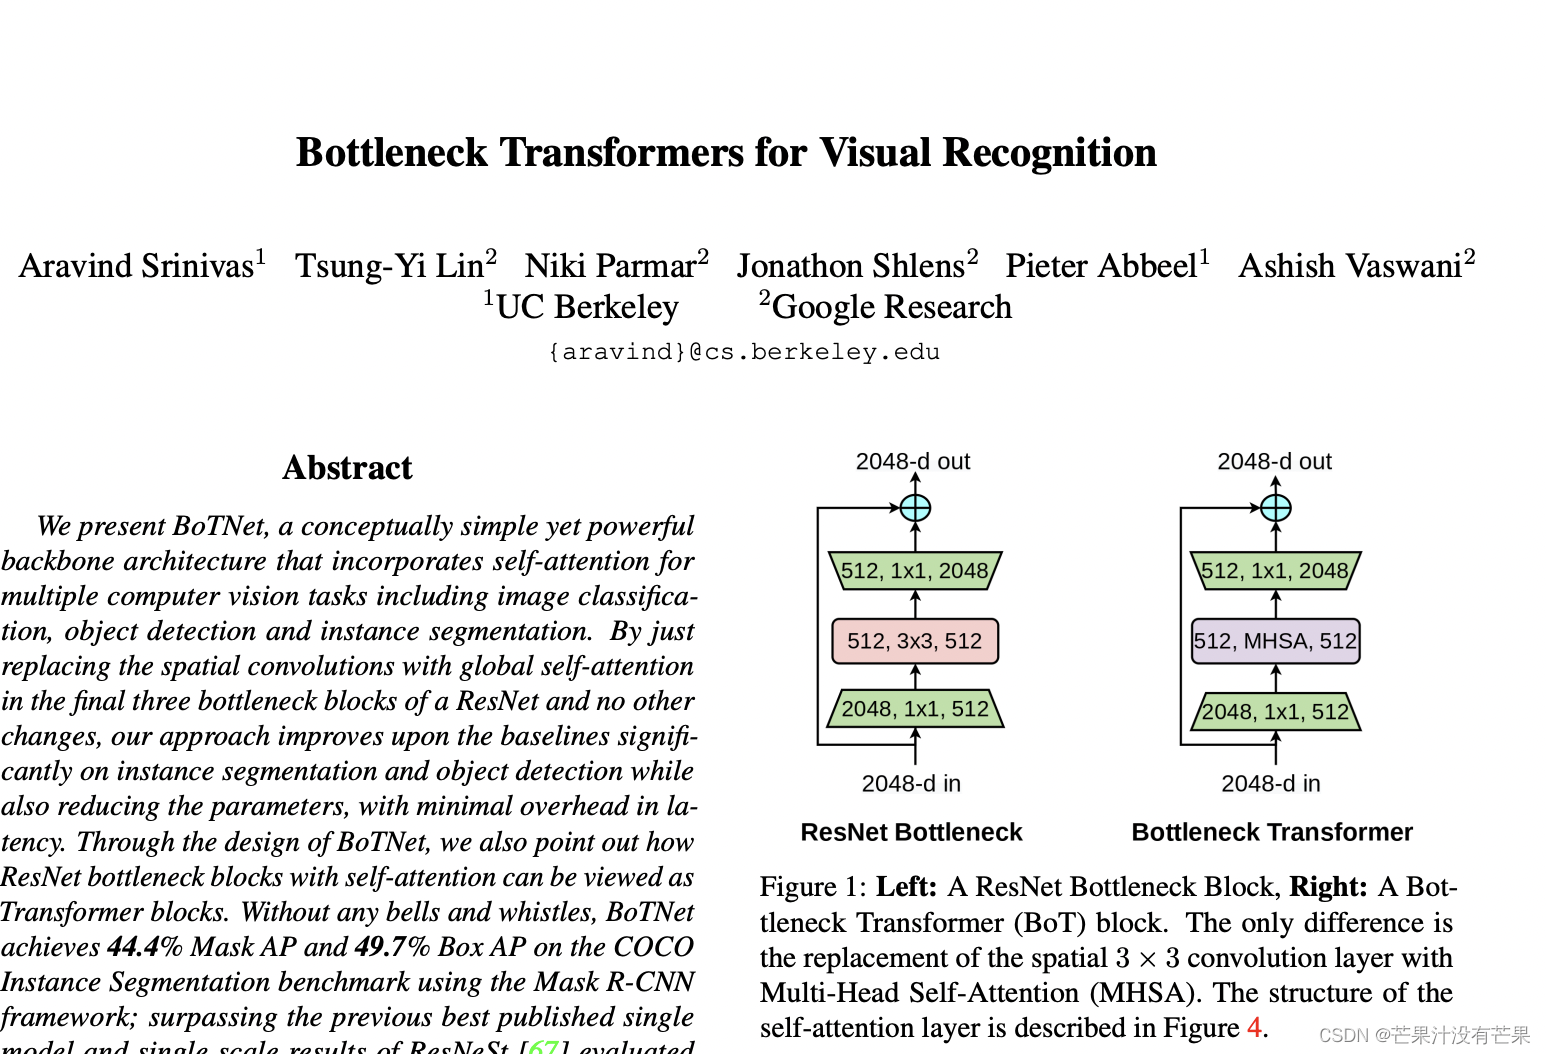
论文:Bottleneck Transformers for Visual Recognition
论文地址:arxiv
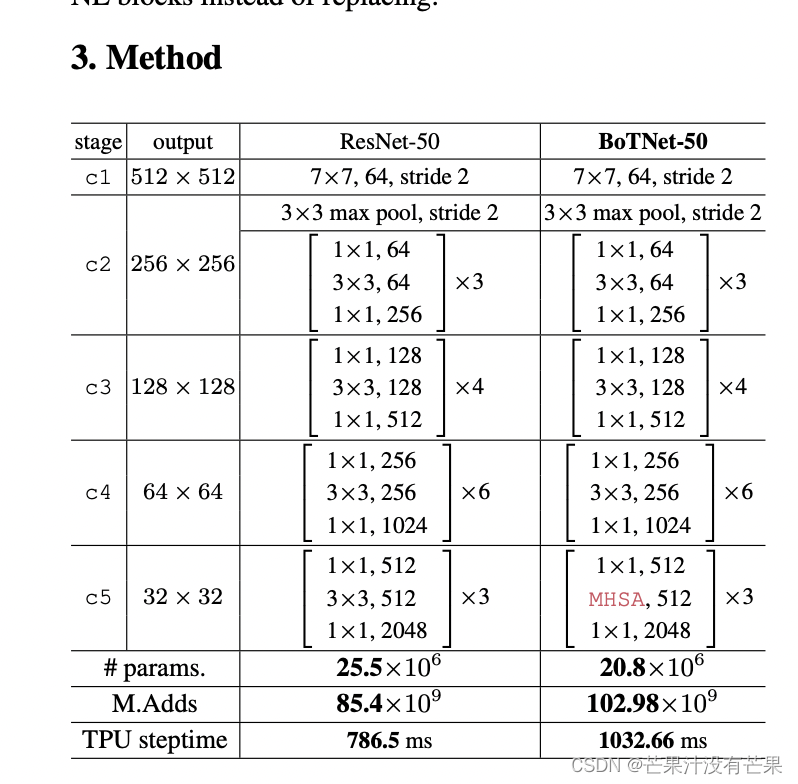
论文提出了 BoTNet,这是一种概念上简单但功能强大的主干架构,它结合了用于多个计算机视觉任务的自注意力,包括图像分类、对象检测和实例分割。通过仅在 ResNet 的最后三个瓶颈块中用全局自注意力替换空间卷积并且没有其他更改,我们的方法在实例分割和对象检测方面显着改进了基线,同时还减少了参数,而延迟开销最小。通过 BoTNet 的设计,我们还指出了如何将具有自注意力的 ResNet 瓶颈块视为 Transformer 块。没有任何花里胡哨,BoTNet 达到44.4 % Mask AP 和49.7% Box AP on the COCO Instance Segmentation benchmark using the Mask R-CNN framework;超过了 ResNeSt 之前发表的最佳单一模型和单一尺度结果 [72]在 COCO 验证集上进行评估。最后,我们展示了对 BoTNet 设计的简单改编,用于图像分类,从而使模型在 ImageNet 基准测试中实现了84.7 % 的 top- 1准确率,同时在“计算”速度上比流行的模型快2.33倍TPU-v3 硬件上的 EfficientNet 模型。我们希望我们简单而有效的方法能够为未来视觉自注意力模型的研究奠定坚实的基础。2
BoTNet:一种简单却功能强大的backbone,该架构将自注意力纳入了多种计算机视觉任务,包括图像分类,目标检测和实例分割。该方法在实例分割和目标检测方面显著改善了基线,同时还减少了参数,从而使延迟最小化。
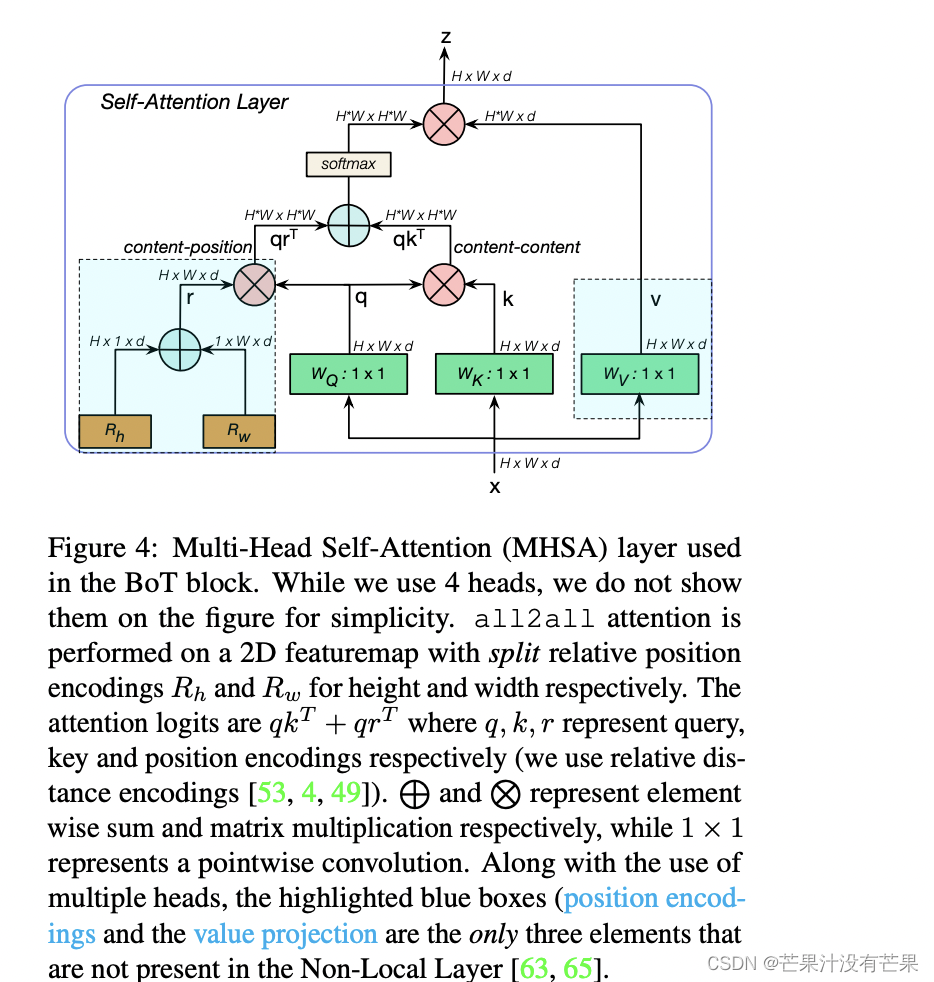
通过仅在ResNet中,用Multi-Head Self-Attention (MHSA)来替换3 × 3 convolution,并且不进行其他任何更改(如图1所示)。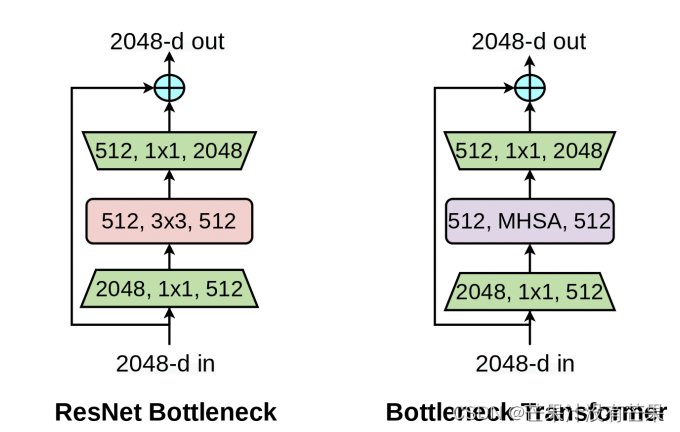
实验
YOLOv5添加BoT的yaml配置文件修改
增加以下yolov5s_botnet.yaml文件
# parameters
nc: 80  # number of classes
depth_multiple: 0.33  # model depth multiple
width_multiple: 0.50  # layer channel multiple

anchors:
  - [10,13, 16,30, 33,23]  # P3/8
  - [30,61, 62,45, 59,119]  # P4/16
  - [116,90, 156,198, 373,326]  # P5/32

# YOLOv5 backbone
backbone:
  # [from, number, module, args]               # [c=channels,module,kernlsize,strides]
  [[-1, 1, Conv, [64, 6, 2, 2]],   # 0-P1/2           [c=3,64*0.5=32,3]
   [-1, 1, Conv, [128, 3, 2]],  # 1-P2/4
   [-1, 3, C3, [128]],
   [-1, 1, Conv, [256, 3, 2]],  # 3-P3/8
   [-1, 6, C3, [256]],
   [-1, 1, Conv, [512, 3, 2]],  # 5-P4/16
   [-1, 9, C3, [512]],
   [-1, 1, Conv, [1024, 3, 2]],  # 7-P5/32
   [-1, 1, SPPF, [1024,5]],
   [-1, 3, BoT3, [1024]],  # 9
  ]

# YOLOv5 head
head:
  [[-1, 1, Conv, [512, 1, 1]],
   [-1, 1, nn.Upsample, [None, 2, 'nearest']],
   [[-1, 5], 1, Concat, [1]],  # cat backbone P4
   [-1, 3, C3, [512, False]],  # 13

   [-1, 1, Conv, [256, 1, 1]],
   [-1, 1, nn.Upsample, [None, 2, 'nearest']],
   [[-1, 3], 1, Concat, [1]],  # cat backbone P3
   [-1, 3, C3, [256, False]],  # 17 (P3/8-small)

   [-1, 1, Conv, [256, 3, 2]],
   [[-1, 14], 1, Concat, [1]],  # cat head P4
   [-1, 3, C3, [512, False]],  # 20 (P4/16-medium)       [256, 256, 1, False]

   [-1, 1, Conv, [512, 3, 2]],                           #[256, 256, 3, 2]
   [[-1, 10], 1, Concat, [1]],  # cat head P5
   [-1, 3, C3, [1024, False]],  # 23 (P5/32-large)       [512, 512, 1, False]

   [[17, 20, 23], 1, Detect, [nc, anchors]],  # Detect(P3, P4, P5)
  ]
common.py配置
./models/common.py文件增加以下模块
class MHSA(nn.Module):
    def __init__(self, n_dims, width=14, height=14, heads=4,pos_emb=False):
        super(MHSA, self).__init__()

        self.heads = heads
        self.query = nn.Conv2d(n_dims, n_dims, kernel_size=1)
        self.key = nn.Conv2d(n_dims, n_dims, kernel_size=1)
        self.value = nn.Conv2d(n_dims, n_dims, kernel_size=1)
        self.pos=pos_emb
        if self.pos :
            self.rel_h_weight = nn.Parameter(torch.randn([1, heads, (n_dims ) // heads, 1, int(height)]), requires_grad=True)
            self.rel_w_weight = nn.Parameter(torch.randn([1, heads, (n_dims )// heads, int(width), 1]), requires_grad=True)
        self.softmax = nn.Softmax(dim=-1)

    def forward(self, x):
        n_batch, C, width, height = x.size()
        q = self.query(x).view(n_batch, self.heads, C // self.heads, -1)
        k = self.key(x).view(n_batch, self.heads, C // self.heads, -1)
        v = self.value(x).view(n_batch, self.heads, C // self.heads, -1)
        #print('q shape:{},k shape:{},v shape:{}'.format(q.shape,k.shape,v.shape))  #1,4,64,256
        content_content = torch.matmul(q.permute(0,1,3,2), k) #1,C,h*w,h*w
        # print("qkT=",content_content.shape)
        c1,c2,c3,c4=content_content.size()
        if self.pos:
       # print("old content_content shape",content_content.shape) #1,4,256,256
            content_position = (self.rel_h_weight + self.rel_w_weight).view(1, self.heads, C // self.heads, -1).permute(0,1,3,2)   #1,4,1024,64

            content_position = torch.matmul(content_position, q)# ([1, 4, 1024, 256])
            content_position=content_position if(content_content.shape==content_position.shape)else content_position[:,: , :c3,]
            assert(content_content.shape==content_position.shape)
        #print('new pos222-> shape:',content_position.shape)
       # print('new content222-> shape:',content_content.shape)
            energy = content_content + content_position
        else:
            energy=content_content
        attention = self.softmax(energy)
        out = torch.matmul(v, attention.permute(0,1,3,2)) #1,4,256,64
        out = out.view(n_batch, C, width, height)
        return out
class BottleneckTransformer(nn.Module):
    # Transformer bottleneck
    #expansion = 1

    def __init__(self, c1, c2, stride=1, heads=4, mhsa=True, resolution=None,expansion=1):
        super(BottleneckTransformer, self).__init__()
        c_=int(c2*expansion)
        self.cv1 = Conv(c1, c_, 1,1)
        #self.bn1 = nn.BatchNorm2d(c2)
        if not mhsa:
            self.cv2 = Conv(c_,c2, 3, 1)
        else:
            self.cv2 = nn.ModuleList()
            self.cv2.append(MHSA(c2, width=int(resolution[0]), height=int(resolution[1]), heads=heads))
            if stride == 2:
                self.cv2.append(nn.AvgPool2d(2, 2))
            self.cv2 = nn.Sequential(*self.cv2)
        self.shortcut = c1==c2
        if stride != 1 or c1 != expansion*c2:
            self.shortcut = nn.Sequential(
                nn.Conv2d(c1, expansion*c2, kernel_size=1, stride=stride),
                nn.BatchNorm2d(expansion*c2)
            )
        self.fc1 = nn.Linear(c2, c2)

    def forward(self, x):
        out=x + self.cv2(self.cv1(x)) if self.shortcut else self.cv2(self.cv1(x))
        return out

class BoT3(nn.Module):
    # CSP Bottleneck with 3 convolutions
    def __init__(self, c1, c2, n=1,e=0.5,e2=1,w=20,h=20):  # ch_in, ch_out, number, , expansion,w,h
        super(BoT3, self).__init__()
        c_ = int(c2*e)  # hidden channels
        self.cv1 = Conv(c1, c_, 1, 1)
        self.cv2 = Conv(c1, c_, 1, 1)
        self.cv3 = Conv(2 * c_, c2, 1)  # act=FReLU(c2)
        self.m = nn.Sequential(*[BottleneckTransformer(c_ ,c_, stride=1, heads=4,mhsa=True,resolution=(w,h),expansion=e2) for _ in range(n)])
        # self.m = nn.Sequential(*[CrossConv(c_, c_, 3, 1, g, 1.0, shortcut) for _ in range(n)])

    def forward(self, x):
        return self.cv3(torch.cat((self.m(self.cv1(x)), self.cv2(x)), dim=1))
yolo.py配置修改
然后找到./models/yolo.py文件下里的parse_model函数,将加入的模块名
BoT3
加入进去
在 models/yolo.py文件夹下
- 定位到parse_model函数中
for i, (f, n, m, args) in enumerate(d['backbone'] + d['head']):内部- 对应位置 下方只需要增加
BoT3模块
参考示意图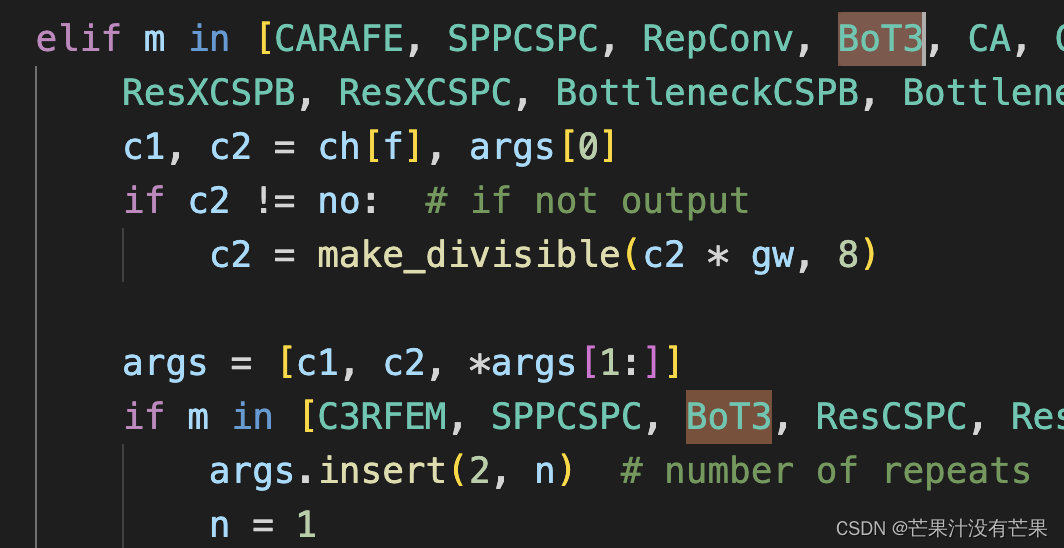
训练yolov5s_botnet.yaml模型
python train.py --cfg yolov5s_botnet.yaml
基于以上yolov5s_botnet.yaml文件继续修改
关于yolov5s_botnet.yaml文件配置中的BoT3模块里面的self-attention模块,可以针对不同数据集自行再进行模块修改,原理一致
版权归原作者 芒果汁没有芒果 所有, 如有侵权,请联系我们删除。