
Whisper.cpp 编译使用
whisper.cpp
是牛人 ggerganov 对 openai 的
whisper
语音识别模型用 C++ 重新实现的项目,开源在 github 上,具有轻量、性能高,实用性强等特点。这篇文章主要记录在 windows 平台,如何使用该模型在本地端进行语音识别。
下载
whisper.cpp 的开源地址在 ggerganov/whisper.cpp: Port of OpenAI’s Whisper model in C/C++ (github.com),首先将项目下载在本地。
git clone https://github.com/ggerganov/whisper.cpp
whisper.cpp
项目里提供了几个现成的模型。建议下载 small 以上的模型,不然识别效果完全无法使用。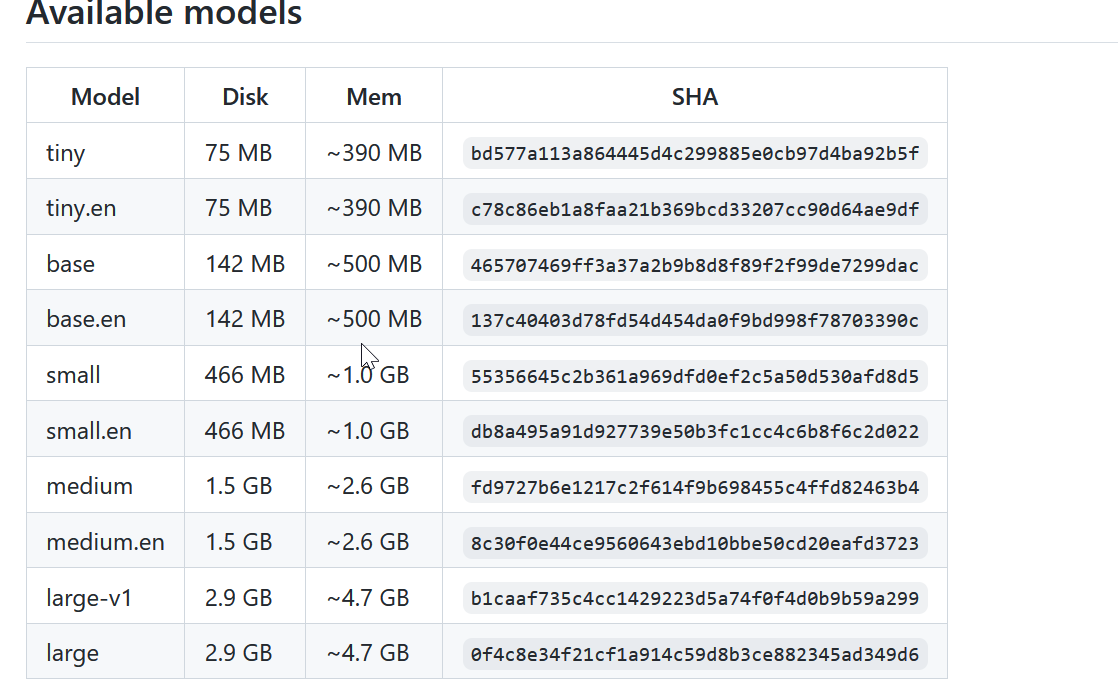
我们可以使用下面命令下载指定模型,下载好之后,它们存储在 models 文件夹下。
.\models\download-ggml-model.cmd small
编译
在项目根目录执行 make 即可编译,得到 main.exe 可执行文件,然后用 main 文件就可以转录本地语音文件了。
> make
转录本地语言
samples 语言文件
- 先我们用项目里自带的一段语音,来体验一下识别效果。其中 - -m 指定模型- -f 指定语音文件
> PS C:\Users\aiyolo\whisper.cpp> ./main.exe -m C:\Users\aiyolo\whisper.cpp\models\ggml-base.bin -f C:\Users\aiyolo\whisper.cpp\samples\jfk.wav
whisper_init_from_file_no_state: loading model from 'C:\Users\aiyolo\whisper.cpp\models\ggml-base.bin'
whisper_model_load: loading model
whisper_model_load: n_vocab       = 51865
whisper_model_load: n_audio_ctx   = 1500
whisper_model_load: n_audio_state = 512
whisper_model_load: n_audio_head  = 8
whisper_model_load: n_audio_layer = 6
whisper_model_load: n_text_ctx    = 448
whisper_model_load: n_text_state  = 512
whisper_model_load: n_text_head   = 8
whisper_model_load: n_text_layer  = 6
whisper_model_load: n_mels        = 80
whisper_model_load: f16           = 1
whisper_model_load: type          = 2
whisper_model_load: mem required  =  215.00 MB (+    6.00 MB per decoder)
whisper_model_load: adding 1608 extra tokens
whisper_model_load: model ctx     =  140.60 MB
whisper_model_load: model size    =  140.54 MB
whisper_init_state: kv self size  =    5.25 MB
whisper_init_state: kv cross size =   17.58 MB

system_info: n_threads = 4 / 16 | AVX = 1 | AVX2 = 1 | AVX512 = 0 | FMA = 1 | NEON = 0 | ARM_FMA = 0 | F16C = 1 | FP16_VA = 0 | WASM_SIMD = 0 | BLAS = 0 | SSE3 = 1 | VSX = 0 |

main: processing 'C:\Users\aiyolo\whisper.cpp\samples\jfk.wav' (176000 samples, 11.0 sec), 4 threads, 1 processors, lang = en, task = transcribe, timestamps = 1 ...

[00:00:00.000 --> 00:00:07.600]   And so my fellow Americans ask not what your country can do for you,
[00:00:07.600 --> 00:00:10.600]   ask what you can do for your country.

whisper_print_timings:     load time =   108.72 ms
whisper_print_timings:     fallbacks =   0 p /   0 h
whisper_print_timings:      mel time =    88.37 ms
whisper_print_timings:   sample time =   104.12 ms /    28 runs (    3.72 ms per run)
whisper_print_timings:   encode time =   824.49 ms /     1 runs (  824.49 ms per run)
whisper_print_timings:   decode time =   138.39 ms /    28 runs (    4.94 ms per run)
whisper_print_timings:    total time =  1302.72 ms
可以看到识别效果很好。
识别中文
用系统的录音机录制了 OpenAI 的 Whisper 模型是一个很伟大的发明。
由于
whisper.cpp
目前只支持
16 khz
的
wav
文件格式的语言文件,需要先使用
ffmpeg
将语音文件转成所需的格式。
windows 平台可以使用
choco
命令来安装
FFmpeg
。
> choco install ffmpeg
然后,将其转成需要的格式。
> ffmpeg -i '.\录音 (2).wav' -ar 16000 -ac 1 -c:a pcm_s16le output.wav
接着使用 whisper 进行识别。
./main.exe -l auto -m C:\Users\aiyolo\whisper.cpp\models\ggml-small.bin -f "C:\Users\aiyolo\Documents\录音\output.wav" -osrt
上面面命令中:
- -l 选项指定的语种,设置成 auto 会自动检测。
- -osrt 将输出 srt 文件格式的文本。
打开文件看看最终的效果。
相比之下 base 模型的输出结果不尽人意,而 small 模型基本能达到日常的用途。
实时转录
再来试一下,实时语音转录功能。实时语音转录需要得到
stream
文件。使用
make stream
命令编译, 发现需要依赖 sdl 库。
> make stream
In file included from examples/common-sdl.cpp:1:
examples/common-sdl.h:3:10: fatal error: SDL.h: No such file or directory
    3 | #include <SDL.h>
由于我使用 mingw 编译的,我可以直接使用下面命令安装 sdl 依赖库。
$ pacman -S mingw-w64-x86_64-SDL2
依赖库安装成功后,编译也顺利完成,得到
stream.exe
文件。但是在 windows 执行下面命令,还不能达到实时转录的效果。
./stream -m ./models/ggml-base.en.bin -t 8 --step 500 --length 5000
本文转载自: https://blog.csdn.net/aiyolo/article/details/129674728
版权归原作者 aiyolo 所有, 如有侵权,请联系我们删除。
版权归原作者 aiyolo 所有, 如有侵权,请联系我们删除。