0.salute
本文复现的代码来自知乎大佬junjieliang.
原文链接:【旋转目标检测】修改YOLOv5旋转目标检测 - 知乎 (zhihu.com)https://zhuanlan.zhihu.com/p/270388743
项目链接:BossZard/rotation-yolov5: rotation detection based on yolov5 (github.com)https://github.com/BossZard/rotation-yolov5
1.制作自己的数据集
制作工具使用roLabellmg,安装及使用请参考链接:
https://blog.csdn.net/qq_41672428/article/details/107690102
记录自己制作时的小trick:(1)勾选使用默认标签名称(2)按E键创建一个粗略的旋转矩形框(3)右键单击矩形某顶点,旋转至合适方向(4)左键矩形两个相对的顶点,调整至合适的大小(5)更换默认标签,进行下一轮的标注。
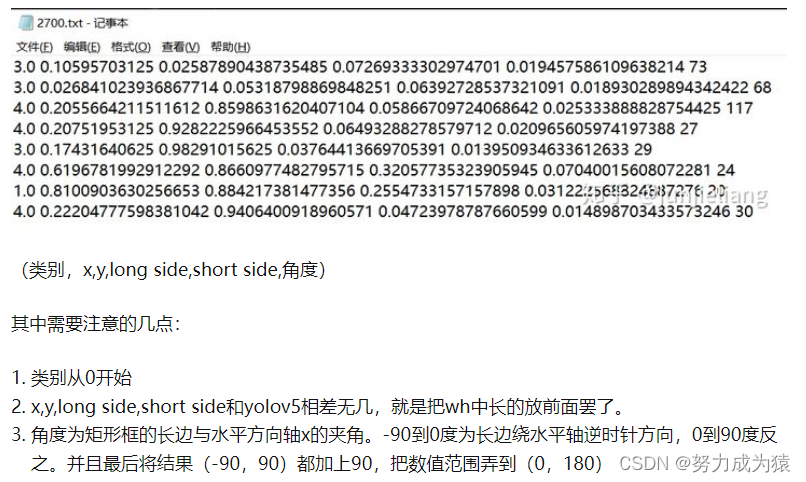
【注】根据大佬原文的描述,数据集要有如下的格式:

而roLabellmg标注出来的,并没有区分长短边,且角度是弧度制,这些都需要进行转换,于是写了如下简易的脚本:
from cmath import pi
import os
import xml.etree.ElementTree as ET
import pickle
import math
'''
旋转目标检测的xml转换为对应的txt
'''

def convert(input_path, classes, output_path):
    for m_xml in os.listdir(input_path):
        m_txt = m_xml.strip('.xml')+'.txt'
        if not os.path.exists(output_path + m_txt):
            os.system('touch ' + output_path + m_txt)
        in_file = open(input_path + m_xml, 'r')
        out_file = open(output_path + m_txt, 'w')
        tree=ET.parse(in_file)
        root = tree.getroot()
        size = root.find('size')
        mw = int(size.find('width').text)
        mh = int(size.find('height').text)

        for obj in root.iter('object'):
            difficult = obj.find('difficult').text
            cls = obj.find('name').text
            if cls not in classes or int(difficult) == 1:
                continue
            cls_id = classes.index(cls)
            xmlbox = obj.find('robndbox')
            b = [float(xmlbox.find('cx').text), float(xmlbox.find('cy').text), float(xmlbox.find('w').text), float(xmlbox.find('h').text), float(xmlbox.find('angle').text)]
            b[0] /= mw
            b[1] /= mh
            b[2] /= mw
            b[3] /= mh
            b[4] *= (180/pi)
            if b[2]<b[3]:
                b[2], b[3] = b[3], b[2]

            out_file.write(str(cls_id) + " " + " ".join([str(a) for a in b]) + '\n')

if __name__ == '__main__':
    input_path = './xmls/'
    classes = ['cat', 'dog']
    output_path = './txts/'
    print('<MSG> action now')
    convert(input_path, classes, output_path)
    print('<MSG> over now')
其中,更改输入输出路径以及自己的类别即可。
之后又发现大佬的项目中有转换的脚本(呜呜)。
https://github.com/BossZard/rotation-yolov5/blob/master/retanglelabel2mylabel.py
2.开始训练
2.1训练配置
参考大佬原文的配置方式即可。
2.2训练过程遇到的报错
(1)AttributeError: Can‘t get attribute ‘C3‘ on <module ‘models.common‘ from
解决方案:
原因在预训练模型,我是使用的之前下好的yolov5-5.0的预训练模型,但是大佬使用的是3.0的,下载对应版本的预训练模型即可。
一种方式是执行weights/download_weights.sh,也可以直接在命令行终端输入:
python -c "
from utils.google_utils import *;
attempt_download('weights/yolov5s.pt');
attempt_download('weights/yolov5m.pt');
attempt_download('weights/yolov5l.pt');
attempt_download('weights/yolov5x.pt')
"
参考链接:https://blog.csdn.net/iamjingong/article/details/116790865
(2)RuntimeError: a view of a leaf Variable that requires grad is being used in an in-place
解决方案:
在Models/yolo.py的148行(报错提示在第148行出错),加一句with torch.no_grad():
    def _initialize_biases(self, cf=None):  # initialize biases into Detect(), cf is class frequency
        # cf = torch.bincount(torch.tensor(np.concatenate(dataset.labels, 0)[:, 0]).long(), minlength=nc) + 1.
        m = self.model[-1]  # Detect() module
        for mi, s in zip(m.m, m.stride):  # from
            b = mi.bias.view(m.na, -1)  # conv.bias(255) to (3,85)
            with torch.no_grad():
                b[:, 4] += math.log(8 / (640 / s) ** 2)  # obj (8 objects per 640 image)
                b[:, 5:] += math.log(0.6 / (m.nc - 0.99)) if cf is None else torch.log(cf / cf.sum())  # cls
            mi.bias = torch.nn.Parameter(b.view(-1), requires_grad=True)
参考链接:https://blog.csdn.net/weixin_44612221/article/details/115359866
(3)ImportError: /opt/conda/lib/python3.7/site-packages/cv2/cv2.abi3.so: cannot read file data
解决方案:
大概是opencv版本的问题,查看可以安装的opencv-python版本。
(from versions: 3.4.0.14, 3.4.2.17, 3.4.3.18, 3.4.4.19, 3.4.5.20, 3.4.6.27, 3.4.7.28, 3.4.8.29, 3.4.9.31, 3.4.9.33, 3.4.10.35, 3.4.10.37, 3.4.11.39, 3.4.11.41, 3.4.11.43, 3.4.11.45, 3.4.13.47, 3.4.14.51, 3.4.14.53, 3.4.15.55, 3.4.16.57, 3.4.16.59, 3.4.17.61, 4.0.0.21, 4.0.1.23, 4.0.1.24, 4.1.0.25, 4.1.1.26, 4.1.2.30, 4.2.0.32, 4.2.0.34, 4.3.0.36, 4.3.0.38, 4.4.0.40, 4.4.0.42, 4.4.0.44, 4.4.0.46, 4.5.1.48, 4.5.2.52, 4.5.2.54, 4.5.3.56, 4.5.4.58, 4.5.4.60, 4.5.5.62)
根据项目中readme.md的提示安装4.2.0.34的opencv即可。
pip install opencv-python==4.2.0.34
(4)AssertionError: WARNING: No labels found in data_rune/labels/. See https://github.com/ultralytics/yolov5/wiki/Train-Custom-Data. Can not train without labels.
解决方案:
修改自己的yaml配置文件时,数据集路径有以下方式:
# train and val data as
1) directory: path/images/
2) file: path/images.txt
3) list: [path1/images/, path2/images/]
我是使用的第一种方式,这时标签文件夹的名称须为labels,不然就会找不到标签。
(5)EOFError: Ran out of input
解决方案:删除labels.cache
3.部署
3.1使用项目中的detect.py
python detect.py --source ./mydata/images/2480.jpg --weights="runs/exp5/weights/best.pt"
也可以将图片换成视频进行检测:
python detect.py --source ./mydata/test.avi --weights="runs/exp8/weights/best.pt"
3.2 使用detect.py时遇到的问题
(1)没有任何检测框或漏检率很高
解决方案:
·可能是训练代数不够,继续训练或降低置信度阈值测试。
·可能是同类物体之间相距太近了,可以将脚本中的nms阈值提高。
(2)TypeError: can't convert cuda:0 device type tensor to numpy. Use Tensor.cpu() to copy the tensor to host memory first.
解决方案:
(这也是卡的最久的问题了)
首先参考博客:https://blog.csdn.net/qq_36848732/article/details/122150198
这位大佬给出的解决方法是在/utils/general.py中一处加上o = o.cpu().numpy()
给出的理由是output是gpu上的list ,list元素的类型是tensor,需要先转为cpu上的numpy()类型
-------不过我按照上述方法照做,并没有生效-----
于是自己尝试在utils/general.py中第1317行附近,加上一句x = x.cpu(),还是报错,猜测可能还需要将x的元素也变成cpu上的,于是改成:
for i in range(len(x)):
    x[i] = x[i].cpu()
x = np.array(x)
这样确实不报错了,不过可能不是最好的方式。
(3)TypeError: Can't parse 'center'. Sequence item with index 0 has a wrong type
解决方案:
原因是使用了4.5的opencv运行detect脚本,将版本降至4.2.0.34即可
(4)AttributeError: 'Hardswish' object has no attribute 'inplace'
解决方案:
pip install torch==1.6.0 torchvision==0.7.0
参考博客:https://blog.csdn.net/qq_33959661/article/details/111560540
(5)AttributeError: 'list' object has no attribute 'xy'
解决方案:
参考项目github上的讨论:https://github.com/BossZard/rotation-yolov5/issues/3
(6)RuntimeError: cuda runtime error (999) : unknown error at /pytorch/aten/src/THC/THCGeneral.cpp:47
解决方案:
sudo rmmod nvidia_uvm
sudo modprobe nvidia_uvm
参考博客:https://blog.csdn.net/maizousidemao/article/details/108234321
3.3自己的部署代码
参考大佬的detect.py大概可以改出一份在自己所需功能的环境下可以运行的代码,不过猜测库版本的匹配会是一个坑,之后写出来会进行分享。
版权归原作者 咿喃小记 所有, 如有侵权,请联系我们删除。