
一、功能描述
1.本文用于记录通过 Opencv 进行相机内参标定和对内参的使用来进行图像畸变矫正。
    1)相机矩阵:包括焦距(fx,fy),光学中心(Cx,Cy),完全取决于相机本身,是相机的固有属性,只需要计算一次,可用矩阵表示如下:[fx, 0, Cx; 0, fy, cy; 0,0,1];

    2) 畸变系数:畸变数学模型的5个参数 D = (k1,k2, P1, P2, k3);

    3)相机内参:相机矩阵和畸变系数统称为相机内参,在不考虑畸变的时候,相机矩阵也会被称为相机内参;

    4) 相机外参:通过旋转和平移变换将3D的坐标转换为相机2维的坐标,其中的旋转矩阵和平移矩阵就被称为相机的外参;描述的是将世界坐标系转换成相机坐标系的过程。
二、标定板制作
   方法一: 标定板可以直接从opencv官网下载:标定板

   方法二:Matlab DIY 制作
J = (checkerboard(300,4,5)>0.5);
figure, imshow(J);
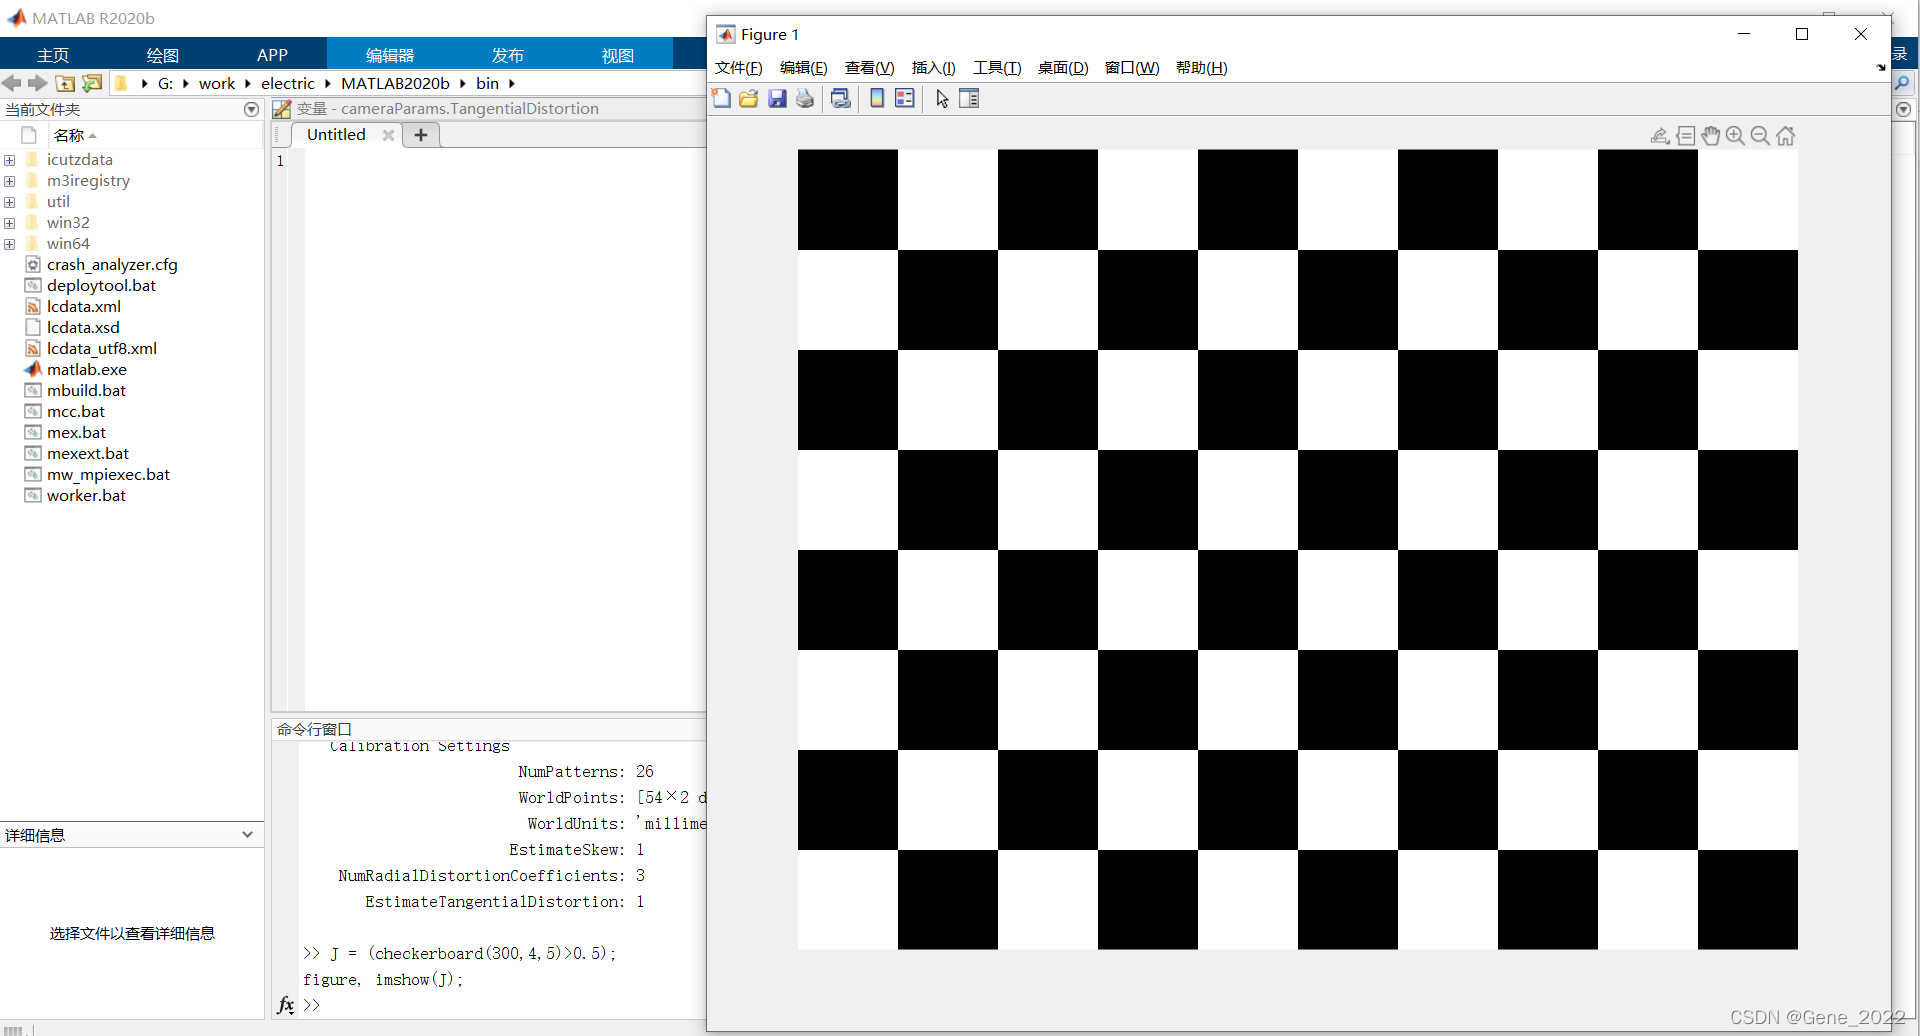
打印完成后,测量实际打印出的网格边长,备用(本人制作的标定板网格边长为 26mm)。将打印纸贴附在硬纸板上(粘贴的尽可能平整),如下图所示。

三、图像采集
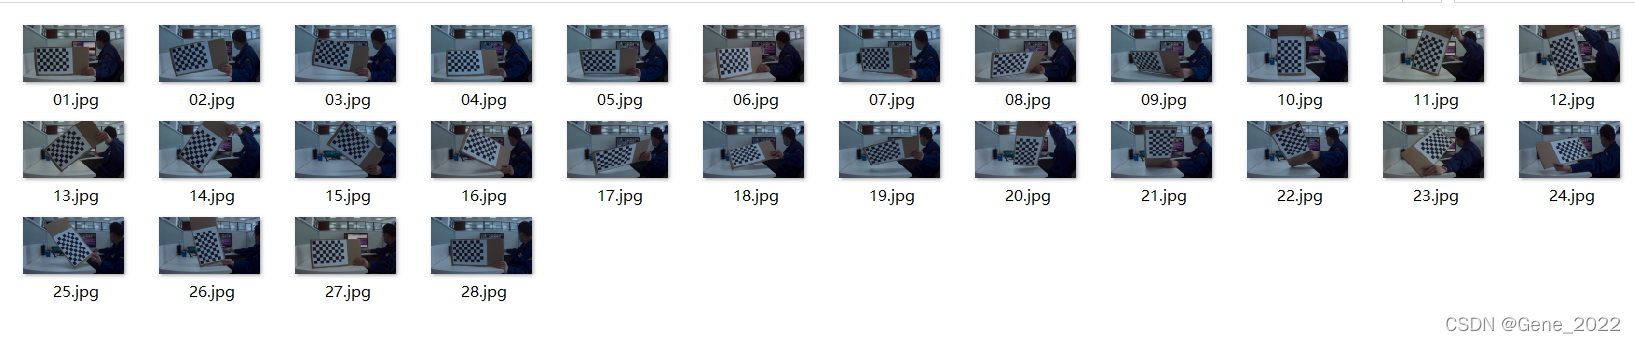
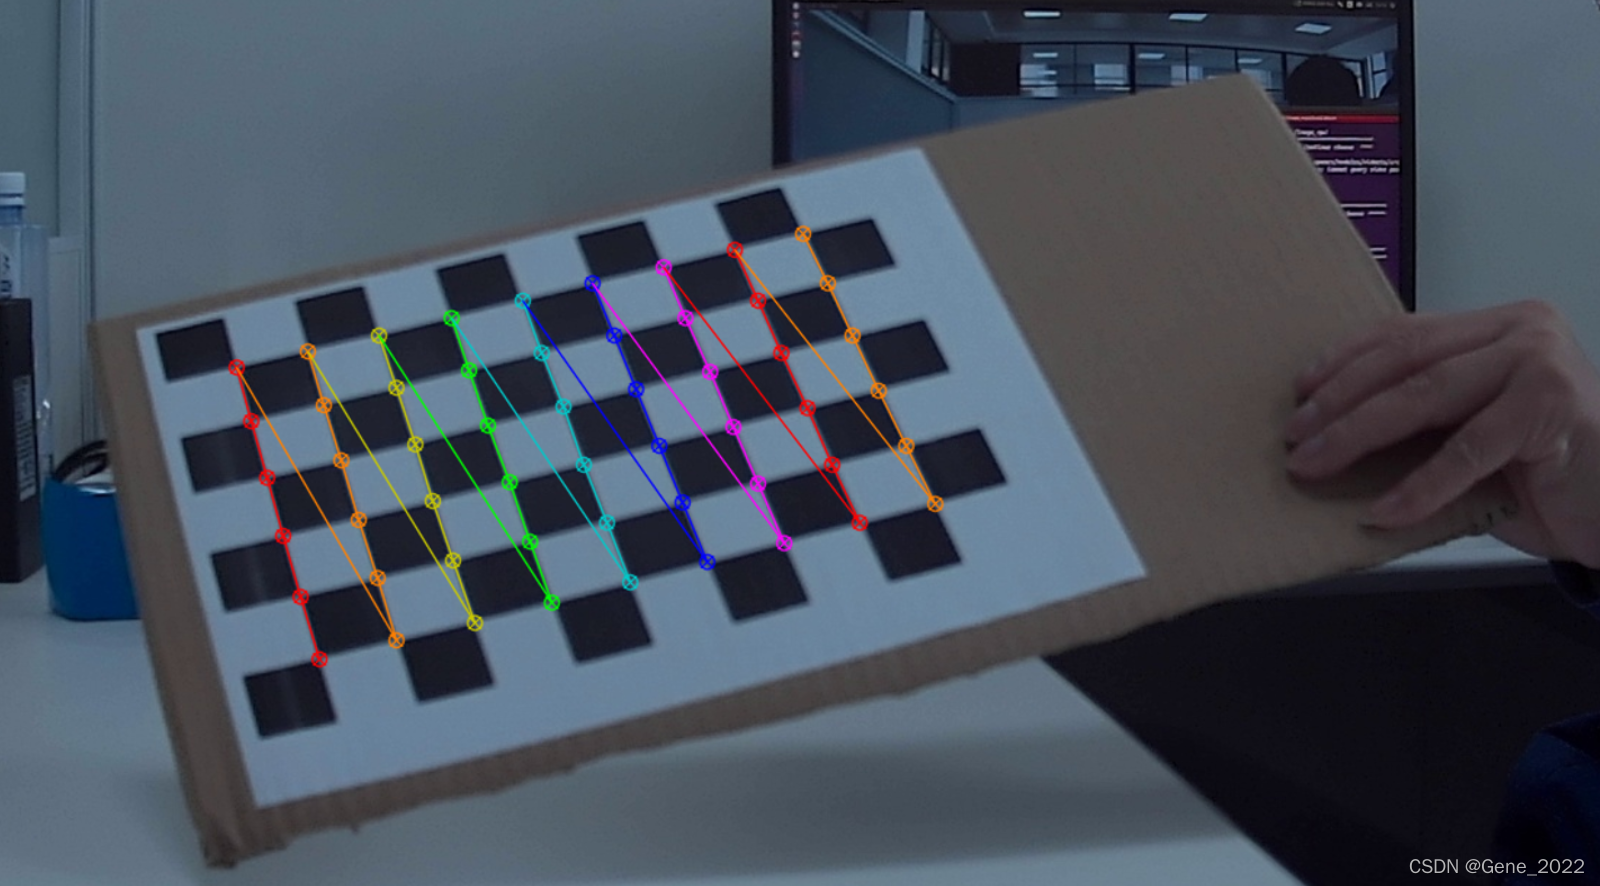
运行以下参考程序按q键即可保存图像,注意尽量把镜头的每个方格都覆盖到,最好拍到整张打印纸。保存大约20到25张,通过 Matlab 标定软件可能会剔除部分图片。
#include "opencv2/opencv.hpp"
#include <string>
#include <iostream>

using namespace cv;
using namespace std;

int main(){
    Mat frame;
    string imgname;
    int f = 1;

    VideoCapture inputVideo(0);
    if (!inputVideo.isOpened()){
        cout << "Could not open the input video " << endl;
        return -1;
    }
    else{
        cout << "video is opened!" << endl;
    }

    while (1){
        inputVideo >> frame;
        if (frame.empty()) continue;
        imshow("Camera", frame);
        char key = waitKey(1);
        if (key == 27) break;
        if (key == 'q' || key == 'Q'){
            imgname = to_string(f++) + ".jpg";
            imwrite(imgname, frame);
        }
    }
    cout << "Finished writing" << endl;
    return 0;
}
图片集如下:
四、标定内参
方法一:Matlab标定
** 步骤1:**在Matlab的Command Window里面输入cameraCalibrator即可调用标定应用程序。
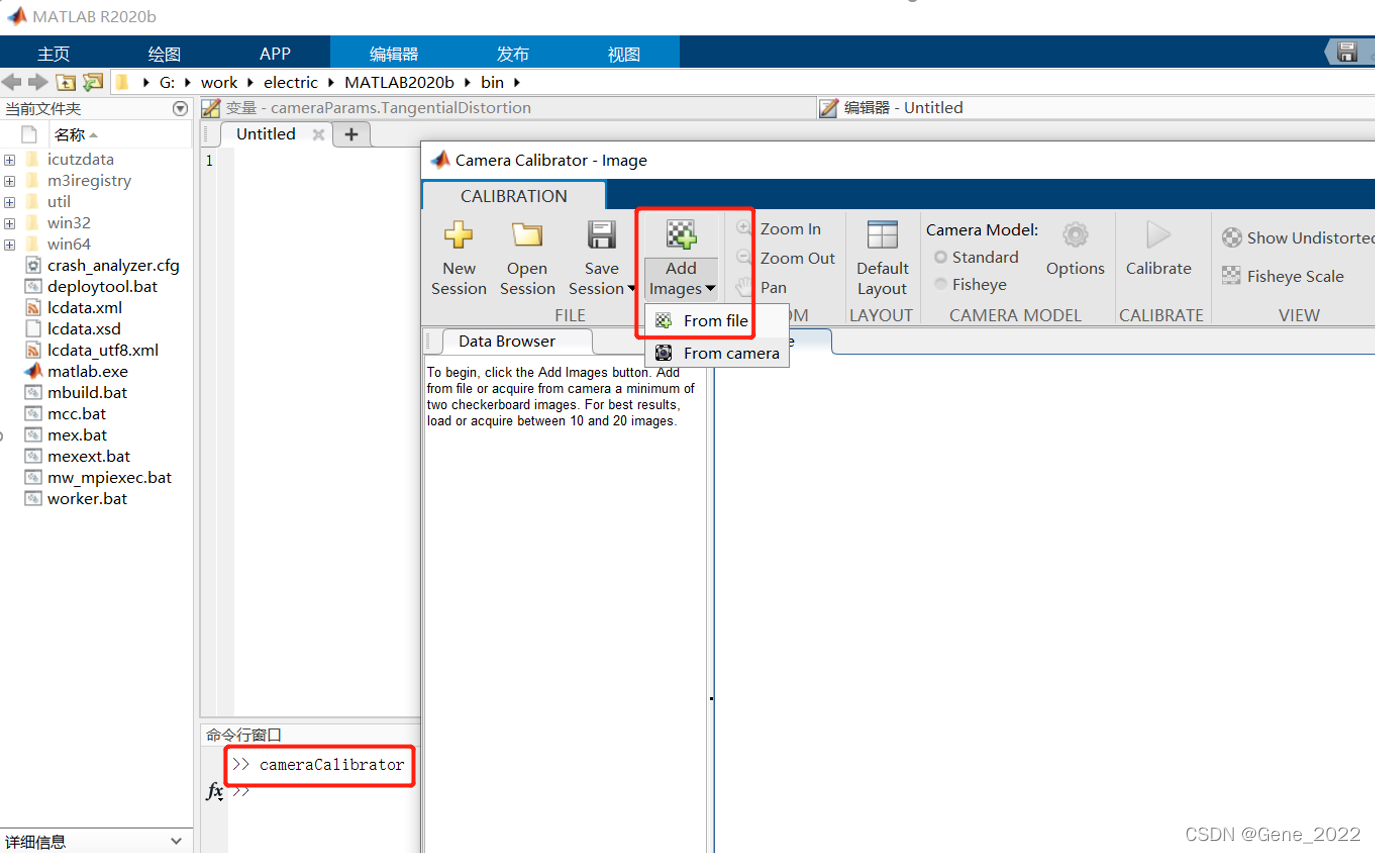
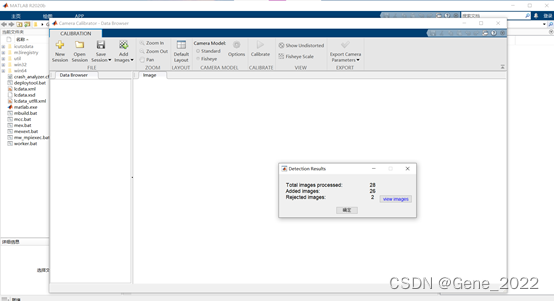
**步骤2:**选择from file 在自己的图片集全选待标定的图片,输入自己实际测量打印的标定板方格实际长度(本人的标定板方格边长26mm),导入后我的有2张图片被拒绝。
    **步骤3:**关键步骤

    畸变参数,总共有五个,径向畸变3个(k1,k2,k3)和切向畸变2个(p1,p2)。

    径向畸变:
切向畸变:
注意:OpenCV中畸变系数的排列(顺序为k1,k2,p1,p2,k3)。
实验表明,在MATLAB中选择使用三个参数,并且选择错切和桶形畸变,关于三个参数还是两个参数,可以根据自己的试验效果选择 。点击 Calibrate 后等待一段时间即可完成标定,标定完成后可通过点击 show Undistorted 对比校正前后效果。
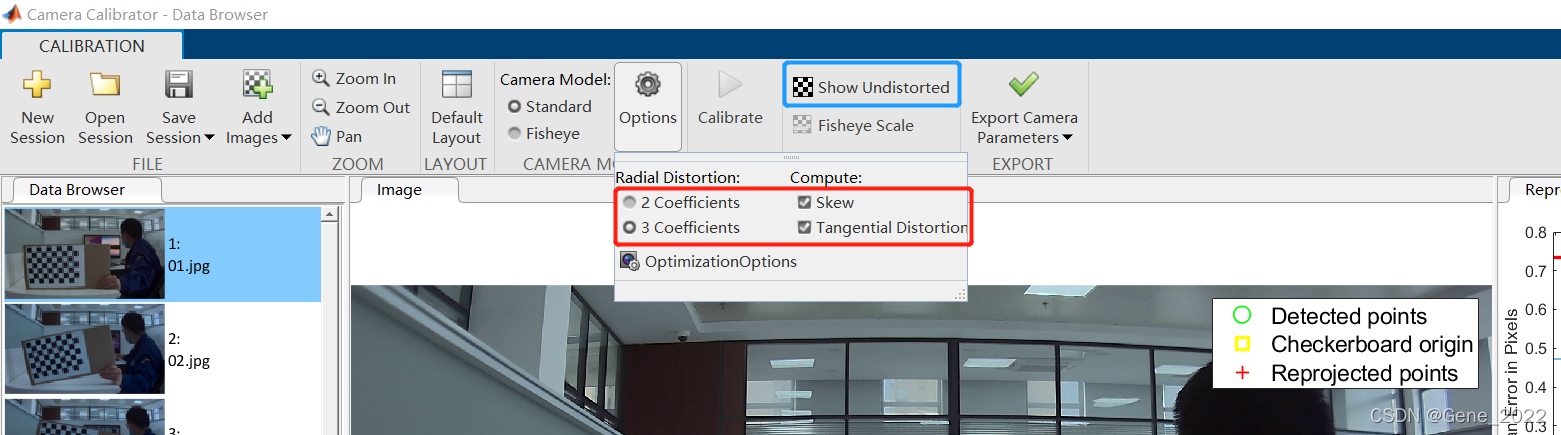
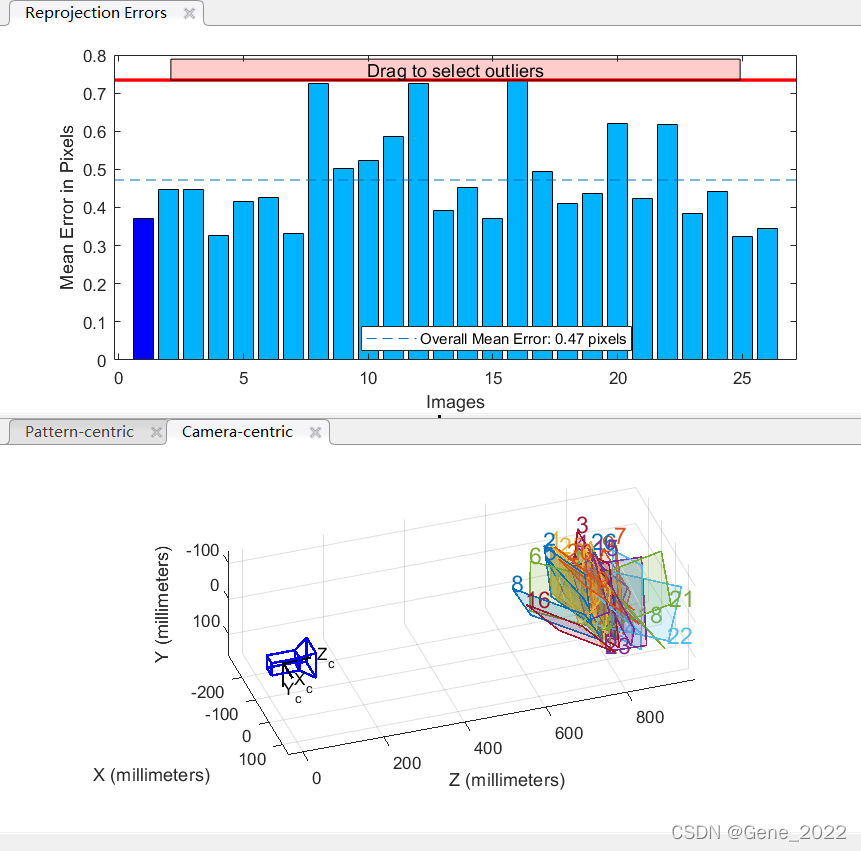
右上角平均误差推荐在0.5以下时,表明该标定数据可信(本人此次平均误差为0.47 )。
** 步骤4:**导出参数,即可把参数进行保存,保存后可退出标定应用,在MATLAB主界面中将保存的Mat文件打开。

**步骤5:**记录、保存数据
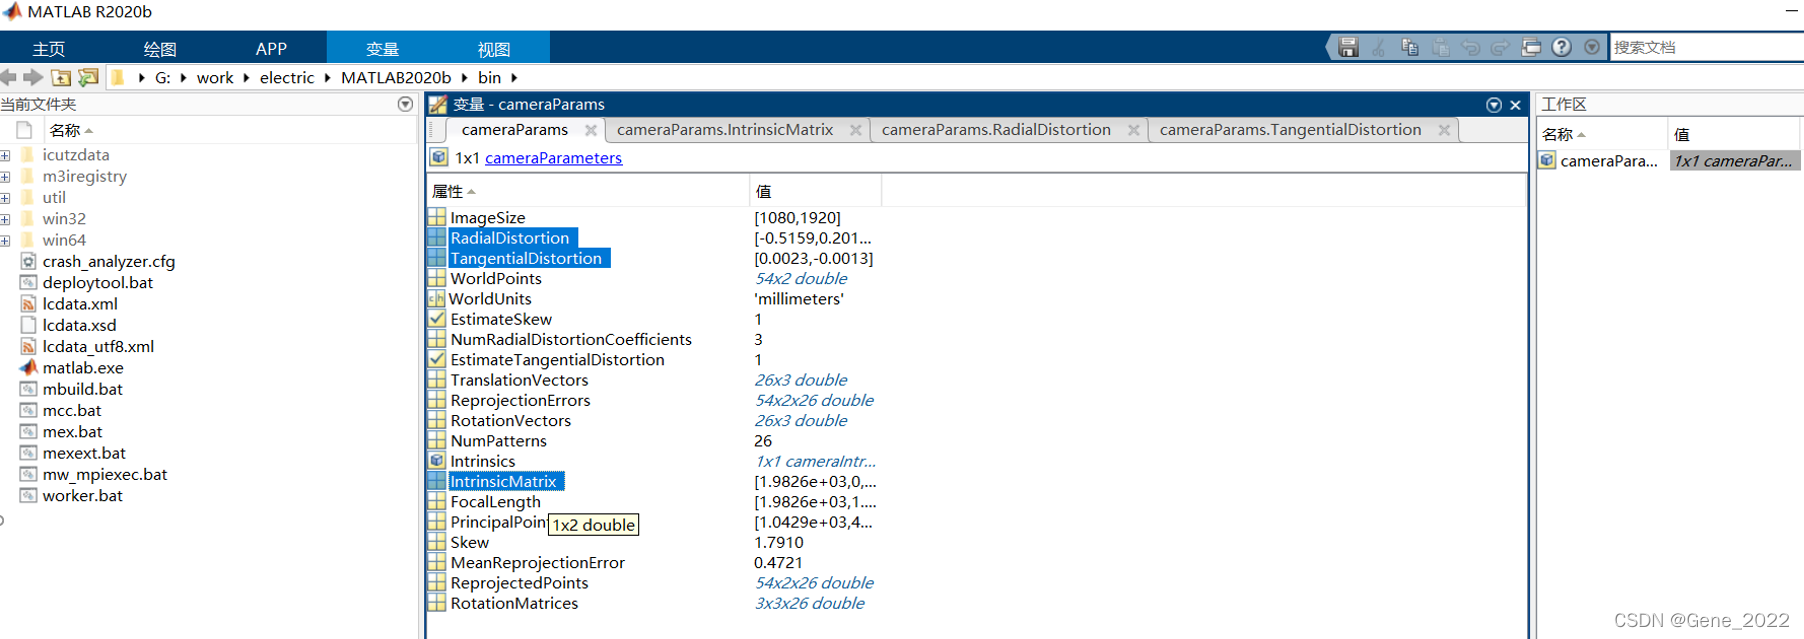
    上图中,RadialDistortion对应k1,k2,k3,TangentialDistortion对应p1,p2。
     IntrinsicMatrix对应相机矩阵,注意具体数值和OpenCV中数据是互为转置的关系。
 对应
对应 
此次本人测得的数据为:
RadialDistortion:
    -0.515906663211726  0.201811855093355    -0.0572379026696125

TangentialDistortion:
    0.00228453839673728 -0.00134697993045861

IntrinsicMatrix:
    1982.56844306278      0                     0
    1.79099355543064      1983.84445594899      0
    1042.90384922068      480.442502729538      1
方法二:C++程序标定
简单粗暴直接上程序:
#include <opencv2/imgproc/types_c.h>
#include<opencv2/opencv.hpp>
#include<iostream>
using namespace cv;
using namespace std;

Mat image, img_gray;
int BOARDSIZE[2]{ 6,9 };//棋盘格每行每列角点个数
int main()
{
    vector<vector<Point3f>> objpoints_img;//保存棋盘格上角点的三维坐标
    vector<Point3f> obj_world_pts;//三维世界坐标
    vector<vector<Point2f>> images_points;//保存所有角点
    vector<Point2f> img_corner_points;//保存每张图检测到的角点
    vector<String> images_path;//创建容器存放读取图像路径

    string image_path = "/home/titan/Calibration/image/pictures/*.jpg";//待处理图路径
    glob(image_path, images_path);//读取指定文件夹下图像

    //转世界坐标系
    for (int i = 0; i < BOARDSIZE[1]; i++)
    {
        for (int j = 0; j < BOARDSIZE[0]; j++)
        {
            obj_world_pts.push_back(Point3f(j, i, 0));
        }
    }

    for (int i = 0; i < images_path.size(); i++)
    {
        image = imread(images_path[i]);
        cvtColor(image, img_gray, COLOR_BGR2GRAY);
        //检测角点
        bool found_success = findChessboardCorners(img_gray, Size(BOARDSIZE[0], BOARDSIZE[1]),
            img_corner_points,
            CALIB_CB_ADAPTIVE_THRESH | CALIB_CB_FAST_CHECK | CALIB_CB_NORMALIZE_IMAGE);

        //显示角点
        if (found_success)
        {
            //迭代终止条件
            TermCriteria criteria(CV_TERMCRIT_EPS | CV_TERMCRIT_ITER, 30, 0.001);

            //进一步提取亚像素角点
            cornerSubPix(img_gray, img_corner_points, Size(11, 11),
                Size(-1, -1), criteria);

            //绘制角点
            drawChessboardCorners(image, Size(BOARDSIZE[0], BOARDSIZE[1]), img_corner_points,
                found_success);

            objpoints_img.push_back(obj_world_pts);//从世界坐标系到相机坐标系
            images_points.push_back(img_corner_points);
        }
        //char *output = "image";
        char text[] = "image";
        char *output = text;
        imshow(output, image);
        waitKey(200);

    }

    /*
    计算内参和畸变系数等
    */

    Mat cameraMatrix, distCoeffs, R, T;//内参矩阵,畸变系数,旋转量,偏移量
    calibrateCamera(objpoints_img, images_points, img_gray.size(),
        cameraMatrix, distCoeffs, R, T);

    cout << "cameraMatrix:" << endl;
    cout << cameraMatrix << endl;

    cout << "*****************************" << endl;
    cout << "distCoeffs:" << endl;
    cout << distCoeffs << endl;
    cout << "*****************************" << endl;

    cout << "Rotation vector:" << endl;
    cout << R << endl;

    cout << "*****************************" << endl;
    cout << "Translation vector:" << endl;
    cout << T << endl;

    ///*
    //畸变图像校准
    //*/
    Mat src, dst;
    src = imread("/home/titan/Calibration/image/pictures/02.jpg");  //读取校正前图像
    undistort(src, dst, cameraMatrix, distCoeffs);

    char texts[] = "image_dst";
    char *dst_output = texts;
    //char *dst_output = "image_dst";
    imshow(dst_output, dst);
    waitKey(100);
    imwrite("/home/titan/Calibration/image/pictures/002.jpg", dst);  //校正后图像

    destroyAllWindows();//销毁显示窗口
    system("pause");
    return 0;
}
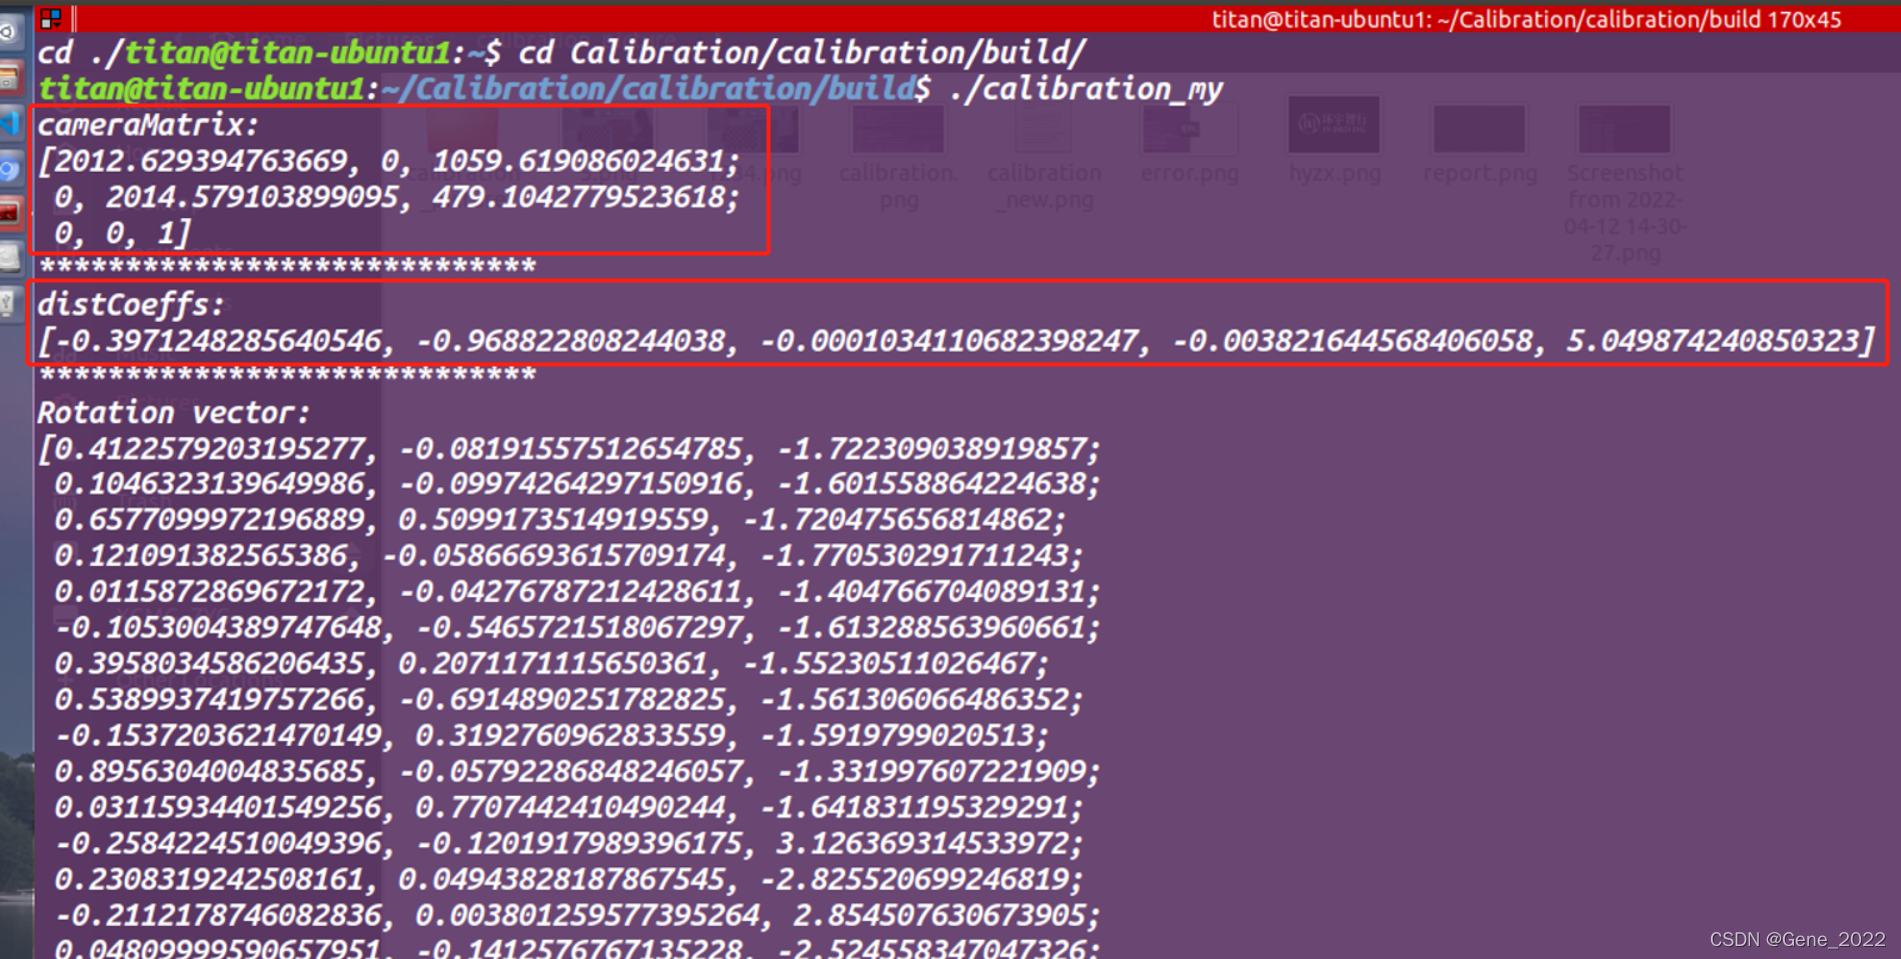
运行上述程序,经过一番图片处理与切换,最终通过终端得到获取相机内参及畸变系数。
五、使用内参
简单粗暴直接上程序:
#include<iostream>
#include <ctime>
#include<opencv2/opencv.hpp>

using namespace cv;
using namespace std;

int main()
{
    VideoCapture inputVideo(0);
    if(!inputVideo.isOpened()){
        std::cout << "video is not opened\n\n"<<endl;
    }
    else{
        std::cout << "video is opened \n\n"<<endl;
    }
//  Matlab 标定的相机参数
    Mat frame, frameCalibration;
    inputVideo >> frame;
    Mat cameraMatrix = Mat::eye(3, 3, CV_64F);
    cameraMatrix.at<double>(0,0) = 1982.56844306278;
    cameraMatrix.at<double>(0,1) = 1.79099355543064;
    cameraMatrix.at<double>(0,2) = 1042.90384922068;
    cameraMatrix.at<double>(1,1) = 1983.84445594899;
    cameraMatrix.at<double>(1,2) = 480.442502729538;

    Mat distCoeffs = Mat::zeros(5, 1, CV_64F);
    distCoeffs.at<double>(0,0) = -0.515906663211726;
    distCoeffs.at<double>(1,0) =  0.201811855093355;
    distCoeffs.at<double>(2,0) =  0.00228453839673728;
    distCoeffs.at<double>(3,0) = -0.00134697993045861;
    distCoeffs.at<double>(4,0) = -0.0572379026696125;

/*  C++程序标定的相机参数
    Mat frame, frameCalibration;
    inputVideo >> frame;
    Mat cameraMatrix = Mat::eye(3, 3, CV_64F);
    cameraMatrix.at<double>(0,0) = 1978.304376178962;
    cameraMatrix.at<double>(0,1) =                   0;
    cameraMatrix.at<double>(0,2) = 1044.639043480329;
    cameraMatrix.at<double>(1,1) = 1979.71454820083;
    cameraMatrix.at<double>(1,2) = 482.6287237060178;

    Mat distCoeffs = Mat::zeros(5, 1, CV_64F);
    distCoeffs.at<double>(0,0) = -0.5277684150872038;
    distCoeffs.at<double>(1,0) =  0.2663992436241138;
    distCoeffs.at<double>(2,0) = -0.001857829391420174;
    distCoeffs.at<double>(3,0) = -0.002175774665050042;
    distCoeffs.at<double>(4,0) = -0.1007311729522544;
*/

    Mat view, rview, map1, map2;
    Size image_Size;
    image_Size = frame.size();

    initUndistortRectifyMap(cameraMatrix, distCoeffs, Mat(), cameraMatrix, image_Size, CV_16SC2, map1, map2);
    // initUndistortRectifyMap(cameraMatrix, distCoeffs, Mat(),getOptimalNewCameraMatrix(cameraMatrix, distCoeffs, image_Size, 0.5, image_Size, 0),image_Size, CV_16SC2, map1, map2);

    while(1){
        inputVideo >> frame;
        if(frame.empty()) break;
        remap(frame, frameCalibration, map1, map2, INTER_LINEAR);
        imshow("Original_image",frame);
        imshow("Calibrated_image", frameCalibration);
        char key =waitKey(1);
        if(key == 27 || key == 'q' || key == 'Q') break;
    }

    return 0;
}
测试效果如下:

参考链接: 链接1 、 链接2
本文转载自: https://blog.csdn.net/qq_38429958/article/details/124125912
版权归原作者 Gene_2022 所有, 如有侵权,请联系我们删除。
版权归原作者 Gene_2022 所有, 如有侵权,请联系我们删除。