
本期开设新的栏目Up&Up,专门针对我自己平日里一些在项目中使用的好玩的点子,或者尚未实现的有趣功能复刻。
第一期:EventSystems中的IPointerClickHandler、IPointerEnterHandler、IPointerExitHandler等...对鼠标回调事件的检测和函数控制。
一、接口及其函数方法总结
〇EventSystems
EventSystems 主要是负责处理输入、射线投射和发送事件。
根据字面意思也可以看出来 ES 是负责处理 Unity 场景中的事件。 一个场景应当只包含一个 EventSystem。
当 EventSystem 启动时,它会搜索附加到同一 GameObject 的任何 BaseInputModule, 并将其添加到内部列表中。这里的BaseInputModule(基本输入模块类)在 EventSystem 中所有关系输入模块都继承自该类。
在更新时,每个附加模块都会收到 一个 UpdateModules 调用,模块可以在其中修改内部状态。所有模块更新完成后, 活动模块将执行 Process 调用。 此时可以进行自定义模块处理。
拿最简单的例子来说就是,每当开发者们新建创建UI的时候都会自动新建一个名为EventSystem对象,如果没有这个对象,对UI上的各种操作都会失效。
①IPointerClickHandler
要实现的接口(如果您希望接收 OnPointerClick 回调)
使用 IPointerClickHandler 接口来处理使用 OnPointerClick 回调的单击输入。确保场景中存在事件系统,以支持单击检测。对于非 UI 游戏对象的单击检测,请确保将 PhysicsRaycaster 附加到摄像机。
使用举例如下图1-1,在头部引用EventSystems,在Mono行为类的后面引用上PointerClickHandler,alt+enter快捷实现接口,自己手打应该也可以。而我们接下来想要实现的效果则是当鼠标点击物体或者UI的时候能够得到某种反馈。

图1-1 IPointerClickHandler接口
所以我们在实现的OnPointerClick方法下编写逻辑。编写好之后,在场景中为两个物体都添加上碰撞盒,按照官方说法给摄像机添加上PhysicsRaycaster,把写好的脚本添加到想要实现点击检测的物体,如图1-2,1-3。

图1-2 碰撞添加

图1-3 PhysicsRaycaster添加
具体测试代码如下,利用Debug理解原理
using System.Collections;
using System.Collections.Generic;
using UnityEngine;
using UnityEngine.EventSystems;

public class ESIPointerTest : MonoBehaviour, IPointerClickHandler
{
    public void OnPointerClick(PointerEventData eventData)
    {
        Debug.Log("你点击到了:" + name + " " + tag);
    }
}
运行点击两物体查看效果,如图1-4。

图1-4 OnPointerClick方法反馈
②IPointerEnter/ExitHandler
要实现的接口(如果您希望接收 OnPointerExit 回调)
用于检测鼠标何时开始悬停在某个游戏对象上。要检测鼠标何时停止悬停在游戏对象上,请使用 IPointerExitHandler。
注意:Enter和Exit本身并不需要同时出现。
和碰撞检测的检测原理其实是一样的,和Tigger或Collision的OnCollisionEnter,OnTriggerEnter等比较类似,只是讲碰撞盒触发器的监测对象换成了鼠标,相当于自写一个摄像机发射鼠标位置射线检测。
也是用Debug来理解,如下代码。
public class ESIPointerTest : MonoBehaviour, IPointerClickHandler, IPointerEnterHandler, IPointerExitHandler
{
    public void OnPointerClick(PointerEventData eventData)
    {
        Debug.Log("你点击到了:" + name + " " + tag);
    }

    public void OnPointerEnter(PointerEventData eventData)
    {
        Debug.Log("你的鼠标悬停在了:" + name + " " + tag + " 开始于:" + Time.time);
    }

    public void OnPointerExit(PointerEventData eventData)
    {
        Debug.Log("你的鼠标离开了:" + name + " " + tag + " 结束于:" + Time.time);
    }
}
具体效果如下图。

图2-1,3-1 鼠标检测
③IPointerUp/DownHandler
要实现的接口(如果您希望接收 OnPointerUp 回调)
注意:为了接收 OnPointerUp 回调,您还必须实现 IPointerDownHandler 接口,即Up和Down的接口必须同时实现。
要实现的接口(如果您希望接收 OnPointerDown 回调)
检测正在进行的鼠标单击,直到松开鼠标按钮。使用 IPointerUpHandler 来处理鼠标按钮的释放。和OnCollision/TriggerStay不同,可以看得出来按下去的一点多秒并不是持续检测的。

二、实际案例
好的,那有了对以上几种接口的效果和实现原理的理解,我们来尝试实现一下几个案例。
①悬浮提示UI
效果见下图1-1:
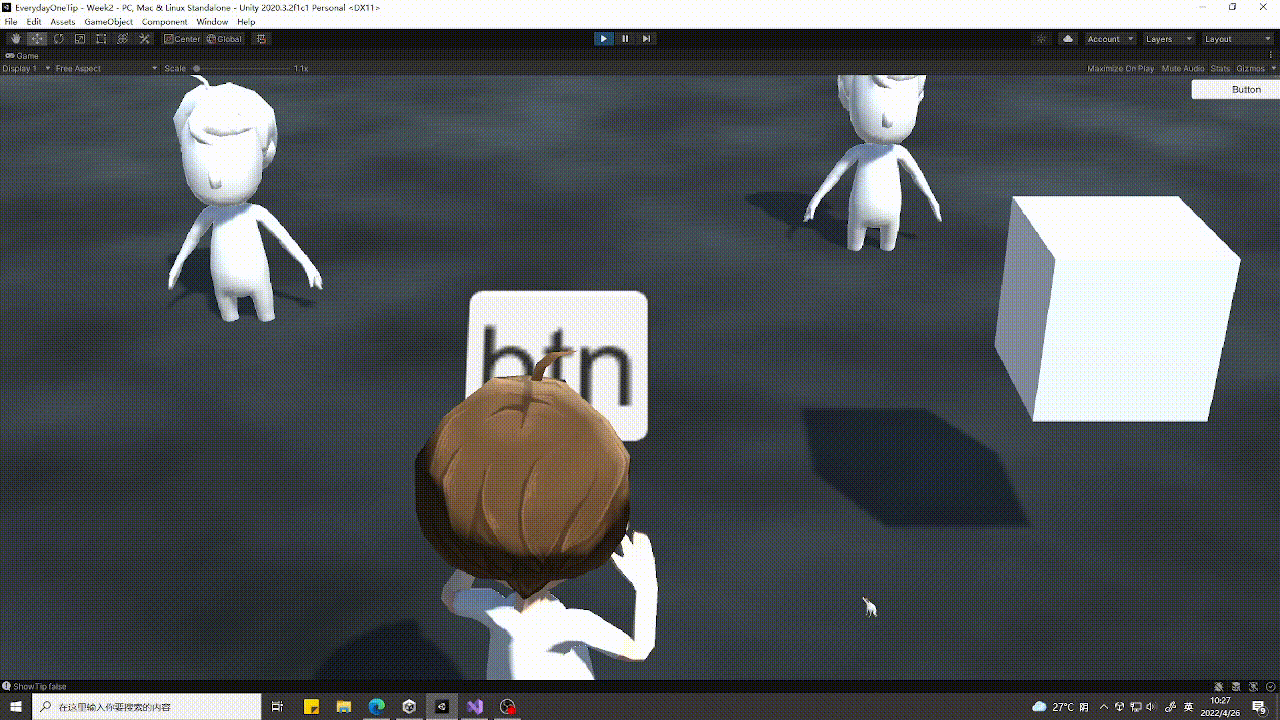
图1-1 悬浮UI
原理分析:
Ⅰ实现生成悬浮UI,则利用RectTransform类型变量来存储和操作矩形(悬浮方块UI)的位置、大小和锚定。
    public static TipUI instance;
    private RectTransform childRectTrans;
    private float rectRefreshTime;
    public float rectIntervaTime = 0.1f; //矩形UI间隔时间,间隔时间越长事件结束后停留越久
    private bool isUI; //判断是否是UI

    void Awake()
    {
        instance = this;

        childRectTrans = transform.GetChild(0).GetComponent<RectTransform>();
        rectRefreshTime = 0.0f;
        isUI = false;
        DontDestroyOnLoad(gameObject); //防止在改变场景的时候销毁 即额外保存可以引用在别的场景
    }
Ⅱ实现鼠标跟随,则需要用Input.mousePosition来控制,同时检测激活状态,在移出检测范围后取消激活。
    /// <summary>
    /// 设置Tip显示位置
    /// </summary>
    private void SetTipPos() {
        childRectTrans.position = Input.mousePosition;
    }

    /// <summary>
    /// 获取当前Tip激活状态
    /// </summary>
    /// <returns></returns>
    public bool GetActive() {
        return childRectTrans.gameObject.activeSelf;
    }
Ⅲ实现判断屏幕是否超界,居于屏幕上部还是下部的调整逻辑,则获取到屏幕上的XY数值,以鼠标位置在屏幕哪一部分来判断,反馈矩形pivot中心位置给悬浮UI后再创建。
    /// <summary>
    /// 设置Tip中心
    /// </summary>
    private void SetTipPivot() {
        int tempPivotX = ((Input.mousePosition.x <= Screen.height / 2.0f) ? 0 : 1);
        int tempPivotY = ((Input.mousePosition.x <= Screen.width / 2.0f) ? 0 : 1);
        if (childRectTrans.pivot.x != tempPivotX || childRectTrans.pivot.y != tempPivotY) {
            childRectTrans.pivot = new Vector2(tempPivotX, tempPivotY);
        }
    }
Ⅳ实现隐藏或显现浮窗TipUI,则命好两个函数根据文章前面介绍的IPointer事件和对物体的OnMouse事件去设置SetActive(true / false)。
    /// <summary>
    /// 隐藏Tip
    /// </summary>
    /// <param name="_isUI"></param>
    public void HideTip(bool _isUI) {
        if (!_isUI && (isUI && childRectTrans.gameObject.activeSelf)) return;
        childRectTrans.GetChild(0).GetComponent<UnityEngine.UI.Text>().text = "";
        childRectTrans.gameObject.SetActive(false);
    }

    /// <summary>
    /// 展示Tip
    /// </summary>
    /// <param name="_infoStr"></param>
    /// <param name="_isUI"></param>
    public void ShowTip(string _infoStr, bool _isUI) {
        if (!_isUI && (isUI && childRectTrans.gameObject.activeSelf)) return;
        childRectTrans.GetChild(0).GetComponent<UnityEngine.UI.Text>().text = _infoStr;
        childRectTrans.gameObject.SetActive(true);
        isUI = _isUI;
        rectRefreshTime = Time.time;
        SetTipPivot();
        SetTipPos();
    }
Ⅴ实现浮窗UI上的文本,则需要额外定义UI信息类,同时调用IPointer和OnMouse,针对某个想要实现浮窗的物体去添加脚本。
using System.Collections;
using System.Collections.Generic;
using UnityEngine;
using UnityEngine.EventSystems;

public class TipUIInfo : MonoBehaviour,IPointerEnterHandler,IPointerExitHandler
{
    public string infoStr;

    /// <summary>
    ///  用于检测UI的悬停移开
    /// </summary>
    /// <param name="eventData"></param>
    public void OnPointerEnter(PointerEventData eventData)
    {
        Debug.LogWarning("OnPointerEnter物体和UI都可以检测,但不连续");
        TipUI.instance.ShowTip(infoStr, true);
    }

    public void OnPointerExit(PointerEventData eventData)
    {
        TipUI.instance.HideTip(true);
    }

    /// <summary>
    /// 检测物体的悬停移开
    /// </summary>
    private void OnMouseOver()
    {
        Debug.LogWarning("OnMouseOver仅检测物体,是连续的");
        if (!TipUI.instance.GetActive())
        {
            TipUI.instance.ShowTip(infoStr, false);
        }

    }

    private void OnMouseExit()
    {
        TipUI.instance.HideTip(false);
    }
}
使用方法则是将TipUIInfo挂载在想要实现悬浮UI的对象或UI上,如下图1-2设置悬浮UI的形态,其中UITip为去掉GraphicRaycast的Canvas如图1-3,TipImage则是一个图标,添加好图1-4的两个组件,TipText就是一个文本。
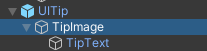
图1-2 UITip预制

图1-3 Canvas作为UITip

图1-4 TipImage的设定
完整代码如下
using System.Collections;
using System.Collections.Generic;
using UnityEngine;
using UnityEngine.SceneManagement;

/// <summary>
/// 显示悬浮UI,优先级顺序-> UI -> 物体
/// </summary>
public class TipUI : MonoBehaviour
{
    public static TipUI instance;
    private RectTransform childRectTrans;
    private float rectRefreshTime;
    public float rectIntervaTime = 0.1f; //矩形UI间隔时间,间隔时间越长事件结束后停留越久
    private bool isUI; //判断是否是UI

    void Awake()
    {
        instance = this;

        childRectTrans = transform.GetChild(0).GetComponent<RectTransform>();
        rectRefreshTime = 0.0f;
        isUI = false;
        DontDestroyOnLoad(gameObject); //防止在改变场景的时候销毁 即额外保存可以引用在别的场景
    }

    void Start()
    {
        childRectTrans.gameObject.SetActive(false);
        Debug.Log("Rect:" + childRectTrans);
    }

    void Update()
    {
        if (childRectTrans.gameObject.activeSelf) {
            if (Time.time >= rectRefreshTime + rectIntervaTime) {
                rectRefreshTime = Time.time;
                SetTipPivot();
            }
            SetTipPos();
        }
    }

    /// <summary>
    /// 设置Tip中心
    /// </summary>
    private void SetTipPivot() {
        int tempPivotX = ((Input.mousePosition.x <= Screen.height / 2.0f) ? 0 : 1);
        int tempPivotY = ((Input.mousePosition.x <= Screen.width / 2.0f) ? 0 : 1);
        if (childRectTrans.pivot.x != tempPivotX || childRectTrans.pivot.y != tempPivotY) {
            childRectTrans.pivot = new Vector2(tempPivotX, tempPivotY);
        }
    }

    /// <summary>
    /// 设置Tip显示位置
    /// </summary>
    private void SetTipPos() {
        childRectTrans.position = Input.mousePosition;
    }

    /// <summary>
    /// 获取当前Tip激活状态
    /// </summary>
    /// <returns></returns>
    public bool GetActive() {
        return childRectTrans.gameObject.activeSelf;
    }

    /// <summary>
    /// 隐藏Tip
    /// </summary>
    /// <param name="_isUI"></param>
    public void HideTip(bool _isUI) {
        if (!_isUI && (isUI && childRectTrans.gameObject.activeSelf)) return;
        childRectTrans.GetChild(0).GetComponent<UnityEngine.UI.Text>().text = "";
        childRectTrans.gameObject.SetActive(false);
    }

    /// <summary>
    /// 展示Tip
    /// </summary>
    /// <param name="_infoStr"></param>
    /// <param name="_isUI"></param>
    public void ShowTip(string _infoStr, bool _isUI) {
        if (!_isUI && (isUI && childRectTrans.gameObject.activeSelf)) return;
        childRectTrans.GetChild(0).GetComponent<UnityEngine.UI.Text>().text = _infoStr;
        childRectTrans.gameObject.SetActive(true);
        isUI = _isUI;
        rectRefreshTime = Time.time;
        SetTipPivot();
        SetTipPos();
    }
}
②拖拽UI
不同于先前讲述的几种IPointer接口,这里还有IBegin..IDrag..类的接口,这一类接口均继承于IEventSystemHandler的事件系统接口。而具体实现效果如图2-1,
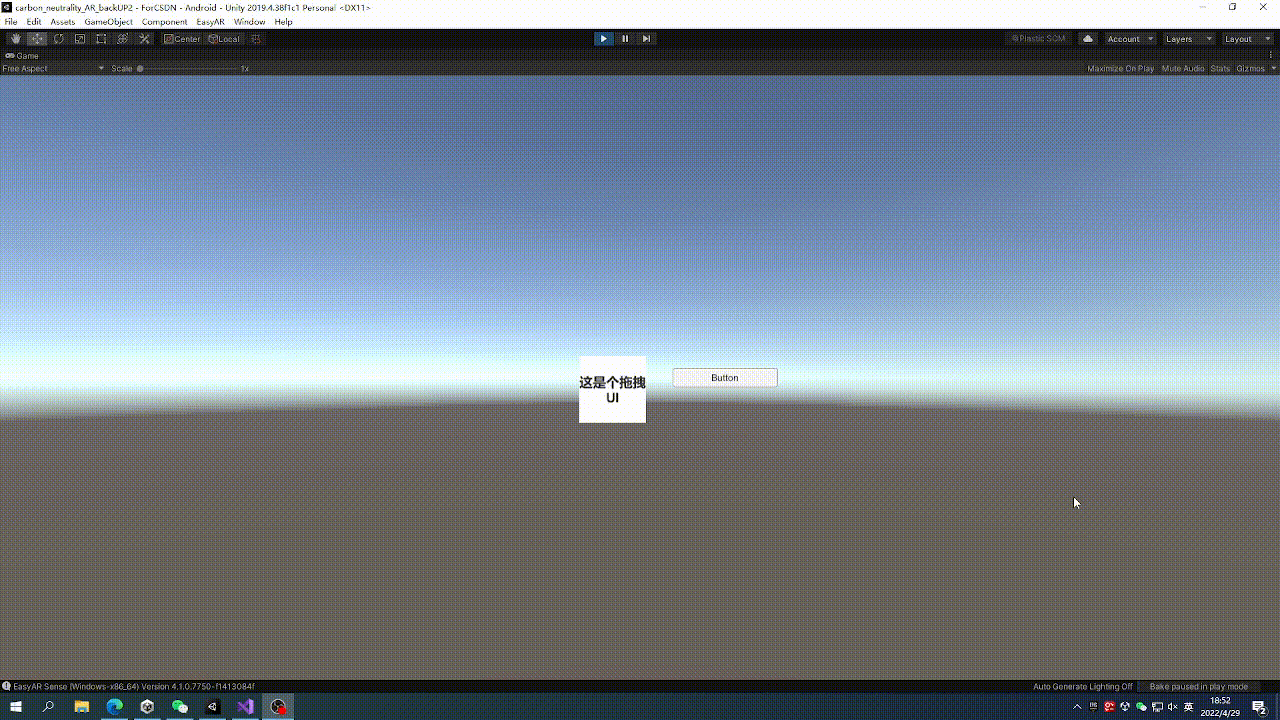
图2-1 UI拖拽
挂上脚本即可,完整代码如下:
using System.Collections;
using System.Collections.Generic;
using UnityEngine;
using UnityEngine.EventSystems;
public class DragUI : MonoBehaviour, IPointerClickHandler, IBeginDragHandler, IDragHandler, IEndDragHandler
{
    private RectTransform rectTransform;
    void Start()
    {
        rectTransform = GetComponent<RectTransform>();
    }

    public void OnBeginDrag(PointerEventData eventData)
    {
        Debug.Log("开始拖拽");
    }

    public void OnDrag(PointerEventData eventData)
    {
        //以备反馈点输出
        Vector3 uiPosition;

        //将一个屏幕空间点转换为世界空间中位于给定 RectTransform 平面上的一个位置
        RectTransformUtility.ScreenPointToWorldPointInRectangle(rectTransform, eventData.position, eventData.enterEventCamera, out uiPosition);

        //将赋值位置的uiPosition反馈回当前具有RectTransform的UI.Position
        rectTransform.position = uiPosition;
    }

    public void OnEndDrag(PointerEventData eventData)
    {
        Debug.Log("结束拖拽");
    }

    public void OnPointerClick(PointerEventData eventData)
    {
        Debug.LogWarning("检测到点击");
    }
}
③3D物体响应
待更新
版权归原作者 牛马大亨 所有, 如有侵权,请联系我们删除。