1. 环境
Host: Ubuntu 22.04.4 LTS
Embeded: kv260 with Ubuntu 22.04
AMD KV260 starts with Ubuntu 22.04 https://www.amd.com/zh-cn/products/system-on-modules/kria/k26/kv260-vision-starter-kit/getting-started-ubuntu/getting-started.html
2. 工具及版本介绍
GitHub - Xilinx/Vitis-AI at 2.5Vitis AI is Xilinx’s development stack for AI inference on Xilinx hardware platforms, including both edge devices and Alveo cards. - GitHub - Xilinx/Vitis-AI at 2.5https://github.com/Xilinx/Vitis-AI/tree/2.5
2.1 工具版本兼容性
IP and Tool Version Compatibility — Vitis™ AI 3.0 documentation
Software Tools VersionDPUCDZX8G IP VersionViTis AI Release VersionVivado / Vitis / Petalinux 2022.24.1v3.0Vivado / Vitis / Petalinux 2022.14v2.5Vivado / Vitis / Petalinux 2021.23.4v2.0Vivado / Vitis / Petalinux 2021.13.3v1.4Vivado / Vitis / Petalinux 2020.23.3v1.3Vivado / Vitis / Petalinux 2020.13.2v1.2Vivado / Vitis / Petalinux 2019.23.2v1.1Vivado / Vitis / Petalinux 2019.13.1v1.0Vivado / Petalinux 2019.13N/AVivado / Petalinux 2018.22N/AVivado / Petalinux 2018.11First Release
PYNQ for Kria SOMs:
PYNQ for Kria SOMsPYNQ support and examples for Kria SOMs. Contribute to Xilinx/Kria-PYNQ development by creating an account on GitHub.https://github.com/Xilinx/Kria-PYNQ
DPU-PYNQ (v2.5)
This overlay contains a Vitis-AI 2.5.0 Deep Learning Processor Unit (DPU) and comes with a variety of notebook examples with pre-trained ML models.Supported boards: KV260, KR260, KD240
从官方给的信息可以看出,KV260 PYNQ Installation 使用的是 Vitis-AI 2.5.0,对应的工具版本Vivado / Vitis / Petalinux 2022.1。
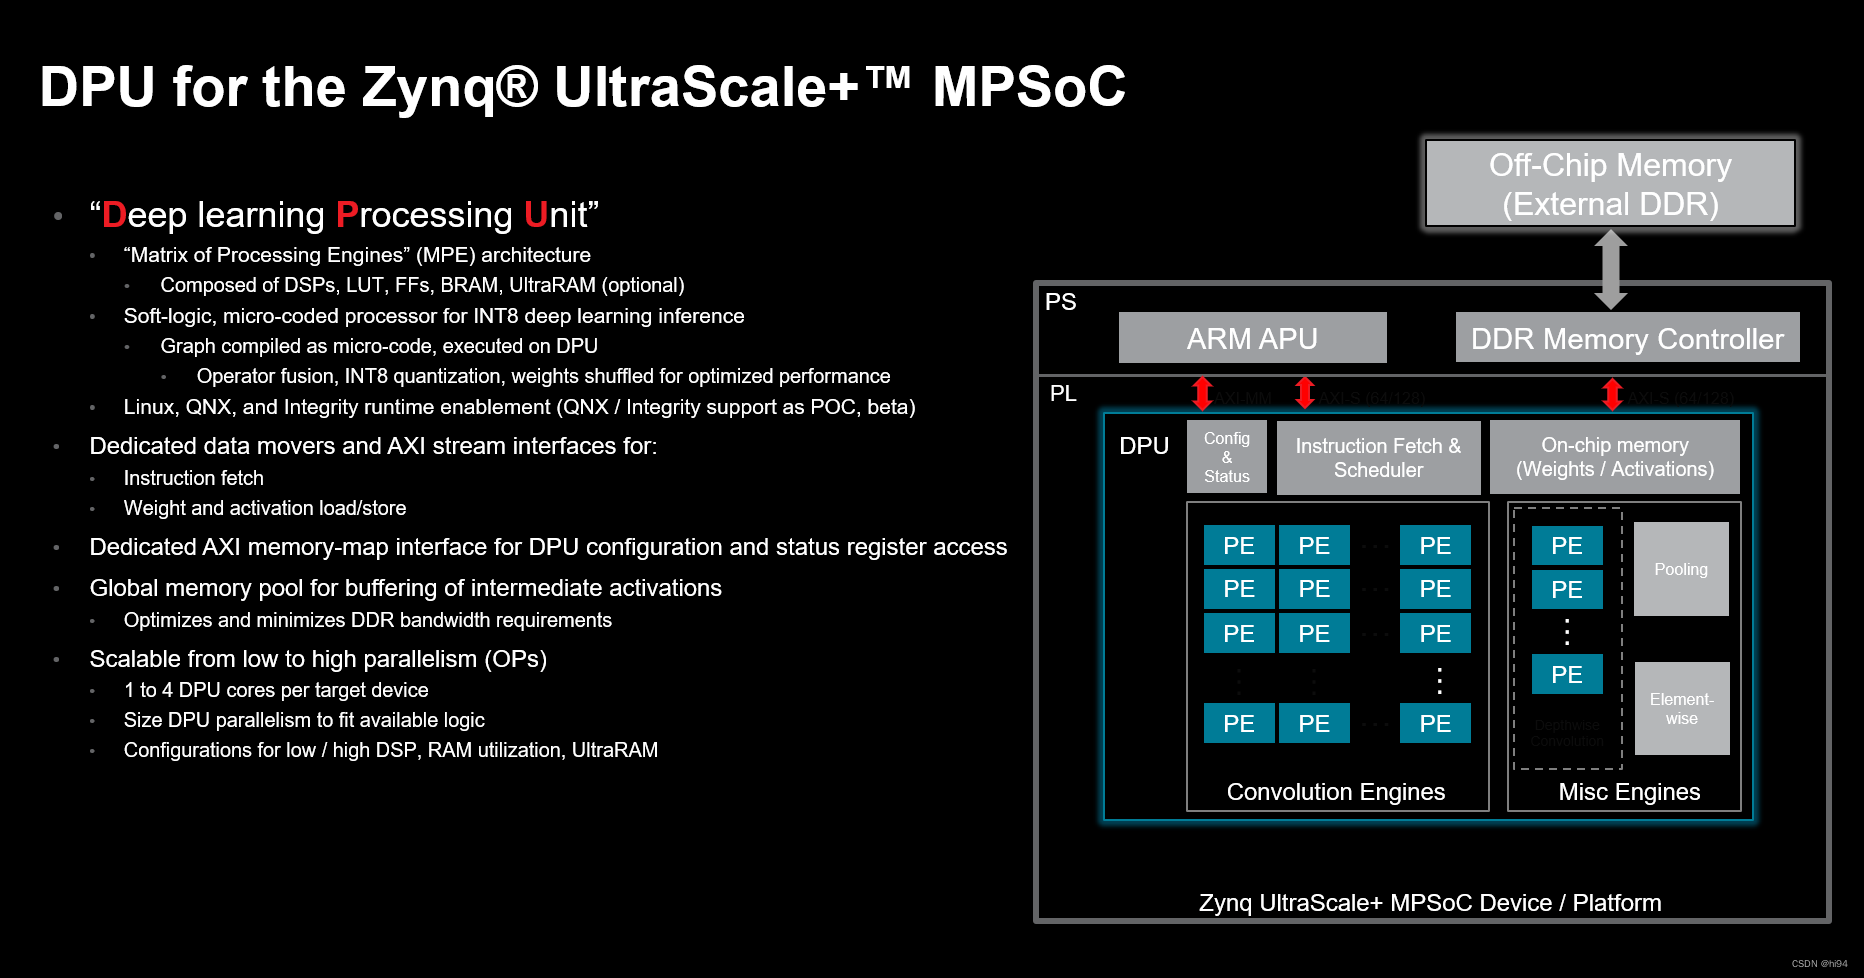
2.2 DPU结构

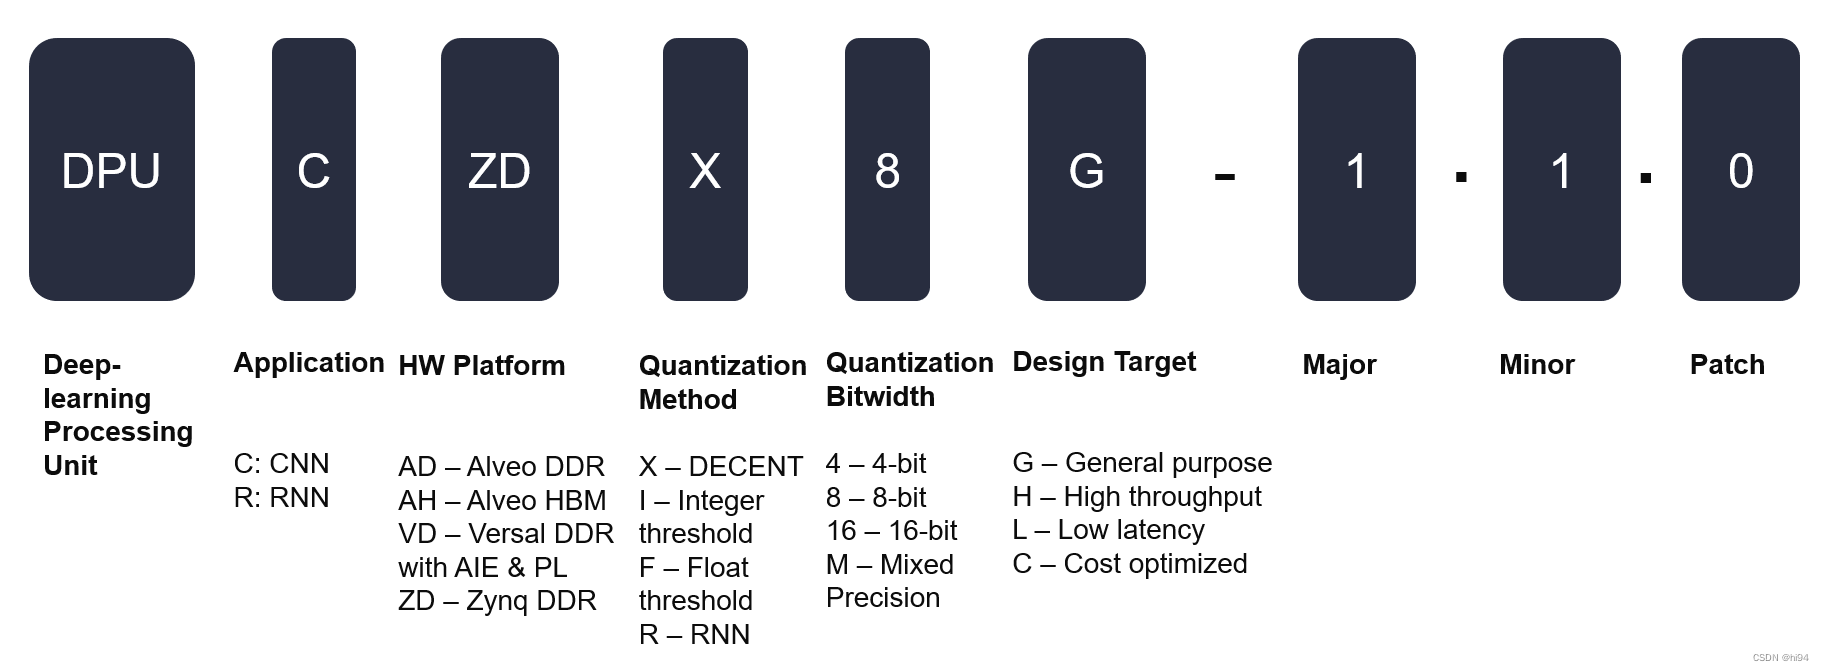
2.3 DPU命名规则

KV260使用DPUCZDX8G IP,表示:
应用领域:CNN
硬件平台:Zynq DDR
量化方法:decent
Decent:一种量化与优化工具,主要用于对神经网络模型进行压缩和量化,以适配于赛灵思的DPU硬件。Decent支持多种量化策略,包括定点量化(通常为INT8量化)。这种工具的目的是通过减小模型的存储与计算需求来优化执行效率,同时尽量保持推理精度。
Integer threshold:一种量化方法,使用整数阈值来确定量化的位宽和位置。
Float threshold:这种方法使用浮点数阈值来进行量化,与整数阈值类似,但使用的是浮点数。
RNN:循环神经网络(Recurrent Neural Network)的缩写,这是一种用于处理序列数据的神经网络结构,通常在量化时需要特别考虑,因为它们的时间依赖性。
量化精度:8 bit
设计目标:通用
3. Vitis AI 配置要点
3.1 配置安装 Docker 库
- sudo apt update
- sudo apt install ca-certificates curl gnupg
- sudo install -m 0755 -d /etc/apt/keyrings
- curl -fsSL https://download.docker.com/linux/ubuntu/gpg | sudogpg --dearmor -o /etc/apt/keyrings/docker.gpg
- sudochmoda+r /etc/apt/keyrings/docker.gpg
- echo "deb [arch="$(dpkg --print-architecture)" signed-by=/etc/apt/keyrings/docker.gpg] https://download.docker.com/linux/ubuntu \
- "$(. /etc/os-release && echo "$VERSION_CODENAME")" stable" | sudo tee /etc/apt/sources.list.d/docker.list > /dev/null
- sudo apt update
参考:Install Docker Engine on Ubuntu | Docker Docs
3.2 Install Docker Engine
- sudo apt install docker-cedocker-ce-cli containerd.io docker-buildx-plugin docker-compose-plugin
- docker-ce: 这是Docker社区版(Community Edition)的包名。
- docker-ce-cli: 这是Docker社区版的命令行界面工具的包名,允许用户通过命令行与Docker交互。
- containerd.io: 这是一个开源容器运行时,Docker用它来管理容器的生命周期。它负责镜像的传输和存储、容器的执行和监控以及任务的分配。
- docker-buildx-plugin: 这是Docker的一个插件,允许用户通过使用Buildx构建功能,构建多平台镜像、利用缓存等高级构建功能。
- docker-compose-plugin: 这是Docker Compose的插件,Docker Compose是一个用于定义和运行多容器Docker应用程序的工具。通过一个YAML文件来配置应用服务,然后使用一个单一的命令,就可以创建并启动所有的服务。
3.3 添加 Docker 用户组并测试
- sudogroupadddocker
- sudousermod -aGdocker $USER
- newgrpdocker
运行:docker run hello-world,进行测试,打印 “hello world” 则成功。
3.4 克隆 Vitis AI 库
- git clone https://github.com/Xilinx/Vitis-AI/tree/2.5
- cd Vitis-AI
3.5 构建 Docker (直接抓取)
- docker pull xilinx/vitis-ai-cpu:latest
3.6 运行 Docker
- ./docker_run.sh xilinx/vitis-ai-cpu:latest
ubuntu@ubuntu:$ ./docker_run.sh xilinx/vitis-ai-cpu:latest
Setting up ubuntu's environment in the Docker container...
usermod: no changes
Running as vitis-ai-user with ID 0 and group 0

==========================================

__      ___ _   _                   _____
\ \    / (_) | (_)            /\   |_   _|
 \ \  / / _| |_ _ ___ ______ /  \    | |
  \ \/ / | | __| / __|______/ /\ \   | |
   \  /  | | |_| \__ \     / ____ \ _| |_
    \/   |_|\__|_|___/    /_/    \_\_____|

==========================================

Docker Image Version: 2.5.0.1260   (CPU)
Vitis AI Git Hash: 502703c
Build Date: 2022-06-12

For TensorFlow 1.15 Workflows do:
     conda activate vitis-ai-tensorflow
For PyTorch Workflows do:
     conda activate vitis-ai-pytorch
For TensorFlow 2.8 Workflows do:
     conda activate vitis-ai-tensorflow2
For WeGo Tensorflow 1.15 Workflows do:
     conda activate vitis-ai-wego-tf1
For WeGo Tensorflow 2.8 Workflows do:
     conda activate vitis-ai-wego-tf2
For WeGo Torch Workflows do:
     conda activate vitis-ai-wego-torch
Vitis-AI /workspace >
出现如上结果,表示启动docker成功,注意版本信息。
3.7 安装 Jupyter Lab
- jupyter --version # 查看是否安装jupyterlab
jupyter --version
Selected Jupyter core packages...
IPython          : 8.12.2
ipykernel        : 6.23.3
ipywidgets       : 8.0.6
jupyter_client   : 8.3.0
jupyter_core     : 5.3.0
jupyter_server   : 2.6.0
jupyterlab       : not installed
nbclient         : 0.8.0
nbconvert        : 7.6.0
nbformat         : 5.9.0
notebook         : 6.5.4
qtconsole        : 5.4.3
traitlets        : 5.9.0
- pip install jupyterlab
- jupyter lab # 进入jupyterlab
- pip install jupyterlab-language-pack-zh-CN
4. PYNQ for KV260 配置要点
4.1 烧录 Ubuntu 22.04 LTS
烧录 Ubuntu 22.04 LTShttps://www.amd.com/zh-cn/products/system-on-modules/kria/k26/kv260-vision-starter-kit/getting-started-ubuntu/getting-started.html
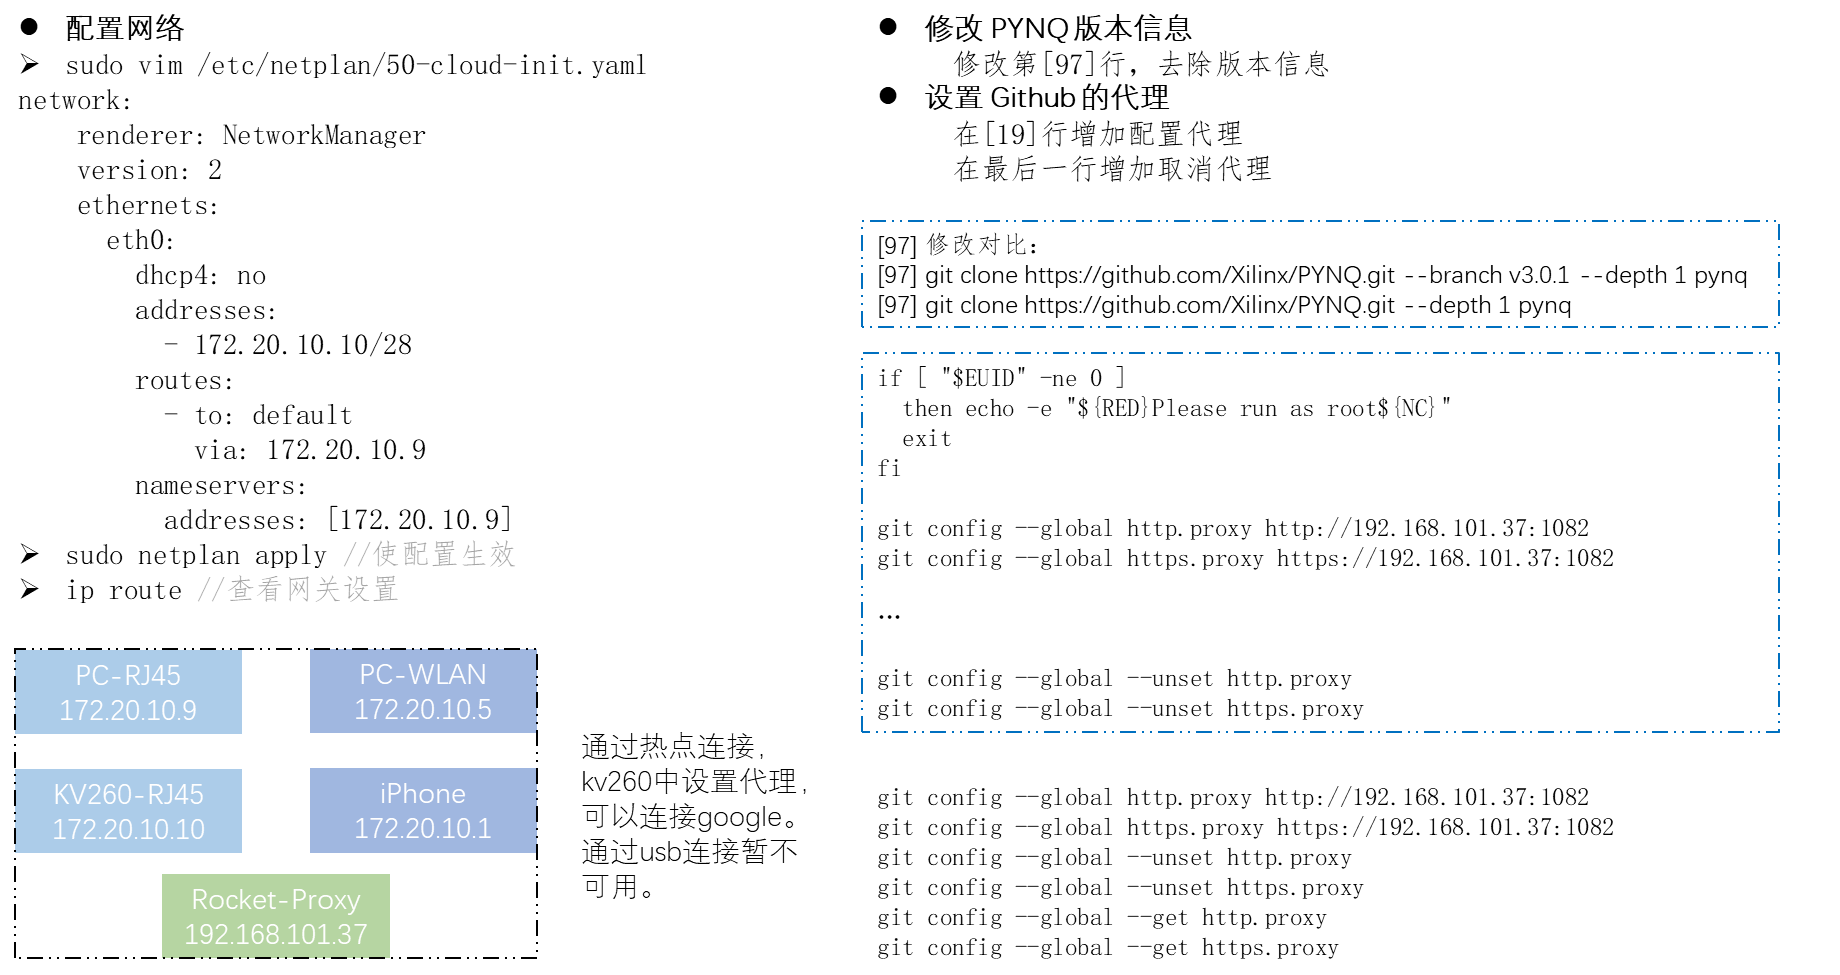
4.2 配置网络

4.3 关闭图形桌面
- xmutildesktop_disable
4.4 添加 AMD 软件源并更新升级 Kernel
- sudo add-apt-repository ppa:xilinx-apps
- sudo add-apt-repository ppa:ubuntu-xilinx/sdk
- sudo apt update
- sudo apt upgrade
**4.5 配置 **Docker (optional)
- sudogroupadddocker
- sudousermod -a -G docker $USER
- newgrpdocker
4.6 *安装 xrtzocl driver (optional)*
- sudo apt install xrt-dkms
4.7 安装 Pynq (需配置代理)
- git clone https://github.com/Xilinx/Kria-PYNQ.git
- cd Kria-PYNQ
- 需要修改install.sh文件
- sudo bash install.sh -b KV260
4.8 Jupyter** Lab **安装中文支持包
- pip install jupyterlab-language-pack-zh-CN
4.9 域名解析
- C:\Windows\System32\drivers\etc\hosts
- 添加:192.168.101.224 kria
版权归原作者 hi94 所有, 如有侵权,请联系我们删除。