虽然有许多用于目标跟踪的算法,包括较新的基于深度学习的算法,但对于这项任务,粒子滤波仍然是一个有趣的算法。所以在这篇文章中,我们将介绍视频中的目标跟踪:预测下一帧中物体的位置。在粒子滤波以及许多其他经典跟踪算法的情况下,我们根据估计的动态进行预测,然后使用一些测量值更新预测。
我们从数学理论开始。粒子滤波是一种贝叶斯滤波方法,主要用于非线性、非高斯动态系统中的状态估计。它通过使用一组随机样本(称为粒子)来表示状态的后验概率分布,并通过这些粒子的加权平均来估计状态。
在每个时间步(或视频中的一帧),对物体的位置有一些信念(也称为先验知识)。这种信念是基于我们从前面的步骤中得到的信息。为了提高对目标位置的估计,可以通过测量当前时间步长的状态,在初始信念(或预测)中添加额外的信息。通过测量我们可以更新或修正目标的状态(即它的位置)。这种新的修正估计也称为后验估计。
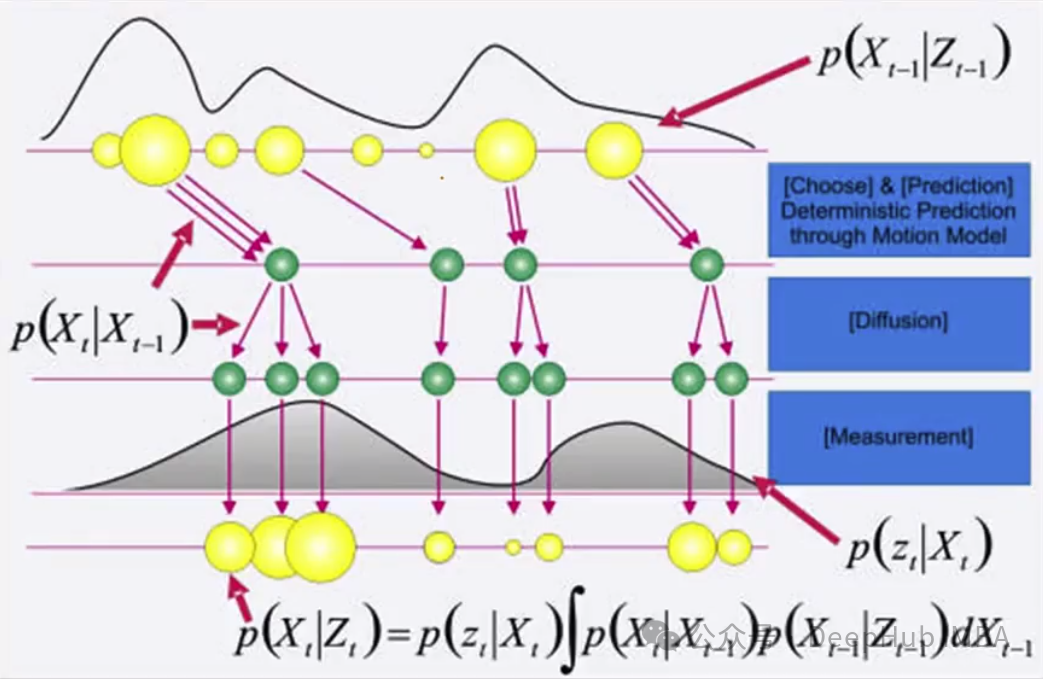
也就是说我们的目标有一些隐藏状态(在这个例子中是位置),它将被标记为x。因为不确定这个状态(这就是它被隐藏的原因),所以可以对它进行估计,同时可以对状态Y进行一些测量,但测量总是有噪声的,这意味着它不是完美的,所以得到的时目标在哪里的一些分布,而不是精确的位置(如果测量是完美的,我们不需要任何估计,我们确切地知道物体在哪里)。
在每个时间步长,目标的状态都会发生变化,我们希望利用过去和当前测量的信息,通过找到最可能的状态来估计当前状态。在数学上首先要根据过去做出预测,以使我们相信当前状态(这是一个概率分布)

然后,使用当前时间步长的测量值对预测进行校正。

一般情况下是通过假设这个过程是马尔可夫的来简化它,这意味着它只依赖于前一个时间步长。所以,关于当前状态的信念只取决于前一步的状态。

修正增加了当前测量的知识。

然后我们可以用贝叶斯规则将最后一个方程表示如下。

这个方程中,当前状态取决于给定我们处于状态X,得到当前测量值Y的概率(如果我们确实处于状态X,看到测量值的可能性)乘以给定我们处于状态X,得到状态X的概率(这是我们的信念或先验)。这样就得到了假设我们在状态X´´´时得到Y´´的概率。
线性动态模型
为了做出我们最初的预测(或信念),我们使用动态模型。这个模型假设在步骤t-1和步骤t的状态之间存在某种关系,我们将使用线性动态模型,这意味着步骤之间的关系是线性的。当我们想要预测一个运动物体的位置时可以将它的状态构造为位置pₓ和p_y,速度vₓ和v_y的向量,因此xₜ=[pₓ,ₜ , p_yₜ , vₓ,ₜ , v_yₜ].一个模型可以将状态x x_i和x x_i关联起来
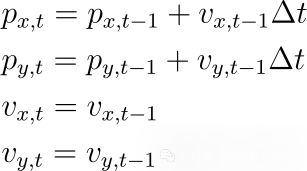
我们这个例子中Δt=1。也可以把它写成矩阵形式:

这里的M为:
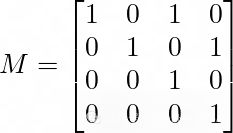
前两行表示新位置的方程,后两行表示x和y方向上的速度都是守恒的。由于存在不确定性,我们还添加了一些噪声。
过程可视化
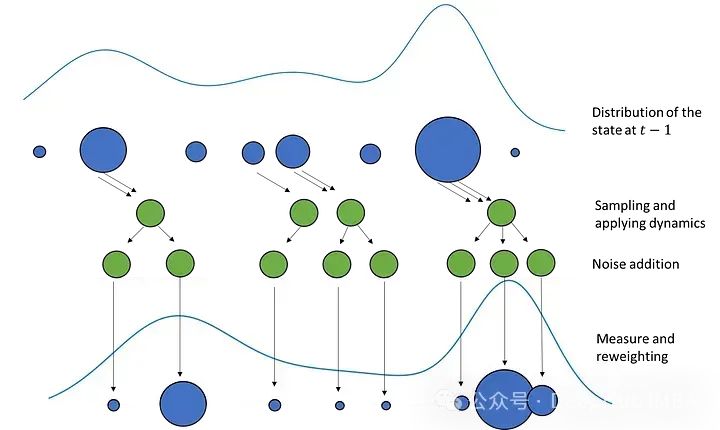
我们描述的从t-1状态到t时刻的过程可以在下面的图中可视化,它描述了一个一维情况。
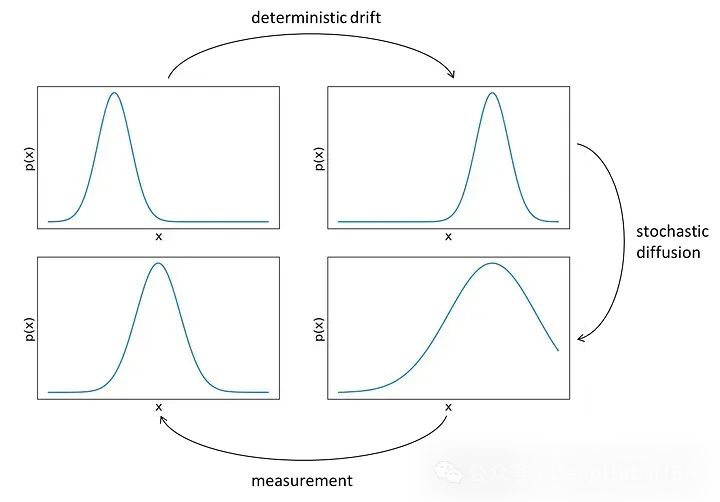
在左上的图中,我们看到了步骤t-1中位置x的分布(因为我们是一维的,所以状态只包含沿x轴的位置)。在应用我们的动态后,分布移动到一个新的位置,不改变形状。这一步是确定的,因为我们知道应用的动态。但是我们不确定动态的具体数值,所以需要在分布中加入噪音或不确定性,使其变得更宽,如图右下所示。最后通过测量来增加额外的信息,这对位置进行了修正,降低了不确定性。
粒子滤波
我们可以把分布看作是不同大小的粒子的表示。大粒子位于概率高的地方,小粒子位于概率低的地方。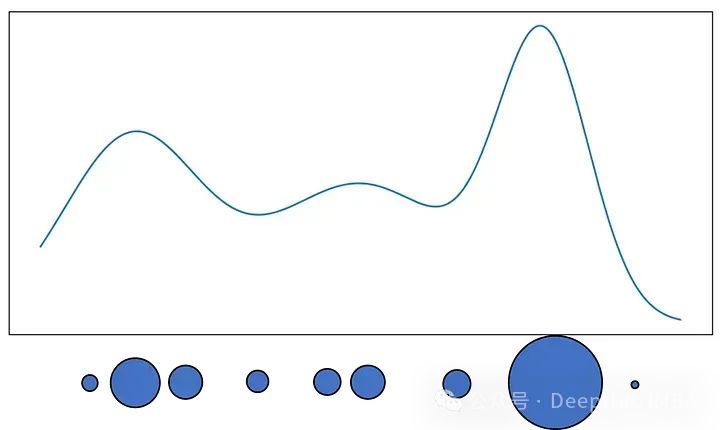
这个过程与前面描述的过程类似。我们从N个不同权重的粒子开始描述步骤t-1的状态分布。从这些粒子中,对N个粒子的新集合进行采样,其中较大的粒子被选中的概率更高,并且可以对相同的粒子进行多次采样。对于新的粒子集合,我们应用动态学并进行确定性漂移。然后在粒子中加入一些噪声来扩展分布。最后,通过使用测量根据获得这种测量的可能性来设置粒子的权重,如果状态确实与粒子中的状态相同。
数学原理一般都很枯燥,并且难以理解,下面我们来用代码来实现这个过程,这样可以更深入的了解这个方法的数学原理。
Python代码实现
首先导入库:
 import matplotlib.pyplot as plt
 import numpy as np
 import cv2  # openCV
接下来初始化一个视频捕获对象,从视频中读取帧并读取第一帧。
 # create video reader object and read te first frame
 cap = cv2.VideoCapture('simpson.avi')
 ret, image = cap.read()
我们通过选择我们将使用的粒子数量来启动粒子滤波器(粒子越多,分布越准确,但会增加更多的计算成本),并设置初始状态。我们选择状态为[边界框中心的x坐标,它的y坐标,边界框x方向的速度,y方向的速度]。我们还假设边界框的大小是恒定的(但一般来说,它可以是状态的一部分)。
 num_of_particles = 250
 s_init = np.array([81, 169, 0, 0])  # initial state [x_center, y_center, x_velocity, y_velocity]

 # bounding box's (half) height and width.
 # We assume those are constant
 half_height = 118
 half_width = 33
初始状态和边界框的大小是手动选择的。在实际计算之前,需要创建了一个视频写入器对象来保存跟踪结果视频。
 # get parameters of the video
 frame_width = int(cap.get(3))
 frame_height = int(cap.get(4))
 fps = 20 #cap.get(5)  # frames per second

 # create a video writer object
 size = (frame_width, frame_height)
 result = cv2.VideoWriter('simpson_tracked.avi',
                          cv2.VideoWriter_fourcc(*'MJPG'),
                          fps, size)
对于测量,可以比较来自初始状态的原始边界框与后续帧中新的候选边界框之间ROI的颜色(归一化)直方图。所以这里定义了一个函数来计算规范化直方图。
 def compute_norm_hist(image, state):
     """
     Compute histogram based on the RGB values of the image in the ROI defined by the state
     Args:
         image (np.ndarray): matrix represent image with the object to track in it
         state (np.ndarray): vector of the state of the tracked object

     Returns:
         vector of the normalized histogram of the colores in the ROI of the image based on the state
     """
     # get the top-left and bottom-right corner of the object bounding box
     # if the bounding box is outside the frame, we clap it
     x_min = max(np.round(state[0] - half_width).astype(int), 0)
     x_max = min(np.round(state[0] + half_width).astype(int), image.shape[1])
     y_min = max(np.round(state[1] - half_height).astype(int), 0)
     y_max = min(np.round(state[1] + half_height).astype(int), image.shape[0])

     roi = image[y_min:y_max+1, x_min:x_max+1]
     roi_reduced = roi // 16  # change range of pixel values from 0-255 to 0-15
     # build vector to represent the combinations of RGB as single value
     roi_indexing = (roi_reduced[..., 0] + roi_reduced[..., 1] * 16 + roi_reduced[..., 2] * 16 ** 2).flatten()
     hist, _ = np.histogram(roi_indexing, bins=4096, range=(0,4096))
     norm_hist = hist / np.sum(hist)  # normalize the histogram
     return norm_hist
根据状态得到边界框左上角和右下角的坐标。只从图像中提取ROI。为了使计算更容易,将颜色的值范围从256个值减少到16个值。' // '运算符将两个数相除,并将结果舍入到最接近的整数。对于RGB的每个组合(在0-15范围内),所以我们构建一个16进制的数字。第一个颜色通道代表16⁰,第二个是16¹,最后一个是16²。所以得到的新数字的取值范围为0 ~ 4095,即唯一的4096个数字。我们从ROI中的所有值构建一个直方图,并通过直方图的总和将其归一化,这个样所有的比较将是一致的。
我们可以创建初始状态的规范化直方图。
q = compute_norm_hist(image, s_init)
由于我们目前只有一种状态,可以将其复制为粒子的数量,并为所有粒子设置相同的权重。
 s_new = np.tile(s_init, (num_of_particles, 1)).T
 weights = np.ones(num_of_particles)
然后就是while循环,执行算法的所有步骤:采样、预测(并添加噪声)、测量和重加权。
 # go over the frames in the video
 while True:
     # sample new particles according to the weights
     s_sampled = sample_particle(s_new, weights)
     # predict new particles (states) according to the previous states
     s_new = predict_particles(s_sampled)
     # go over the new predicted states, and compute the histogram for the state and
     # the weight with the original histogram
     for jj, s in enumerate(s_new.T):
         p = compute_norm_hist(image, s)
         weights[jj] = compute_weight(p, q)
让我们把这些步骤逐个实现。首先,我们根据粒子及其分布进行采样。
 def sample_particle(particles_states, weights):
     """
     Sample the particles (states) according to their weights.
     First a random numbers from uniform distribution U~[0,1] are generated.
     The random numbers are subtracted from the cumulative sum of the weights,
     and the sampling is made by selecting the state which its cumulative weights
     sum is the minimal one which is greater than the random number. If c[i] is the
     cumulative sum of the weights for the i-th state and r is a random number, the
     state which will be sampled is the j-th state so c[j] >= r and also c[j] is
     the smaller one that hold this inequality.
     Args:
         particles_states (np.ndarray): matrix which its columns are the states
         weights (np.ndarray): weights of each state

     Returns:
         (np.ndarray): matrix of sampled states according to their weights
     """
     normalized_weights = weights / np.sum(weights)
     sampling_weights = np.cumsum(normalized_weights)
     rand_numbers = np.random.random(sampling_weights.size)  # get random numbers from U~[0,1]
     cross_diff = sampling_weights[None, :] - rand_numbers[:, None]  # subtract from each weight any of the random numbers
     cross_diff[cross_diff < 0] = np.inf  # remove negative results
     sampling = np.argmin(cross_diff, axis=1)
     sampled_particles = particles_states[:, sampling]  # sample the particles
     return sampled_particles
我们对粒子的权重进行归一化,并计算它们的累积和。我们在0到1之间随机选择一个数字,然后从之前计算的累积权重向量中减去这个数字。然后选择第一个累积权值大于随机数的元素。权重高的状态更有可能被选中(我们可以多次选择一个状态)。
然后就是抽样进行预测。
 def predict_particles(particles_states):
     """
     Predict new particles (states) based on the previous states
     Args:
         particles_states (np.ndarray): matrix of states. The rows are the properties of the state and the columns are the particles

     Returns:
         (np.ndarray): new predicted particles
     """
     # the dynamic we use assume that:
     # x_new = x + v_x (x - center position)
     # y_new = y + v_y (y - center position)
     # v_x_new = v_x (velocity at x)
     # v_y_new = v_y (velocity at y)
     dynamics = np.array(
         [[1 ,0, 1, 0],
          [0, 1, 0, 1],
          [0, 0, 1, 0],
          [0, 0, 0, 1]]
     )
     # multiplying the state by the dynamics and add some noise
     predicted_states = dynamics @ particles_states + np.random.normal(loc=0, scale=1, size=particles_states.shape)
     return predicted_states
使用之前描述过的动态模型来预测新的状态。对于每个新状态,还添加高斯噪声来创建预测状态。
对于新粒子,想要测量它们与原始ROI的相似度。对于测量,我们将使用Bhattacharyya系数,它测量两个标准化直方图之间的相似性。
 def compute_weight(p, q):
     """
     Compute the weight based on Bhattacharyya coefficient between 2 normalized histograms
     Args:
         p (np.ndarray): normalized histogram
         q (np.ndarray): normalized histogram

     Returns:
         (float): weight based on Bhattacharyya coefficient between p and q
     """
     # make sure the histogram is normalized
     if not np.isclose(np.sum(p), 1):
         raise ValueError('p histogram is not normalized')
     if not np.isclose(np.sum(q), 1):
         raise ValueError('q histogram is not normalized')
     bc = np.sum(np.sqrt(p * q))  # Bhattacharyya coefficient
     return np.exp(20 * bc)
对于每个粒子,我们测量其直方图与原始粒子之间的相似性作为权重。最后在帧上绘制边界框并将其保存到视频中。
     image_with_boxes = draw_bounding_box(image, s_new, weights, with_max=True)
     result.write(image_with_boxes)
对于边界框的绘制,计算新状态的加权平均值来得到平均状态并绘制它。我们还添加了最可能状态(权重最高的状态)的边界框。
 def draw_bounding_box(image, states, weights, with_max=True):
     """
     Draw rectangle according to the weighted average state and (optionally) a rectangle of the state with
     the maximum score.
     Args:
         image (np.ndarray): the image to draw recangle on
         states (np.ndarray): the sampling states
         weights (np.ndarray): the weight of each state
         with_max (bool): True to draw a rectangle according to the state with the highest weight

     Returns:
         (np.ndarray): image with rectangle drawn on for the tracked object
     """
     mean_box = np.average(states, axis=1, weights=weights)
     x_c_mean, y_c_mean = np.round(mean_box[:2]).astype(int)
     image_with_boxes = image.copy()
     cv2.rectangle(image_with_boxes, (x_c_mean - half_width, y_c_mean - half_height),
                                      (x_c_mean + half_width, y_c_mean + half_height), (0, 255, 0), 1)
     if with_max:
         max_box = states[:, np.argmax(weights)]
         x_c_max, y_c_max = np.round(max_box[:2]).astype(int)
         cv2.rectangle(image_with_boxes, (x_c_max - half_width, y_c_max - half_height),
                                          (x_c_max + half_width, y_c_max + half_height), (0, 0, 255), 1)
     return image_with_boxes
在循环结束时,检查视频的下一帧。如果没有了就结束循环,这时opencv的标准操作
    # read next frame
     ret, image = cap.read()
     if not ret:  # if there is no next frame to read, stop
         break
在最后关闭对象
 cap.release()
 result.release()
总结
在这篇文章中,我们讨论了在视频中跟踪目标的粒子滤波算法。我们只简单的对其进行了实现,其实现实使用时有更多的技术可以对它进行改进(例如其他度量方法)。
这个算法适用于非线性、非高斯系统。实现简单,灵活性高,并且能处理高维状态空间。
但是他的缺点也很明显:计算量较大,特别是在高维状态空间中。并且需要大量粒子才能得到较好的估计精度,容易出现粒子退化问题。
但是该算法可以应用于更多的领域,而不仅仅是跟踪目标,例如机器人定位、金融时间序列分析等。
作者:DZ