
文章目录
读取图片
形态学处理
二值化
提取轮廓
获取轮廓索引,并筛选所需要的轮廓
画出轮廓,显示计数
检测记数
原图-》灰度化-》阈值分割-》形态学变换-》距离变换-》轮廓查找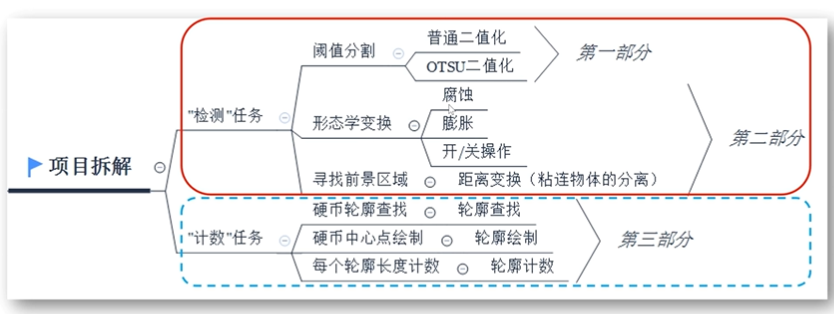
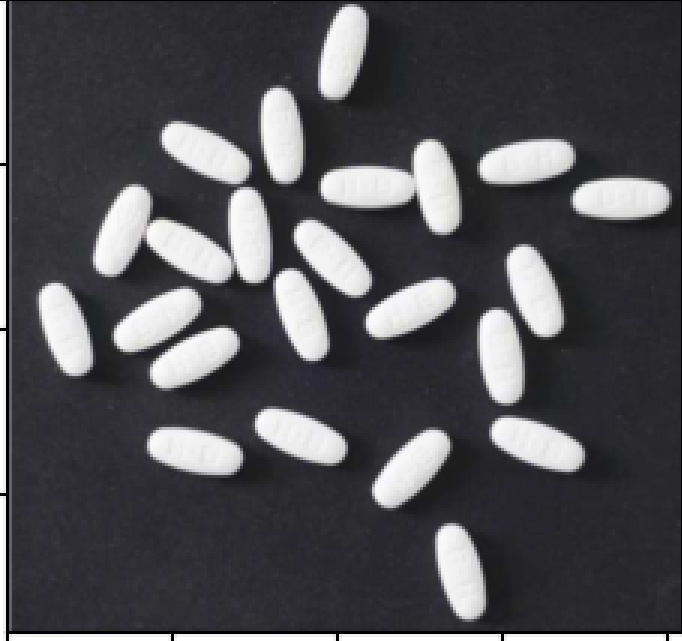
原图
importcv2 as cv
importmatplotlib.pyplot as plt
image = cv.imread('img/img.png')
gray_image = cv.cvtColor(image, cv.COLOR_BGR2GRAY)
ret, binary = cv.threshold(gray_image,127,255, cv.THRESH_BINARY)
# 寻找轮廓
contours, hierarchy = cv.findContours(binary, cv.RETR_TREE, cv.CHAIN_APPROX_SIMPLE)
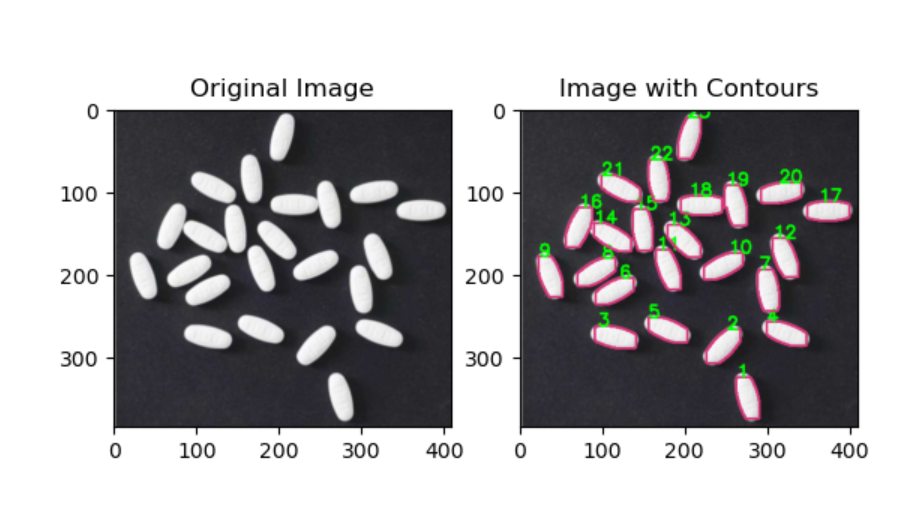
# 在原始图像的副本上绘制轮廓并标注序号
image_with_contours = image.copy()for i, contour in enumerate(contours):
cv.drawContours(image_with_contours,[contour],-1,(122,55,215),2)
# 标注轮廓序号
cv.putText(image_with_contours,str(i+1),tuple(contour[0][0]), cv.FONT_HERSHEY_SIMPLEX,0.5,(0,255,0),2)
# 使用 matplotlib 显示结果
plt.subplot(121), plt.imshow(cv.cvtColor(image, cv.COLOR_BGR2RGB)), plt.title('Original Image')
plt.subplot(122), plt.imshow(cv.cvtColor(image_with_contours, cv.COLOR_BGR2RGB)), plt.title('Image with Contours')
plt.show()print(len(contours))
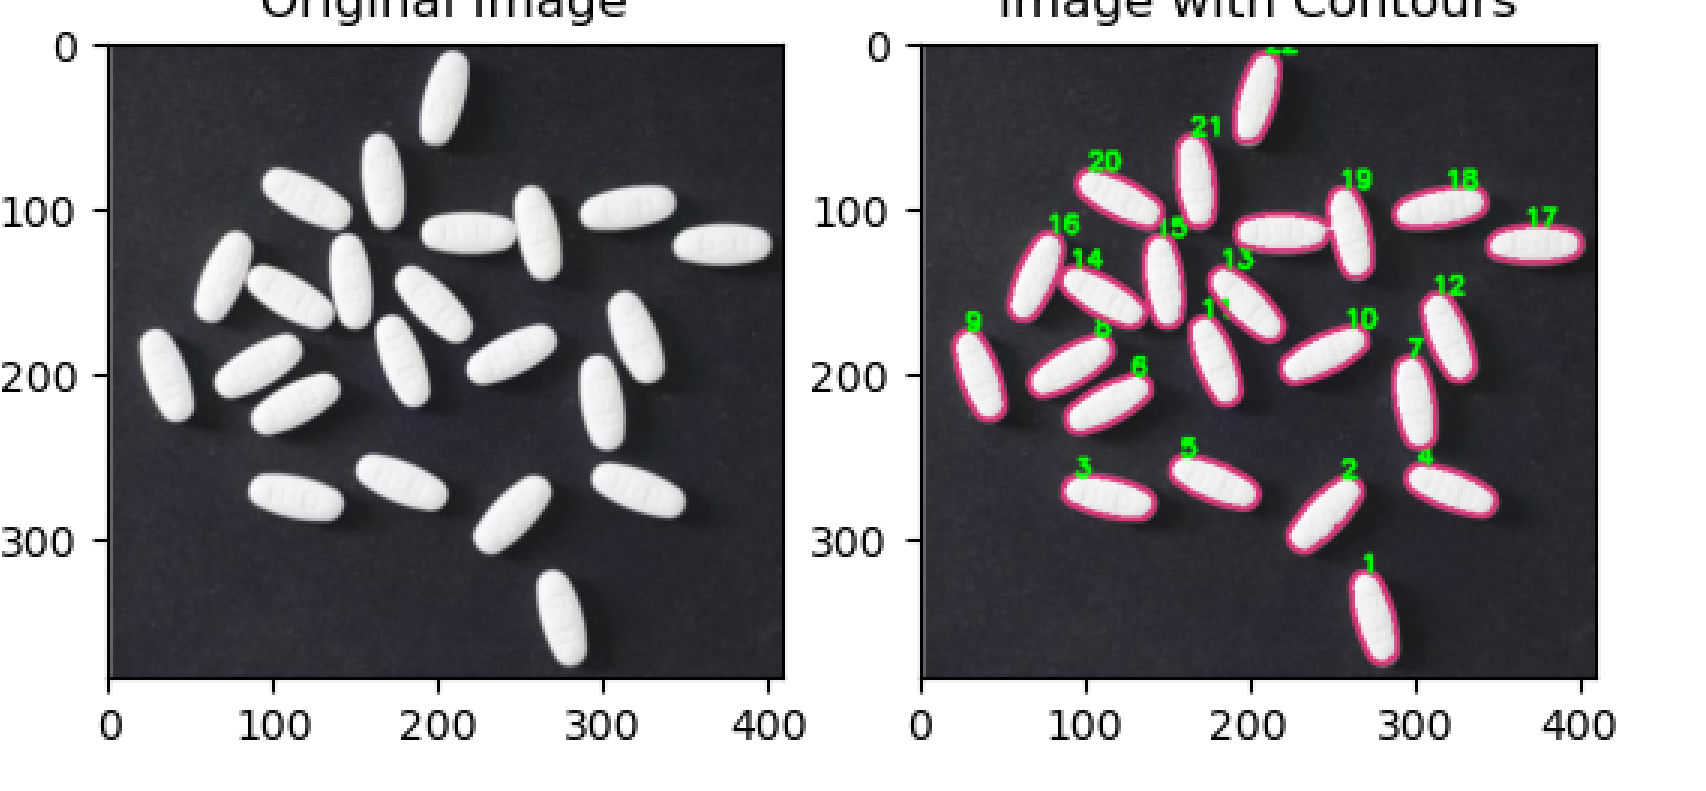
经过操作
发现其具有粘连性,所以阈值分割、形态学变换等图像处理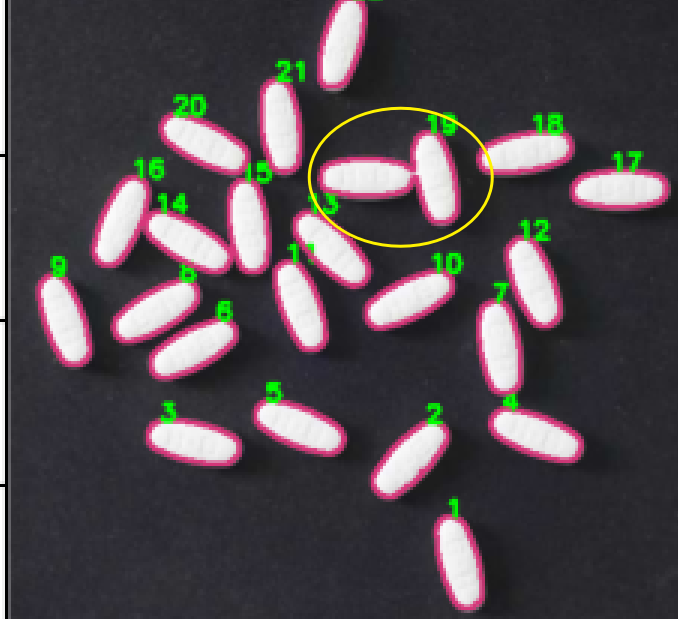
开始进行消除粘连性–形态学变换
importnumpy as np
importcv2 as cv
importmatplotlib.pyplot as plt

image = cv.imread('img/img.png')
gray_image= cv.cvtColor(image, cv.COLOR_BGR2GRAY)
kernel = np.ones((16,16), np.uint8)
gray_image=cv.morphologyEx(gray_image, cv.MORPH_OPEN, kernel)
ret, binary = cv.threshold(gray_image,127,255, cv.THRESH_BINARY)

# 寻找轮廓
contours, hierarchy = cv.findContours(binary, cv.RETR_TREE, cv.CHAIN_APPROX_SIMPLE)

# 在原始图像的副本上绘制轮廓并标注序号
image_with_contours = image.copy()for i, contour in enumerate(contours):
    cv.drawContours(image_with_contours,[contour],-1,(122,55,215),2)
    # 标注轮廓序号
    cv.putText(image_with_contours,str(i+1),tuple(contour[0][0]), cv.FONT_HERSHEY_SIMPLEX,0.7,(0,255,0),2)

# 使用 matplotlib 显示结果
plt.subplot(121), plt.imshow(cv.cvtColor(image, cv.COLOR_BGR2RGB)), plt.title('Original Image')
plt.subplot(122), plt.imshow(cv.cvtColor(image_with_contours, cv.COLOR_BGR2RGB)), plt.title('Image with Contours')
plt.show()print(len(contours))
总结实现方法
1. 读取图片:
import cv2

# 读取图片
image = cv2.imread("path/to/your/image.png")
cv2.imshow("Original Image", image)
cv2.waitKey(0)
2. 形态学处理:
import cv2
import numpy as np

# 形态学处理
kernel = np.ones((16,16), np.uint8)
morphology_result = cv2.morphologyEx(image, cv2.MORPH_OPEN, kernel)
cv2.imshow("Morphology Result", morphology_result)
cv2.waitKey(0)
3. 二值化:
import cv2

# 灰度转换
gray_image = cv2.cvtColor(morphology_result, cv2.COLOR_BGR2GRAY)# 二值化
_, binary_image = cv2.threshold(gray_image,100,255, cv2.THRESH_OTSU)
cv2.imshow("Binary Image", binary_image)
cv2.waitKey(0)
4. 提取轮廓:
import cv2

# 寻找轮廓
contours, _ = cv2.findContours(binary_image, cv2.RETR_EXTERNAL, cv2.CHAIN_APPROX_NONE)# 在原图上绘制轮廓
contour_image = image.copy()
cv2.drawContours(contour_image, contours,-1,(0,255,0),2)
cv2.imshow("Contours", contour_image)
cv2.waitKey(0)
5. 轮廓筛选和计数:
import cv2
# 遍历轮廓for i, contour inenumerate(contours):
area = cv2.contourArea(contour)if area <500:continue# 获取轮廓的位置(x, y, w, h)= cv2.boundingRect(contour)# 在原图上绘制矩形
cv2.rectangle(image,(x, y),(x + w, y + h),(0,255,0),2)# 在矩形位置写上计数
cv2.putText(image,str(i),(x, y), cv2.FONT_HERSHEY_COMPLEX,1,(0,0,255),2)
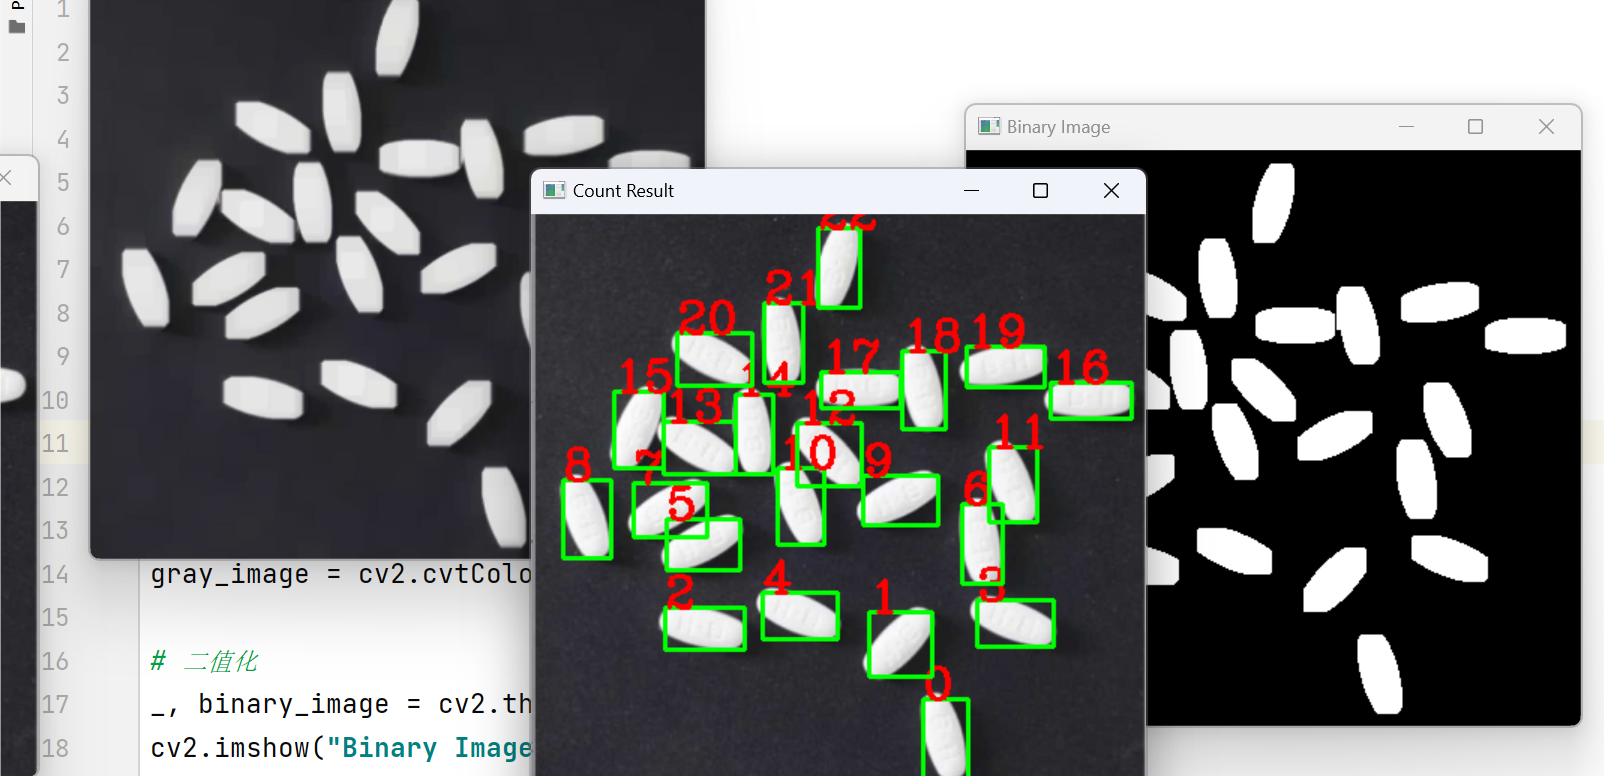
cv2.imshow("Count Result", image)
cv2.waitKey(0)
分水岭算法:
import cv2
import numpy as np

# 读取图片
image = cv2.imread("path/to/your/image.png")
cv2.imshow("Original Image", image)# 形态学处理
kernel = np.ones((3,3), np.uint8)
morphology_result = cv2.morphologyEx(image, cv2.MORPH_OPEN, kernel)
cv2.imshow("Morphology Result", morphology_result)# 灰度转换
gray_image = cv2.cvtColor(morphology_result, cv2.COLOR_BGR2GRAY)# 二值化
_, binary_image = cv2.threshold(gray_image,100,255, cv2.THRESH_OTSU)
cv2.imshow("Binary Image", binary_image)# 寻找轮廓
contours, _ = cv2.findContours(binary_image, cv2.RETR_EXTERNAL, cv2.CHAIN_APPROX_NONE)# 统计药片数量并标记轮廓
count =0for i, contour inenumerate(contours):
    area = cv2.contourArea(contour)if area <500:continue# 获取轮廓的位置(x, y, w, h)= cv2.boundingRect(contour)# 在原图上绘制矩形
    cv2.rectangle(image,(x, y),(x + w, y + h),(0,255,0),2)# 在矩形位置写上计数
    cv2.putText(image,str(count),(x, y), cv2.FONT_HERSHEY_COMPLEX,1,(0,0,255),2)

    count +=1

cv2.imshow("Count Result", image)print("药片检测个数:", count)

cv2.waitKey(0)
cv2.destroyAllWindows()
逐行解释
当然,让我们逐行解释上述代码:
import cv2
import numpy as np

# 读取图片
image = cv2.imread("path/to/your/image.png")
cv2.imshow("Original Image", image)
- 导入OpenCV库和NumPy库。
- 读取图片并显示原始图像。
# 形态学处理
kernel = np.ones((3,3), np.uint8)
morphology_result = cv2.morphologyEx(image, cv2.MORPH_OPEN, kernel)
cv2.imshow("Morphology Result", morphology_result)
- 定义一个3x3的矩形内核(kernel)。
- 对原始图像进行形态学开运算,去除小的噪点和不重要的细节。
- 显示形态学处理后的图像。
# 灰度转换
gray_image = cv2.cvtColor(morphology_result, cv2.COLOR_BGR2GRAY)
- 将形态学处理后的图像转换为灰度图。
# 二值化
_, binary_image = cv2.threshold(gray_image,100,255, cv2.THRESH_OTSU)
cv2.imshow("Binary Image", binary_image)
- 对灰度图进行自适应阈值二值化,使用OTSU算法。
- 显示二值化后的图像。
# 寻找轮廓
contours, _ = cv2.findContours(binary_image, cv2.RETR_EXTERNAL, cv2.CHAIN_APPROX_NONE)
- 寻找二值化后图像中的外部轮廓。
# 统计药片数量并标记轮廓
count =0for i, contour inenumerate(contours):
    area = cv2.contourArea(contour)if area <500:continue# 获取轮廓的位置(x, y, w, h)= cv2.boundingRect(contour)# 在原图上绘制矩形
    cv2.rectangle(image,(x, y),(x + w, y + h),(0,255,0),2)# 在矩形位置写上计数
    cv2.putText(image,str(count),(x, y), cv2.FONT_HERSHEY_COMPLEX,1,(0,0,255),2)

    count +=1

cv2.imshow("Count Result", image)print("药片检测个数:", count)
- 初始化药片计数为0。
- 遍历所有找到的轮廓。 - 如果轮廓的面积小于500,则跳过。- 获取轮廓的位置信息(矩形边界框)。- 在原图上绘制矩形,标记检测到的药片。- 在矩形位置写上计数。- 计数加1。
- 显示标记了计数的结果图像,并输出药片检测个数。
cv2.waitKey(0)
cv2.destroyAllWindows()
- 等待用户按下任意按键,然后关闭所有打开的窗口。
在基于距离变换的分水岭算法中,二值化操作是为了得到
sure_fg
(肯定是前景的区域),以便将其用作分水岭算法的标记点。这个过程涉及以下几步:
- 距离变换: 通过距离变换,我们得到了一个灰度图,其中像素值表示每个像素到最近的零像素点的距离。这个距离图范围是浮点数,通常需要进行归一化。
dist_transform = cv2.distanceTransform(binary_image, cv2.DIST_L2,3) - 归一化: 将距离变换后的图像进行归一化,使其范围在0到1之间。
normalized_distance = cv2.normalize(dist_transform,0,1, cv2.NORM_MINMAX) - 再次二值化: 对归一化后的图像进行二值化,以获取肯定是前景的区域。这是通过设置一个阈值,将距离较大的区域认定为前景。
_, sure_fg = cv2.threshold(normalized_distance,0.4,1, cv2.THRESH_BINARY)
这样,
sure_fg
中的像素值为 1 的区域就被认为是明确的前景区域,而不是可能的边界区域。这种区域将被用作分水岭算法的种子点。
本文转载自: https://blog.csdn.net/m0_74154295/article/details/134621904
版权归原作者 你会魔法吗✧(≖ ◡ ≖✿) 所有, 如有侵权,请联系我们删除。
版权归原作者 你会魔法吗✧(≖ ◡ ≖✿) 所有, 如有侵权,请联系我们删除。