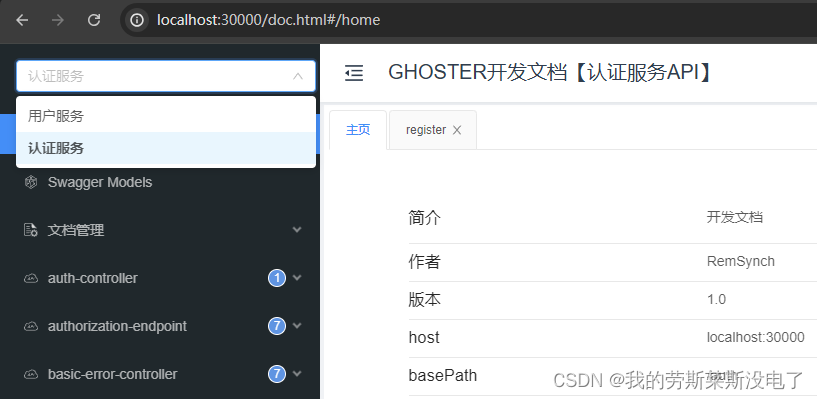
以前做过的都是单服务应用的文档,就算换到了微服务里做的实际上也是单服务(每个服务模块一个单独的文档,然后手动访问不同的端口去查找不同的模块文档,例如用户是3000端口,订单是3100端口,商品是3200端口)。这样的实现实际上挺蠢的,对前端伙伴很不友好,对自己测试也不友好,因此今天要说的是直接就在文档页面里切换不同的模块。
实现效果:

实际上这有一部分都是看这位佬的,只是说的不完全详细自己摸索了一番后发现有很多问题,于是总结了这篇文章出来
已解决了https://blog.csdn.net/qq_20695397
思路:给子模块引入Knife4j并编写配置类,给网关引入Knife4j并编写配置文件,依靠配置文件中的路径导航到不同模块的接口文档中。
1、依赖
在父模块中的pom.xml中加上:
<properties>
<maven.compiler.source>8</maven.compiler.source>
<maven.compiler.target>8</maven.compiler.target>
<spring.cloud.starter.gateway.version>3.1.4</spring.cloud.starter.gateway.version>
<spring.boot.version>2.6.3</spring.boot.version>
<knife4j.version>4.4.0</knife4j.version>
<swagger.version>1.6.2</swagger.version>
</properties>
<dependencyManagement>
<dependencies>
<!--SpringBoot-->
<dependency>
<groupId>org.springframework.boot</groupId>
<artifactId>spring-boot-starter-web</artifactId>
<version>${spring.boot.version}</version>
</dependency>
<!--Knife4j-->
<dependency>
<groupId>com.github.xiaoymin</groupId>
<artifactId>knife4j-openapi2-spring-boot-starter</artifactId>
<version>${knife4j.version}</version>
</dependency>
<!--swagger注解依赖-->
<dependency>
<groupId>io.swagger</groupId>
<artifactId>swagger-annotations</artifactId>
<version>${swagger.version}</version>
</dependency>
</dependencies>
</dependencyManagement>
给子模块引入Knife4j:
<dependency>
    <groupId>com.github.xiaoymin</groupId>
    <artifactId>knife4j-openapi2-spring-boot-starter</artifactId>
</dependency>
给网关模块引入Knife4j(跟上面那个依赖不同哦):
<!--Knife4j-->
<dependency>
    <groupId>com.github.xiaoymin</groupId>
    <artifactId>knife4j-gateway-spring-boot-starter</artifactId>
    <version>4.4.0</version>
</dependency>
2、配置类
子模块中的配置类
@Configuration
@EnableSwagger2WebMvc
public class SwaggerConfig {
/**
* 配置基本信息
*
* @return
*/
@Bean
public ApiInfo apiInfo() {
return new ApiInfoBuilder()
.title("GHOSTER开发文档【用户服务API】") // 文档的标题
.description("开发文档") // 测试的接口文档
.contact(new Contact("RemSynch", "111", "[email protected]")) // 联系人信息
.version("1.0") // 版本信息,可自定义
.build();
}
/**
* 配置文档生成最佳实践
*
* @param apiInfo
* @return
*/
@Bean
public Docket createRestApi(ApiInfo apiInfo) {
return new Docket(DocumentationType.SWAGGER_2)
.apiInfo(apiInfo) // 设置Swagger接口文档的首页信息
.select() // 初始化并返回一个API选择构造器
.apis(RequestHandlerSelectors.any()) // 选择将全部接口生成API文档,你可以自己筛
.paths(PathSelectors.any()) // 可以根据url路径设置哪些请求加入文档,忽略哪些请求
.build().groupName("user"); // 组名为user,因为我这是用户模块,这名字你自己取
}
}
网关模块配置文件 :
#knife4j的网关聚合配置 文档地址:http://{gateway.host}:{gateway.port}/doc.html
knife4j:
  # 聚合swagger文档
  gateway:
    enabled: true
    # 排序规则(tag/operation排序自4.2.0版本新增)
    # 取值:alpha-默认排序规则,官方swagger-ui默认实现,order-Knife4j提供的增强排序规则,开发者可扩展x-order,根据数值来自定义排序
    tags-sorter: order
    operations-sorter: order
    # 指定手动配置的模式(默认为该模式)
    strategy: manual
    routes:
      - name: 用户服务
        # 真实子服务访问url地址-提供OpenAPI的文档
        # /user是我网关中配置的服务访问的前缀,group=user才是刚刚配置的组名,别搞混了
        url: /user/v2/api-docs?group=user
        #        url: /v3/api-docs
        service-name: user-service  # 服务名
        # 路由前缀
        # 兼容OpenAPI3规范在聚合时丢失contextPath属性的异常情况,由开发者自己配置contextPath,Knife4j的前端Ui做兼容处理,与url属性独立不冲突,仅OpenAPI3规范聚合需要,OpenAPI2规范不需要设置此属性,默认为(apiPathPrefix)
        context-path: /
        order: 1
      - name: 认证服务
        url: /auth/v2/api-docs?group=oauth
        service-name: oauth-service
        # 路由前缀
        context-path: /
        order: 2
服务,启动!如果你能成功启动而且访问http://localhost:网关端口/doc.html能正常并且左上角可以成功切换的话那么恭喜你完事了,但是如果你跟我一样甚至依赖版本都一样的话那应该是不会直接成功的,可能会遇到挺多问题的,例如:
- 子服务启动后一直转圈然后报错:Failed to start bean ‘documentationPluginsBootstrapper‘; nested exception is java.lang.NullPointer
- 打开了上面那个链接后显示“Knife4j文档请求异常”
- 显示Swagger某某包内某个类打不开,因为他不存在(遇到的时候忘记复制了)
- 啊我甚至没有
@EnableSwagger2WebMvc
第一二个问题通常会一起遇到,需要这样解决:
在子模块配置类中加上一段配置,即改成这样
package com.ghoster.user.config;
import org.springframework.boot.actuate.autoconfigure.endpoint.web.CorsEndpointProperties;
import org.springframework.boot.actuate.autoconfigure.endpoint.web.WebEndpointProperties;
import org.springframework.boot.actuate.autoconfigure.web.server.ManagementPortType;
import org.springframework.boot.actuate.endpoint.ExposableEndpoint;
import org.springframework.boot.actuate.endpoint.web.*;
import org.springframework.boot.actuate.endpoint.web.annotation.ControllerEndpointsSupplier;
import org.springframework.boot.actuate.endpoint.web.annotation.ServletEndpointsSupplier;
import org.springframework.boot.actuate.endpoint.web.servlet.WebMvcEndpointHandlerMapping;
import org.springframework.context.annotation.Bean;
import org.springframework.context.annotation.Configuration;
import org.springframework.core.env.Environment;
import org.springframework.util.StringUtils;
import springfox.documentation.builders.ApiInfoBuilder;
import springfox.documentation.builders.PathSelectors;
import springfox.documentation.builders.RequestHandlerSelectors;
import springfox.documentation.service.ApiInfo;
import springfox.documentation.service.Contact;
import springfox.documentation.spi.DocumentationType;
import springfox.documentation.spring.web.plugins.Docket;
import springfox.documentation.swagger2.annotations.EnableSwagger2WebMvc;
import java.util.ArrayList;
import java.util.Collection;
import java.util.List;
@Configuration
@EnableSwagger2WebMvc
public class SwaggerConfig {
/**
* 配置基本信息
*
* @return
*/
@Bean
public ApiInfo apiInfo() {
return new ApiInfoBuilder()
.title("GHOSTER开发文档【用户服务API】") // 文档的标题
.description("开发文档") // 测试的接口文档
.contact(new Contact("RemSynch", "111", "[email protected]")) // 联系人信息
.version("1.0") // 版本信息,可自定义
.build();
}
/**
* 配置文档生成最佳实践
*
* @param apiInfo
* @return
*/
@Bean
public Docket createRestApi(ApiInfo apiInfo) {
return new Docket(DocumentationType.SWAGGER_2)
.apiInfo(apiInfo) // 设置Swagger接口文档的首页信息
.select() // 初始化并返回一个API选择构造器
.apis(RequestHandlerSelectors.any()) // 选择将全部接口生成API文档,你可以自己筛
.paths(PathSelectors.any()) // 可以根据url路径设置哪些请求加入文档,忽略哪些请求
.build().groupName("user"); // 组名为user,因为我这是用户模块
}
@Bean
public WebMvcEndpointHandlerMapping webEndpointServletHandlerMapping(WebEndpointsSupplier webEndpointsSupplier,
ServletEndpointsSupplier servletEndpointsSupplier, ControllerEndpointsSupplier controllerEndpointsSupplier,
EndpointMediaTypes endpointMediaTypes, CorsEndpointProperties corsProperties,
WebEndpointProperties webEndpointProperties, Environment environment) {
List<ExposableEndpoint<?>> allEndpoints = new ArrayList<>();
Collection<ExposableWebEndpoint> webEndpoints = webEndpointsSupplier.getEndpoints();
allEndpoints.addAll(webEndpoints);
allEndpoints.addAll(servletEndpointsSupplier.getEndpoints());
allEndpoints.addAll(controllerEndpointsSupplier.getEndpoints());
String basePath = webEndpointProperties.getBasePath();
EndpointMapping endpointMapping = new EndpointMapping(basePath);
boolean shouldRegisterLinksMapping =
// 如果这个environment爆红,原因是你没有引用对,正确的是org.springframework.core.env.Environment;中的
webEndpointProperties.getDiscovery().isEnabled() && (StringUtils.hasText(basePath)
|| ManagementPortType.get(environment).equals(ManagementPortType.DIFFERENT));
return new WebMvcEndpointHandlerMapping(endpointMapping, webEndpoints, endpointMediaTypes,
corsProperties.toCorsConfiguration(), new EndpointLinksResolver(allEndpoints, basePath),
shouldRegisterLinksMapping, null);
}
}
这一大坨的对于
webEndpointServletHandlerMapping
的配置,你也不需要管他是什么玩意,加就是了。
然后在子模块配置文件中加上:
spring:
  mvc:
    pathmatch:
      matching-strategy: ant_path_matcher
这样的做法是把原本spring和spring actuator默认的路径匹配方式从
pathPatternsCondition
改为了
ant_path_matcher
,实现方式是
WebMvcEndpointHandlerMapping
这个Bean的覆盖。
现在再启动,应该是能启动成功且正常访问了,如果成功了还是页面报错“Knife4j文档请求异常”,请检查网关配置文件中的路径是否配置正确,因为你可能有其他的前缀啥的。
如果报错swagger相关的某某文件没找到,可能是你在某个其他子模块中引入了swagger的依赖,但是又没有在那个模块中进行配置,并且现在又引用到了那个模块,我就试过了,我在common模块中为了使用swagger的注解从而引入了swagger的依赖,但是又没进行配置,后面才发现还有单独的swagger注解依赖,把依赖替换一下不需要配置就解决了。
如果你甚至没有
@EnableSwagger2WebMvc
,那就再好好检查一下依赖吧,依赖跟我一样的话是不会少了这个注解的,这个注解除了存在于
knife4j-openapi2-spring-boot-starter
的依赖中,还存在于
springfox-swagger2
中,但是
springfox-swagger2
在2.10之前是没有这个注解的,所以你可能是哪里冲突了或者忘记改依赖了。
版权归原作者 我的劳斯莱斯没电了 所有, 如有侵权,请联系我们删除。