
文章目录
前言
基本原理
- how-dall-e-2-actually-works dalle-2基本工作原理
torch timer windows AttributeError: module ‘signal’ has no attribute ‘SIGKILL’ 解决
openai公司
这是一家马斯克投资了的AI公司,从公司介绍可见,它是一个研究AI的公司。
OpenAI is an AI research and deployment company. Our mission is to ensure that artificial general intelligence benefits all of humanity.
从公司主页看到,它的主要作品有DALLE,DALLE2等。
hugginface公司
【HugBert01】Huggingface Transformers,一个顶级自然语言处理框架介绍了hugginface这家公司。其代表作有HuggingFace-transformers、数据集等。
Huggingface(抱抱脸)总部位于纽约,是一家专注于自然语言处理、人工智能和分布式系统的创业公司。他们所提供的聊天机器人技术一直颇受欢迎,但更出名的是他们在NLP开源社区上的贡献。Huggingface一直致力于自然语言处理NLP技术的平民化(democratize),希望每个人都能用上最先进(SOTA, state-of-the-art)的NLP技术,而非困窘于训练资源的匮乏。
- 从hugginface medium主页可以阅读更多高质量的AI文章。
diffusion相关代码实现
- youtube的aleska发布了教程,并附带了openai的diffusion实现。这个实现需要预处理数据集,并且有class-conditioned embedding,但没作text embdding。
- youtube的deepfindr发布了教程,并附带notebook。该实现有time embedding,但没有Text embedding。
- hugginface在github提供了diffusion的实现,diffusers
openai实现
已知unet模型是用来预测噪声的,那么openai是如何将上下文信息融合到unet模型的?从该模型的unet实现可见,该模型有作time embedding,也有class conditioned embedding,但并没作text embedding。
从Unet::forward的注释可见,该方法的y参数用来标识一组label,维度是[N]。
defforward(self, x, timesteps, y=None):"""
        Apply the model to an input batch.
        :param x: an [N x C x ...] Tensor of inputs.
        :param timesteps: a 1-D batch of timesteps.
        :param y: an [N] Tensor of labels, if class-conditional.
        :return: an [N x C x ...] Tensor of outputs.
        """assert(y isnotNone)==(
            self.num_classes isnotNone),"must specify y if and only if the model is class-conditional"
time embedding会和class embedding直接相加,从而融合信息。
        hs =[]
        emb = self.time_embed(timestep_embedding(timesteps, self.model_channels))if self.num_classes isnotNone:assert y.shape ==(x.shape[0],)
            emb = emb + self.label_emb(y)
这种做法有两点思考:
- 相加的方式简单粗暴,是否可以考虑别的融合方式
- 只融合了类别信息,但对于基于文本生成图片的场景,如何去融合文本向量,仍是个问题。
deepfindr实现
deepfinr的实现是如何将信息融合到向量的?看向"Step 2: The backward process = U-Net"的SimpleUnet::forward实现,显然unet模型会融合时间信息,但没有融合标签信息。
defforward(self, x, timestep):# Embedd time
        t = self.time_mlp(timestep)# Initial conv
        x = self.conv0(x)# Unet
        residual_inputs =[]for down in self.downs:
            x = down(x, t)
            residual_inputs.append(x)for up in self.ups:
            residual_x = residual_inputs.pop()# Add residual x as additional channels
            x = torch.cat((x, residual_x), dim=1)
            x = up(x, t)return self.output(x)
整体代码的实现是比较简明的。
huggingface实现
github首页给出了两个notebook
- 其中diffusers_intro介绍了如何用hugginface的api生成图片,并前后使用了DDPM、DDIM两个噪声生成器。但缺点在于没有讲明文本信息如何融合到unet模型中
hugginface样例运行
1. 安装依赖
pip install --upgrade diffusers transformers scipy
2. 注册并登陆hugginface
代码需要访问hugginface仓库下载模型,为此需要拥有hugginface账号。首先到,hugginface注册界面,注册一个账号并登陆。
执行以下命令,
huggingface-cli login
,可以看到需要token。登陆控制台输出的链接,同意相关条款,即可得到token,填回此处。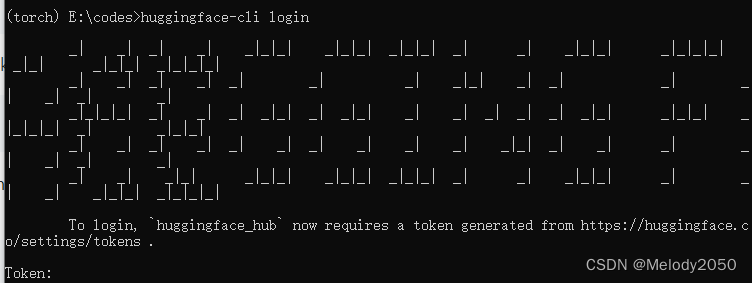
代码首次运行需要下载模型,若用pycharm IDE,请配置为使用代理。
3. 运行样例代码
执行以下代码,它会默认从服务器下载模型,并根据输入的prompt文本生成图片。
import torch
from diffusers import StableDiffusionPipeline

pipe = StableDiffusionPipeline.from_pretrained("runwayml/stable-diffusion-v1-5", torch_dtype=torch.float16, revision="fp16")
pipe = pipe.to("cuda")

prompt ="a photo of an astronaut riding a horse on mars"
image = pipe(prompt).images[0]
hugginface代码阅读
类加载机制
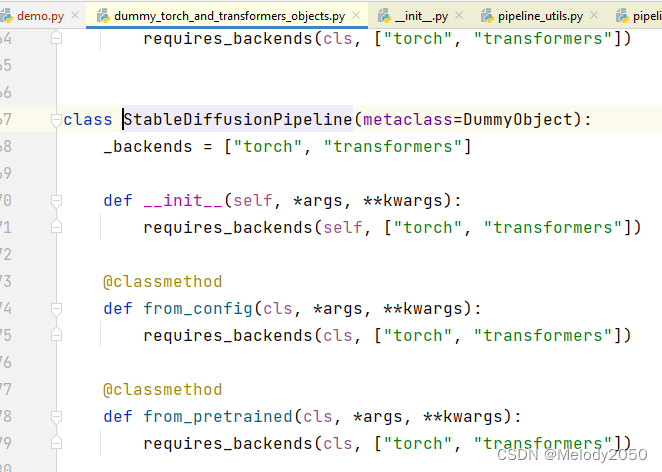
代码样例引入StableDiffusionPipeline时,是用
from diffusers import StableDiffusionPipeline
,ctrl+左键点击会跳转到dummy_torch_and_transformers_objects.py的StableDiffusionPipeline。
这个类实现了DummyObject,它会检查给定的依赖,并在依赖不存在时抛出ImportError。
可是在debug模式下,跳转到的是pipeline_utils.py的DiffusionPipeline类。为什么快捷跳转和实际debug的代码文件不一样呢?
查看diffusers的
__init__.py
文件有如下内容:
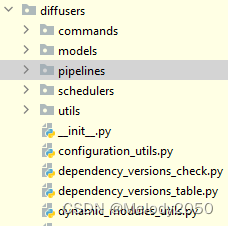
if is_torch_available()and is_transformers_available():from.pipelines import(
        LDMTextToImagePipeline,
        StableDiffusionImg2ImgPipeline,
        StableDiffusionInpaintPipeline,
        StableDiffusionInpaintPipelineLegacy,
        StableDiffusionPipeline,
        VQDiffusionPipeline,)else:from.utils.dummy_torch_and_transformers_objects import*# noqa F403
显然代码会判断,当pytorch和transformers类库存在时,从子目录
.pipelines
加载StableDiffusionInpaintPipeline,否则从
.utils.dummy_torch_and_transformers_objects
加载。同时,前者又继承自
pipeline_utils.py
的DiffusionPipeline类,这就是打断点debug时停留的代码处。
初始化
from_pretrained函数末尾处,对模型作了初始化。此处变量pipeline_class为StableDiffusionPipeline,初始化参数为unet、text_encoder等等。换句话说,静态方法from_pretrained是初始化StableDiffusionPipeline的工具方法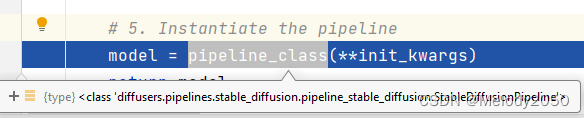

模型调用
查看__call__方法,这里是实现的本体。
分别生成prompt和negative prompt的embedding,然后将它们拼接。
根据do_classifier_free_guidance配置,决定是否重复一份预测输入,即一份输入带文本embedding,另一份输入不带。该做法来自Imagen论文。
井带噪音图片输入unet,预测噪音。详见UNet2DConditionModel::forward。
CrossAttnDownBlock2D::forward,其中temb是时间向量,encoder_hidden_states是文本向量。在如下代码中,分别融入了时间信息和文本信息。
hidden_states = resnet(hidden_states, temb)
hidden_states = attn(hidden_states, encoder_hidden_states=encoder_hidden_states).sample
主循环
StableDiffusionPipeline的__call__方法中,以下for循环是主要功能。它会将带噪音图片输入unet,再得到下一个t时刻的图片。

其中i是步数,t是时间戳,timesteps_tensor是个递减序列,从981,961,一直递减因为最大步长为1000,共50步,所以每步是20。
PNDM的timestep机制
看到PNDMScheduler的_get_prev_sample方法,代码描述了如何获取之前timestep样本。最好阅读PNDM原文的公式(9)。
举个例子,假如timestep最大为1000步,设置共50步,那么步长为20。此时
     δ


     =


     20


    \delta=20


δ=20,当


     t


     =


     981


    t=981


t=981时,有


     t


     −


     δ


     =


     961


    t-\delta=961


t−δ=961。两者分别对应了变量timestep和prev_timestep。

融合时间信息
从上文的第一行深入,看到ResnetBlock2D::forward中:
defforward(self, input_tensor, temb):
        hidden_states = input_tensor

        hidden_states = self.norm1(hidden_states)
        hidden_states = self.nonlinearity(hidden_states)if self.upsample isnotNone:...elif self.downsample isnotNone:...

        hidden_states = self.conv1(hidden_states)if temb isnotNone:
            temb = self.time_emb_proj(self.nonlinearity(temb))[:,:,None,None]## 关键
            hidden_states = hidden_states + temb
时间信息在下面代码块中被融入。时间向量会先经过非线性层,再经过一个线性映射,再加到隐藏层信息上。
if temb isnotNone:
            temb = self.time_emb_proj(self.nonlinearity(temb))[:,:,None,None]## 关键
            hidden_states = hidden_states + temb
融合文本信息
继续看到Tr
ansformer2DModel::forward。再看向BasicTransformerBlock::forward,其中context是文本向量:
hidden_states = self.attn2(norm_hidden_states, context=context)+ hidden_states
深入调试,看到CrossAttention::forward,显然,是将上下文信息与隐藏层信息做基于qkv模式的注意力机制融合。
defforward(self, hidden_states, context=None, mask=None):
        batch_size, sequence_length, _ = hidden_states.shape

        query = self.to_q(hidden_states)
        context = context if context isnotNoneelse hidden_states
        key = self.to_k(context)
        value = self.to_v(context)
深入
hidden_states = self._attention(query, key, value)
,这里的两个else语句都会被触发。显而易见,q相继与k和v做了矩阵乘法。详见注意力机制公式里的QKV
def_attention(self, query, key, value):# TODO: use baddbmm for better performanceif query.device.type=="mps":# Better performance on mps (~20-25%)
            attention_scores = torch.einsum("b i d, b j d -> b i j", query, key)* self.scale
        else:
            attention_scores = torch.matmul(query, key.transpose(-1,-2))* self.scale
        attention_probs = attention_scores.softmax(dim=-1)# compute attention outputif query.device.type=="mps":
            hidden_states = torch.einsum("b i j, b j d -> b i d", attention_probs, value)else:
            hidden_states = torch.matmul(attention_probs, value)# reshape hidden_states
        hidden_states = self.reshape_batch_dim_to_heads(hidden_states)return hidden_states
由此,我们明白了hugginface的实现中,文本信息是以注意力机制的方式融合到隐藏层信息中的。
版权归原作者 Melody2050 所有, 如有侵权,请联系我们删除。