
[嵌入式AI从0开始到入土]嵌入式AI系列教程
注:等我摸完鱼再把链接补上
可以关注我的B站号工具人呵呵的个人空间,后期会考虑出视频教程,务必催更,以防我变身鸽王。
第一章 昇腾Altas 200 DK上手
第二章 下载昇腾案例并运行
第三章 官方模型适配工具使用
第四章 炼丹炉的搭建(基于Ubuntu23.04 Desktop)
第五章 Ubuntu远程桌面配置
第六章 下载yolo源码及样例运行验证
第七章 转化为昇腾支持的om离线模型
第八章 jupyter lab的使用
第九章 yolov5在昇腾上推理
第十章 yolov5在昇腾上应用
未完待续…
文章目录
前言
注:本人代码在pc机上完成编写,运行需要昇腾推理卡或者开发者套件
先说下我的环境,pc机是ubuntu23.04,CANN版本7.0.0.alpha001,mindx版本5.0.RC3。Atlas 200 DK上CANN版本5.1.RC2.alpha007,mindx版本3.0.0。务必注意版本兼容性问题
别问我为什么鸽了这么久,不信你就跳过第一节!!!
一、环境准备
1、确认驱动版本
如下图所示,为200DK的驱动和CANN的对照表,需严格按照图中所写版本进行安装,否则运行报错。
关于驱动版本的查看,使用
npu-smi info
,
version
后的数字对应版本,但没找到具体对应关系。目前我只确定200DK官方制卡工具提供的镜像是最新的1.0.13.alpha的驱动,也就是version:21.0.4。
似乎200i A2需要使用CANN6.2,一般就是镜像自带的。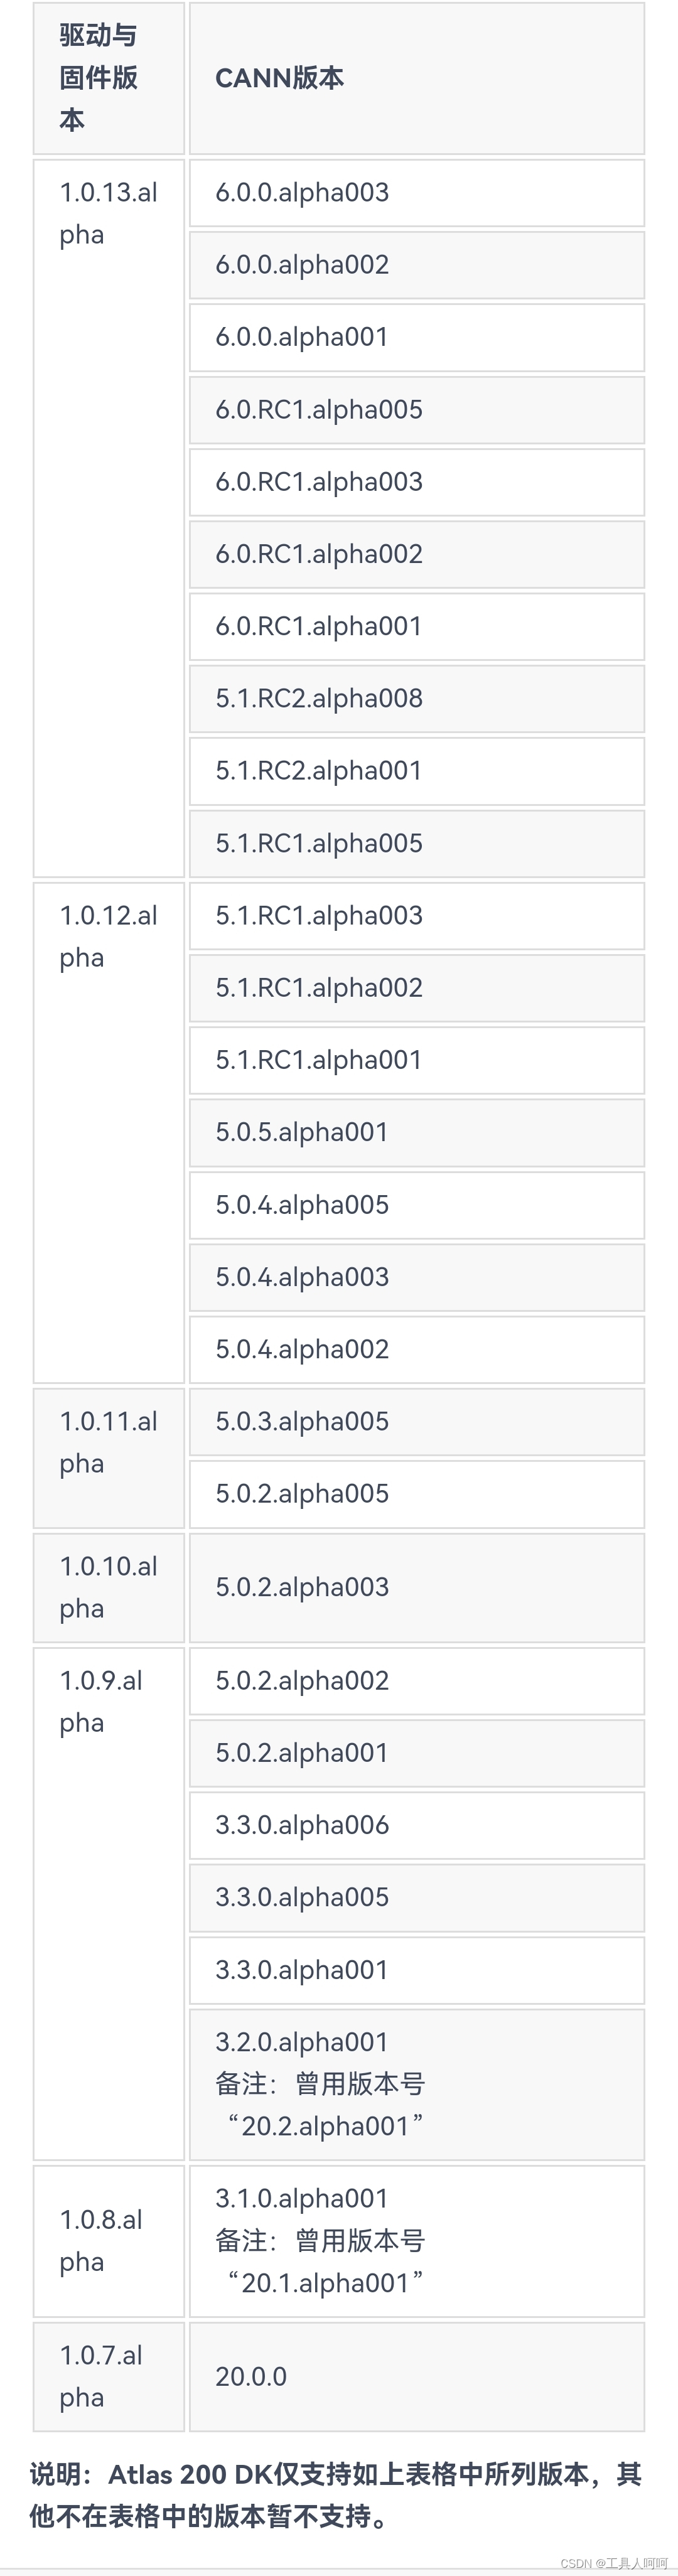
2、CANN安装
如果版本符合要求,直接跳过,否则需要重新安装。这个不在重复,看往期文章就可以了。下载地址点这里。社区版,记得添加硬件信息,不然找不到对应的版本。
注意一点,下载aarch64的,别下成x86_64的就行。
3、Mindx sdk安装
我们需要的是mxVision,另外两个现在暂时用不上
这里我卡了好久,后来才查到也需要安装当前CANN匹配的Mindx。具体对照表没查到,根据论坛和我个人的测试,6.2或者6.3的cann应该安装5.0的mindx,6.0.0或者5.1应该是3.0mindx。
下载地址放在这,我使用镜像自带的5.1cann和3.0.0mindx测试通过。
注意:因为安装mindx的时候会复制算子到cann的文件夹内,所以需要先装cann再装mindx,即使是升降级版本
二、新建项目
这是我的项目结构,项目也已经上传,在本文最上方的绑定资源中。没找到点这里跳转。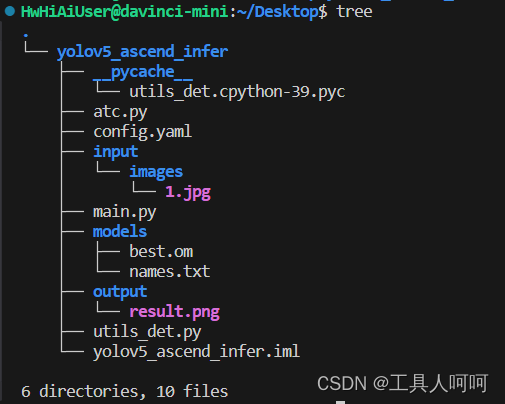
这里atc虽然在里面,但是我们已经转换了模型,所以不再解析了。
1、input
这里我使用了一个images的文件夹用来存放需要检测的图片。正常的jpg图片都可以,但是需要图中有你数据集中的类(我这用的coco128的数据集,支持的物体还是很多的)。
2、models
这里负责存放模型文件和类别名称。names.txt格式如下
person
bicycle
car
motorcycle
airplane
......
3、output
存放输出的结果
4、utils_det.py
主要是模型的前后处理函数,内容如下
import time

import cv2
import numpy as np
import torch
import torchvision

defletterbox(img, new_shape=(640,640), color=(114,114,114), auto=False, scaleFill=False, scaleup=True):# Resize image to a 32-pixel-multiple rectangle https://github.com/ultralytics/yolov3/issues/232
    shape = img.shape[:2]# current shape [height, width]ifisinstance(new_shape,int):
        new_shape =(new_shape, new_shape)# Scale ratio (new / old)
    r =min(new_shape[0]/ shape[0], new_shape[1]/ shape[1])ifnot scaleup:# only scale down, do not scale up (for better test mAP)
        r =min(r,1.0)# Compute padding
    ratio = r, r  # width, height ratios
    new_unpad =int(round(shape[1]* r)),int(round(shape[0]* r))
    dw, dh = new_shape[1]- new_unpad[0], new_shape[0]- new_unpad[1]# wh paddingif auto:# minimum rectangle
        dw, dh = np.mod(dw,64), np.mod(dh,64)# wh paddingelif scaleFill:# stretch
        dw, dh =0.0,0.0
        new_unpad =(new_shape[1], new_shape[0])
        ratio = new_shape[1]/ shape[1], new_shape[0]/ shape[0]# width, height ratios

    dw /=2# divide padding into 2 sides
    dh /=2if shape[::-1]!= new_unpad:# resize
        img = cv2.resize(img, new_unpad, interpolation=cv2.INTER_LINEAR)
    top, bottom =int(round(dh -0.1)),int(round(dh +0.1))
    left, right =int(round(dw -0.1)),int(round(dw +0.1))
    img = cv2.copyMakeBorder(img, top, bottom, left, right, cv2.BORDER_CONSTANT, value=color)# add borderreturn img, ratio,(dw, dh)defnon_max_suppression(
        prediction,
        conf_thres=0.25,
        iou_thres=0.45,
        classes=None,
        agnostic=False,
        multi_label=False,
        labels=(),
        max_det=300,
        nm=0,# number of masks):"""Non-Maximum Suppression (NMS) on inference results to reject overlapping detections

    Returns:
         list of detections, on (n,6) tensor per image [xyxy, conf, cls]
    """ifisinstance(prediction,(list,tuple)):# YOLOv5 model in validation model, output = (inference_out, loss_out)
        prediction = prediction[0]# select only inference output

    device = prediction.device
    mps ='mps'in device.type# Apple MPSif mps:# MPS not fully supported yet, convert tensors to CPU before NMS
        prediction = prediction.cpu()
    bs = prediction.shape[0]# batch size
    nc = prediction.shape[2]- nm -5# number of classes
    xc = prediction[...,4]> conf_thres  # candidates# Checksassert0<= conf_thres <=1,f'Invalid Confidence threshold {conf_thres}, valid values are between 0.0 and 1.0'assert0<= iou_thres <=1,f'Invalid IoU {iou_thres}, valid values are between 0.0 and 1.0'# Settings# min_wh = 2  # (pixels) minimum box width and height
    max_wh =7680# (pixels) maximum box width and height
    max_nms =30000# maximum number of boxes into torchvision.ops.nms()
    time_limit =0.5+0.05* bs  # seconds to quit after
    multi_label &= nc >1# multiple labels per box (adds 0.5ms/img)

    t = time.time()
    mi =5+ nc  # mask start index
    output =[torch.zeros((0,6+ nm), device=prediction.device)]* bs
    for xi, x inenumerate(prediction):# image index, image inference# Apply constraints# x[((x[..., 2:4] < min_wh) | (x[..., 2:4] > max_wh)).any(1), 4] = 0  # width-height
        x = x[xc[xi]]# confidence# Cat apriori labels if autolabellingif labels andlen(labels[xi]):
            lb = labels[xi]
            v = torch.zeros((len(lb), nc + nm +5), device=x.device)
            v[:,:4]= lb[:,1:5]# box
            v[:,4]=1.0# conf
            v[range(len(lb)), lb[:,0].long()+5]=1.0# cls
            x = torch.cat((x, v),0)# If none remain process next imageifnot x.shape[0]:continue# Compute conf
        x[:,5:]*= x[:,4:5]# conf = obj_conf * cls_conf# Box/Mask
        box = xywh2xyxy(x[:,:4])# center_x, center_y, width, height) to (x1, y1, x2, y2)
        mask = x[:, mi:]# zero columns if no masks# Detections matrix nx6 (xyxy, conf, cls)if multi_label:
            i, j =(x[:,5:mi]> conf_thres).nonzero(as_tuple=False).T
            x = torch.cat((box[i], x[i,5+ j,None], j[:,None].float(), mask[i]),1)else:# best class only
            conf, j = x[:,5:mi].max(1, keepdim=True)
            x = torch.cat((box, conf, j.float(), mask),1)[conf.view(-1)> conf_thres]# Filter by classif classes isnotNone:
            x = x[(x[:,5:6]== torch.tensor(classes, device=x.device)).any(1)]# Check shape
        n = x.shape[0]# number of boxesifnot n:# no boxescontinueelif n > max_nms:# excess boxes
            x = x[x[:,4].argsort(descending=True)[:max_nms]]# sort by confidenceelse:
            x = x[x[:,4].argsort(descending=True)]# sort by confidence# Batched NMS
        c = x[:,5:6]*(0if agnostic else max_wh)# classes
        boxes, scores = x[:,:4]+ c, x[:,4]# boxes (offset by class), scores
        i = torchvision.ops.nms(boxes, scores, iou_thres)# NMSif i.shape[0]> max_det:# limit detections
            i = i[:max_det]

        output[xi]= x[i]if mps:
            output[xi]= output[xi].to(device)if(time.time()- t)> time_limit:print(f'WARNING ⚠️ NMS time limit {time_limit:.3f}s exceeded')break# time limit exceededreturn output

defxywh2xyxy(x):# Convert nx4 boxes from [x, y, w, h] to [x1, y1, x2, y2] where xy1=top-left, xy2=bottom-right
    y = x.clone()ifisinstance(x, torch.Tensor)else np.copy(x)
    y[:,0]= x[:,0]- x[:,2]/2# top left x
    y[:,1]= x[:,1]- x[:,3]/2# top left y
    y[:,2]= x[:,0]+ x[:,2]/2# bottom right x
    y[:,3]= x[:,1]+ x[:,3]/2# bottom right yreturn y

defget_labels_from_txt(path):
    labels_dict =dict()withopen(path)as f:for cat_id, label inenumerate(f.readlines()):
            labels_dict[cat_id]= label.strip()return labels_dict

defscale_coords(img1_shape, coords, img0_shape, ratio_pad=None):# Rescale coords (xyxy) from img1_shape to img0_shapeif ratio_pad isNone:# calculate from img0_shape
        gain =min(img1_shape[0]/ img0_shape[0], img1_shape[1]/ img0_shape[1])# gain  = old / new
        pad =(img1_shape[1]- img0_shape[1]* gain)/2,(img1_shape[0]- img0_shape[0]* gain)/2# wh paddingelse:
        gain = ratio_pad[0][0]
        pad = ratio_pad[1]

    coords[:,[0,2]]-= pad[0]# x padding
    coords[:,[1,3]]-= pad[1]# y padding
    coords[:,:4]/= gain
    clip_coords(coords, img0_shape)return coords

defclip_coords(boxes, shape):# Clip bounding xyxy bounding boxes to image shape (height, width)ifisinstance(boxes, torch.Tensor):# faster individually
        boxes[:,0].clamp_(0, shape[1])# x1
        boxes[:,1].clamp_(0, shape[0])# y1
        boxes[:,2].clamp_(0, shape[1])# x2
        boxes[:,3].clamp_(0, shape[0])# y2else:# np.array (faster grouped)
        boxes[:,[0,2]]= boxes[:,[0,2]].clip(0, shape[1])# x1, x2
        boxes[:,[1,3]]= boxes[:,[1,3]].clip(0, shape[0])# y1, y2defnms(box_out, conf_thres=0.4, iou_thres=0.5):try:
        boxout = non_max_suppression(box_out, conf_thres=conf_thres, iou_thres=iou_thres, multi_label=True)except:
        boxout = non_max_suppression(box_out, conf_thres=conf_thres, iou_thres=iou_thres)return boxout

defdraw_bbox(bbox, img0, color, wt, names):
    det_result_str =''for idx, class_id inenumerate(bbox[:,5]):iffloat(bbox[idx][4]<float(0.05)):continue
        img0 = cv2.rectangle(img0,(int(bbox[idx][0]),int(bbox[idx][1])),(int(bbox[idx][2]),int(bbox[idx][3])), color, wt)
        img0 = cv2.putText(img0,str(idx)+' '+ names[int(class_id)],(int(bbox[idx][0]),int(bbox[idx][1]+16)), cv2.FONT_HERSHEY_SIMPLEX,0.5,(0,0,255),1)
        img0 = cv2.putText(img0,'{:.4f}'.format(bbox[idx][4]),(int(bbox[idx][0]),int(bbox[idx][1]+32)), cv2.FONT_HERSHEY_SIMPLEX,0.5,(0,0,255),1)
        det_result_str +='{} {} {} {} {} {}\n'.format(names[bbox[idx][5]],str(bbox[idx][4]), bbox[idx][0], bbox[idx][1], bbox[idx][2], bbox[idx][3])return img0
5、main.py
这里也是卡了我好几天,mindx.sdk那两行ide一直在报错,但似乎能跑。
import cv2  # 图片处理三方库,用于对图片进行前后处理import numpy as np  # 用于对多维数组进行计算import torch  # 深度学习运算框架,此处主要用来处理数据from mindx.sdk import Tensor  # mxVision 中的 Tensor 数据结构from mindx.sdk import base  # mxVision 推理接口from utils_det import get_labels_from_txt, letterbox, scale_coords, nms, draw_bbox  # 模型前后处理相关函数# 初始化资源和变量
base.mx_init()# 初始化 mxVision 资源
DEVICE_ID =0# 设备id
model_path ='models/best.om'# 模型路径
image_path ='input/images/1.jpg'# 测试图片路径# 数据前处理
img_bgr = cv2.imread(image_path, cv2.IMREAD_COLOR)# 读入图片
img, scale_ratio, pad_size = letterbox(img_bgr, new_shape=[640,640])# 对图像进行缩放与填充,保持长宽比
img = img[:,:,::-1].transpose(2,0,1)# BGR to RGB, HWC to CHW
img = np.expand_dims(img,0).astype(np.float16)# 将形状转换为 channel first (1, 3, 640, 640),即扩展第一维为 batchsize
img = np.ascontiguousarray(img)/255.0# 转换为内存连续存储的数组
img = Tensor(img)# 将numpy转为转为Tensor类# 模型推理, 得到模型输出
model = base.model(modelPath=model_path, deviceId=DEVICE_ID)# 初始化 base.model 类
output = model.infer([img])[0]# 执行推理。输入数据类型:List[base.Tensor], 返回模型推理输出的 List[base.Tensor]# 后处理
output.to_host()# 将 Tensor 数据转移到内存
output = np.array(output)# 将数据转为 numpy array 类型
boxout = nms(torch.tensor(output), conf_thres=0.4, iou_thres=0.5)# 利用非极大值抑制处理模型输出,conf_thres 为置信度阈值,iou_thres 为iou阈值
pred_all = boxout[0].numpy()# 转换为numpy数组
scale_coords([640,640], pred_all[:,:4], img_bgr.shape, ratio_pad=(scale_ratio, pad_size))# 将推理结果缩放到原始图片大小
labels_dict = get_labels_from_txt('models/names.txt')# 得到类别信息,返回序号与类别对应的字典
img_dw = draw_bbox(pred_all, img_bgr,(0,255,0),2, labels_dict)# 画出检测框、类别、概率# 保存图片到文件
cv2.imwrite('output/result.png', img_dw)print('save infer result success')
三、运行
正常情况
很简单,但是务必注意,200DK默认的python是2.7.17,而镜像中配置的是python3.9.7,我们的包也是安装到python3里的。当然,你可以直接做软连接,具体方便请自行搜索。
python3 main.py
运行成功会有如图所示的提示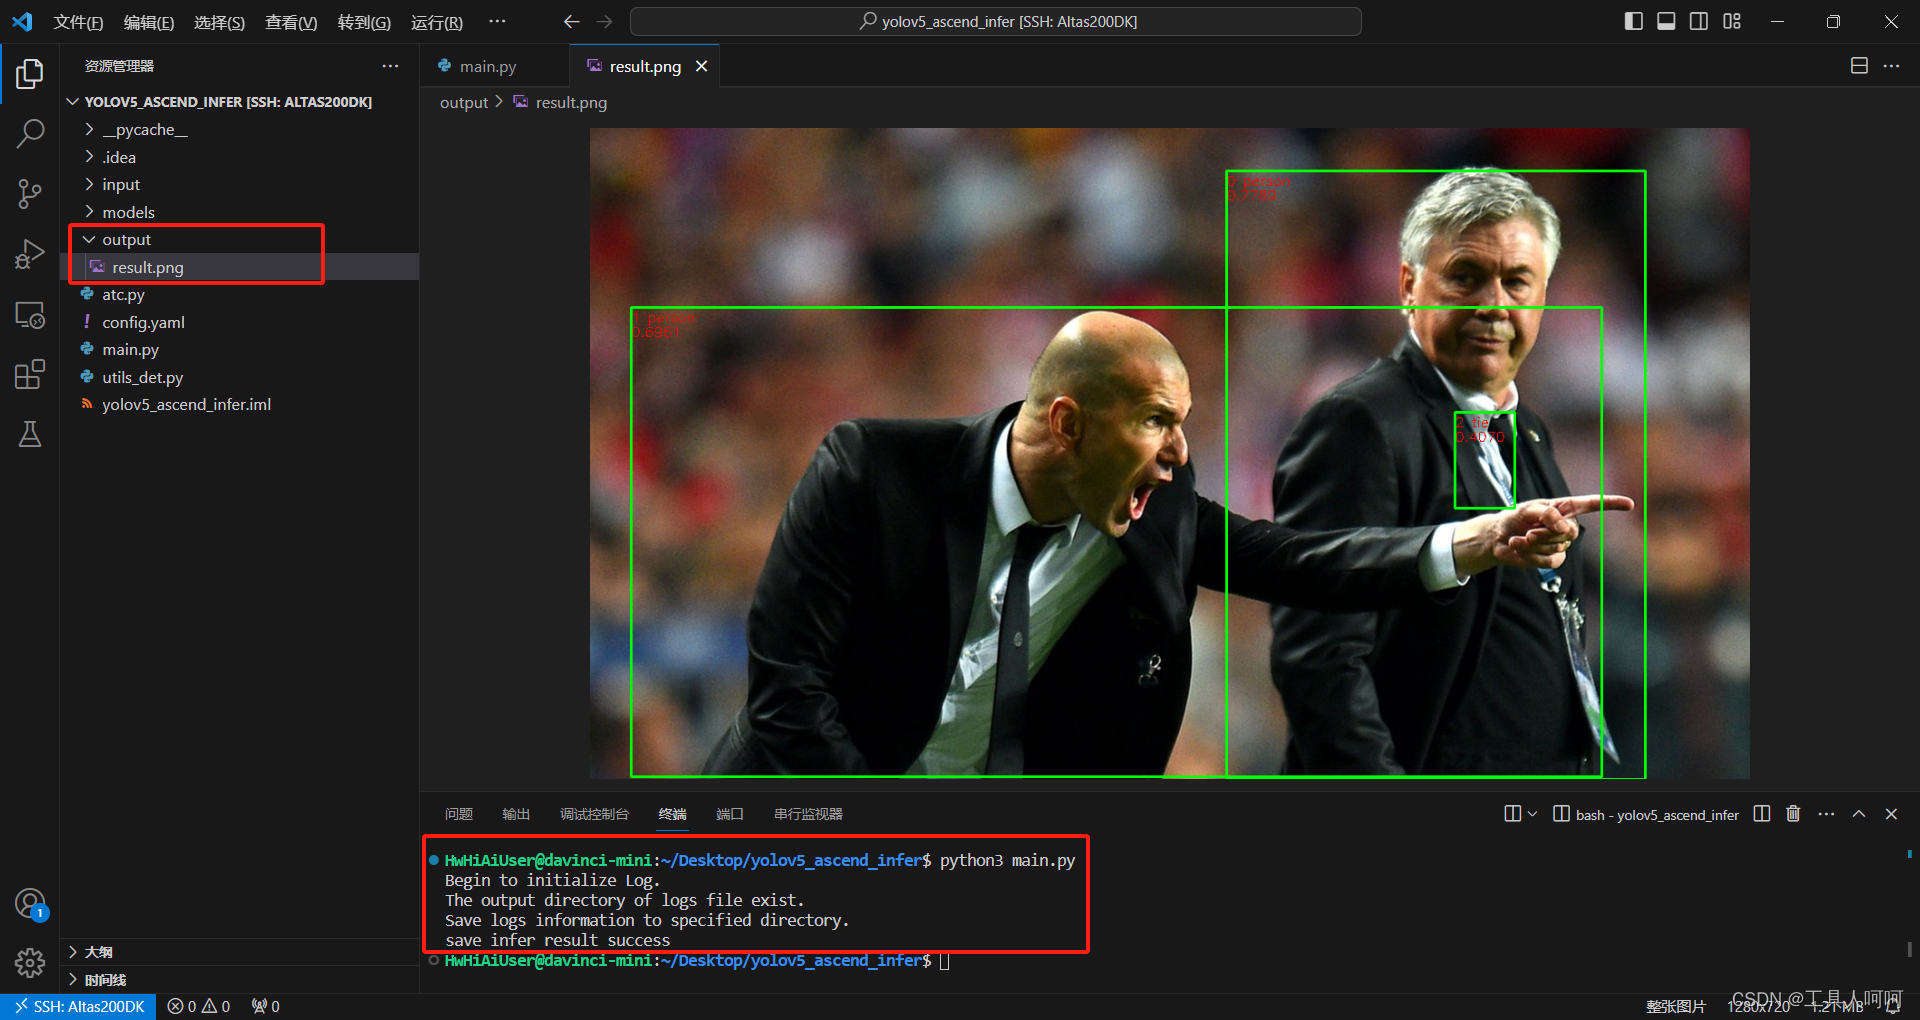
如果你用的是MIndStudio转换的模型,应该是可以正常到这的,如果是ATC指令转换的,那么恭喜和我一起掉坑里了。
大翻车
这里我在写下一章的时候才意识到翻了一个大车,是由模型转换导致的。具体表现如下图所示:
InputTensor Data Type mismatches.No.0 inputTensor, modelInput data type is 0, actualInput data type is 1。Infer failed, result is null。Infer failed, create output fail.
我查了好久都没查到,后来使用atc指令查看离线模型信息才发现问题。
因为我是用的mindstudio里的模型转换,所以没有报错。我后面使用atc指令转换的模型都会报错。详细的请看下一节内容。
解决方法就是在atc转换的时候添加
--input_fp16_nodes=images
参数。
四、IDE
这里我必须狠狠的压力一下华为,mindstudio竟然不支持打开远程ssh的工程,甚至选了远程的python,还读取不到pip软件包。
这里pycharm虽然可以远程,包也读取正常,但是运行代码后似乎不会同步结果到本地。当然,你愿意的话可以远程打开工程,当然,没记错的话这个是收费的功能。
所以,那肯定得掏出我们祖传多年的vscode啦。我们只需要安装
Remote-SSH
这个插件,然后添加如下配置
Host Altas200DK
  HostName 192.168.3.2
  User HwHiAiUser
点击连接,然后安装python扩展,即可开始愉快的敲代码啦!
五、问题
1、No module named cv2
首先确认安装,使用
pip list
命令查询是否有
opencv-python
和
opencv-python-headless
。如果存在,请检查你的运行main.py的python版本是否是这个pip列出包的这个环境。在200DK上就需要使用
python3
而不是
python
。
如果不存在,使用这个命令安装opencv。
pip install opencv-python
之后重复以上动作。
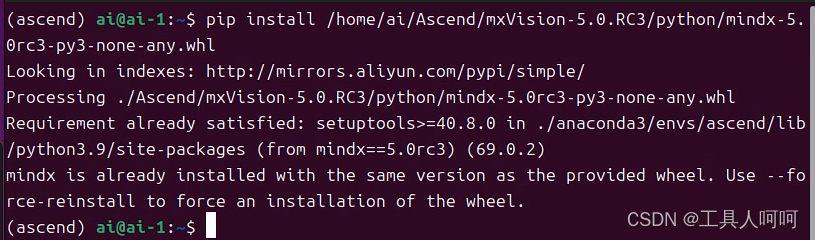
2、No module named mindx
在mindx sdk的安装目录下找到这个包,pip安装即可。
pip install mindx-5.0rc3-py3-none-any.whl
3、undefined symbol: aclrtCreateStreamWithConfig
这大概率就是mindx和cann版本不匹配导致的。更换匹配的版本即可。
4、AttributeError: ‘NoneType’ object has no attribute ’ infer ’
请检查模型路径是否正确,没错,我承认我真的没看见路径错了,花了两天去怀疑环境有问题,甚至重新制卡了。
另外,没有昇腾的推理卡也会报这个错误。可以使用
npu-smi info
来查看推理卡是否正常被识别。
5、libpython3.9.so.1.0: cannot open shared object file: No such file or directory
这个问题会在安装mindx的时候出现,请务必注意。解决方法如下:
将Python安装路径下的libpython3.9.so.1.0对象(我的在
/usr/local/python3.9.7/lib/
下),复制到“/usr/lib”下。
6、libxxx.so :cannot open shared object file
这里可能是类似libadump_server.so这种的,其他运行库都一样的操作。
- 搜索这个文件,发现在
ascend-toolkit/latest/x86_64-linux/lib64下面。 - 添加路径至环境变量
.bashrc发现还是找不到 - 执行
vim /etc/ld.so.conf,如果不能保存的话使用sudo提权 - 在最下面加入这个共享库的绝对路径,例如
/home/ai/Ascend/ascend-toolkit/latest/x86_64-linux/lib64 - 执行
ldconfig更新共享库路径 - 问题解决
总结
这个案例基本就是按照华为官方文档里写的改的,但他那个案例似乎下载不了。目前推理好像有点慢,应该是在前后处理耗时比较长,大家可以自行对前后处理函数做优化。或者直接换成c++的版本,性能会有所提高,但我是废物[大哭],根本看不懂。
版权归原作者 工具人呵呵 所有, 如有侵权,请联系我们删除。