
目录
创建环境
conda create -n qwen_vl python==3.10
安装依赖
pip install-r requirements.txt -i https://pypi.tuna.tsinghua.edu.cn/simple
- 使用清华源安装
- requirements.txt文件在官方github仓库。
- 仓库链接: GitHub
- 仓库中有三个re文件,微调我们只需要第一个就够了

安装一下deepspeed,用于加速
pip install deepspeed -i https://pypi.tuna.tsinghua.edu.cn/simple
安装一下peft 框架
pip install peft -i https://pypi.tuna.tsinghua.edu.cn/simple
模型下载
- 第一种方法(推荐) 去huggingface上下载,下载链接: Qwen-VL-Chat
- 第二种方法 去魔塔下载,下载链接:Qwen-VL-Chat
- 第二种方法 用脚本下载
import os
# 使用抱脸镜像
os.environ["HF_ENDPOINT"]="https://hf-mirror.com"from modelscope import snapshot_download
from transformers import AutoModelForCausalLM, AutoTokenizer

# 其中版本v1.1.0支持INT4、INT8的在线量化,其余版本不支持
model_id ='qwen/Qwen-VL-Chat'

revision ='v1.0.0'# 下载模型到指定目录
local_dir ="/root/autodl-tmp/Qwen-VL-Chat"

snapshot_download(repo_id=model_id, revision=revision, local_dir=local_dir)
数据集
数据集格式如下:
[{"id":"identity_0","conversations":[{"from":"user","value":"你好"},{"from":"assistant","value":"我是Qwen-VL,一个支持视觉输入的大模型。"}]},{"id":"identity_1","conversations":[{"from":"user","value":"Picture 1: <img>https://qianwen-res.oss-cn-beijing.aliyuncs.com/Qwen-VL/assets/demo.jpeg</img>\n图中的狗是什么品种?"},{"from":"assistant","value":"图中是一只拉布拉多犬。"},{"from":"user","value":"框出图中的格子衬衫"},{"from":"assistant","value":"<ref>格子衬衫</ref><box>(588,499),(725,789)</box>"}]},{"id":"identity_2","conversations":[{"from":"user","value":"Picture 1: <img>assets/mm_tutorial/Chongqing.jpeg</img>\nPicture 2: <img>assets/mm_tutorial/Beijing.jpeg</img>\n图中都是哪"},{"from":"assistant","value":"第一张图片是重庆的城市天际线,第二张图片是北京的天际线。"}]}]
微调
qwenVL提供了finetune.py脚本来进行微调,这个脚本也在github仓库里,自行下载即可。
- 单卡微调
# 单卡训练sh finetune/finetune_lora_single_gpu.sh
finetune_lora_single_gpu.sh脚本在github仓库的finetun文件下。
其中的内容为:
#!/bin/bash
export CUDA_DEVICE_MAX_CONNECTIONS=1
DIR=`pwd`
export NCCL_P2P_DISABLE="1"
export NCCL_IB_DISABLE="1"
MODEL="/qwen-vl/Qwen-VL-Chat/"#"Qwen/Qwen-VL-Chat"/"Qwen/Qwen-VL" # Set the path if you do not want to load from huggingface directly# ATTENTION: specify the path to your training data, which should be a json file consisting of a list of conversations.# See the section for finetuning in README for more information.
DATA="/qwen-vl/new1_qwen.json"

export CUDA_VISIBLE_DEVICES=1

python finetune.py \
    --model_name_or_path $MODEL \
    --data_path $DATA \
    --bf16 True \
    --fix_vit True \
    --output_dir output_qwen \
    --num_train_epochs 25 \
    --per_device_train_batch_size 2 \
    --per_device_eval_batch_size 1 \
    --gradient_accumulation_steps 8 \
    --evaluation_strategy "no" \
    --save_strategy "steps" \
    --save_steps 1000 \
    --save_total_limit 10 \
    --learning_rate 1e-3 \
    --weight_decay 1e-3 \
    --adam_beta2 0.95 \
    --warmup_ratio 0.01 \
    --lr_scheduler_type "cosine" \
    --logging_steps 1 \
    --report_to "none" \
    --model_max_length 1024\
    --lazy_preprocess True \
    --gradient_checkpointing \
    --use_lora
- 这两行是为了解决 RTX4090显卡通信问题
export NCCL_P2P_DISABLE=“1”
export NCCL_IB_DISABLE=“1”
- MODEL和DATA改为自己的模型地址和数据集地址
- 我这里修改脚本里的model_max_length参数,默认是2048(需要27.3GB的显存),调小
开始训练
输入命令:
nohup ./finetune_lora_single_gpu.sh > train.log 2>&1&
- nohup: nohup 是 “no hang up” 的缩写,它用于在用户退出登录后继续运行命令。使用 nohup 可以防止进程在用户退出会话后被挂起。
- ./finetune_lora_single_gpu.sh: 这是要运行的脚本文件,位于当前目录下。这个脚本文件名为 finetune_lora_single_gpu.sh,通常用于单 GPU 上进行 LoRA(Low-Rank Adaptation)的微调。
- ">"重定向符号,将命令的标准输出(stdout)重定向到文件。
- train.log: 重定向输出的目标文件名。这里是 train.log,用于保存命令的标准输出。
- 2>&1: 这部分将标准错误输出(stderr)重定向到标准输出(stdout)。2 代表标准错误,1 代表标准输出,>& 表示重定向。通过这个重定向,标准错误输出和标准输出都会被写入 train.log 文件。
- &: 将命令放到后台运行。这意味着命令会在后台执行,用户可以继续在当前终端进行其他操作。 显示如下:
 可得知这个为train进程,且被挂到后台。 用命令etail -f train.log来实时监控train.log,以查看训练情况
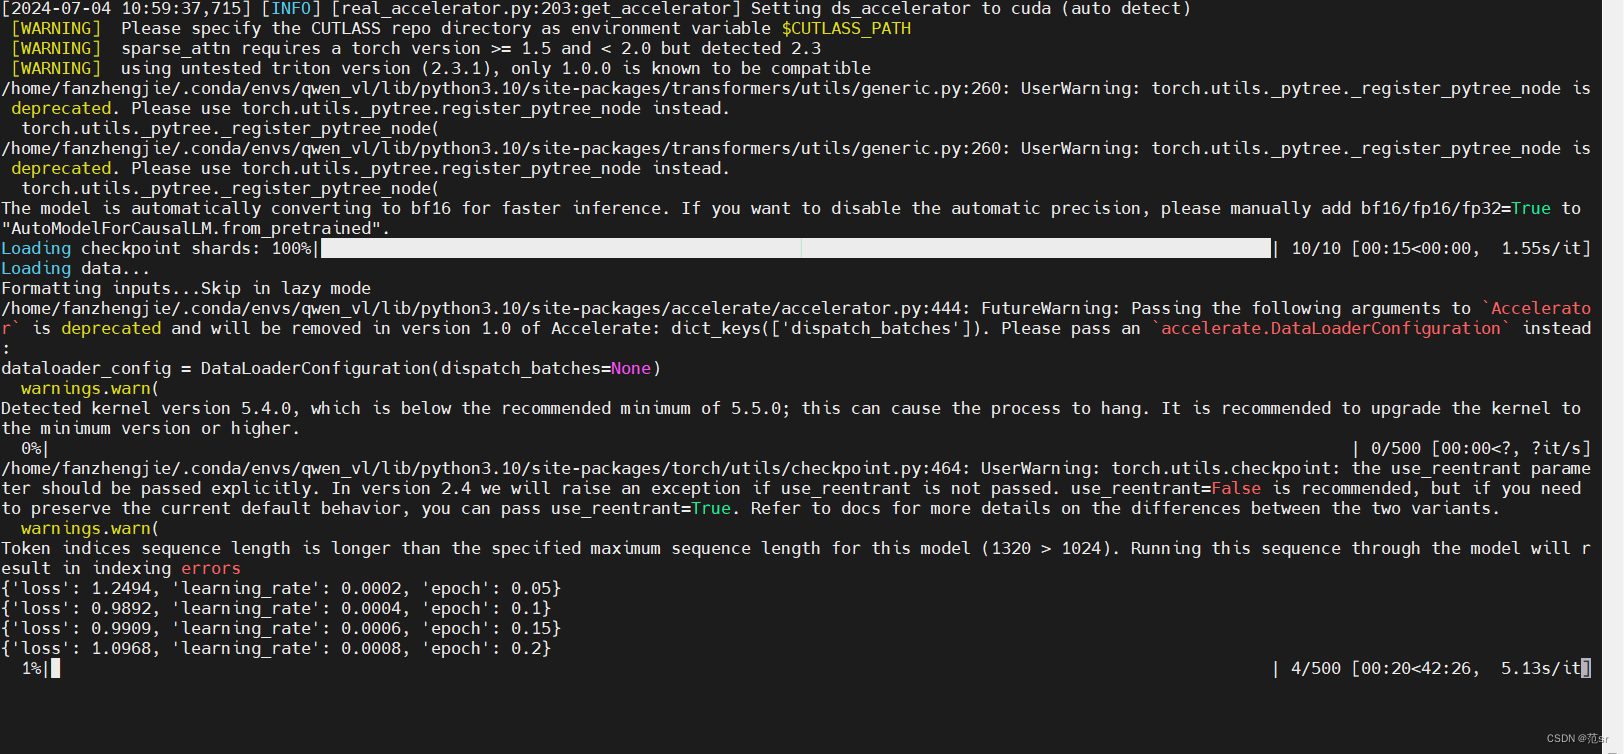 模型训练完会保存在output_qwen文件中,想要修改去finetune.py 脚本中修改 --output_dir参数。
模型合并
合并脚本
from peft import AutoPeftModelForCausalLM

model = AutoPeftModelForCausalLM.from_pretrained(
    path_to_adapter,# 将这里改为输出新模型的路径
    device_map="auto",
    trust_remote_code=True).eval()

merged_model = model.merge_and_unload()# max_shard_size and safe serialization are not necessary. # They respectively work for sharding checkpoint and save the model to safetensors
merged_model.save_pretrained(new_model_directory, max_shard_size="2048MB", safe_serialization=True)
- new_model_directory 为合并后的新模型的存放位置
推理
from transformers import AutoTokenizer, AutoModelForCausalLM
import torch
from transformers import AutoModelForCausalLM, AutoTokenizer
from transformers.generation import GenerationConfig
import torch
torch.manual_seed(1234)# 加载合并后的模型和tokenizer
tokenizer = AutoTokenizer.from_pretrained("/qwen-vl/new_model/", trust_remote_code=True)# 默认gpu进行推理,需要约24GB显存
model = AutoModelForCausalLM.from_pretrained("/qwen-vl/new_model/", device_map="cuda", trust_remote_code=True).eval()# 可指定不同的生成长度、top_p等相关超参(transformers 4.32.0及以上无需执行此操作)# model.generation_config = GenerationConfig.from_pretrained("Qwen/Qwen-VL", trust_remote_code=True)

query = tokenizer.from_list_format([{'image':'/qwen-vl/dewarping_test1.png'},# Either a local path or an url{'text':'Provide the OCR results of this picture.'},])
inputs = tokenizer(query, return_tensors='pt')
inputs = inputs.to(model.device)
pred = model.generate(**inputs)
response = tokenizer.decode(pred.cpu()[0], skip_special_tokens=False)print(response)

image = tokenizer.draw_bbox_on_latest_picture(response)if image:
  image.save('2.jpg')else:print("no box")
可能遇到的错误
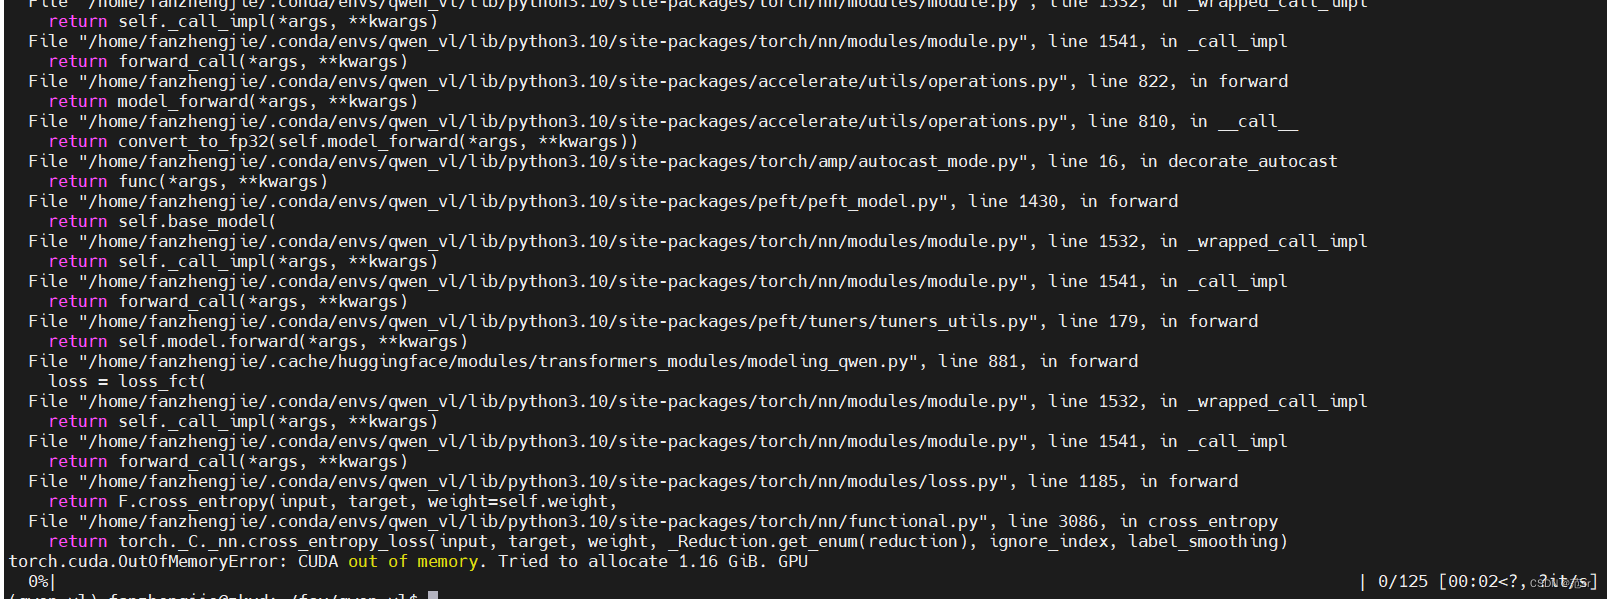
- 显存不足,调小batchsize或model_max_length
- 找不到分词器,报错信息:
ValueError: Unrecognized configuration class <class ‘transformers_modules.configuration_qwen.QWenConfig’> to build an AutoTokenizer.
相关问题解决可以看我这篇博客:链接: Unrecognized configuration class to build an AutoTokenizer.
因为保存模型的时候没有保存token相关的文件,解决方法是将最初模型的分词器文件粘贴过来到新模型中,应该就三个文件如下: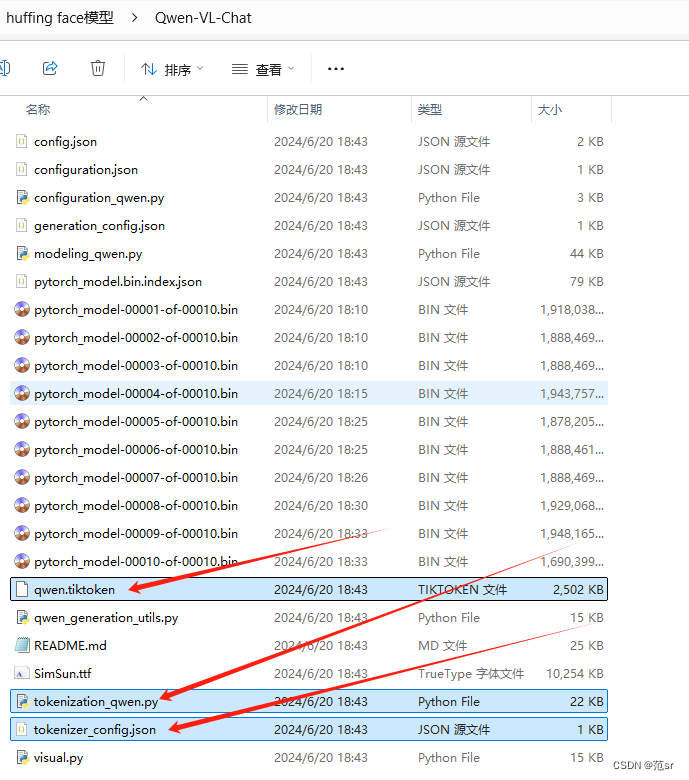
最后在推理的时候,在获取tokenizer的时候,一定要加上trust_remote_code=True,如下:
tokenizer = AutoTokenizer.from_pretrained(“/root/autodl-tmp/self_qwen/”, trust_remote_code=True)
本文转载自: https://blog.csdn.net/weixin_51074012/article/details/140185535
版权归原作者 范sr 所有, 如有侵权,请联系我们删除。
版权归原作者 范sr 所有, 如有侵权,请联系我们删除。