
esp32接入ai模型与经验分享
前言
本次用到的为arduino环境编写的。
先前我是用到Thonny,但其网络库在api请求时不支持重定向,而arduino库支持。
并且感谢博主 2345VOR (鹏哥) 其博客:
2345VOR
我的代码在他的基础框架进行修改的
实物

硬件准备
1.一块esp32
2.屏幕 1.8寸TFT彩屏(驱动芯片ST7735)
3.语音输入与输出部分
(货物清单在这)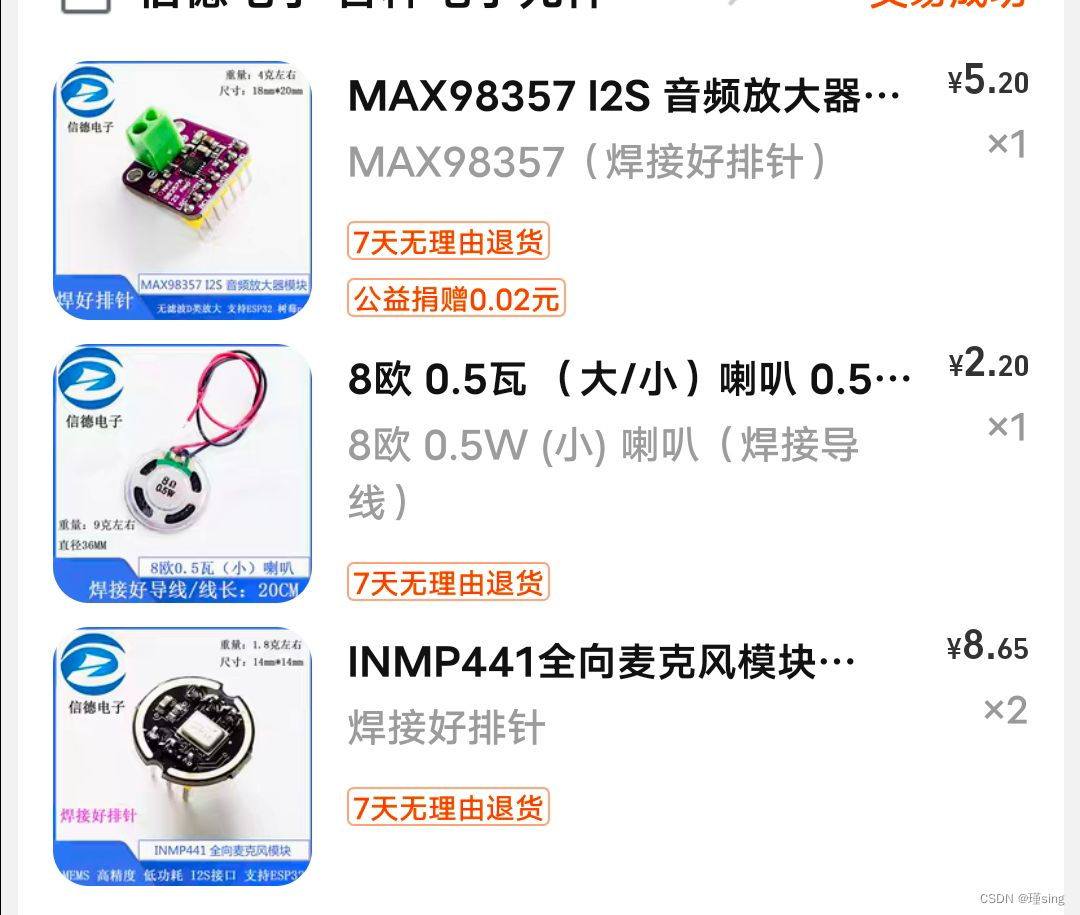
4.杜邦线,面包线,led,按键,散热片(芯片发热量有点大)
库文件准备
1.首先要有编程环境(arduino)
2.安装esp32开发板管理
3.安装必要的库文件
#include <TFT_eSPI.h>  //tft库
#include <U8g2_for_TFT_eSPI.h> //汉字库头文件,主要是它

#include <WiFi.h>
#include <ArduinoJson.h>
#include <HTTPClient.h>
#include "base64.h"
#include "cJSON.h"  //网络请求与解析库

#include <driver/i2s.h>//语音输入输出库
#include "Audio.h"
(网络与解析库文件可以直接在arduino下载)
(<driver/i2s.h>库本身就包含了是i2s库的一个分支)
("Audio.h"库需要自己安装)esp32_audio库
(TFT_esoI.h可以直接在arduino下载)
(<U8g2_for_TFT_eSPI.h>库有博主提供了需要自己放在库文件下)
TFT汉字库
TFT屏幕的驱动设置
详细可以看b站视频驱动设置
我这里带大家简单操作下
1.打开对应的库文件 打开arduino文件夹
 打开libaries文件夹
 打开TFT_ESPI库文件夹
 选择这个文件,进行屏幕驱动的选择
 对于我这块屏幕是st7735驱动芯片驱动的
在对应的宏定义前解除注释就行
(驱动选择选完了之后就是引脚选择了)也在同样的文件下 这是我对应的引脚修改
这些做完之后便可以先用arduino上的TFT例程测试一下
(详细可以看视频)
API请求
推荐调试工具为 (postman)
本次用到的为KIMI的ai模型API(post请求)
kimiAPI官网
语音识别为百度智能云上面的云服务(post请求)
语音输出也是百度智能云上的云服务(get请求)
百度智能云平台官网
(这里得知道如何发送请求,与接收json格式的数据)
(以及注册api账户开启api服务,这会产生一些费用)
【由于篇幅原因,希望您可以去网上自行了解】
语音上传部分
一.语音数据采集
语音识别部分为driver/i2s.h库,麦克风部分为INMP441,具体用法
可以csdn上看其他博主的介绍,值得注意的是这个库虽然在声音信号上的
数据采集便利了,但其本身双声道库,一个左或者右麦克风只能采集一半的数
据量,举例:如果我是8k采样1600个16位数据,按理来说是采集2秒,但实际
上其接口函数只有前一半右数据(左声道),后一半(右声道)无数据都为0。
为了解决这个问题有两种方法
          1.是数据增加到3200个,这样也是采样两秒(直接out)浪费资源
          2.在接口函数填入数组大小是设置为两倍长度
二.数据上传部分
    要将采集到的音频数据编码为base64才可上传到百度云,该上传代码
    主要为2345VOR博主所提供
文字转语音
这个是我看到了其他博主的文章发现audio.h库刚好有函数接口可以播放
网络音乐(MP3格式),正好百度智能云的文字转语音用get方法获取也为
MP3格式,在游览器上试了下可以(这个不能用postman调试了),所以这
一部分库函数功能刚好实现
同时输出与输入音频文件
因为库的底层有冲突站用了同一个I2s,虽然说esp32的i2s资源有两个i2s1
与i2s2,我尝试了修改其库的底层让他们分别用不同的i2s,但还是会一直重
启报错(其实是冲突了),网上查了一下是虽然有两个i2s但其实还是同一个
也就是不能同时输出与输入
    解决办法是:用到时候安装上对应的驱动,用完了再去卸载驱动,给另外
               一个用,这样就不会冲突了
接线部分
语音输出(max98357)
#define I2S_DOUT      25
#define I2S_BCLK      27
#define I2S_LRC       26
max98357的接线端子还要接喇叭(正负不分)
语音输入(inmp441)
#define I2S_WS 32
#define I2S_SD 35
#define I2S_SCK 33
注意INMP441的 L/R接地
tft屏幕
#define TFT_MOSI 2
#define TFT_SCLK 15
#define TFT_CS   17
#define TFT_DC   16
#define TFT_RST   4
LED
#define ledPin 21 (接正极)
按键
#define keypin 18 (按键脚的另一端接地,且需要给18脚接个上拉电阻)
整个工程arduino源码
#include <TFT_eSPI.h>  //tft库
#include <U8g2_for_TFT_eSPI.h> //汉字库头文件,主要是它

#include <WiFi.h>
#include <ArduinoJson.h>
#include <HTTPClient.h>
#include "base64.h"
#include "cJSON.h"  //网络请求与解析库

#include <driver/i2s.h>//语音输入输出库
#include "Audio.h"

//json data
char data_json[43700];  //内存不大,只能录两秒钟,设置大了,会报错

//音频输出
#define I2S_DOUT      25
#define I2S_BCLK      27
#define I2S_LRC       26

//文字显示
U8g2_for_TFT_eSPI  u8g2;
TFT_eSPI my_tft;

//WiFi
const char* ssid = "OK";  //你的WiFi名称
const char* password = "33333333"; //你的WiFi密码

//声音采集
//按照接线确定编号-----------------------------------------------------------------------------------------------------
#define I2S_WS 32
#define I2S_SD 35
#define I2S_SCK 33

// 使用I2S处理器
#define I2S_PORT I2S_NUM_0

// 定义缓冲区长度
#define bufferLen 16000
int16_t sBuffer[bufferLen]; //内存不大,只能录两秒钟,设置大了,会报错
//-------------------------------------------------------------------------------------------------------------------------

//kimi——api
String Kimi_url = "https://api.moonshot.cn/v1/chat/completions";

//百度文字转音频
String voice_url = "http://tsn.baidu.com/text2audio";

//文字显示函数
void TFT_print(uint16_t x,uint16_t y,String Text,uint16_t TextColor,uint8_t Size)
{
  switch(Size)
  {
    case 1:
      u8g2.setFont(u8g2_font_wqy12_t_gb2312); //12像素大小
      break;
    case 2:
      u8g2.setFont(u8g2_font_wqy16_t_gb2312); //16像素大小
      break;
  }
  u8g2.setForegroundColor(TextColor);  //字的颜色
  u8g2.setCursor(y, x); //位置
  u8g2.print(Text); //打印
}

//——————————————————————————————————————————————————————————————————————————————————————————————————————————麦克风驱动安装的函数---------------------------------
void i2s_install() {
  //设置I2S处理器配置
  const i2s_config_t i2s_config = {
    .mode = i2s_mode_t(I2S_MODE_MASTER | I2S_MODE_RX),
    .sample_rate = 8000,
    .bits_per_sample = i2s_bits_per_sample_t(16),
    .channel_format = I2S_CHANNEL_FMT_ONLY_LEFT,
    .communication_format = i2s_comm_format_t(I2S_COMM_FORMAT_STAND_I2S),
    .intr_alloc_flags = 0,
    .dma_buf_count = 8,
    .dma_buf_len = 64,
    .use_apll = false
  };

  i2s_driver_install(I2S_PORT, &i2s_config, 0, NULL);
}

void i2s_setpin() {
  // 设置I2S引脚配置
  const i2s_pin_config_t pin_config = {
    .bck_io_num = I2S_SCK,
    .ws_io_num = I2S_WS,
    .data_out_num = -1,
    .data_in_num = I2S_SD
  };

  i2s_set_pin(I2S_PORT, &pin_config);
}
//-------------------------------------------------------------------------------------------------------------------------------------------------------------

//---------------------------------------------------------------ai回答部分(接入kimi)------------------------------------------
String get_kimi(String question)
{
HTTPClient http1 ;
http1.setTimeout(20000);
http1.begin(Kimi_url);
http1.addHeader("Content-Type", "application/json");
http1.addHeader("Authorization", "sk-4cyiL5............................................................."); //注意得填写你的码
 String body="{\"model\":\"moonshot-v1-8k\",\"messages\":[{\"role\":\"system\",\"content\":\"你是我的AI助手小南,你必须用中文回答且字数不超过85个\"},{\"role\":\"user\",\"content\":\"" + question + "\"},{\"role\": \"assistant\",\"name\":\" 小南\", \"content\":\"\", \"partial\": true}],\"temperature\":0.3}";

int httpResponseCode = http1.POST(body);
  if(httpResponseCode == 200)
  {
    String response = http1.getString();
    http1.end();
    //Serial.println(response);
    StaticJsonDocument<1024> json1;
    deserializeJson(json1,response);
    String json_get1 = json1["choices"];
     deserializeJson(json1,json_get1);
    String message = json1[0]["message"].as<String>();
     deserializeJson(json1,message);
     String respone = json1["content"];
    //Serial.println(respone);
    return respone ;
  }
  else
  {
    http1.end();
    //Serial.println("error");
    return "你问的太快了询问不能频繁当前为一分钟三到四次询问)";//(kimi的api比较菜一分钟只能问他3个问题)
  }
}
//---------------------------------------------------------------------------------------------------------------------------------------------------------------------------

String Voice_2_Text(); // 语音转文字的函数

#define ledPin 21
#define keypin 18

void setup()
{
  // put your setup code here, to run once:
  Serial.begin(115200);
  WiFi.mode(WIFI_STA);

  pinMode(ledPin, OUTPUT); //led初始化
  pinMode(keypin, INPUT); //按键初始化

  digitalWrite(ledPin,HIGH); //开始时,亮灯
  my_tft.init(); //初始化
  u8g2.begin(my_tft); //将U8g2绑定到TFT
  my_tft.setRotation(2); //屏幕旋转方向(可自行修改)
  my_tft.setTextColor(TFT_DARKGREEN); //设置屏幕字颜色(用到了字库的话本句没用)
  my_tft.fillScreen(TFT_BLACK); //屏幕背景

  i2s_install(); //麦克封初始化---安装驱动
  i2s_setpin();
  i2s_start(I2S_PORT);
  TFT_print(80,3,"Voiceinput (inx441) " ,TFT_YELLOW,1);
  delay(150);
  i2s_driver_uninstall(I2S_PORT); // 驱动卸载 (因为输出输入不能同时有,连个库的底层对应一个i2s,用到的时候在安装)

  //audio.setPinout(I2S_BCLK, I2S_LRC, I2S_DOUT);
  //audio.setVolume(12); // 0...21
  //audio.connecttohost("");  //语音输出驱动(不能在全局定义,应为没有对应的释放接口,只能在局部变量中使用,否则esp32一直重启)
 TFT_print(90,3,"Voiceinput (out) " ,TFT_YELLOW,1);//屏幕打印信息
  delay(100);

  WiFi.begin(ssid, password); //WiFi连接

  uint8_t i = 1 ;
   TFT_print(10,1,"WiFi is connecting....",TFT_WHITE,1);
   while (WiFi.status() != WL_CONNECTED) {
    TFT_print(20,i*5+1,".",TFT_WHITE,1);
    delay(800);
    i++;
    if(i>=25)
    {
      TFT_print(30,1,"WiFi can`t conect ",TFT_RED,1);
      TFT_print(40,1,"please check and again",TFT_RED,1);
      while(1){}
    }
  }
  digitalWrite(ledPin,LOW);
  String ip = WiFi.localIP().toString().c_str();
  TFT_print(30,1,"WiFi is connected",TFT_DARKGREEN,1);
  TFT_print(40,1,"IP:" + ip ,TFT_DARKGREEN,1);
  TFT_print(50,1,"Welcome:" ,TFT_WHITE,1);
  TFT_print(60,3,"The api is kimi" ,TFT_WHITE,1);
  TFT_print(70,3,"the character is CoNan" ,TFT_WHITE,1);
  delay(1500);
  my_tft.fillScreen(TFT_BLACK);
}

uint8_t voice_flag = 0 ;//是否有语音生成的状态值
String voic_get; // 文字转语音用到的get网址
void loop()
{
  bool VAL_KEY = digitalRead(keypin);
   TFT_print(10,1,"Answer:(空闲中)      ",TFT_DARKGREEN,1);
  if (VAL_KEY ==LOW)
  {
     delay(500);
     String str_error = "error" ;
     String get = Voice_2_Text();
      if(get.compareTo(str_error) !=0)
      {
        Serial.println(get);
        // inputText.trim();
         my_tft.fillScreen(TFT_BLACK);
        TFT_print(10,1,"Answer:(思考中)",TFT_RED,1);
        Serial.println("\n Input:"+get);

         String answer = get_kimi(get);
        Serial.println("Answer: " + answer);
        Serial.println("Enter a prompt:");
         TFT_print(10,1,"Answer:",TFT_WHITE,1);
        uint16_t len = answer.length();
        uint16_t i =0;
        uint16_t j =0;
        TFT_print(10,1,"Answer:(交谈中)      ",TFT_YELLOW,1);
        for(i=0;i<len;i=i+30)
        {
          uint16_t k=0;
           for(k=0;k<30;k=k+3)
          {
          TFT_print(22+j,5+(k/3)*12, answer.substring(i+k,i+k+3),TFT_WHITE,1);
          delay(15);
          }
          //TFT_print(22+j,5, answer.substring(i,i+30),TFT_WHITE,1);
          j+=15;
          delay(15);
        }//屏幕一个字一个字的显示的遍历
       voic_get = voice_url + "?tex=" +  answer +"&lan=zh&cuid=2579527033&ctp=1&tok=24.d9c2c.........................&per=111";//+号的&tok=...后面的部分得填写你的tok码
       delay(20);
      voice_flag = 1;
      }else
      {
        TFT_print(10,1,"Answer:(出错了)      ",TFT_RED,1);
        TFT_print(25,1,"服务器端错误      ",TFT_YELLOW,1);
      }
       Serial.println("voice_flag is:");
       Serial.println(voice_flag);
  }
  if(voice_flag == 1)
    {
    voice_flag = 0;
    Audio audio;
    audio.setPinout(I2S_BCLK, I2S_LRC, I2S_DOUT);//安装驱动
    audio.setVolume(12); // 0...21 设置音量大小
    const char* voice_url = voic_get.c_str(); //转化数据类型
    audio.connecttohost(voice_url); //get请求网络上百度云生成的语音数据
     TFT_print(10,1,"Answer:(空闲中)      ",TFT_DARKGREEN,1); //屏幕显示
    while(1)
    {
      audio.loop(); //循环播放
      VAL_KEY = digitalRead(keypin); //检测按键值
      if(VAL_KEY ==LOW )
      {
        break; //按下时为退出
      }
    }
    }
}

//--------------------------------------------语音识别函数--------------------------------------------------------------

String Voice_2_Text()
{
  //安装麦克风驱动-------------------------------
  i2s_install(); //麦克封初始化
  i2s_setpin();
  i2s_start(I2S_PORT);
  //-----------------------------------------------

  memset(data_json, '\0', strlen(data_json));  //将数组清空
  TFT_print(10,1,"Answer:(聆听中)      ",TFT_BLUE,1);
  size_t bytesIn = 0;
  digitalWrite(ledPin,HIGH);
  esp_err_t result_voice = i2s_read(I2S_PORT, &sBuffer, 2*bufferLen, &bytesIn, portMAX_DELAY); //应为该函数是用的左右声道同时采集,我们只有一个声道,所以告诉函数采用长度为实际数据的两倍数据长度,这样就可以将所有数据填满
  // result = i2s_read(I2S_PORT, &sBuffer, 2*bufferLen, &bytesIn, portMAX_DELAY);
   if (result_voice == ESP_OK)//采样完成标志位
   {
      TFT_print(10,1,"Answer:(识别中)      ",TFT_BLUE,1);
     digitalWrite(ledPin,LOW);

      i2s_driver_uninstall(I2S_PORT);//麦克封驱动卸载
       Serial.println("驱动卸载");
        strcat(data_json, "{");
        Serial.println("json写入");
       strcat(data_json, "\"format\":\"pcm\",");
        delay(10);
        Serial.println("json写入1");
       strcat(data_json, "\"rate\":8000,");
        Serial.println("json写入2");                                                                        //采样率    如果采样率改变了,记得修改该值,只有16000、8000两个固定采样率
       strcat(data_json, "\"dev_pid\":1537,");
       Serial.println("json写入3");                                                                       //中文普通话
       strcat(data_json, "\"channel\":1,");
       Serial.println("json写入4");                                                                           //单声道
       strcat(data_json, "\"cuid\":\"2579527033\",");
       Serial.println("json写入5");                                                                    //识别码    随便打几个字符,但最好唯一
       strcat(data_json, "\"token\":\"24.d9c2c44461f80b0.....................................................\","); //这里填写你的tok码
        Serial.println("json写入6");     //token    这里需要修改成自己申请到的token
        strcat(data_json, "\"len\":32000,");
        Serial.println("json写入7");                                                                            //数据长度  如果传输的数据长度改变了,记得修改该值,该值是ADC采集的数据字节数,不是base64编码后的长度
        strcat(data_json, "\"speech\":\"");
        Serial.println("json写入8");
        delay(20);
        strcat(data_json, base64::encode((uint8_t*)sBuffer, sizeof(sBuffer)).c_str());  //base64编码数据
        delay(20);
        Serial.println("json写入9");
       strcat(data_json, "\"");
       Serial.println("json写入10");
        strcat(data_json, "}");
         Serial.println("json以安好");
      int httpCode;
      HTTPClient http2;
      http2.setTimeout(5000);  //设置超出响应时间
      http2.begin("http://vop.baidu.com/server_api");  //https://vop.baidu.com/pro_api 语音转文字api
      http2.addHeader("Content-Type", "application/json");
      httpCode = http2.POST(data_json);
      Serial.println("json以发送");
    if (httpCode == 200)
     {
        if (httpCode == HTTP_CODE_OK)
        {
          Serial.println("接收正确");
          String  response = http2.getString();
          http2.end();
          Serial.println(response);
          DynamicJsonDocument jsonDoc(1024);
          // Parse JSON response
          // DynamicJsonDocument jsonDoc(512);
          deserializeJson(jsonDoc, response);
          String question = jsonDoc["result"][0];
          // 访问"result"数组,并获取其第一个元
          // 输出结果
          Serial.println(question);
          return question ;
        } else {
          Serial.printf("[HTTP] GET... failed, error: %s\n", http2.errorToString(httpCode).c_str());
          return "error" ;
        }
     }
     else
     {
       Serial.println("接收有误区");
       return "error";
     }

  }
}
//---------------------------------------------------------------------------------------------------------
存在的问题
我只是把他基本功能完成了,还有很多地方可以优化,且到了晚上开机第一次
使用时都是报错,之后就可以用了。如果您有什么好的办法与优化欢迎留言。
版权归原作者 瑾sing 所有, 如有侵权,请联系我们删除。