
乐观学习,乐观生活,才能不断前进啊!!!我的主页:optimistic_chen
我的专栏:c语言
点击主页:optimistic_chen和专栏:c语言,
创作不易,大佬们点赞鼓励下吧~

文章目录
合并两个有序链表
合并两个有序链表———力扣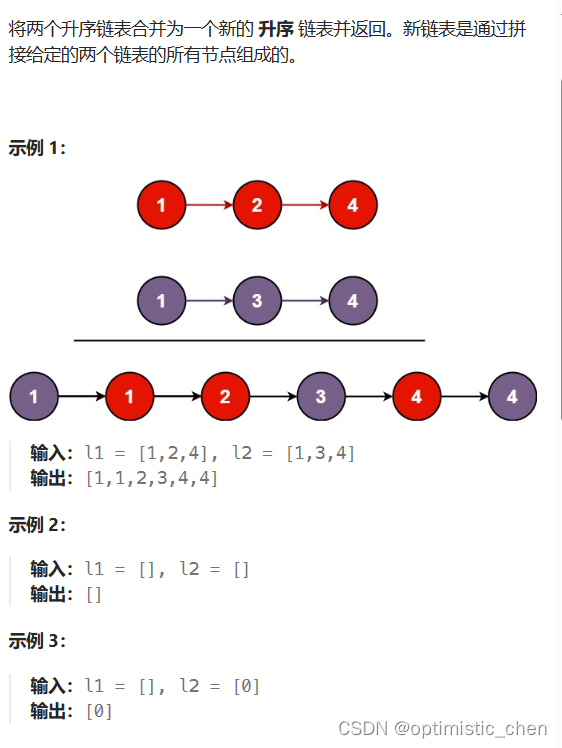
第一种思路
直接创建一个空链表,分别判断两个原链表的元素大小,升序插入到新链表中,但是此方法可能会超出时间限制(每一次都需要判断新链表的头节点是否为空),代码重复执行太多。
typedefstructListNode ListNode;structListNode*mergeTwoLists(structListNode* list1,structListNode* list2){//判断为空链表if(list1==NULL){return list2;}if(list2==NULL){return list1;}

    ListNode* l1=list1;
    ListNode*l2=list2;//创建的新链表
    ListNode*newHead,*newTail;
    newHead=newTail=NULL;while(l1&&l2){if(l1->val < l2->val){//l1拿下来尾插if(newHead==NULL){
                newHead=newTail=l2;}else{
                    newTail->next=l1;
                    newTail=newTail->next;}

            l1=l1->next;}else{//l2拿下来尾插if(newHead==NULL){
            newHead=newTail=l2;}else{
                newTail->next=l2;
                newTail=newTail->next;}
            l2=l2->next;}}//跳出循环,要么l1先为空,要么l2先为空if(l2){
        newTail->next=l2;}if(l1){
        newTail->next=l1;}return newHead;}
第二种思路
优化:让新链表不为空,判断两个原链表元素大小后,直接插入到新链表中
typedefstructListNode ListNode;structListNode*mergeTwoLists(structListNode* list1,structListNode* list2){//判断为空链表if(list1==NULL){return list2;}if(list2==NULL){return list1;}

    ListNode* l1=list1;
    ListNode*l2=list2;//创建的新链表(链表不为空)
    ListNode*newHead,*newTail;//newHead=newTail=NULL;
    newHead=newTail=(ListNode*)malloc(sizeof(ListNode));while(l1&&l2){if(l1->val < l2->val){//l1拿下来尾插
            newTail->next=l1;
            newTail=newTail->next;
            l1=l1->next;}else{//l2拿下来尾插
            newTail->next=l2;
            newTail=newTail->next;
            l2=l2->next;}}//跳出循环,要么l1先为空,要么l2先为空if(l2){
        newTail->next=l2;}if(l1){
        newTail->next=l1;}//动态申请的空间要手动释放掉
    ListNode* ret=newHead->next;free(newHead);
    newHead=NULL;return ret;}
环形链表的约瑟夫问题
环形链表的约瑟夫问题——牛客网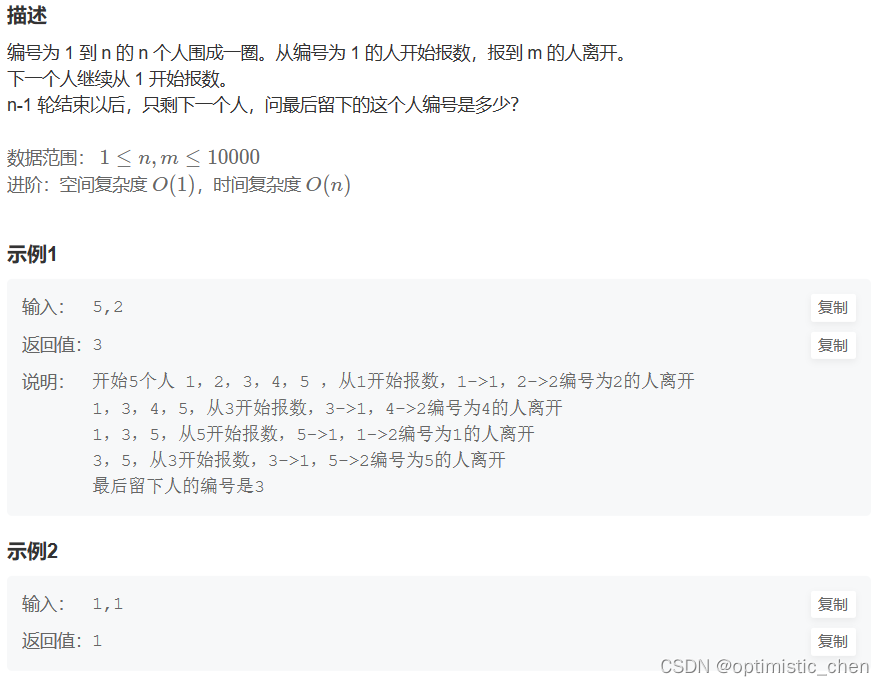
环形链表与我们平时见到的链表不同的是:他的尾节点的next指针指向头节点,而不是NULL。
typedefstructListNode ListNode;//创建节点
ListNode*buyNode(int x){
ListNode*node=(ListNode*)malloc(sizeof(ListNode));if(node==NULL){exit(1);}
node->val=x;
node->next=NULL;return node;}
ListNode*createCircle(int n){//先创建第一个节点
ListNode*phead=buyNode(1);
ListNode*ptail=phead;for(int i=2;i<=n;i++){
ptail->next=buyNode(i);
ptail=ptail->next;}//首位相连
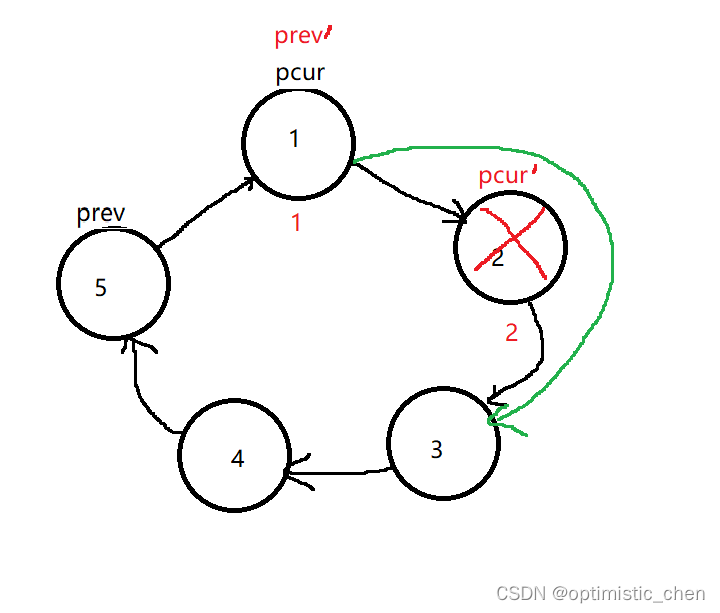
ptail->next=phead;return ptail;}intysf(int n,int m ){//第一步,根据n创建带环链表
ListNode*prev=createCircle(n);
ListNode*pcur=prev->next;//第二步记数int count=1;while(pcur->next!=pcur){if(count==m){//销毁pcur节点
prev->next=pcur->next;free(pcur);
pcur=prev->next;
count=1;}else{
prev=pcur;
pcur=pcur->next;
count++;}}//此时剩下的一个节点就是要返回的值return pcur->val;}
分割链表
分割链表——力扣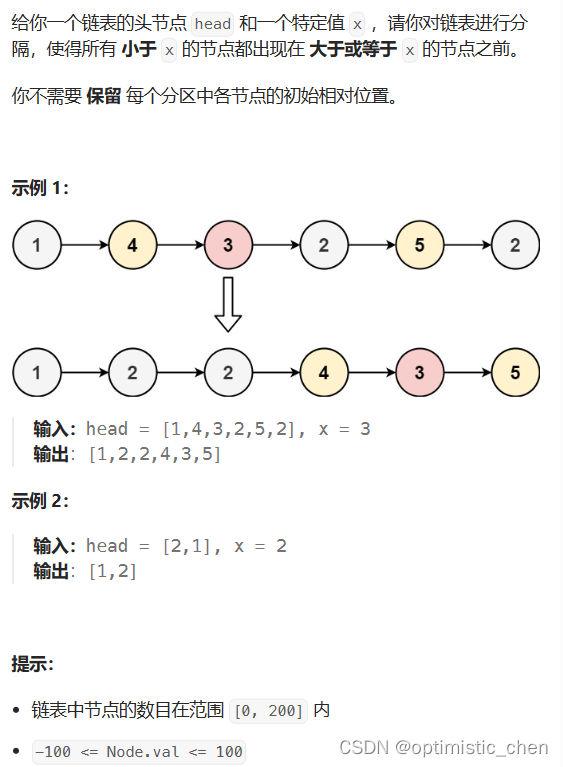
第一种思路
双指针法:
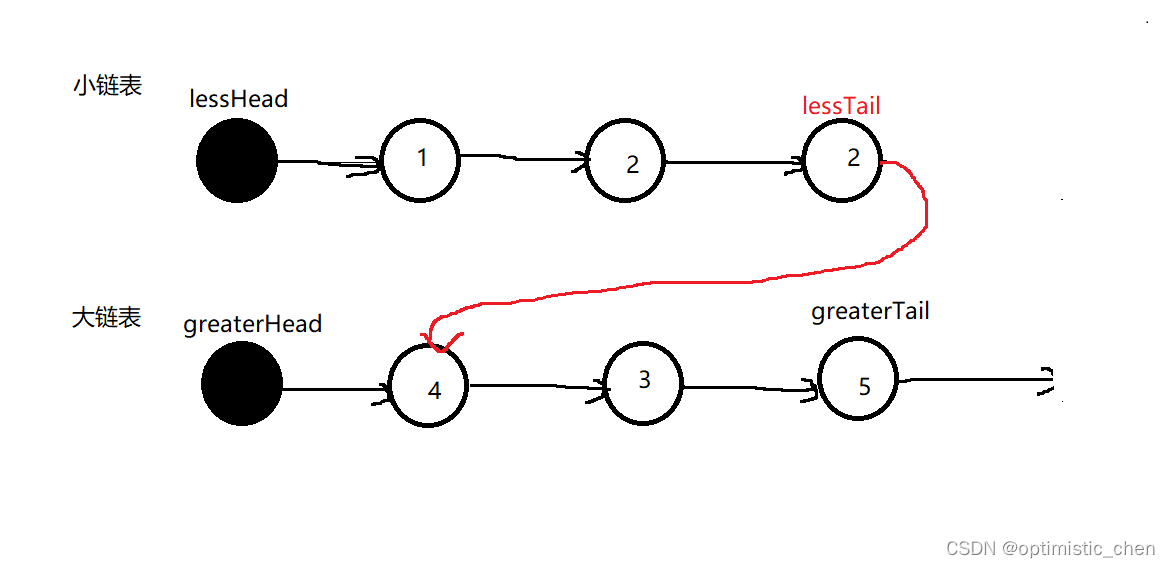
1.创建大,小两个新链表。
2.将小于特定值的节点放到小链表中,将大于等于特定值的节点放到大链表中
3.小链表的尾节点和大链表的第一个有效节点首尾相连
typedefstructListNode ListNode;structListNode*partition(structListNode* head,int x){if(head==NULL){return head;}//创建两个带头链表
ListNode*lessHead,*lessTail;
ListNode*greaterHead,*greaterTail;
lessHead=lessTail=(ListNode*)malloc(sizeof(ListNode));
greaterHead=greaterTail=(ListNode*)malloc(sizeof(ListNode));//遍历原链表,将原链表中的节点尾插到大小链表中
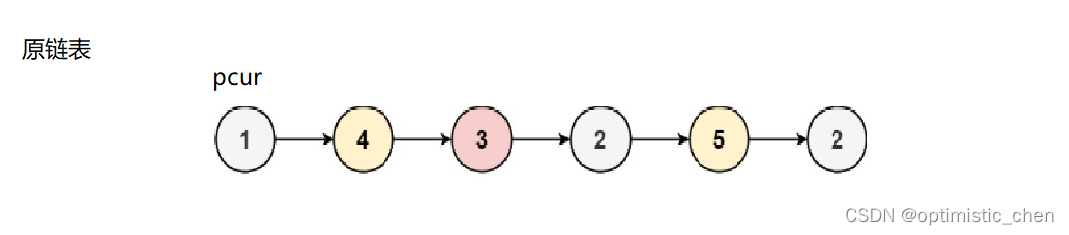
ListNode*pcur=head;while(pcur){if(pcur->val<x){//尾插到小链表中
lessTail->next=pcur;
lessTail=lessTail->next;}else{//尾插到大链表中
greaterTail->next=pcur;
greaterTail=greaterTail->next;}
pcur=pcur->next;}//修改大链表的尾节点的next指针指向
greaterTail->next=NULL;//小链表的尾节点和大链表的第一个有效节点首尾相连
lessTail->next=greaterHead->next;
ListNode*ret=lessHead->next;free(lessHead);free(greaterHead);
lessHead=greaterHead=NULL;return ret;}
第二种思路
HeadNode哨兵结点:用于头插;Tail尾指针用于尾插;cur表示当前链表结点;
遍历链表依次用链表结点元素值与X比较;小于则头插;大于则尾插;
这里有一个小细节就是头插时,如果尾指针等于哨兵HeadNode则需更新Tail指向尾结点
structListNode*partition(structListNode* head,int x){structListNode* HeadNode=(structListNode*)malloc(sizeof(structListNode));structListNode* Tail=HeadNode,*cur=head;
    Tail->next=NULL;while(cur){structListNode* next=cur->next;if(cur->val<x){
            cur->next=HeadNode->next;
            HeadNode->next=cur;if(Tail==HeadNode){
                Tail=cur;}}else{
            Tail->next=cur;
            Tail=cur;
            cur->next=NULL;}
        cur=next;}return HeadNode->next;}
完结
好了,这期的分享到这里就结束了~
如果这篇博客对你有帮助的话,可以点一个免费的赞并收藏起来哟~
可以点点关注,避免找不到我~
我们下期不见不散~~
这个链表题目还会继续,敬请期待~
本文转载自: https://blog.csdn.net/optimistic_chen/article/details/139216600
版权归原作者 optimistic_chen 所有, 如有侵权,请联系我们删除。
版权归原作者 optimistic_chen 所有, 如有侵权,请联系我们删除。