
此文章仅大致讲解yolov5神经网络结构,具体理论知识请自行学习神经网络。(电脑阅读体验更佳)
目录
在解析yolo文件之前,我们需要先了解yolov5的网络结构是怎么样的:
yolov5s.yaml:
(这个文件其实只是指导我们搭建模型的配置文件的说明书,供我们参考,我们可以参考此文件配置自己的模型文件)
先如图了解yolov5网络结构:
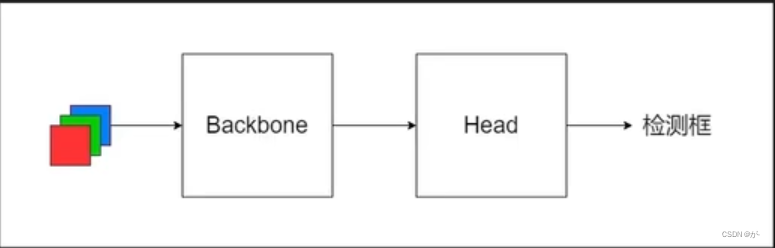
我们先了解一下中间的Backone,Head是什么东西:
# YOLOv5 v6.0 backbone
backbone:
  # [from, number, module, args]
  [[-1, 1, Conv, [64, 6, 2, 2]],  # 0-P1/2
   [-1, 1, Conv, [128, 3, 2]],  # 1-P2/4
   [-1, 3, C3, [128]],
   [-1, 1, Conv, [256, 3, 2]],  # 3-P3/8
   [-1, 6, C3, [256]],
   [-1, 1, Conv, [512, 3, 2]],  # 5-P4/16
   [-1, 9, C3, [512]],
   [-1, 1, Conv, [1024, 3, 2]],  # 7-P5/32
   [-1, 3, C3, [1024]],
   [-1, 1, SPPF, [1024, 5]],  # 9
  ]

# YOLOv5 v6.0 head
head:
  [[-1, 1, Conv, [512, 1, 1]],
   [-1, 1, nn.Upsample, [None, 2, 'nearest']],
   [[-1, 6], 1, Concat, [1]],  # cat backbone P4
   [-1, 3, C3, [512, False]],  # 13

   [-1, 1, Conv, [256, 1, 1]],
   [-1, 1, nn.Upsample, [None, 2, 'nearest']],
   [[-1, 4], 1, Concat, [1]],  # cat backbone P3
   [-1, 3, C3, [256, False]],  # 17 (P3/8-small)

   [-1, 1, Conv, [256, 3, 2]],
   [[-1, 14], 1, Concat, [1]],  # cat head P4
   [-1, 3, C3, [512, False]],  # 20 (P4/16-medium)

   [-1, 1, Conv, [512, 3, 2]],
   [[-1, 10], 1, Concat, [1]],  # cat head P5
   [-1, 3, C3, [1024, False]],  # 23 (P5/32-large)

   [[17, 20, 23], 1, Detect, [nc, anchors]],  # Detect(P3, P4, P5)
  ]
   backbone:            仅仅表示数字的含义

          # 0-P1/2       第一层

                 from:-1表示该输入从上一层传过来,【-1,6】表示从11和6层传过来

                 number:表示模块结构数量,若number>1,则数量=number*depth_multiple

                 module:模块结构(Conv、C3等),卷积层结构,定义于(**common.py**)

                 args:    传入参数,需要联系到common各网络层模型类别确定各参数含义

                 P1:       第一层

                 /2:       步长为2,图片长宽尺寸分别除以2(图片分辨率要求长宽为32倍数的原因)

             # 1-P2/4       第二层:

            依次往下逐层叠加

    head:        这里和backbone一样也是由各网络层组成

           **nn.Upsample**:    上采样层

           **Concat**:              综合各层传出特征的网络层

          ** Detect: **                  推理检测层
我们留意到这里一共有24层神经网络层,那么这24层是怎么相互叠加的呢,是简单的逐层叠加吗?
答案显然不是,实际上的网络结构是这样的:(网上多处的网络结构解析backbone都是从上往下叠加的,这里我是从B站up:480920279那里取经得到的从下往上的神经网络结构)
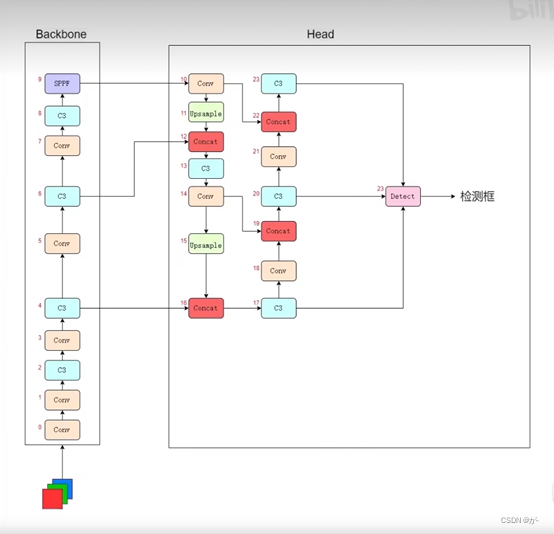
这个图的意思是,我们往神经网络中传入一个RGB三通道的图片,经Backbone10层网络后,进入Head进行上采样,综合特征处理等,最终有3个C3网络层输出到Detect层,这3个C3层从上到下就是我们说的高层特征层、中层特征层、低层特征层。
这些特征层区别在于低层检测小目标,中层检测中型目标,高层检测大目标,综合起来预测目标。
# Parameters
nc: 6  # number of classes
depth_multiple: 0.33  # model depth multiple
width_multiple: 0.50  # layer channel multiple
anchors:
  - [10,13, 16,30, 33,23]  # P3/8
  - [30,61, 62,45, 59,119]  # P4/16
  - [116,90, 156,198, 373,326]  # P5/32
    nc:                        (number of classes)目标类别数

    Anchors:            三层对应不同的特征层级

           [10,13, 16,30, 33,23]      低层3个anchor,10×13,16×30,33×23

           [30,61, 62,45, 59,119]      中层3个anchor

    depth_multiple:         模型深度倍数,创建模型时number* depth_multiple

    width_multiple:         通道倍数,每层通道参数* width_multiple=传出通道数,深度宽度参数相乘不为整向下取整

    depth_multiple,width_multiple决定模型复杂程度,值越大越复杂准确率越高,耗时长
对于各种模型文件的准确率:n<s<m<l<x(准确率越高,耗时越长)(这些文件的区别也仅仅是深度倍数和通道倍数的不同而已)
因此,我们可以参照此说明书自己写一个模型配置文件。
了解神经网络结构后,我们到yolo.py中看看神经网络是怎么实现的:
yolo.py:
if __name:
**create model**: **创建yolov5模型**
(这里可能会出现有几种写法):
第一种:
# Create model
im = torch.rand(opt.batch_size,3,640,640).to(device)
model = Model(opt.cfg).to(device)
第二种:
    # Create model
    model = Model(opt.cfg).to(device)
    model.train()

    # Profile
    if opt.profile:
        img = torch.rand(8 if torch.cuda.is_available() else 1, 3, 640, 640).to(device)
        y = model(img, profile=True)
                 im(g):    随机定义一张图片

                 y=model:   定义模型(——>Model)

          (Options):
Model:
init: 搭建网络结构
    def __init__(self, cfg='yolov5s.yaml', ch=3, nc=None, anchors=None):  # model, input channels, number of classes
        super().__init__()
        if isinstance(cfg, dict):
            self.yaml = cfg  # model dict
        else:  # is *.yaml
            import yaml  # for torch hub
            self.yaml_file = Path(cfg).name
            with open(cfg, encoding='ascii', errors='ignore') as f:
                self.yaml = yaml.safe_load(f)  # model dict
                 cfg:         配置文件(yolov5s.yaml)

                 ch:       输入图片通道数

                 super().init:        加载配置文件

                        判断传入的是否为字符串

                        self.yaml_file         获取文件名

                 with:    开始加载文件,关键元素以字典形式存放
Define model: 定义模型
# Define model
        ch = self.yaml['ch'] = self.yaml.get('ch', ch)  # input channels
        if nc and nc != self.yaml['nc']:            # 判断该值和yaml中的值是否一样
            LOGGER.info(f"Overriding model.yaml nc={self.yaml['nc']} with nc={nc}")
            self.yaml['nc'] = nc  # override yaml value
        if anchors:
            LOGGER.info(f'Overriding model.yaml anchors with anchors={anchors}')
            self.yaml['anchors'] = round(anchors)  # override yaml value
        self.model, self.save = parse_model(deepcopy(self.yaml), ch=[ch])  # model, savelist
        self.names = [str(i) for i in range(self.yaml['nc'])]  # default names
        self.inplace = self.yaml.get('inplace', True)
                 ch:       定义通道数

                 nc、anchor: 校正类数量

                 .model:       搭建模型(——>parse_model)

                 .names:       类别名

                 .inplace:      加载关键字
Build:
# Build strides, anchors
        m = self.model[-1]  # Detect()
        if isinstance(m, Detect):
            s = 256  # 2x min stride
            m.inplace = self.inplace
            m.stride = torch.tensor([s / x.shape[-2] for x in self.forward(torch.zeros(1, ch, s, s))])  # forward:[8, 16, 32]
            m.anchors /= m.stride.view(-1, 1, 1)
            check_anchor_order(m)
            self.stride = m.stride
            self._initialize_biases()  # only run once
                 判断model上一层是否为detect层

                        m.stride:     将s*s图片放入低中高特征层次中预测,将原尺寸除以预测层尺寸                                                      获得步长

                        m.anchors /=:    anchors除以步长

                        check_anchor:    检验传入的anchor顺序
forward: 对输入图片预测
parse_model:
LOGGER.info(f"\n{'':>3}{'from':>18}{'n':>3}{'params':>10}  {'module':<40}{'arguments':<30}")
    anchors, nc, gd, gw = d['anchors'], d['nc'], d['depth_multiple'], d['width_multiple']
    na = (len(anchors[0]) // 2) if isinstance(anchors, list) else anchors  # number of anchors
    no = na * (nc + 5)  # number of outputs = anchors * (classes + 5)

    layers, save, c2 = [], [], ch[-1]  # layers, savelist, ch out
          .info:           打印信息

          获取yaml参数:

          na:              anchor数量

          no:              输出通道,nc(80),5(矩形框四点+置信度),值为255

          layers(存储创建的每层网络),save(统计要保存的特征层)
    for i, (f, n, m, args) in enumerate(d['backbone'] + d['head']):  # from, number, module, args
        # 获取模型,这里主要是作者防止格式错误而不采取直接赋值
        m = eval(m) if isinstance(m, str) else m  # eval strings
        for j, a in enumerate(args):
            try:
                # 同理防止格式错误而不直接赋值
                args[j] = eval(a) if isinstance(a, str) else a  # eval strings, [64, 6, 2, 2]
            except NameError:
                pass
获取模型和args,这里这样写可能是因为作者防止格式错误而不采用直接赋值
接下来就是判断当前网络层是卷积层还是上采样层,检测层等,然后相应的进行不同处理
# n>1就乘以深度倍数
        n = n_ = max(round(n * gd), 1) if n > 1 else n  # depth gain
        if m in [Conv, GhostConv, Bottleneck, GhostBottleneck, SPP, SPPF, DWConv, MixConv2d, Focus, CrossConv,
                 BottleneckCSP, C3, C3TR, C3SPP, C3Ghost]:
            c1, c2 = ch[f], args[0]
            if c2 != no:  # if not output
                c2 = make_divisible(c2 * gw, 8)

            args = [c1, c2, *args[1:]]   # args[3, 32, 6, 2, 2]
            if m in [BottleneckCSP, C3, C3TR, C3Ghost]:
                args.insert(2, n)  # number of repeats
                n = 1
        elif m is nn.BatchNorm2d:
            args = [ch[f]]
        elif m is Concat:
            c2 = sum(ch[x] for x in f)
        elif m is Detect:
            args.append([ch[x] for x in f])
            if isinstance(args[1], int):  # number of anchors
                args[1] = [list(range(args[1] * 2))] * len(f)
        elif m is Contract:
            c2 = ch[f] * args[0] ** 2
        elif m is Expand:
            c2 = ch[f] // args[0] ** 2
        else:
            c2 = ch[f]
          If m:            判断结构类型

                 卷积层:       判断通道数是否为255否则乘以通道倍数,判断是否为8倍数(8的倍数对GPU计算更加友好)

                    C3层:
m_ = nn.Sequential(*(m(*args) for _ in range(n))) if n > 1 else m(*args)  # module
        t = str(m)[8:-2].replace('__main__.', '')  # module type
        np = sum(x.numel() for x in m_.parameters())  # number params
        m_.i, m_.f, m_.type, m_.np = i, f, t, np  # attach index, 'from' index, type, number params
        LOGGER.info(f'{i:>3}{str(f):>18}{n_:>3}{np:10.0f}  {t:<40}{str(args):<30}')  # print
        save.extend(x % i for x in ([f] if isinstance(f, int) else f) if x != -1)  # append to savelist
        layers.append(m_)
          save.extend:       保存所需特征层,【4,6,10,14,17,20, 23】

          ch.append(c2):   存储各层通道数,将上层输出通道作为该层输入通道
common.py:
以Conv为例简单了解:
class Conv(nn.Module):
    # Standard convolution
    def __init__(self, c1, c2, k=1, s=1, p=None, g=1, act=True):  # ch_in, ch_out, kernel, stride, padding, groups
        super().__init__()
        self.conv = nn.Conv2d(c1, c2, k, s, autopad(k, p), groups=g, bias=False)
        self.bn = nn.BatchNorm2d(c2)
        self.act = nn.SiLU() if act is True else (act if isinstance(act, nn.Module) else nn.Identity())

    def forward(self, x):
        return self.act(self.bn(self.conv(x)))

    def forward_fuse(self, x):
        return self.act(self.conv(x))
Conv:

          init:

                 c1:       输入该层通道数

                 c2:          输出该层通道数

                 k=1:    卷积核的大小

                 s=1:     卷积层滑动的步长

   C3:
本人才疏学浅,若各位读者发现文章内容有误,烦请不吝赐教,本人将不胜感激。
本文转载自: https://blog.csdn.net/qq_68271367/article/details/127418353
版权归原作者 が- 所有, 如有侵权,请联系我们删除。
版权归原作者 が- 所有, 如有侵权,请联系我们删除。