
文章目录
CentOS Stream 8 通过 Packstack 安装开源 OpenStack(V版)
需要了解
- 虚拟化平台版本
VMware Workstation 16.2.3- 操作系统版本
CentOS Linux Stream 8- 安装源您可访问 阿里永久镜像站 / 华为永久镜像站 或其他镜像站进行下载
- 环境用到 2台 虚拟机,单网卡,并为其配置 静态 IP 及 DNS
- 从
Ussuri版本开始,需要使用CentOS 8或RHEL 8,截至发稿前,Stream 8版本支持的最高版本为 xena- 搭建 openstack 最麻烦的是 yum 源问题,建议严格按照本篇博客进行 yum 源配置操作
- 保姆级别,按照步骤操作,绝对一次性安装成功。
环境规划
控制节点及计算节点必须开启虚拟化引擎
Intel VT-x或
AMD-V。控制节点未来将被复用为计算节点和网络节点。虚拟机配置可根据实际情况进行调整。
主机名IP网关/DNSCPU/内存磁盘角色备注controller192.168.129.185192.168.129.24c8g100g控制/网络/计算节点必须开启虚拟化引擎computer192.168.129.186192.168.129.24c8g100g计算节点必须开启虚拟化引擎
系统环境配置
网络配置
当前环境中控制节点及计算节点网卡类型为
NAT
网卡配置、关闭防火墙、Selinux、NetworkManager
- 控制节点
### 网卡配置[root@tmp ~]# hostnamectl set-hostname controller[root@tmp ~]# hostname
controller

[root@tmp ~]# cd /etc/sysconfig/network-scripts/[root@tmp network-scripts]# ls
ifcfg-ens160
[root@tmp network-scripts]# vi ifcfg-ens160 [root@tmp network-scripts]# cat ifcfg-ens160
TYPE=Ethernet
BOOTPROTO=none
NAME=ens160
DEVICE=ens160
ONBOOT=yes
IPADDR=192.168.129.185
NETMASK=255.255.255.0
GATEWAY=192.168.129.2
DNS1=192.168.129.2

### 可以再配置完ip之后关机拍摄快照

### 关闭防火墙[root@controller ~]# systemctl stop firewalld[root@controller ~]# systemctl disable firewalld
Removed /etc/systemd/system/multi-user.target.wants/firewalld.service.
Removed /etc/systemd/system/dbus-org.fedoraproject.FirewallD1.service.

### 关闭SELINUX[root@controller ~]# setenforce 0[root@controller ~]# sed -i 's/SELINUX=enforcing/SELINUX=disabled/g' /etc/selinux/config### 关闭NetworkManager[root@controller ~]# systemctl stop NetworkManager[root@controller ~]# systemctl disable NetworkManager
Removed /etc/systemd/system/multi-user.target.wants/NetworkManager.service.
Removed /etc/systemd/system/dbus-org.freedesktop.nm-dispatcher.service.
Removed /etc/systemd/system/network-online.target.wants/NetworkManager-wait-online.service.
- 计算节点
### 网卡配置[root@tmp ~]# hostnamectl set-hostname computer[root@tmp ~]# hostname
computer

[root@tmp ~]# cd /etc/sysconfig/network-scripts/[root@tmp network-scripts]# ls
ifcfg-ens160
[root@tmp network-scripts]# vi ifcfg-ens160 [root@tmp network-scripts]# cat ifcfg-ens160
TYPE=Ethernet
BOOTPROTO=none
NAME=ens160
DEVICE=ens160
ONBOOT=yes
IPADDR=192.168.129.186
NETMASK=255.255.255.0
GATEWAY=192.168.129.2
DNS1=192.168.129.2
[root@tmp network-scripts]# ### 可以再配置完ip之后关机拍摄快照
根据实际情况给处理器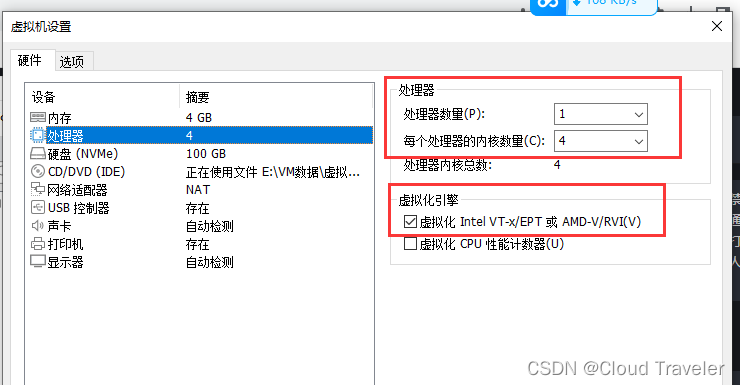
### 关闭防火墙[root@computer ~]# systemctl stop firewalld[root@computer ~]# systemctl disable firewalld
Removed /etc/systemd/system/multi-user.target.wants/firewalld.service.
Removed /etc/systemd/system/dbus-org.fedoraproject.FirewallD1.service.

### 关闭SELINUX[root@computer ~]# setenforce 0[root@computer ~]# sed -i 's/SELINUX=enforcing/SELINUX=disabled/g' /etc/selinux/config### 关闭NetworkManager[root@computer ~]# systemctl stop NetworkManager[root@computer ~]# systemctl disable NetworkManager
Removed /etc/systemd/system/multi-user.target.wants/NetworkManager.service.
Removed /etc/systemd/system/dbus-org.freedesktop.nm-dispatcher.service.
Removed /etc/systemd/system/network-online.target.wants/NetworkManager-wait-online.service.
配置ip及主机名安装基础包
- 控制节点
### 配置ip及主机名[root@controller ~]# vi /etc/hosts[root@controller ~]# cat /etc/hosts
127.0.0.1   localhost localhost.localdomain localhost4 localhost4.localdomain4
::1         localhost localhost.localdomain localhost6 localhost6.localdomain6
192.168.129.185 controller
192.168.129.186 computer

[root@controller ~]# ping computer### 安装基础包[root@controller ~]# yum install -y vim net-tools bash-completion chrony.x86_64 centos-release-openstack-victoria.noarch
- 计算节点
### 配置ip及主机名[root@computer ~]# vi /etc/hosts[root@computer ~]# cat /etc/hosts
127.0.0.1   localhost localhost.localdomain localhost4 localhost4.localdomain4
::1         localhost localhost.localdomain localhost6 localhost6.localdomain6
192.168.129.185 controller
192.168.129.186 computer
[root@computer ~]# ping controller### 安装基础包[root@computer ~]# yum install -y vim net-tools bash-completion chrony.x86_64 centos-release-openstack-victoria.noarch
如果在安装基础包出错,重启之后没有ip,可以重启 NetworkManager,再讲其关闭
NTP时间同步配置
Linux 8 版本开始默认不再支持
ntpdate工具,换用
chronyd进行同步
- 控制节点
[root@controller ~]#  vi /etc/chrony.conf# Please consider joining the pool (http://www.pool.ntp.org/join.html).#pool 2.centos.pool.ntp.org iburst
sever  pool ntp.aliyun.com iburst     ### 配置了阿里云ntp# Record the rate at which the system clock gains/losses time.
driftfile /var/lib/chrony/drift
..............### 启动服务[root@controller ~]# systemctl start chronyd.service
Job for chronyd.service failed because the control process exited with error code.
See "systemctl status chronyd.service" and "journalctl -xe"for details.
[root@controller ~]# systemctl enable chronyd.service
- 计算节点
[root@computer ~]# vi /etc/chrony.conf# Please consider joining the pool (http://www.pool.ntp.org/join.html).#pool 2.centos.pool.ntp.org iburst
sever  pool ntp.aliyun.com iburst     ### 配置了阿里云ntp# Record the rate at which the system clock gains/losses time.
driftfile /var/lib/chrony/drift
..............### 启动服务[root@computer ~]# systemctl start chronyd.service
Job for chronyd.service failed because the control process exited with error code.
See "systemctl status chronyd.service" and "journalctl -xe"for details.
[root@computer ~]# systemctl enable chronyd.service
配置YUM源
- 控制节点
[root@controller ~]# mkdir /etc/yum.repos.d/bak[root@controller ~]# mv /etc/yum.repos.d/*.repo /etc/yum.repos.d/bak/[root@controller ~]# cat <<EOF > /etc/yum.repos.d/cloudcs.repo[highavailability]
name=CentOS Stream 8 - HighAvailability
baseurl=https://mirrors.aliyun.com/centos/8-stream/HighAvailability/x86_64/os/
gpgkey=file:///etc/pki/rpm-gpg/RPM-GPG-KEY-centosofficial
gpgcheck=1
repo_gpgcheck=0
metadata_expire=6h
countme=1
enabled=1

[nfv]
name=CentOS Stream 8 - NFV
baseurl=https://mirrors.aliyun.com/centos/8-stream/NFV/x86_64/os/
gpgkey=file:///etc/pki/rpm-gpg/RPM-GPG-KEY-centosofficial
gpgcheck=1
repo_gpgcheck=0
metadata_expire=6h
countme=1
enabled=1

[rt]
name=CentOS Stream 8 - RT
baseurl=https://mirrors.aliyun.com/centos/8-stream/RT/x86_64/os/
gpgkey=file:///etc/pki/rpm-gpg/RPM-GPG-KEY-centosofficial
gpgcheck=1
repo_gpgcheck=0
metadata_expire=6h
countme=1
enabled=1

[resilientstorage]
name=CentOS Stream 8 - ResilientStorage
baseurl=https://mirrors.aliyun.com/centos/8-stream/ResilientStorage/x86_64/os/
gpgkey=file:///etc/pki/rpm-gpg/RPM-GPG-KEY-centosofficial
gpgcheck=1
repo_gpgcheck=0
metadata_expire=6h
countme=1
enabled=1

[extras-common]
name=CentOS Stream 8 - Extras packages
baseurl=https://mirrors.aliyun.com/centos/8-stream/extras/x86_64/extras-common/
gpgkey=file:///etc/pki/rpm-gpg/RPM-GPG-KEY-CentOS-SIG-Extras-SHA512
gpgcheck=1
repo_gpgcheck=0
metadata_expire=6h
countme=1
enabled=1

[extras]
name=CentOS Stream $releasever - Extras
mirrorlist=http://mirrorlist.centos.org/?release=$stream&arch=$basearch&repo=extras&infra=$infra#baseurl=http://mirror.centos.org/$contentdir/$stream/extras/$basearch/os/
baseurl=https://mirrors.aliyun.com/centos/8-stream/extras/x86_64/os/
gpgcheck=1
enabled=1
gpgkey=file:///etc/pki/rpm-gpg/RPM-GPG-KEY-centosofficial

[centos-ceph-pacific]
name=CentOS - Ceph Pacific
baseurl=https://mirrors.aliyun.com/centos/8-stream/storage/x86_64/ceph-pacific/
gpgcheck=0
enabled=1
gpgkey=file:///etc/pki/rpm-gpg/RPM-GPG-KEY-CentOS-SIG-Storage

[centos-rabbitmq-38]
name=CentOS-8 - RabbitMQ 38
baseurl=https://mirrors.aliyun.com/centos/8-stream/messaging/x86_64/rabbitmq-38/
gpgcheck=1
enabled=1
gpgkey=file:///etc/pki/rpm-gpg/RPM-GPG-KEY-CentOS-SIG-Messaging

[centos-nfv-openvswitch]
name=CentOS Stream 8 - NFV OpenvSwitch
baseurl=https://mirrors.aliyun.com/centos/8-stream/nfv/x86_64/openvswitch-2/
gpgcheck=1
enabled=1
gpgkey=file:///etc/pki/rpm-gpg/RPM-GPG-KEY-CentOS-SIG-NFV
module_hotfixes=1

[baseos]
name=CentOS Stream 8 - BaseOS
baseurl=https://mirrors.aliyun.com/centos/8-stream/BaseOS/x86_64/os/
gpgkey=file:///etc/pki/rpm-gpg/RPM-GPG-KEY-centosofficial
gpgcheck=1
repo_gpgcheck=0
metadata_expire=6h
countme=1
enabled=1

[appstream]
name=CentOS Stream 8 - AppStream
baseurl=https://mirrors.aliyun.com/centos/8-stream/AppStream/x86_64/os/
gpgkey=file:///etc/pki/rpm-gpg/RPM-GPG-KEY-centosofficial
gpgcheck=1
repo_gpgcheck=0
metadata_expire=6h
countme=1
enabled=1

[centos-openstack-victoria]
name=CentOS 8 - OpenStack victoria
baseurl=https://mirrors.aliyun.com/centos/8-stream/cloud/x86_64/openstack-victoria/
#baseurl=https://repo.huaweicloud.com/centos/8-stream/cloud/x86_64/openstack-yoga/
gpgcheck=1
enabled=1
gpgkey=file:///etc/pki/rpm-gpg/RPM-GPG-KEY-CentOS-SIG-Cloud
module_hotfixes=1

[powertools]
name=CentOS Stream 8 - PowerTools
#mirrorlist=http://mirrorlist.centos.org/?release=$stream&arch=$basearch&repo=PowerTools&infra=$infra
baseurl=https://mirrors.aliyun.com/centos/8-stream/PowerTools/x86_64/os/
gpgcheck=1
enabled=1
gpgkey=file:///etc/pki/rpm-gpg/RPM-GPG-KEY-centosofficial
EOF

[root@controller ~]# ls /etc/yum.repos.d/
bak  cloudcs.repo
[root@controller ~]# yum clean all
27 files removed
[root@controller ~]# yum repolist all
repo id                           repo name                                   status
appstream                         CentOS Stream 8 - AppStream                 enabled
baseos                            CentOS Stream 8 - BaseOS                    enabled
centos-ceph-pacific               CentOS - Ceph Pacific                       enabled
centos-nfv-openvswitch            CentOS Stream 8 - NFV OpenvSwitch           enabled
centos-openstack-victoria         CentOS 8 - OpenStack victoria               enabled
centos-rabbitmq-38                CentOS-8 - RabbitMQ 38                      enabled
extras                            CentOS Stream  - Extras                     enabled
extras-common                     CentOS Stream 8 - Extras packages           enabled
highavailability                  CentOS Stream 8 - HighAvailability          enabled
nfv                               CentOS Stream 8 - NFV                       enabled
powertools                        CentOS Stream 8 - PowerTools                enabled
resilientstorage                  CentOS Stream 8 - ResilientStorage          enabled
rt                                CentOS Stream 8 - RT                        enabled
[root@controller ~]#
- 计算节点
[root@computer ~]# mkdir /etc/yum.repos.d/bak[root@computer ~]# mv /etc/yum.repos.d/*.repo /etc/yum.repos.d/bak/### 通过远程拷贝方式将 控制节点 yum 文件,拉取到计算节点[root@compute ~]# scp controller:/etc/yum.repos.d/cloudcs.repo /etc/yum.repos.d/
The authenticity of host 'controller (192.168.100.128)' can't be established.
ECDSA key fingerprint is SHA256:0wisA68htG476jVggvEX5wWHxAK9nmDDWXzLAmwP8as.
Are you sure you want to continue connecting (yes/no/[fingerprint])? yes
Warning: Permanently added 'controller,192.168.100.128' (ECDSA) to the list of known hosts.
root@controller's password:
cloudcs.repo

[root@computer ~]# [root@computer ~]# ls /etc/yum.repos.d/
bak  cloudcs.repo
[root@computer ~]# yum clean all
27 files removed
[root@computer ~]# yum repolist  all
repo id                           repo name                                   status
appstream                         CentOS Stream 8 - AppStream                 enabled
baseos                            CentOS Stream 8 - BaseOS                    enabled
centos-ceph-pacific               CentOS - Ceph Pacific                       enabled
centos-nfv-openvswitch            CentOS Stream 8 - NFV OpenvSwitch           enabled
centos-openstack-victoria         CentOS 8 - OpenStack victoria               enabled
centos-rabbitmq-38                CentOS-8 - RabbitMQ 38                      enabled
extras                            CentOS Stream  - Extras                     enabled
extras-common                     CentOS Stream 8 - Extras packages           enabled
highavailability                  CentOS Stream 8 - HighAvailability          enabled
nfv                               CentOS Stream 8 - NFV                       enabled
powertools                        CentOS Stream 8 - PowerTools                enabled
resilientstorage                  CentOS Stream 8 - ResilientStorage          enabled
rt                                CentOS Stream 8 - RT                        enabled
[root@computer ~]#
安装配置
控制节点安装 PackStack 工具
[root@controller ~]# yum install -y openstack-packstack..............
  rubygems-2.7.6.3-110.module_el8.6.0+1187+541216eb.noarch
  yaml-cpp-0.6.3-1.el8.x86_64
Complete!
生成应答文件
[root@controller ~]# packstack --help | grep ans
  --gen-answer-file=GEN_ANSWER_FILE
                        Generate a template of an answer file.
  --validate-answer-file=VALIDATE_ANSWER_FILE
                        Check if answerfile contains unexpected options.
  --answer-file=ANSWER_FILE
                        answerfile will also be generated and should be used
  -o, --options         Print details on options available in answer file(rst
                        Packstack a second time with the same answer file and
                        attribute where "y" means an account is disabled.
    --manila-netapp-transport-type=MANILA_NETAPP_TRANSPORT_TYPE
                        The transport protocol used when communicating with

[root@controller ~]# packstack --gen-answer-file=memeda.txt   ## 指定文件路径名称
Packstack changed given value  to required value /root/.ssh/id_rsa.pub
Additional information:
 * Parameter CONFIG_NEUTRON_L2_AGENT: You have chosen OVN Neutron backend. Note that this backend does not support the VPNaaS plugin. Geneve will be used as the encapsulation method for tenant networks
编辑应答文件
注意设置参数
CONFIG_NEUTRON_OVN_BRIDGE_IFACES,OVN 会自动创建 br-ex 虚拟交换机并使 ens160 桥接到 br-ex 虚拟交换机上,未来云主机通过 br-ex 可以连通外部网络。
[root@controller ~]# cat /etc/redhat-release
CentOS Stream release 8

[root@controller ~]# vi memeda.txt

92 # Server on which to install OpenStack services specific to the
93 # controller role (for example, API servers or dashboard).
94 CONFIG_CONTROLLER_HOST=192.168.129.185
95
### 要安装计算服务的服务器。我们在计算和控制节点都安装,复用
96 # List the servers on which to install the Compute service.
97 CONFIG_COMPUTE_HOSTS=192.168.129.185,192.168.129.186

### 身份验证密码
322 # Password to use for the Identity service 'admin' user.
323 CONFIG_KEYSTONE_ADMIN_PW=redhat

### 创建测试用例,关闭
1168 # Specify 'y' to provision for demo usage and testing. ['y', 'n']
1169 CONFIG_PROVISION_DEMO=n

### 编排组件
59 # Specify 'y' to install OpenStack Orchestration (heat). ['y', 'n        ']
60 CONFIG_HEAT_INSTALL=y

### 桥接,映射射到自己控制节点的网卡
907 # ovn-bridge-mappings=ext-net:br-ex --os-neutron-ovn-bridge-
908 # interfaces=br-ex:eth0
909 CONFIG_NEUTRON_OVN_BRIDGE_IFACES=br-ex:ens160   -------注意自己网卡
执行应答文件进行安装
### 大概需要等待30分钟[root@controller ~]# packstack --answer-file=memeda.txt
Welcome to the Packstack setup utility

The installation log file is available at: /var/tmp/packstack/20230806-151155-lamn_upk/openstack-setup.log

Installing:
Clean Up                                             [ DONE ]
Discovering ip protocol version                      [ DONE ]
[email protected]'s password:          ### 输入两台节点密码
[email protected]'s password:          ### 输入两台节点密码
Setting up ssh keys                                  [ DONE ]
Preparing servers                                    [ DONE ]
Pre installing Puppet and discovering hosts' details [ DONE ]
Preparing pre-install entries                        [ DONE ]
Setting up CACERT                                    [ DONE ]
Preparing AMQP entries                               [ DONE ]
Preparing MariaDB entries                            [ DONE ]
Fixing Keystone LDAP config parameters to be undef if empty[ DONE ]
Preparing Keystone entries                           [ DONE ]
Preparing Glance entries                             [ DONE ]
Checking if the Cinder server has a cinder-volumes vg[ DONE ]
Preparing Cinder entries                             [ DONE ]
Preparing Nova API entries                           [ DONE ]
Creating ssh keys for Nova migration                 [ DONE ]
Gathering ssh host keys for Nova migration           [ DONE ]
Preparing Nova Compute entries                       [ DONE ]
Preparing Nova Scheduler entries                     [ DONE ]
Preparing Nova VNC Proxy entries                     [ DONE ]
Preparing OpenStack Network-related Nova entries     [ DONE ]
Preparing Nova Common entries                        [ DONE ]
Preparing Neutron API entries                        [ DONE ]
Preparing Neutron L3 entries                         [ DONE ]
Preparing Neutron L2 Agent entries                   [ DONE ]
Preparing Neutron DHCP Agent entries                 [ DONE ]
Preparing Neutron Metering Agent entries             [ DONE ]
Checking if NetworkManager is enabled and running    [ DONE ]
Preparing OpenStack Client entries                   [ DONE ]
Preparing Horizon entries                            [ DONE ]
Preparing Swift builder entries                      [ DONE ]
Preparing Swift proxy entries                        [ DONE ]
Preparing Swift storage entries                      [ DONE ]
Preparing Heat entries                               [ DONE ]
Preparing Heat CloudFormation API entries            [ DONE ]
Preparing Gnocchi entries                            [ DONE ]
Preparing Redis entries                              [ DONE ]
Preparing Ceilometer entries                         [ DONE ]
Preparing Aodh entries                               [ DONE ]
Preparing Puppet manifests                           [ DONE ]
Copying Puppet modules and manifests                 [ DONE ]
Applying 192.168.129.185_controller.pp
192.168.129.185_controller.pp:                       [ DONE ]
Applying 192.168.129.185_network.pp
192.168.129.185_network.pp:                          [ DONE ]
Applying 192.168.129.186_compute.pp
Applying 192.168.129.185_compute.pp
192.168.129.185_compute.pp:                          [ DONE ]
192.168.129.186_compute.pp:                          [ DONE ]
Applying Puppet manifests                            [ DONE ]
Finalizing                                           [ DONE ]

 **** Installation completed successfully ******

Additional information:
 * Parameter CONFIG_NEUTRON_L2_AGENT: You have chosen OVN Neutron backend. Note that this backend does not support the VPNaaS plugin. Geneve will be used as the encapsulation method for tenant networks
 * Time synchronization installation was skipped. Please note that unsynchronized time on server instances might be problem for some OpenStack components.
 * File /root/keystonerc_admin has been created on OpenStack client host 192.168.129.185. To use the command line tools you need to source the file.
 * To access the OpenStack Dashboard browse to http://192.168.129.185/dashboard .
Please, find your login credentials stored in the keystonerc_admin in your home directory.
 * The installation log file is available at: /var/tmp/packstack/20230806-151155-lamn_upk/openstack-setup.log
 * The generated manifests are available at: /var/tmp/packstack/20230806-151155-lamn_upk/manifests
完成安装
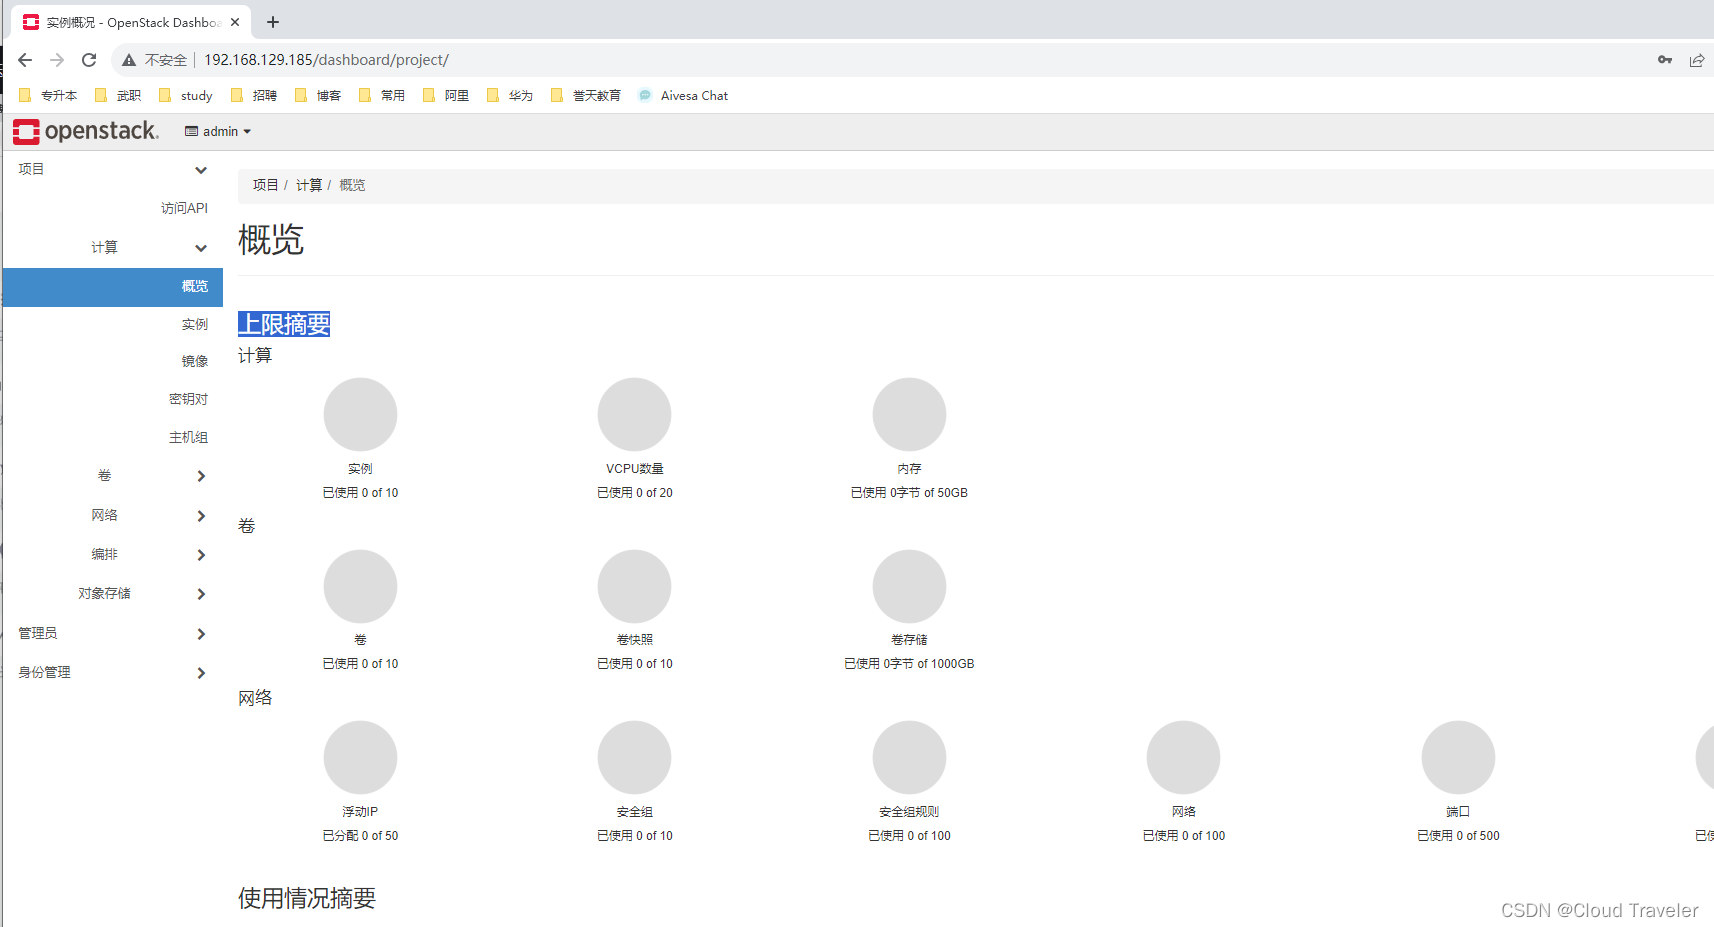
测试登录
打开浏览器,访问
http://192.168.129.185/dashboard账号:admin
密码:redhat
开启network
- 控制节点
因关闭 NetworkManager 服务,会导致节点重启后网络无法自动启用,也会导致 openstack 组件异常,所以启用 network 来替代 NetworkManager 服务。
[root@controller ~]# systemctl enable network
network.service is not a native service, redirecting to systemd-sysv-install.
Executing: /usr/lib/systemd/systemd-sysv-install enable network
[root@controller ~]# systemctl start  network
- 计算节点
[root@computer ~]# systemctl enable network
network.service is not a native service, redirecting to systemd-sysv-install.
Executing: /usr/lib/systemd/systemd-sysv-install enable network
[root@computer ~]# systemctl start  network
- 补充
- 在使用 Packstack 工具搭建 OpenStack 时需要关闭 NetworkManager 而开启并使用network,主要是因为OpenStack 环境对网络的要求和配置与NetworkManager的工作方式不太适配NetworkManager是一个用于图形和命令行环境下的网络管理工具,旨在为桌面用户提供便捷的网络配置。它能够处理各种网络类型,包括有线、无线、蓝牙等,并根据网络环境进行动态管理。然而,在 OpenStack 环境中,网络需求通常更加复杂,需要更多的控制和自定义。
- OpenStack是一个用于搭建云基础设施的开源平台,涉及到多个虚拟机、网络、存储等组件的配置和管理。在 OpenStack 环境中,网络通常需要进行高度定制和精细控制,以满足不同的租户和应用场景的需求。这与 NetworkManager 提供的自动化和动态网络管理方式不太吻合。
- 而采用传统的 network 服务,您可以更精确地配置和管理网络接口、IP 地址、路由等参数以满足OpenStack环境中的复杂网络需求。这对于创建虚拟网络、隔离租户、实现网络互通等 OpenStack 功能非常重要。
- 因此,为了确保 OpenStack 环境的网络配置能够精确地满足其需求,通常会建议在搭建OpenStack 时关闭 NetworkManager,使用传统的 network 服务来进行网络配置。这样可以更好地控制和调整网络参数,以确保 OpenStack 网络的稳定性和性能
- End
本文转载自: https://blog.csdn.net/weixin_62782025/article/details/132138633
版权归原作者 Cloud Traveler 所有, 如有侵权,请联系我们删除。
版权归原作者 Cloud Traveler 所有, 如有侵权,请联系我们删除。