
简介
densenet网络是CVPR 2017 (Best Paper Award),这篇论文是在Stochastic Depth的启发下提出的。densenet和Stochastic Depth都是清华的黄高博士提出的。关于densenet的详细介绍可以看【0】,关于Stochastic Depth的详细介绍可以看【1】。
论文链接:https://arxiv.org/pdf/1608.06993.pdf
代码的github链接:https://github.com/liuzhuang13/DenseNet
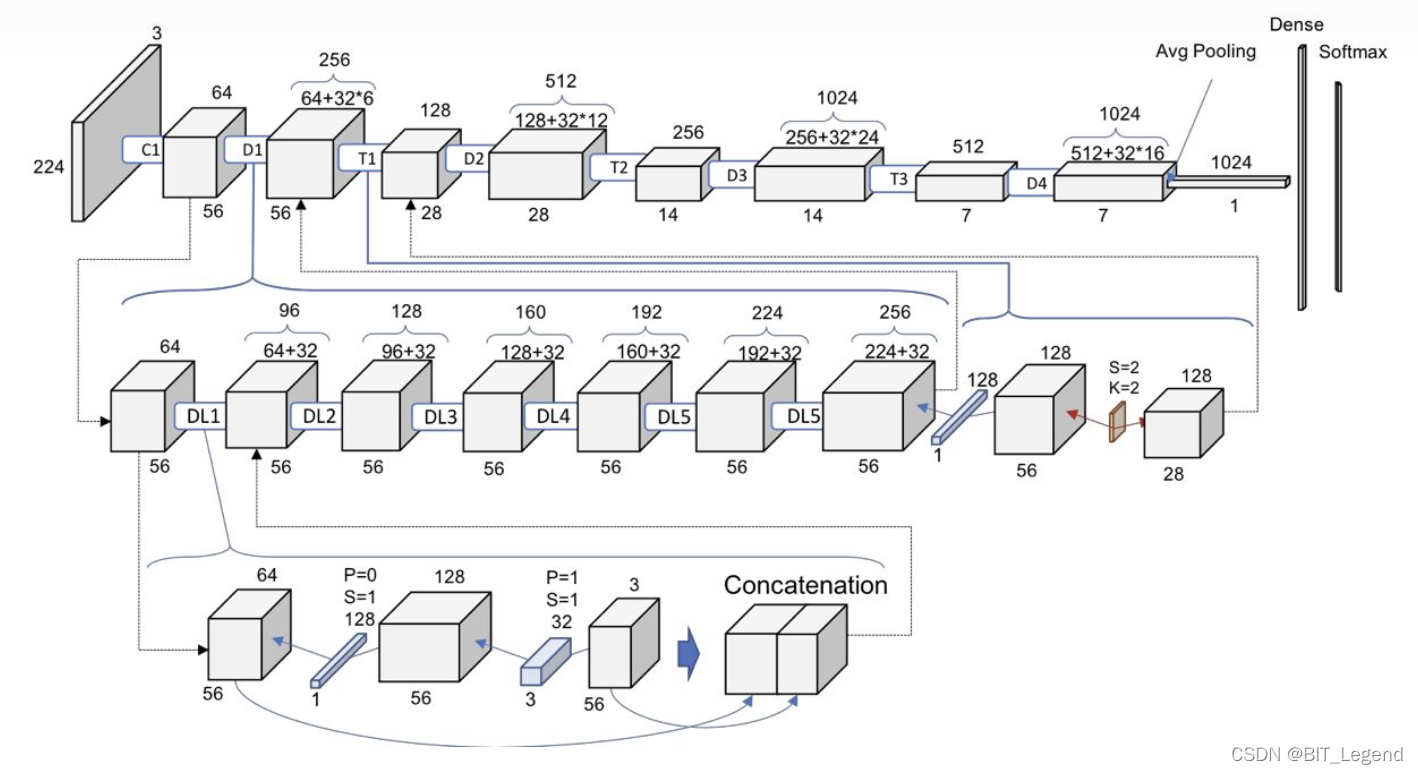
DenseNet(密集卷积网络)的核心思想是密集连接,即某层的输入除了包含前一层的输出外还包含前面所有层的输出,因此L层的模型会有L(L-1)/2个连接,具体结构图如下图所示,DenseNet的几个优点是:
1,减轻了消失梯度(梯度消失)
2,加强了特征的传递
3,更有效地利用了特征
4,一定程度上较少了参数数量
在保证网络中层与层之间最大程度的信息传输的前提下,直接将所有层连接起来!

模型细节
整个densenet模型主要包含三个核心细节结构,分别是DenseLayer(整个模型最基础的原子单元,完成一次最基础的特征提取,如下图第三行)、DenseBlock(整个模型密集连接的基础单元,如下图第二行左侧部分)和Transition(不同密集连接之间的过度单元,如下图第二行右侧部分),通过以上结构的拼接+分类层即可完成整个模型的搭建。
DenseLayer层包含BN + Relu + 11Conv + BN + Relu + 33Conv。第L个DenseLayer层的第一个11Conv的输入通道层数为num_input_features+(L-1)growth_rate,输出通道层数为bn_sizegrowth_rate;第二个33Conv的输入通道数为bn_size*growth_rate,输出通道数为growth_rate。整个DenseLayer层内特征层宽度不变,不存在stride=2或者池化的情况。这里有一点特殊之处,DenseLayer层的第一个结构是BN层而不是像其它模型那样是Conv。在BN层前面还存在一个Concatenation操作,负责本DenseBlock模块内前面所有层的输出以及第一层的输出进行拼接操作,
DenseBlock模块其实就是堆叠一定数量的DenseLayer层,在整个DenseBlock模块内不同DenseLayer层之间会发生密集连接,在DenseBlock模块内特征层宽度不变,不存在stride=2或者池化的情况。
Transition模块包含BN + Relu + 11Conv + 22AvgPool,11Conv负责降低通道数,22AvgPool负责降低特征层宽度,降低到1/2。Transition模块的作用是连接不同的DenseBlock模块,之所以这样设计原因是,密接连接必须保证特征层的宽度是一致的,原因是连接方式为沿通道维拼接,如果整个模型都采用密集连接,那势必导致整个模型从输入到输出特征层宽度都不变,那最后无法完成分类任务,也无法压缩特征。
模型可能优点
更强的梯度流动:
DenseNet可以说是一种隐式的强监督模式,因为每一层都建立起了与前面层的连接,误差信号可以很容易地传播到较早的层,所以较早的层可以从最终分类层获得直接监管。
参数更少计算效率更高
在ResNet中,参数量与CC成正比,而在DenseNet中参数量与lk*k成正比,因为k远小于C,所以DenseNet的参数量小得多。
保存了低维度的特征
在标准的卷积网络中,最终输出只会利用提取最高层次的特征。而在DenseNet中,它使用了不同层次的特征,它倾向于给出更平滑的决策边界。这也解释了为什么训练数据不足时DenseNet表现依旧良好。
模型效果
该文章提出的DenseNet核心思想在于建立了不同层之间的连接关系,充分利用了功能,进一步减轻了梯度消失问题,加深网络不是问题,而且训练效果非常好。另外,利用瓶颈层,翻译层以及较小的增长率使得网络变窄,参数减少,有效抑制了过拟合,同时计算量也减少了DenseNet优点很多,而且在和RESNET的对比中优势还是非常明显的。【2】
模型代码
改代码修改自torch官方代码
# 根据torch官方代码修改的densenet代码
# 模型下载地址:
#           121 --- https://download.pytorch.org/models/densenet121-a639ec97.pth
#           161 --- https://download.pytorch.org/models/densenet161-8d451a50.pth
#           169 --- https://download.pytorch.org/models/densenet169-b2777c0a.pth
#           201 --- https://download.pytorch.org/models/densenet201-c1103571.pth

from collections import OrderedDict
from typing import Any, Tuple

import torch
import torch.nn as nn
import torch.nn.functional as F
from torch import Tensor

# 定义了当你使用 from <module> import * 导入某个模块的时候能导出的符号
__all__ = [
    "densenet121",
    "densenet161",
    "densenet169",
    "densenet201",
]

# 定义densenet的最基本模块,包含BN1 + relu1 + conv1 + BN2 + relu2 + conv2 + dropout,注意这里是BN在最前面,一般别的模型都是conv在前
class _DenseLayer(nn.Module):
    def __init__(
        self, num_input_features: int, growth_rate: int, bn_size: int, drop_rate: float, memory_efficient: bool = False
    ) -> None:
        super().__init__()
        self.norm1: nn.BatchNorm2d                                    # 定义norm1这个字段并提前赋予数据类型
        self.add_module("norm1", nn.BatchNorm2d(num_input_features))  # 对定义的norm1字段进行赋值
        self.relu1: nn.ReLU
        self.add_module("relu1", nn.ReLU(inplace=True))
        self.conv1: nn.Conv2d
        self.add_module(                                              # 第一个卷积模块输出通道数是bn_size * growth_rate
            "conv1", nn.Conv2d(num_input_features, bn_size * growth_rate, kernel_size=1, stride=1, bias=False)
        )
        self.norm2: nn.BatchNorm2d
        self.add_module("norm2", nn.BatchNorm2d(bn_size * growth_rate))
        self.relu2: nn.ReLU
        self.add_module("relu2", nn.ReLU(inplace=True))
        self.conv2: nn.Conv2d
        self.add_module(                                              # 第二个卷积模块输出通道数是growth_rate
            "conv2", nn.Conv2d(bn_size * growth_rate, growth_rate, kernel_size=3, stride=1, padding=1, bias=False)
        )
        self.drop_rate = float(drop_rate)

    def forward(self, input: Tensor) -> Tensor:
        prev_features = input
        new_features0 = torch.cat(prev_features, 1)                   # 每一个最基本模块的输入通道是init_num + (n - 1) * growth_rate
        new_features1 = self.conv1(self.relu1(self.norm1(new_features0)))  # 第一个卷积输出通道bn_size * growth_rate
        new_features2 = self.conv2(self.relu2(self.norm2(new_features1)))  # 第二个卷积输出通道growth_rate
        if self.drop_rate > 0:                                        # 每一个最基本模块的输出通道是growth_rate
            new_features2 = F.dropout(new_features2, p=self.drop_rate, training=self.training)  # 当前使用时,没有启用这一层
        return new_features2

# 定义densenet的大模块,包含num_layers个最基本模块,这个num_layers个最基本模块遵循密集连接的原则
# nn.ModuleDict可以以字典的形式向nn.ModuleDict中输入子模块,也可以以add_module()的形式向nn.ModuleDict中输入子模块
# 但是nn.ModuleDict类似于nn.Module需要自己实现forward()函数,类似的模块还有nn.ModuleList以列表形式搭建模型
# 所以说白了nn.Sequential,nn.Module,nn.ModuleList,nn.ModuleDict是搭建模型或模块的四种方式,是并行的关系,可以根据不同应用条件下使用
# https://blog.csdn.net/weixin_42486623/article/details/122822580
class _DenseBlock(nn.ModuleDict):

    def __init__(
        self,
        num_layers: int,
        num_input_features: int,
        bn_size: int,
        growth_rate: int,
        drop_rate: float,
    ) -> None:
        super().__init__()
        for i in range(num_layers):
            layer = _DenseLayer(
                num_input_features + i * growth_rate, growth_rate=growth_rate, bn_size=bn_size, drop_rate=drop_rate
            )
            self.add_module("denselayer%d" % (i + 1), layer)   # 以add_module()形式输入子模块

    def forward(self, init_features: Tensor) -> Tensor:
        features = [init_features]
        for name, layer in self.items():                       # 以items()形式访问子模块
            new_features = layer(features)
            features.append(new_features)
        return torch.cat(features, 1)

# 定义densenet的大模块,用于拼接_DenseBlock模块,在本模块内通过均值池化将空间尺寸减小一半
# torch.nn.Sequential相当于tf2.0中的keras.Sequential(),其实就是以最简单的方式搭建序列模型,不需要写forward()函数,
# 直接以列表形式将每个子模块送进来就可以了,或者也可以使用OrderedDict()或add_module()的形式向模块中添加子模块
# https://blog.csdn.net/weixin_42486623/article/details/122822580
class _Transition(nn.Sequential):
    def __init__(self, num_input_features: int, num_output_features: int) -> None:
        super().__init__()
        self.add_module("norm", nn.BatchNorm2d(num_input_features))
        self.add_module("relu", nn.ReLU(inplace=True))
        self.add_module("conv", nn.Conv2d(num_input_features, num_output_features, kernel_size=1, stride=1, bias=False))
        self.add_module("pool", nn.AvgPool2d(kernel_size=2, stride=2))

# 根据block_config参数配置列表搭建整个densenet模型
class DenseNet(nn.Module):

    def __init__(
        self,
        growth_rate: int = 32,
        block_config: Tuple[int, int, int, int] = (6, 12, 24, 16),
        num_init_features: int = 64,
        bn_size: int = 4,
        drop_rate: float = 0,
        num_classes: int = 1000,
    ) -> None:

        super().__init__()

        ### 搭建第一层,即stem层,包含conv + BN + relu + maxpool,以字典的形式向nn.Sequential中添加子模块
        self.features = nn.Sequential(        # 用nn.Sequential搭建一个子模块,不需要重写forward()函数
            OrderedDict(
                [
                    ("conv0", nn.Conv2d(3, num_init_features, kernel_size=7, stride=2, padding=3, bias=False)),
                    ("norm0", nn.BatchNorm2d(num_init_features)),
                    ("relu0", nn.ReLU(inplace=True)),
                    ("pool0", nn.MaxPool2d(kernel_size=3, stride=2, padding=1)),
                ]
            )
        )

        ### 搭建bottleneck层,包含4个_DenseBlock大模块和4个_Transition大模块
        num_features = num_init_features
        for i, num_layers in enumerate(block_config):
            block = _DenseBlock(
                num_layers=num_layers,
                num_input_features=num_features,
                bn_size=bn_size,
                growth_rate=growth_rate,
                drop_rate=drop_rate,
            )
            self.features.add_module("denseblock%d" % (i + 1), block)
            num_features = num_features + num_layers * growth_rate
            if i != len(block_config) - 1:
                trans = _Transition(num_input_features=num_features, num_output_features=num_features // 2)
                self.features.add_module("transition%d" % (i + 1), trans)
                num_features = num_features // 2  # _Transition模块不仅将空间尺寸减半还将通道尺寸减半
        self.features.add_module("norm5", nn.BatchNorm2d(num_features))

        ### 搭建最后的分类层
        self.classifier = nn.Linear(num_features, num_classes)

        # 参数初始化
        for m in self.modules():
            if isinstance(m, nn.Conv2d):
                nn.init.kaiming_normal_(m.weight)
            elif isinstance(m, nn.BatchNorm2d):
                nn.init.constant_(m.weight, 1)
                nn.init.constant_(m.bias, 0)
            elif isinstance(m, nn.Linear):
                nn.init.constant_(m.bias, 0)

    def forward(self, x: Tensor) -> Tensor:
        features = self.features(x)
        out = F.relu(features, inplace=True)
        out = F.adaptive_avg_pool2d(out, (1, 1))
        out = torch.flatten(out, 1)
        out = self.classifier(out)
        return out

##############################################################################################################################
## 通过修改配置列表实现不同模型的定义
def densenet121(**kwargs: Any) -> DenseNet:
    return DenseNet(32, (6, 12, 24, 16), 64, **kwargs)

def densenet161(**kwargs: Any) -> DenseNet:
    return DenseNet(48, (6, 12, 36, 24), 96, **kwargs)

def densenet169(**kwargs: Any) -> DenseNet:
    return DenseNet(32, (6, 12, 32, 32), 64, **kwargs)

def densenet201(**kwargs: Any) -> DenseNet:
    return DenseNet(32, (6, 12, 48, 32), 64, **kwargs)

if __name__ == "__main__":
    import torchvision.transforms as transforms
    from PIL import Image
    import re

    # 等比例拉伸图片,多余部分填充value
    def resize_padding(image, target_length, value=0):
        h, w = image.size                                   # 获得原始尺寸
        ih, iw = target_length, target_length               # 获得目标尺寸
        scale = min(iw/w, ih/h)                             # 实际拉伸比例
        nw, nh  = int(scale * w), int(scale * h)            # 实际拉伸后的尺寸
        image_resized = image.resize((nh, nw), Image.ANTIALIAS)    # 实际拉伸图片
        image_paded = Image.new("RGB", (ih, iw), value)
        dw, dh = (iw - nw) // 2, (ih-nh) // 2
        image_paded.paste(image_resized, (dh, dw, nh+dh, nw+dw))   # 居中填充图片
        return image_paded

    # 变换函数
    transform=transforms.Compose([transforms.ToTensor(), transforms.Normalize([0.485, 0.456, 0.406], [0.229, 0.224, 0.225])])

    # 读取图片并预处理
    image = resize_padding(Image.open("./car.jpg"), 224)
    image = transform(image)
    image = image.reshape(1, 3, 224, 224)

    # 建立模型并恢复权重
    weight_path = "./checkpoint/densenet121-a639ec97.pth"  # 这个预训练权重是老版本torch生成的,当时模块的命名允许出现"."
    pre_weights = torch.load(weight_path)  # 但是最新的torch不允许出现".",所以老版权重恢复进新版模型时需要修改一下模块命名
    pattern = re.compile(r"^(.*denselayer\d+\.(?:norm|relu|conv))\.((?:[12])\.(?:weight|bias|running_mean|running_var))$")
    for key in list(pre_weights.keys()):   # 主要是新版模型中的最基础模块的命名是类似于...denselayer1.conv1.weight
        res = pattern.match(key)           # 而老版本权重的命名类似于               ...denselayer1.conv.1.weight
        if res:                            # 所以需要正则表达式去老版本权重的key中匹配一下,一旦匹配成功就修改为最新模型的权重名称
            new_key = res.group(1) + res.group(2)  # 正则表达式中()的作用是提取满足匹配要求的字符串,group(0)就是匹配正则表达式整体结果
            pre_weights[new_key] = pre_weights[key]
            del pre_weights[key]
    model = densenet121()
    model.load_state_dict(pre_weights)
    # print(model)

    # 单张图片推理
    model.cpu().eval()     # .eval()用于通知BN层和dropout层,采用推理模式而不是训练模式
    with torch.no_grad():  # torch.no_grad()用于整体修改模型中每一层的requires_grad属性,使得所有可训练参数不能修改,且正向计算时不保存中间过程,以节省内存
        output = torch.squeeze(model(image))
        predict = torch.softmax(output, dim=0)
        predict_cla = torch.argmax(predict).numpy()

    # 输出结果
    print(predict_cla)
    print(predict[predict_cla])
包含训练和测试的完整代码见:https://github.com/LegendBIT/torch-classification-model
参考:
深入解析DenseNet(含大量可视化及计算)
CNN模型合集 | 9 Stochastic_Depth
DenseNet算法详解
版权归原作者 BIT_Legend 所有, 如有侵权,请联系我们删除。