
这里写自定义目录标题
Nerfstudio 安装和使用记录
参考网站:https://docs.nerf.studio/en/latest/quickstart/installation.html
安装
因为服务器无法联网,采用本地安装的方法进行安装:
conda create --name nerfstudio -y python=3.8
conda activate nerfstudio
python -m pip install --upgrade pip

pip installtorch==1.12.1+cu113 torchvision==0.13.1+cu113 -f https://download.pytorch.org/whl/torch_stable.html
这个链接无法在服务器联网安装,服务器一般不连外网
pip install git+https://github.com/NVlabs/tiny-cuda-nn/#subdirectory=bindings/torch
可以去官网github下载
另外fmt 和 cutlass github 是给的超链接,因此上面的链接并没有下载 这两个包,需要手动下载和安装。
如果报错 ld: cannot find -lcuda
exportLIBRARY_PATH="/usr/local/cuda-11.3/lib64/stubs:$LIBRARY_PATH"
cd bindings/torch
python setup.py install
安装nerfstudio:
git clone [email protected]:nerfstudio-project/nerfstudio.git
cd nerfstudio
pip install --upgrade pip setuptools
pip install -e .
训练
下面这些配置是有顺序,更改顺序可能会报错。比如把 --viewer.skip-openrelay True 加在命令行的最后,会报错。应该跟在–viewer 的后面
在之前的权重上继续进行训练,加上 --load_dir 参数指定 ckpt 权重的 路径
ns-train nerfacto --data posters_v3/ --vis viewer --viewer.skip-openrelay True  --viewer.websocket-port 7008

ns-train nerfacto --data kitti360/ --load_dir ckpt_path --vis viewer --viewer.skip-openrelay True  --viewer.websocket-port 7008
打开电脑浏览器的 localhost:7008,可以查看viewer中的训练过程。
ns-train nerfacto --data posters_v3/ --vis viewer --viewer.skip-openrelay True --viewer.websocket-port 7008 --load-dir ./nerfstudio-main/outputs/posters_v3/nerfacto/2022-12-29_142632/nerfstudio_models/
加上==–logdir== 参数可以从预加载模型开始训练
出现 Address already in use 的错误的时候,原因是因为Port已经被占据,执行以下命令。
netstat -tunlp
kill -9 pid_number
运行原始的nerf (vanilla-nerf):
## Viewer
ns-train vanilla-nerf --data nerf_synthetic/kitti360 --vis viewer --viewer.skip-openrelay True  --viewer.websocket-port 7007## Tensorboad
ns-train vanilla-nerf --data nerf_synthetic/kitti360 --vis tensorboard
导出TSDF的Geometry
ns-export tsdf --load-config CONFIG.yml --output-dir OUTPUT_DIR
ns-extract-mesh --load-config outputs/../config.yml --output-path meshes/xxx.ply
添加Camera 之后的 Render 命令
这里采用 nohup 的后端执行命令,即使关闭 Terminal 也照样执行程序代码。
nohup ns-render --load-config outputs/datasets-kitti360_mono_priors/monosdf/2023-02-06_125735/config.yml --traj filename --camera-path-filename outputs/datasets-kitti360_mono_priors/monosdf/2023-02-06_125735/camera_path.json --output-path renders/monosdf_output.mp4 &
Nerfstudio 代码笔记大致梳理
Pipeline 如下: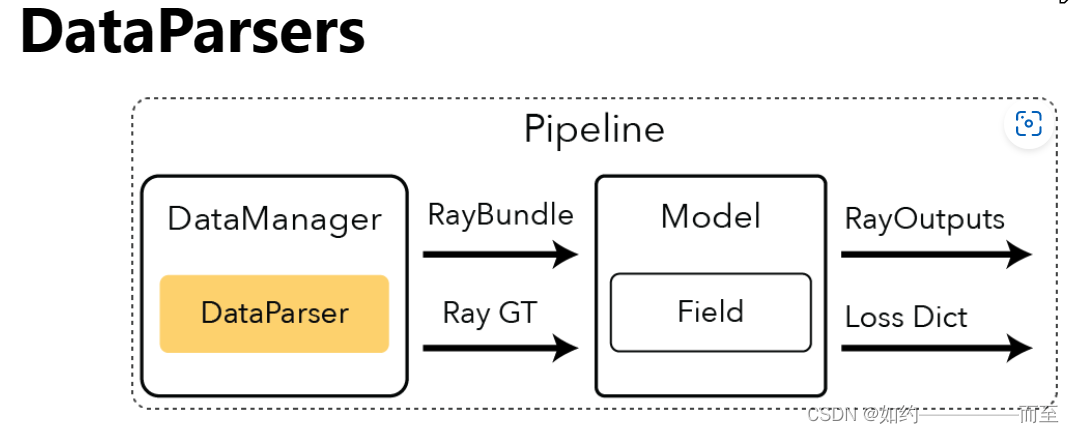
- DataParser 是什么?
DataParser 将各种形式的数据集作为输入,并且读取各个数据类别的Meta数据,返回的参数是DataparserOutputs
- DataManager 是什么?
DataManger 返回的是RayBundle 和 RayGT 。对于大多数的NerfPaper ,NerfStudio 设立了 VanillaDataManger. 其随机在DataManger中随机采样了一些像素点。生成了Training Ray 的颜色和Gt 的颜色
每一次采样的 光线数量 由参数 --pipeline.datamanager.train-num-rays-per-batch 来指定,默认数值是1024
Code:
ray_bundle, batch = self.datamanager.next_train(step) Ray_bundle (1024)
具体如何从DataManger 中进行Random Sample pixel 来生成 pixel_batch?
在Sample 函数中,输入的是img_batch 参数,是一个Dict,包含image_idx 列表和 image (batch,H,W,C)的Tensor。
在 pixel_sampler.py 代码中,调用sample_method 均匀采样pixel。具体算法是生成均匀采样的随机数t(batch,3) 和 tensor([num_images, image_height, image_width]) 进行相乘,返回一个Tensor.
 indices = torch.floor(
                torch.rand((batch_size,3), device=device)* torch.tensor([num_images, image_height, image_width], device=device)).long()
- Model是什么?
Model 是实际执行的 Nerf-based 算法。Model读取RayBundle 对象返回的是每一条Ray对应的 rendered color
一般包含的模块有:
    # Fields
    # Ray Samplers
    # Colliders
    # Renderers
    # Losses
    # Metrics
- Field 是什么?
Field 是 Model 模块中的一个重要的Component 。在大多数经典的应用当中,输入是3D 的Location 和 View direction 输出是 density 和 color 数值。
- Pipeline 是什么?
在Nerfstudio 的代码中,Pipeline 包含Nerf方法所有的代码。在代码中有一个 Vanilla Implementation 类,负责从DataManger 中读取数据然后feed到Model当中。
render 代码阅读和梳理
对于在nerfstudio 的 Viewer 中会生成 camera.json 文件,解析这个json 文件,从其中读出 需要渲染的 相机的信息,包括 相机的 c2w 矩阵, 相机的内参数cx,cy 等。
elif self.traj =="filename":withopen(self.camera_path_filename,"r", encoding="utf-8")as f:
         camera_path = json.load(f)
     seconds = camera_path["seconds"]
     camera_path = get_path_from_json(camera_path)
came_path 包含的信息如下所示: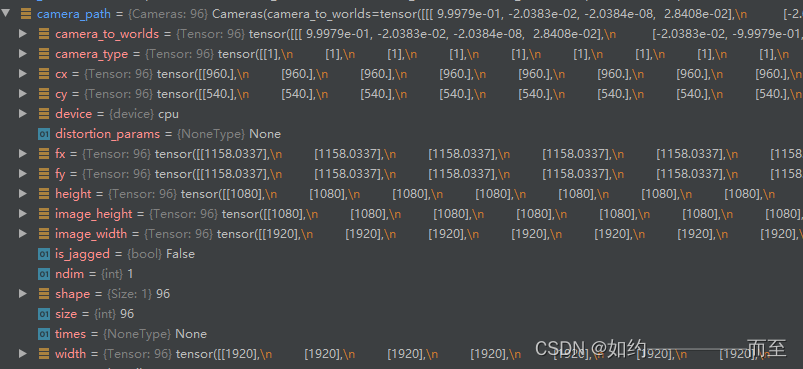
得到了相机的参数,主要通过 _render_trajectory_video 进行渲染:
def_render_trajectory_video(
    pipeline: Pipeline,
    cameras: Cameras,
    output_filename: Path,
    rendered_output_names: List[str],
    rendered_resolution_scaling_factor:float=1.0,
    seconds:float=5.0,
    output_format: Literal["images","video"]="video",)->None:"""Helper function to create a video of the spiral trajectory.

    Args:
        pipeline: Pipeline to evaluate with.
        cameras: Cameras to render.
        output_filename: Name of the output file.
        rendered_output_names: List of outputs to visualise.
        rendered_resolution_scaling_factor: Scaling factor to apply to the camera image resolution.
        seconds: Length of output video.
        output_format: How to save output data.
    """
修改了nerfstudio 的sprial_marching 的代码
可以按照相机的位姿 进行螺旋前景跑完整个场景
python scripts/render.py --load-config outputs/data_leader-train_00/nerfacto/2023-03-17_223503/config.yml --traj spiral --output-path trai00.mp4
版权归原作者 如约—————而至 所有, 如有侵权,请联系我们删除。