
前言
写这篇文章是为了使用百度ai和AForge来实现人脸识别功能,提升自己的编程能力和提升自己写博客的能力,最后希望这篇文章对正在学习c#的您有帮助。
问题分析
根据作业要求,我们分析得出:我们需要开发一个C# WinForms应用程序,该应用程序能够:从摄像头获取视频流并捕捉单帧图像、将捕捉到的图像发送到Baidu AI人脸识别API进行人脸检测和识别、显示识别结果,如年龄、性别、颜值等。、
解决问题的基础方法:AForge.NET: 一个用于计算机视觉和人工智能的.NET框架、Baidu AI: 百度的人工智能平台,提供了包括人脸识别在内的多种AI服务、WinForms: Windows Forms,是用于开发Windows桌面应用程序的GUI工具包。
代码实现
安装以下NuGet包:
AForge.ControlsAForge.VideoAForge.Video.DirectShowNewtonsoft.Json
设置百度AI的API密钥
方法:如何注册百度AI开放平台创建应用获得API Kcy及Secret Key密钥生成签名下载SDK资源_注册百度开发者账号,并创建应用以获取api key。-CSDN博客
private string APP_ID = "your_app_id";
private string API_KEY = "your_api_key";
private string SECRET_KEY = "your_secret_key";
private Face client = null;
client = new Face(API_KEY, SECRET_KEY);
设置摄像头
private FilterInfoCollection videoDevices = null;
private VideoCaptureDevice videoSource;
private void Form1_Load(object sender, EventArgs e)
{
videoDevices = new FilterInfoCollection(FilterCategory.VideoInputDevice);
if (videoDevices != null && videoDevices.Count > 0)
{
foreach (FilterInfo device in videoDevices)
{
comboBox1.Items.Add(device.Name);
}
comboBox1.SelectedIndex = 0;
}
videoSourcePlayer1.NewFrame += VideoSourcePlayer1_NewFrame;
}
捕捉视频
private void CameraConn()
{
videoSource = new VideoCaptureDevice(videoDevices[comboBox1.SelectedIndex].MonikerString);
videoSource.DesiredFrameSize = new System.Drawing.Size(320, 240);
videoSource.DesiredFrameRate = 1;
videoSourcePlayer1.VideoSource = videoSource;
videoSourcePlayer1.Start();
}
private void VideoSourcePlayer1_NewFrame(object sender, ref Bitmap image)
{
if (IsStart)
{
IsStart = false;
ThreadPool.QueueUserWorkItem(new WaitCallback(this.Detect), image.Clone());
}
if (location != null)
{
Graphics g = Graphics.FromImage(image);
g.DrawRectangle(new Pen(Color.Red), location.left, location.top, location.width, location.height);
g.Dispose();
}
}
识别人脸
public string ConvertImageToBase64(Image file)
{
using (MemoryStream memoryStream = new MemoryStream())
{
file.Save(memoryStream, file.RawFormat);
byte[] imageBytes = memoryStream.ToArray();
return Convert.ToBase64String(imageBytes);
}
}
private void Detect(object image)
{
if (image != null && image is Bitmap)
{
Bitmap img = (Bitmap)image;
string image1 = ConvertImageToBase64(img);
string imageType = "BASE64";
var options = new Dictionary<string, object>{
{"max_face_num", 2},
{"face_fields", "age,qualities,beauty"}
};
var result = client.Detect(image1, imageType, options);
// 处理检测结果...
}
}
界面
private void button1_Click(object sender, EventArgs e)
{
OpenFileDialog dialog = new OpenFileDialog();
dialog.InitialDirectory = "C:\Images";
dialog.Filter = "所有文件|.";
if (dialog.ShowDialog() == DialogResult.OK)
{
string filename = dialog.FileName;
Image im = Image.FromFile(filename);
var image = ConvertImageToBase64(im);
string imageType = "BASE64";
var options = new Dictionary<string, object>{
{"face_field", "age,beauty"}
};
var result = client.Detect(image, imageType, options);
var jsonResult = JObject.Parse(result.ToString());
textBox1.Text = result.ToString();
}
}
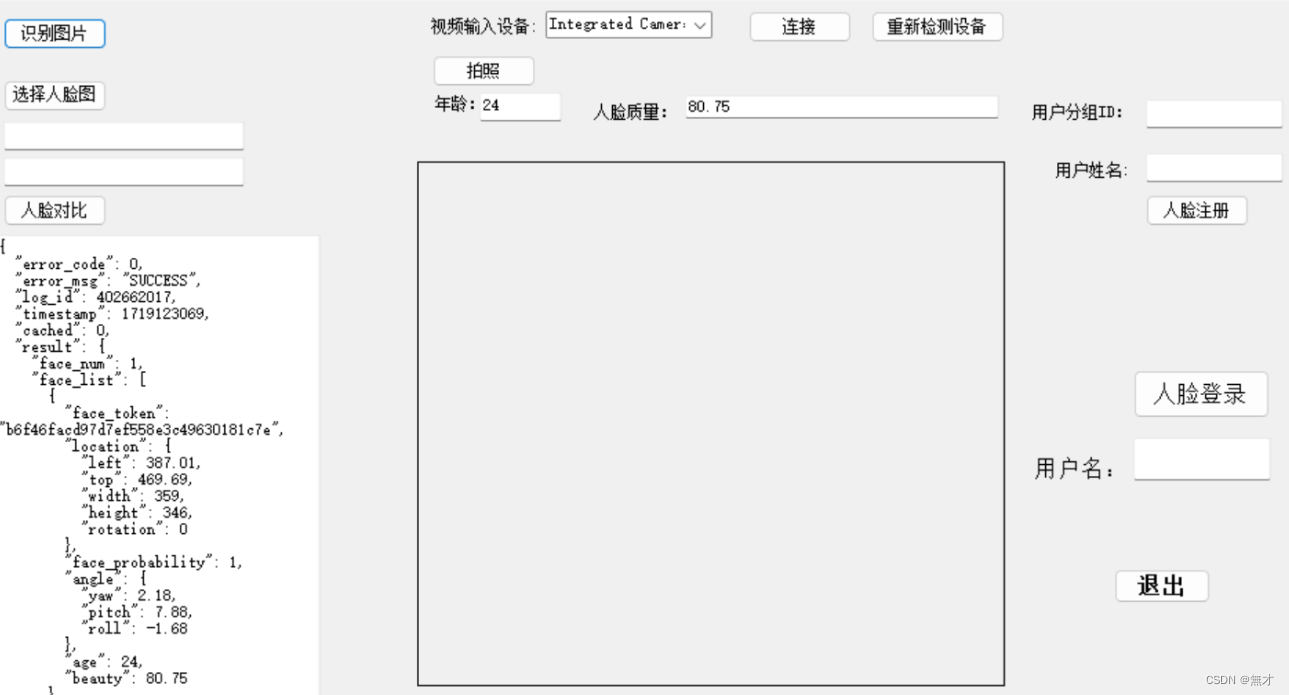
运行结果
实验总结
通过本次项目实践,我们成功构建了一个基于WinForms的简易智能应用程序,实现了实时摄像头视频流的捕获、人脸检测以及人脸识别功能。借助AForge库强大的视频处理能力,我们能够轻松地从摄像头捕获视频流并进行实时处理。同时,通过集成百度AI的人脸识别服务,我们的应用程序具备了高效准确的人脸识别能力,进一步提升了其智能化水平。
本应用程序的实现过程不仅加深了我们对于WinForms开发框架的理解,还锻炼了我们在图像处理、人工智能应用集成等方面的技能。通过这一实践,我们证明了利用现有开源库和云服务,可以快速构建出功能丰富、性能稳定的智能应用程序。
完整代码
private string APP_ID = "your_app_id";
private string API_KEY = "your_api_key";
private string SECRET_KEY = "your_secret_key";
private Face client = null;
client = new Face(API_KEY, SECRET_KEY);
private FilterInfoCollection videoDevices = null;
private VideoCaptureDevice videoSource;
private void Form1_Load(object sender, EventArgs e)
{
videoDevices = new FilterInfoCollection(FilterCategory.VideoInputDevice);
if (videoDevices != null && videoDevices.Count > 0)
{
foreach (FilterInfo device in videoDevices)
{
comboBox1.Items.Add(device.Name);
}
comboBox1.SelectedIndex = 0;
}
videoSourcePlayer1.NewFrame += VideoSourcePlayer1_NewFrame;
}
private void CameraConn()
{
videoSource = new VideoCaptureDevice(videoDevices[comboBox1.SelectedIndex].MonikerString);
videoSource.DesiredFrameSize = new System.Drawing.Size(320, 240);
videoSource.DesiredFrameRate = 1;
videoSourcePlayer1.VideoSource = videoSource;
videoSourcePlayer1.Start();
}
private void VideoSourcePlayer1_NewFrame(object sender, ref Bitmap image)
{
if (IsStart)
{
IsStart = false;
ThreadPool.QueueUserWorkItem(new WaitCallback(this.Detect), image.Clone());
}
if (location != null)
{
Graphics g = Graphics.FromImage(image);
g.DrawRectangle(new Pen(Color.Red), location.left, location.top, location.width, location.height);
g.Dispose();
}
}
public string ConvertImageToBase64(Image file)
{
using (MemoryStream memoryStream = new MemoryStream())
{
file.Save(memoryStream, file.RawFormat);
byte[] imageBytes = memoryStream.ToArray();
return Convert.ToBase64String(imageBytes);
}
}
private void Detect(object image)
{
if (image != null && image is Bitmap)
{
Bitmap img = (Bitmap)image;
string image1 = ConvertImageToBase64(img);
string imageType = "BASE64";
var options = new Dictionary<string, object>{
{"max_face_num", 2},
{"face_fields", "age,qualities,beauty"}
};
var result = client.Detect(image1, imageType, options);
// 处理检测结果...
}
}
private void button1_Click(object sender, EventArgs e)
{
OpenFileDialog dialog = new OpenFileDialog();
dialog.InitialDirectory = "C:\Images";
dialog.Filter = "所有文件|.";
if (dialog.ShowDialog() == DialogResult.OK)
{
string filename = dialog.FileName;
Image im = Image.FromFile(filename);
var image = ConvertImageToBase64(im);
string imageType = "BASE64";
var options = new Dictionary<string, object>{
{"face_field", "age,beauty"}
};
var result = client.Detect(image, imageType, options);
var jsonResult = JObject.Parse(result.ToString());
textBox1.Text = result.ToString();
}
}
版权归原作者 無才 所有, 如有侵权,请联系我们删除。