
学习转载自:睿智的目标检测56——Pytorch搭建YoloV5目标检测平台_Bubbliiiing的博客-CSDN博客_睿智yolo
Pytorch 搭建自己的YoloV5目标检测平台(Bubbliiiing 源码详解 训练 预测)-主干网络介绍_哔哩哔哩_bilibili
还有一些视频的学习笔记。
YOLOV5结构
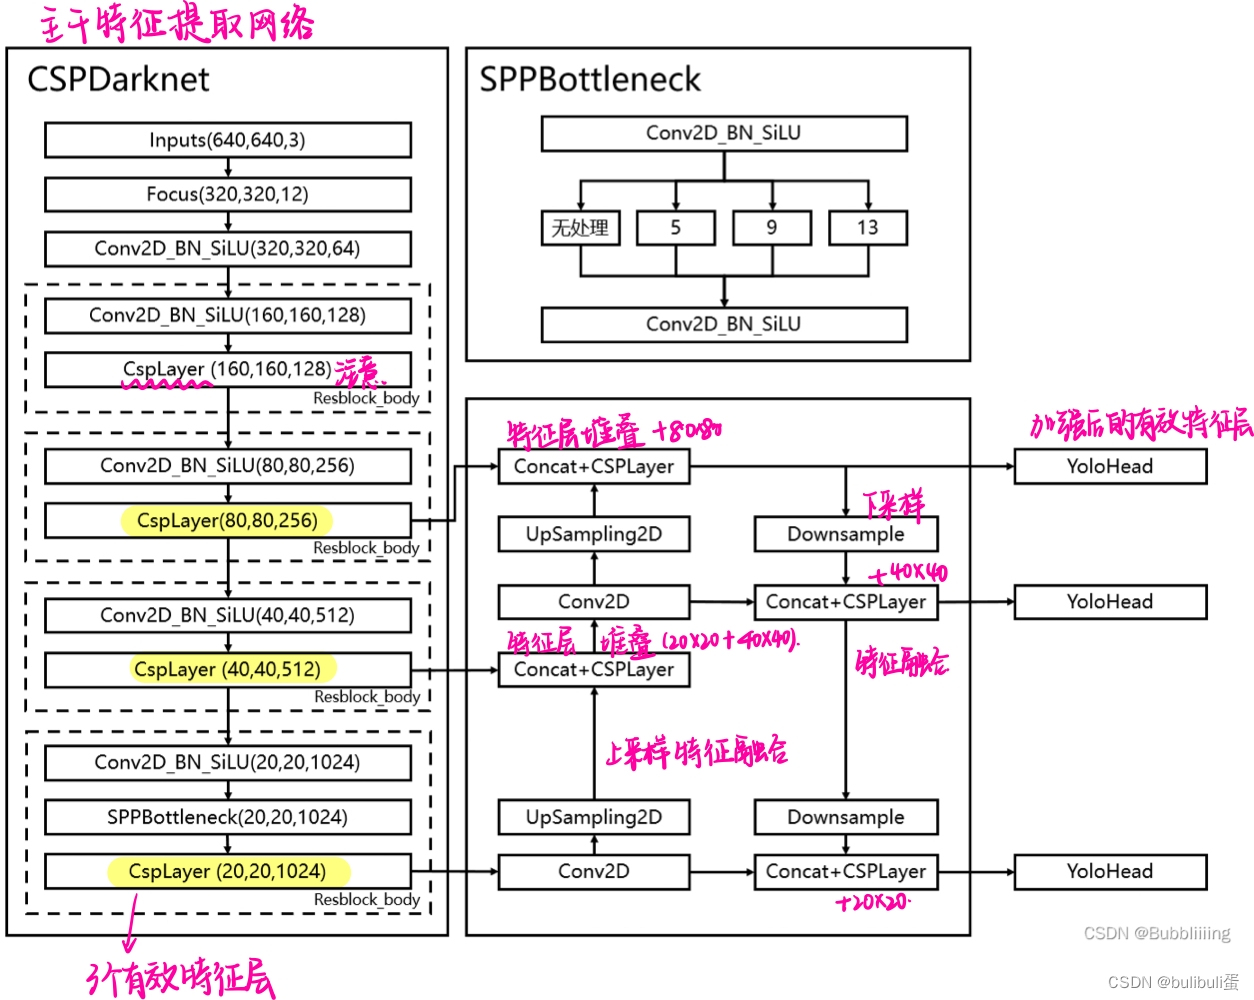
整个YoloV5可以分为三个部分,分别是Backbone,FPN以及Yolo Head。
Backbone:可以被称作YoloV5的主干特征提取网络,根据它的结构以及之前Yolo主干的叫法,我一般叫它CSPDarknet
- 输入的图片首先会在CSPDarknet里面进行特征提取,提取到的特征可以被称作特征层,是输入图片的特征集合。
- 在主干部分,我们获取了三个特征层进行下一步网络的构建,这三个特征层我称它为有效特征层。
FPN:可以被称作YoloV5的加强特征提取网络。
- 在主干部分获得的三个有效特征层会在这一部分进行特征融合,特征融合的目的是结合不同尺度的特征信息。
- 在FPN部分,已经获得的有效特征层被用于继续提取特征。
- 在YoloV5里依然使用到了Panet的结构,我们不仅会对特征进行上采样实现特征融合,还会对特征再次进行下采样实现特征融合。
Yolo Head:是YoloV5的分类器与回归器。
- 通过CSPDarknet和FPN,我们已经可以获得三个加强过的有效特征层。每一个特征层都有宽、高和通道数,此时我们可以将特征图看作一个又一个特征点的集合,每一个特征点都有通道数个特征。
- Yolo Head实际上所做的工作就是对特征点进行判断,判断特征点是否有物体与其对应。与以前版本的Yolo一样,YoloV5所用的解耦头是一起的,也就是分类和回归在一个1X1卷积里实现。
因此,整个YoloV5网络所作的工作就是 特征提取-特征加强-预测特征点对应的物体情况。
CSPDarknet的五个重要特点
- 残差网络Residual
- CSPnet网络结构
- Focus网络结构
- SiLU激活函数
- SPP结构
YOLOv5主干构建
初始化方法
文件位置:nets/CSPdarknet.py
#初始化
def __init__(self, base_channels, base_depth, phi, pretrained):
super().__init__()
#-----------------------------------------------#
# 输入图片是640, 640, 3
# 初始的基本通道base_channels是64
#-----------------------------------------------#
#-----------------------------------------------#
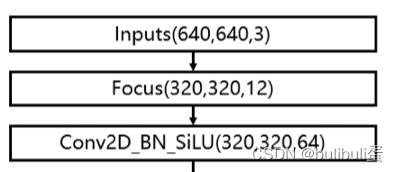
# 利用focus网络结构进行特征提取
# 640, 640, 3 -> 320, 320, 12 -> 320, 320, 64
#-----------------------------------------------#
self.stem = Focus(3, base_channels, k=3)
#-----------------------------------------------#
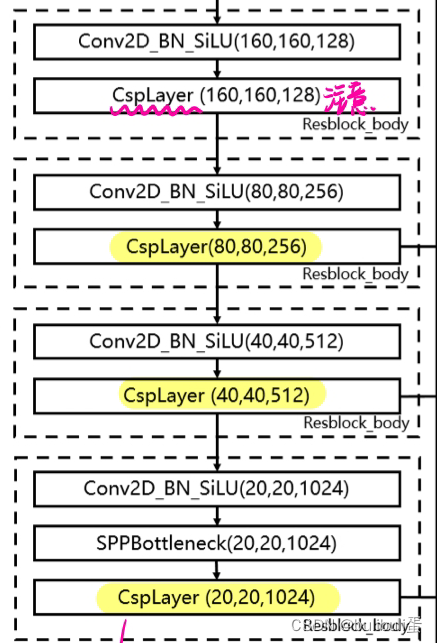
# 完成卷积之后,320, 320, 64 -> 160, 160, 128
# 完成CSPlayer之后,160, 160, 128 -> 160, 160, 128
#-----------------------------------------------#
self.dark2 = nn.Sequential(
# 320, 320, 64 -> 160, 160, 128
Conv(base_channels, base_channels * 2, 3, 2),
# 160, 160, 128 -> 160, 160, 128
C3(base_channels * 2, base_channels * 2, base_depth),
)
#-----------------------------------------------#
# 完成卷积之后,160, 160, 128 -> 80, 80, 256
# 完成CSPlayer之后,80, 80, 256 -> 80, 80, 256
# 在这里引出有效特征层80, 80, 256
# 进行加强特征提取网络FPN的构建
#-----------------------------------------------#
self.dark3 = nn.Sequential(
Conv(base_channels * 2, base_channels * 4, 3, 2),
C3(base_channels * 4, base_channels * 4, base_depth * 3),
)
#-----------------------------------------------#
# 完成卷积之后,80, 80, 256 -> 40, 40, 512
# 完成CSPlayer之后,40, 40, 512 -> 40, 40, 512
# 在这里引出有效特征层40, 40, 512
# 进行加强特征提取网络FPN的构建
#-----------------------------------------------#
self.dark4 = nn.Sequential(
Conv(base_channels * 4, base_channels * 8, 3, 2),
C3(base_channels * 8, base_channels * 8, base_depth * 3),
)
#-----------------------------------------------#
# 完成卷积之后,40, 40, 512 -> 20, 20, 1024
# 完成SPP之后,20, 20, 1024 -> 20, 20, 1024
# 完成CSPlayer之后,20, 20, 1024 -> 20, 20, 1024
#-----------------------------------------------#
self.dark5 = nn.Sequential(
Conv(base_channels * 8, base_channels * 16, 3, 2),
SPP(base_channels * 16, base_channels * 16),
C3(base_channels * 16, base_channels * 16, base_depth, shortcut=False),
)
if pretrained:
url = {
's' : 'https://github.com/bubbliiiing/yolov5-pytorch/releases/download/v1.0/cspdarknet_s_backbone.pth',
'm' : 'https://github.com/bubbliiiing/yolov5-pytorch/releases/download/v1.0/cspdarknet_m_backbone.pth',
'l' : 'https://github.com/bubbliiiing/yolov5-pytorch/releases/download/v1.0/cspdarknet_l_backbone.pth',
'x' : 'https://github.com/bubbliiiing/yolov5-pytorch/releases/download/v1.0/cspdarknet_x_backbone.pth',
}[phi]
checkpoint = torch.hub.load_state_dict_from_url(url=url, map_location="cpu", model_dir="./model_data")
self.load_state_dict(checkpoint, strict=False)
print("Load weights from ", url.split('/')[-1])
focus网络结构——特征提取
首先利用focus网络结构进行特征提取(卷积标准化激活工作在focus中调用)。这个网络结构是在YoloV5里面使用到比较有趣的网络结构,具体操作:
- 在一张图片中每隔一个像素拿到一个值,这个时候获得了四个独立的特征层
- 然后将四个独立的特征层进行堆叠,此时宽高信息就集中到了通道信息,输入通道扩充了四倍。
- 拼接起来的特征层相对于原先的三通道变成了十二个通道
- 下图很好的展示了Focus结构,一看就能明白。

        #-----------------------------------------------#
        #   输入图片是640, 640, 3
        #   初始的基本通道base_channels是64
        #-----------------------------------------------#

        #-----------------------------------------------#
        #   利用focus网络结构进行特征提取
        #   640, 640, 3 -> 320, 320, 12 -> 320, 320, 64
        #-----------------------------------------------#
class Focus(nn.Module):
    def __init__(self, c1, c2, k=1, s=1, p=None, g=1, act=True):  # ch_in, ch_out, kernel, stride, padding, groups
        super(Focus, self).__init__()
        # 卷积+标准化+激活函数
        self.conv = Conv(c1 * 4, c2, k, s, p, g, act)

    def forward(self, x):
        # 320, 320, 12 => 320, 320, 64
        # 特征堆叠
        return self.conv(
            # 640, 640, 3 => 320, 320, 12
            torch.cat(
                [
                    # 切片拼接
                    x[..., ::2, ::2],
                    x[..., 1::2, ::2],
                    x[..., ::2, 1::2],
                    x[..., 1::2, 1::2]
                ], 1
            )
        )
以下是调用的卷积标准化激活函数
# 顺便放上卷积标准化激活函数
class Conv(nn.Module):
    def __init__(self, c1, c2, k=1, s=1, p=None, g=1, act=True):
        super(Conv, self).__init__()
        self.conv   = nn.Conv2d(c1, c2, k, s, autopad(k, p), groups=g, bias=False)
        self.bn     = nn.BatchNorm2d(c2, eps=0.001, momentum=0.03)
        self.act    = SiLU() if act is True else (act if isinstance(act, nn.Module) else nn.Identity())

    def forward(self, x):
        return self.act(self.bn(self.conv(x)))

    def fuseforward(self, x):
        return self.act(self.conv(x))
SiLU激活函数
里面使用了SiLU激活函数,SiLU是Sigmoid和ReLU的改进版。SiLU具备无上界有下界、平滑、非单调的特性。SiLU在深层模型上的效果优于 ReLU。可以看做是平滑的ReLU激活函数。
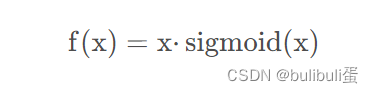

class SiLU(nn.Module):
    @staticmethod
    def forward(x):
        return x * torch.sigmoid(x)
然后是四层卷积标准化激活和csp layer
#-----------------------------------------------#
        #   完成卷积之后,320, 320, 64 -> 160, 160, 128
        #   完成CSPlayer之后,160, 160, 128 -> 160, 160, 128
        #-----------------------------------------------#
        self.dark2 = nn.Sequential(
            # 320, 320, 64 -> 160, 160, 128
            Conv(base_channels, base_channels * 2, 3, 2),
            # 160, 160, 128 -> 160, 160, 128
            C3(base_channels * 2, base_channels * 2, base_depth),
        )

        #-----------------------------------------------#
        #   完成卷积之后,160, 160, 128 -> 80, 80, 256
        #   完成CSPlayer之后,80, 80, 256 -> 80, 80, 256
        #                   在这里引出有效特征层80, 80, 256
        #                   进行加强特征提取网络FPN的构建
        #-----------------------------------------------#
        self.dark3 = nn.Sequential(
            Conv(base_channels * 2, base_channels * 4, 3, 2),
            C3(base_channels * 4, base_channels * 4, base_depth * 3),
        )

        #-----------------------------------------------#
        #   完成卷积之后,80, 80, 256 -> 40, 40, 512
        #   完成CSPlayer之后,40, 40, 512 -> 40, 40, 512
        #                   在这里引出有效特征层40, 40, 512
        #                   进行加强特征提取网络FPN的构建
        #-----------------------------------------------#
        self.dark4 = nn.Sequential(
            Conv(base_channels * 4, base_channels * 8, 3, 2),
            C3(base_channels * 8, base_channels * 8, base_depth * 3),
        )

        #-----------------------------------------------#
        #   完成卷积之后,40, 40, 512 -> 20, 20, 1024
        #   完成SPP之后,20, 20, 1024 -> 20, 20, 1024
        #   完成CSPlayer之后,20, 20, 1024 -> 20, 20, 1024
        #-----------------------------------------------#
        self.dark5 = nn.Sequential(
            Conv(base_channels * 8, base_channels * 16, 3, 2),
            SPP(base_channels * 16, base_channels * 16),
            C3(base_channels * 16, base_channels * 16, base_depth, shortcut=False),
        )
里面包括了cspNet结构
CSPNet结构
CSPnet结构并不算复杂,就是将原来的残差块的堆叠进行了一个拆分,拆成左右两部分:主干部分继续进行原来的残差块的堆叠;另一部分则像一个残差边一样,经过少量处理直接连接到最后。因此可以认为CSP中存在一个大的残差边。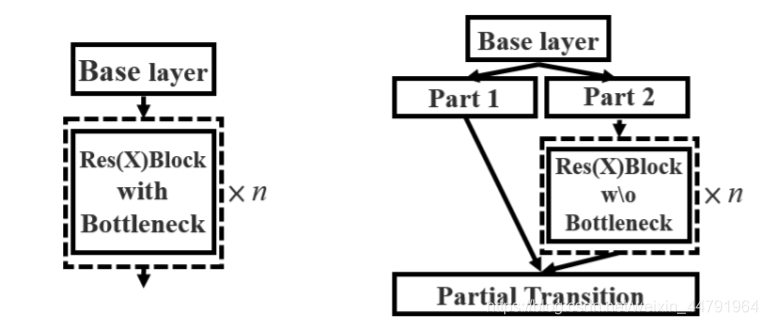
class C3(nn.Module):
    # CSP Bottleneck with 3 convolutions 主干部分
    def __init__(self, c1, c2, n=1, shortcut=True, g=1, e=0.5):  # ch_in, ch_out, number, shortcut, groups, expansion
        super(C3, self).__init__()
        c_ = int(c2 * e)  # hidden channels
        #通道调整
        self.cv1 = Conv(c1, c_, 1, 1)
        self.cv2 = Conv(c1, c_, 1, 1)
        self.cv3 = Conv(2 * c_, c2, 1)  # act=FReLU(c2)
        # 利用残差结构进行特征提取
        self.m = nn.Sequential(*[Bottleneck(c_, c_, shortcut, g, e=1.0) for _ in range(n)])
        # self.m = nn.Sequential(*[CrossConv(c_, c_, 3, 1, g, 1.0, shortcut) for _ in range(n)])

    def forward(self, x):
        # C3是csplayer的结果 分为c2(残差部分,只做少量处理)和c1(主干部分)
        return self.cv3(torch.cat(
            (
                self.m(self.cv1(x)),
                self.cv2(x)
            )
            , dim=1))
CSPNet结构中包含了残差网络的应用
残差网络
CSPDarknet中的残差卷积可以分为两个部分,主干部分是一次1X1的卷积和一次3X3的卷积;残差边部分不做任何处理,直接将主干的输入与输出结合。整个YoloV5的主干部分都由残差卷积构成:
class Bottleneck(nn.Module):
    # Standard bottleneck
    def __init__(self, c1, c2, shortcut=True, g=1, e=0.5):  # ch_in, ch_out, shortcut, groups, expansion
        super(Bottleneck, self).__init__()
        c_ = int(c2 * e)  # hidden channels
        self.cv1 = Conv(c1, c_, 1, 1)
        self.cv2 = Conv(c_, c2, 3, 1, g=g)
        self.add = shortcut and c1 == c2

    def forward(self, x):
        return x + self.cv2(self.cv1(x)) if self.add else self.cv2(self.cv1(x))
残差网络的特点是容易优化,并且能够通过增加相当的深度来提高准确率。其内部的残差块使用了跳跃连接,缓解了在深度神经网络中增加深度带来的梯度消失问题。
在dark5中进行了spp结构的构建。
SPP结构
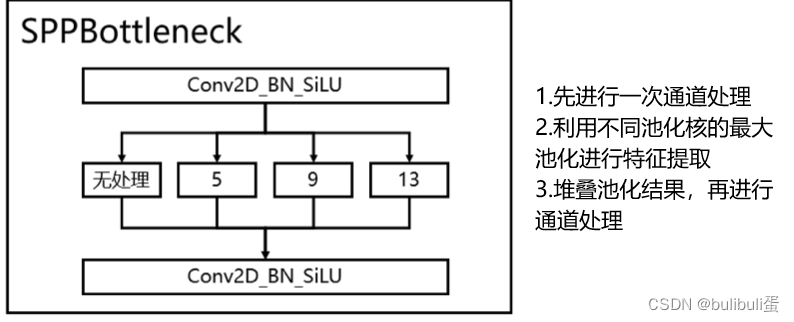
通过不同池化核大小的最大池化进行特征提取,提高网络的感受野。在YoloV4中,SPP是用在FPN里面的,在YoloV5中,SPP模块被用在了主干特征提取网络中。
class SPP(nn.Module):
    # Spatial pyramid pooling layer used in YOLOv3-SPP
    def __init__(self, c1, c2, k=(5, 9, 13)):
        super(SPP, self).__init__()
        c_ = c1 // 2  # hidden channels
        self.cv1 = Conv(c1, c_, 1, 1)
        self.cv2 = Conv(c_ * (len(k) + 1), c2, 1, 1)
        #利用不同池化核的最大池化进行特征提取
        self.m = nn.ModuleList([nn.MaxPool2d(kernel_size=x, stride=1, padding=x // 2) for x in k])

    def forward(self, x):
        x = self.cv1(x)
        #堆叠池化结果,通过cv2进行通道处理
        return self.cv2(torch.cat([x] + [m(x) for m in self.m], 1))
经过主干网络,三个有效特征层将被传入FPN加强特征提取网络。
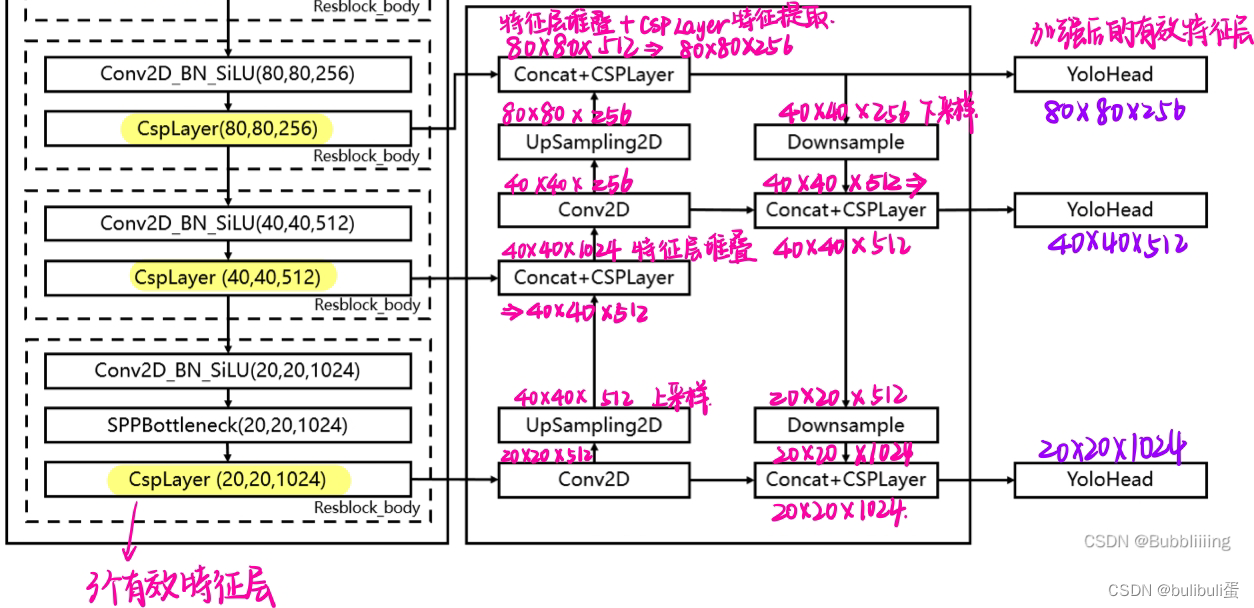
FPN加强特征提取网络
总的来说就是,通过卷积+上采样+特征堆叠+CSPLayer特征提取+下采样等方法加强特征,这些方法在init函数中有所规划。过程详见图片。
文件位置:nets/yolo.py
import torch
import torch.nn as nn

from nets.ConvNext import ConvNeXt_Small, ConvNeXt_Tiny
from nets.CSPdarknet import C3, Conv, CSPDarknet
from nets.Swin_transformer import Swin_transformer_Tiny

#---------------------------------------------------#
#   yolo_body
#---------------------------------------------------#
class YoloBody(nn.Module):
    def __init__(self, anchors_mask, num_classes, phi, backbone='cspdarknet', pretrained=False, input_shape=[640, 640]):
        super(YoloBody, self).__init__()
        depth_dict          = {'s' : 0.33, 'm' : 0.67, 'l' : 1.00, 'x' : 1.33,}
        width_dict          = {'s' : 0.50, 'm' : 0.75, 'l' : 1.00, 'x' : 1.25,}
        dep_mul, wid_mul    = depth_dict[phi], width_dict[phi]

        base_channels       = int(wid_mul * 64)  # 64
        base_depth          = max(round(dep_mul * 3), 1)  # 3
        #-----------------------------------------------#
        #   输入图片是640, 640, 3
        #   初始的基本通道是64
        #-----------------------------------------------#
        self.backbone_name  = backbone
        if backbone == "cspdarknet":
            #---------------------------------------------------#
            #   生成CSPdarknet53的主干模型
            #   获得三个有效特征层,他们的shape分别是:
            #   80,80,256
            #   40,40,512
            #   20,20,1024
            #---------------------------------------------------#
            self.backbone   = CSPDarknet(base_channels, base_depth, phi, pretrained)
        else:
            #---------------------------------------------------#
            #   如果输入不为cspdarknet,则调整通道数
            #   使其符合YoloV5的格式
            #---------------------------------------------------#
            self.backbone       = {
                'convnext_tiny'         : ConvNeXt_Tiny,
                'convnext_small'        : ConvNeXt_Small,
                'swin_transfomer_tiny'  : Swin_transformer_Tiny,
            }[backbone](pretrained=pretrained, input_shape=input_shape)
            in_channels         = {
                'convnext_tiny'         : [192, 384, 768],
                'convnext_small'        : [192, 384, 768],
                'swin_transfomer_tiny'  : [192, 384, 768],
            }[backbone]
            feat1_c, feat2_c, feat3_c = in_channels
            self.conv_1x1_feat1 = Conv(feat1_c, base_channels * 4, 1, 1)
            self.conv_1x1_feat2 = Conv(feat2_c, base_channels * 8, 1, 1)
            self.conv_1x1_feat3 = Conv(feat3_c, base_channels * 16, 1, 1)

        self.upsample   = nn.Upsample(scale_factor=2, mode="nearest")

        self.conv_for_feat3         = Conv(base_channels * 16, base_channels * 8, 1, 1)
        self.conv3_for_upsample1    = C3(base_channels * 16, base_channels * 8, base_depth, shortcut=False)

        self.conv_for_feat2         = Conv(base_channels * 8, base_channels * 4, 1, 1)
        self.conv3_for_upsample2    = C3(base_channels * 8, base_channels * 4, base_depth, shortcut=False)

        self.down_sample1           = Conv(base_channels * 4, base_channels * 4, 3, 2)
        self.conv3_for_downsample1  = C3(base_channels * 8, base_channels * 8, base_depth, shortcut=False)

        self.down_sample2           = Conv(base_channels * 8, base_channels * 8, 3, 2)
        self.conv3_for_downsample2  = C3(base_channels * 16, base_channels * 16, base_depth, shortcut=False)

        # 80, 80, 256 => 80, 80, 3 * (5 + num_classes) => 80, 80, 3 * (4 + 1 + num_classes)
        self.yolo_head_P3 = nn.Conv2d(base_channels * 4, len(anchors_mask[2]) * (5 + num_classes), 1)
        # 40, 40, 512 => 40, 40, 3 * (5 + num_classes) => 40, 40, 3 * (4 + 1 + num_classes)
        self.yolo_head_P4 = nn.Conv2d(base_channels * 8, len(anchors_mask[1]) * (5 + num_classes), 1)
        # 20, 20, 1024 => 20, 20, 3 * (5 + num_classes) => 20, 20, 3 * (4 + 1 + num_classes)
        self.yolo_head_P5 = nn.Conv2d(base_channels * 16, len(anchors_mask[0]) * (5 + num_classes), 1)

    def forward(self, x):
        #  backbone
        feat1, feat2, feat3 = self.backbone(x)
        if self.backbone_name != "cspdarknet":
            feat1 = self.conv_1x1_feat1(feat1)
            feat2 = self.conv_1x1_feat2(feat2)
            feat3 = self.conv_1x1_feat3(feat3)

        # 20, 20, 1024 -> 20, 20, 512
        P5          = self.conv_for_feat3(feat3)
        # 20, 20, 512 -> 40, 40, 512
        P5_upsample = self.upsample(P5)
        # 40, 40, 512 -> 40, 40, 1024
        P4          = torch.cat([P5_upsample, feat2], 1)
        # 40, 40, 1024 -> 40, 40, 512
        P4          = self.conv3_for_upsample1(P4)

        # 40, 40, 512 -> 40, 40, 256
        P4          = self.conv_for_feat2(P4)
        # 40, 40, 256 -> 80, 80, 256
        P4_upsample = self.upsample(P4)
        # 80, 80, 256 cat 80, 80, 256 -> 80, 80, 512
        P3          = torch.cat([P4_upsample, feat1], 1)
        # 80, 80, 512 -> 80, 80, 256
        P3          = self.conv3_for_upsample2(P3)

        # 80, 80, 256 -> 40, 40, 256
        P3_downsample = self.down_sample1(P3)
        # 40, 40, 256 cat 40, 40, 256 -> 40, 40, 512
        P4 = torch.cat([P3_downsample, P4], 1)
        # 40, 40, 512 -> 40, 40, 512
        P4 = self.conv3_for_downsample1(P4)

        # 40, 40, 512 -> 20, 20, 512
        P4_downsample = self.down_sample2(P4)
        # 20, 20, 512 cat 20, 20, 512 -> 20, 20, 1024
        P5 = torch.cat([P4_downsample, P5], 1)
        # 20, 20, 1024 -> 20, 20, 1024
        P5 = self.conv3_for_downsample2(P5)

        #---------------------------------------------------#
        #   第三个特征层
        #   y3=(batch_size,75,80,80)
        #---------------------------------------------------#
        out2 = self.yolo_head_P3(P3)
        #---------------------------------------------------#
        #   第二个特征层
        #   y2=(batch_size,75,40,40)
        #---------------------------------------------------#
        out1 = self.yolo_head_P4(P4)
        #---------------------------------------------------#
        #   第一个特征层
        #   y1=(batch_size,75,20,20)
        #---------------------------------------------------#
        out0 = self.yolo_head_P5(P5)
        return out0, out1, out2
利用YOLO HEAD获得预测结果
 利用FPN特征金字塔,我们可以获得三个加强特征,这**三个加强特征的shape分别为(20,20,1024)、(40,40,512)、(80,80,256)**,然后我们利用这三个shape的特征层传入Yolo Head获得预测结果。
对于每一个特征层,我们可以获得利用一个卷积调整通道数,最终的通道数和需要区分的种类个数相关,在YoloV5里,每一个特征层上每一个特征点存在3个先验框。
head非常简单是三个1x1的卷积核,我们只需了解输出通道的含义即可,意思就是预测框的大小和位置,以及框内是否有物体,物体的种类是什么。
        # 80, 80, 256 => 80, 80, 3 * (5 + num_classes) => 80, 80, 3 * (4 + 1 + num_classes)
        #3:每个点包含3个预测框,4:x,y,w,h四个参数,1:物体是否包含在框内,num_classes:物品种类
        self.yolo_head_P3 = nn.Conv2d(base_channels * 4, len(anchors_mask[2]) * (5 + num_classes), 1)
        # 40, 40, 512 => 40, 40, 3 * (5 + num_classes) => 40, 40, 3 * (4 + 1 + num_classes)
        self.yolo_head_P4 = nn.Conv2d(base_channels * 8, len(anchors_mask[1]) * (5 + num_classes), 1)
        # 20, 20, 1024 => 20, 20, 3 * (5 + num_classes) => 20, 20, 3 * (4 + 1 + num_classes)
        self.yolo_head_P5 = nn.Conv2d(base_channels * 16, len(anchors_mask[0]) * (5 + num_classes), 1)
yolov5的解码过程
- 文件位置:utils/utils_bbox.py
- 目的:将预测值的每个特征层调成真实值
- 输入:input尺寸:batch_size, 3 * (4 + 1 + num_classes), 20, 20
- 20x20 特征层的步长计算: - 输入图片为640x640时- input_shape = [640, 640] input_height = 20, input_width = 20 ,640 / 20 = 32- stride_h = stride_w = 32- 高和宽的步长都是32,相当于压缩成原来的1/32
- 此时获得相对于特征层大小的scaled_anchors(先验框)
anchor_width, anchor_height / stride_h, stride_w - 对input进行reshape,以便于更好操作 -
# batch_size, 3 * (4 + 1 + num_classes), 20, 20 => # batch_size, 3, 5 + num_classes, 20, 20 => # batch_size, 3, 20, 20, 4 + 1 + num_classes - 接着调整先验框的参数 x,y,w,h,并获得置信度
- 生成网格、
- 利用预测结果对先验框进行调整
# 首先调整先验框的中心,从先验框中心向右下角偏移# 再调整先验框的宽高。# x 0 ~ 1 => 0 ~ 2 => -0.5 ~ 1.5 + grid_x# y 0 ~ 1 => 0 ~ 2 => -0.5 ~ 1.5 + grid_y# w 0 ~ 1 => 0 ~ 2 => 0 ~ 4 * anchor_w# h 0 ~ 1 => 0 ~ 2 => 0 ~ 4 * anchor_h - 如图所示,蓝色的点为20x20的特征点,此时我们对左图黑色点的三个先验框进行解码操作演示: 1、进行中心预测点的计算,利用Regression预测结果前两个序号的内容对特征点的三个先验框中心坐标进行偏移,偏移后是右图红色的三个点; 2、进行预测框宽高的计算,利用Regression预测结果后两个序号的内容求指数后获得预测框的宽高; 3、此时获得的预测框就可以绘制在图片上了。
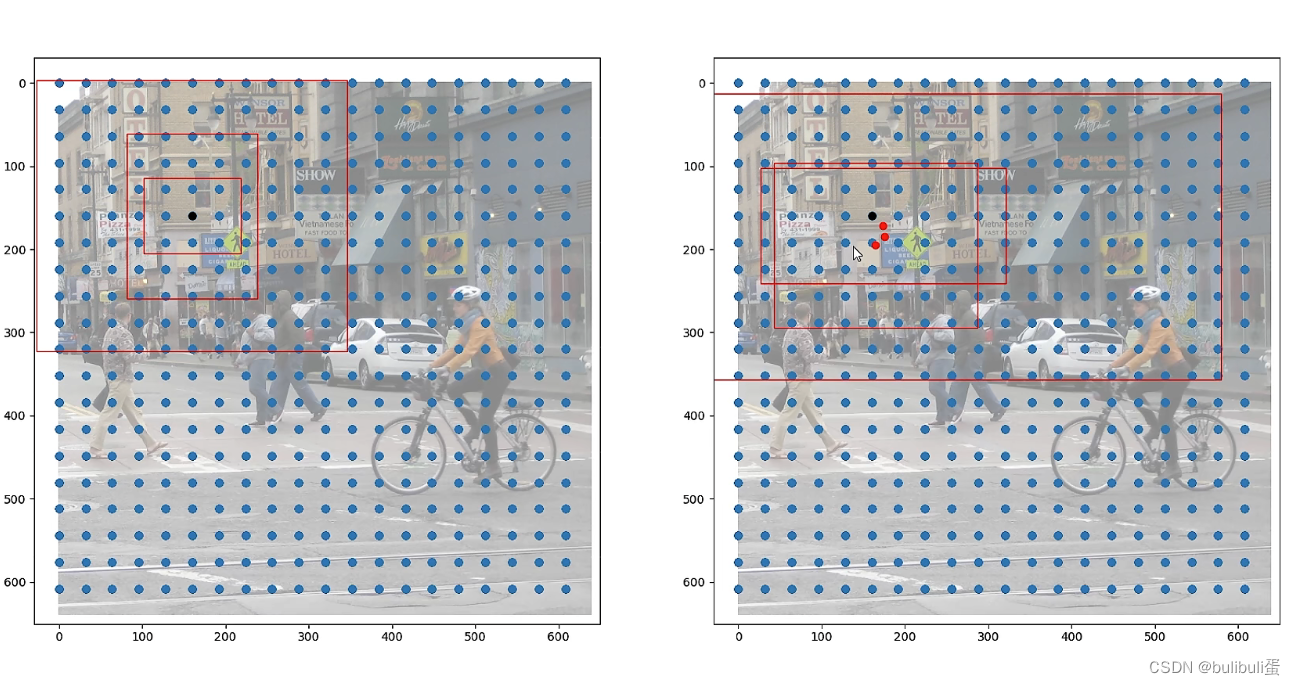
除去这样的解码操作,还有非极大抑制的操作需要进行,防止同一种类的框的堆积。
 #---------------------------------------------------#
    #   将预测值的每个特征层调成真实值
    #---------------------------------------------------#
    def get_anchors_and_decode(input, input_shape, anchors, anchors_mask, num_classes):
        #-----------------------------------------------#
        #   input   batch_size, 3 * (4 + 1 + num_classes), 20, 20
        #-----------------------------------------------#
        batch_size      = input.size(0)
        input_height    = input.size(2)
        input_width     = input.size(3)

        #-----------------------------------------------#
        #   输入为640x640时 input_shape = [640, 640]  input_height = 20, input_width = 20
        #   640 / 20 = 32
        #   stride_h = stride_w = 32
        #-----------------------------------------------#
        stride_h = input_shape[0] / input_height
        stride_w = input_shape[1] / input_width
        #-------------------------------------------------#
        #   此时获得的scaled_anchors大小是相对于特征层的
        #   anchor_width, anchor_height / stride_h, stride_w
        #-------------------------------------------------#
        scaled_anchors = [(anchor_width / stride_w, anchor_height / stride_h) for anchor_width, anchor_height in anchors[anchors_mask[2]]]

        #-----------------------------------------------#
        #   batch_size, 3 * (4 + 1 + num_classes), 20, 20 =>
        #   batch_size, 3, 5 + num_classes, 20, 20  =>
        #   batch_size, 3, 20, 20, 4 + 1 + num_classes
        #-----------------------------------------------#
        prediction = input.view(batch_size, len(anchors_mask[2]),
                                num_classes + 5, input_height, input_width).permute(0, 1, 3, 4, 2).contiguous()

        #-----------------------------------------------#
        #   先验框的中心位置的调整参数
        #-----------------------------------------------#
        x = torch.sigmoid(prediction[..., 0])
        y = torch.sigmoid(prediction[..., 1])
        #-----------------------------------------------#
        #   先验框的宽高调整参数
        #-----------------------------------------------#
        w = torch.sigmoid(prediction[..., 2])
        h = torch.sigmoid(prediction[..., 3])
        #-----------------------------------------------#
        #   获得置信度,是否有物体 0 - 1
        #-----------------------------------------------#
        conf        = torch.sigmoid(prediction[..., 4])
        #-----------------------------------------------#
        #   种类置信度 0 - 1
        #-----------------------------------------------#
        pred_cls    = torch.sigmoid(prediction[..., 5:])

        FloatTensor = torch.cuda.FloatTensor if x.is_cuda else torch.FloatTensor
        LongTensor  = torch.cuda.LongTensor if x.is_cuda else torch.LongTensor

        #----------------------------------------------------------#
        #   生成网格,先验框中心,网格左上角
        #   batch_size,3,20,20
        #   range(20)
        #   [
        #       [0, 1, 2, 3 ……, 19],
        #       [0, 1, 2, 3 ……, 19],
        #       …… (20次)
        #       [0, 1, 2, 3 ……, 19]
        #   ] * (batch_size * 3)
        #   [batch_size, 3, 20, 20]
        #
        #   [
        #       [0, 1, 2, 3 ……, 19],
        #       [0, 1, 2, 3 ……, 19],
        #       …… (20次)
        #       [0, 1, 2, 3 ……, 19]
        #   ].T * (batch_size * 3)
        #   [batch_size, 3, 20, 20]
        #----------------------------------------------------------#
        grid_x = torch.linspace(0, input_width - 1, input_width).repeat(input_height, 1).repeat(
            batch_size * len(anchors_mask[2]), 1, 1).view(x.shape).type(FloatTensor)
        grid_y = torch.linspace(0, input_height - 1, input_height).repeat(input_width, 1).t().repeat(
            batch_size * len(anchors_mask[2]), 1, 1).view(y.shape).type(FloatTensor)

        #----------------------------------------------------------#
        #   按照网格格式生成先验框的宽高
        #   batch_size, 3, 20 * 20 => batch_size, 3, 20, 20
        #   batch_size, 3, 20 * 20 => batch_size, 3, 20, 20
        #----------------------------------------------------------#
        anchor_w = FloatTensor(scaled_anchors).index_select(1, LongTensor([0]))
        anchor_h = FloatTensor(scaled_anchors).index_select(1, LongTensor([1]))
        anchor_w = anchor_w.repeat(batch_size, 1).repeat(1, 1, input_height * input_width).view(w.shape)
        anchor_h = anchor_h.repeat(batch_size, 1).repeat(1, 1, input_height * input_width).view(h.shape)

        #----------------------------------------------------------#
        #   利用预测结果对先验框进行调整
        #   首先调整先验框的中心,从先验框中心向右下角偏移
        #   再调整先验框的宽高。
        #   x  0 ~ 1 => 0 ~ 2 => -0.5 ~ 1.5 + grid_x
        #   y  0 ~ 1 => 0 ~ 2 => -0.5 ~ 1.5 + grid_y
        #   w  0 ~ 1 => 0 ~ 2 => 0 ~ 4 * anchor_w
        #   h  0 ~ 1 => 0 ~ 2 => 0 ~ 4 * anchor_h
        #----------------------------------------------------------#
        pred_boxes          = FloatTensor(prediction[..., :4].shape)
        pred_boxes[..., 0]  = x.data * 2. - 0.5 + grid_x
        pred_boxes[..., 1]  = y.data * 2. - 0.5 + grid_y
        pred_boxes[..., 2]  = (w.data * 2) ** 2 * anchor_w
        pred_boxes[..., 3]  = (h.data * 2) ** 2 * anchor_h
预测过程
首先对图像进行一些处理,然后将图像输入网络进行预测,调用上方的解码过程。
将预测框进行堆叠,进行非极大抑制
    #---------------------------------------------------#
    #   检测图片
    #---------------------------------------------------#
    def detect_image(self, image, crop = False, count = False):
        #---------------------------------------------------#
        #   计算输入图片的高和宽
        #---------------------------------------------------#
        image_shape = np.array(np.shape(image)[0:2])
        #---------------------------------------------------------#
        #   在这里将图像转换成RGB图像,防止灰度图在预测时报错。
        #   代码仅仅支持RGB图像的预测,所有其它类型的图像都会转化成RGB
        #---------------------------------------------------------#
        image       = cvtColor(image)
        #---------------------------------------------------------#
        #   给图像增加灰条,实现不失真的resize
        #   也可以直接resize进行识别
        #---------------------------------------------------------#
        image_data  = resize_image(image, (self.input_shape[1], self.input_shape[0]), self.letterbox_image)
        #---------------------------------------------------------#
        #   添加上batch_size维度
        #---------------------------------------------------------#
        image_data  = np.expand_dims(np.transpose(preprocess_input(np.array(image_data, dtype='float32')), (2, 0, 1)), 0)
        with torch.no_grad():
            images = torch.from_numpy(image_data)
            if self.cuda:
                images = images.cuda()
            #---------------------------------------------------------#
            #   将图像输入网络当中进行预测!
            #---------------------------------------------------------#
            outputs = self.net(images)
            outputs = self.bbox_util.decode_box(outputs)
            #---------------------------------------------------------#
            #   将预测框进行堆叠,然后进行非极大抑制
            #---------------------------------------------------------#
            results = self.bbox_util.non_max_suppression(torch.cat(outputs, 1), self.num_classes, self.input_shape,
                        image_shape, self.letterbox_image, conf_thres = self.confidence, nms_thres = self.nms_iou)

            if results[0] is None:
                return image

            top_label   = np.array(results[0][:, 6], dtype = 'int32')
            top_conf    = results[0][:, 4] * results[0][:, 5]
            top_boxes   = results[0][:, :4]
非极大抑制
得到最终的预测结果后还要进行得分排序与非极大抑制筛选。
得分筛选就是筛选出得分满足confidence置信度的预测框。
非极大抑制就是筛选出一定区域内属于同一种类得分最大的框。
得分筛选与非极大抑制的过程可以概括如下:
1、找出该图片中得分大于门限函数的框。在进行重合框筛选前就进行得分的筛选可以大幅度减少框的数量。
2、对种类进行循环,非极大抑制的作用是筛选出一定区域内属于同一种类得分最大的框,对种类进行循环可以帮助我们对每一个类分别进行非极大抑制。
3、根据得分对该种类进行从大到小排序。
4、每次取出得分最大的框,计算其与其它所有预测框的重合程度,重合程度过大的则剔除。
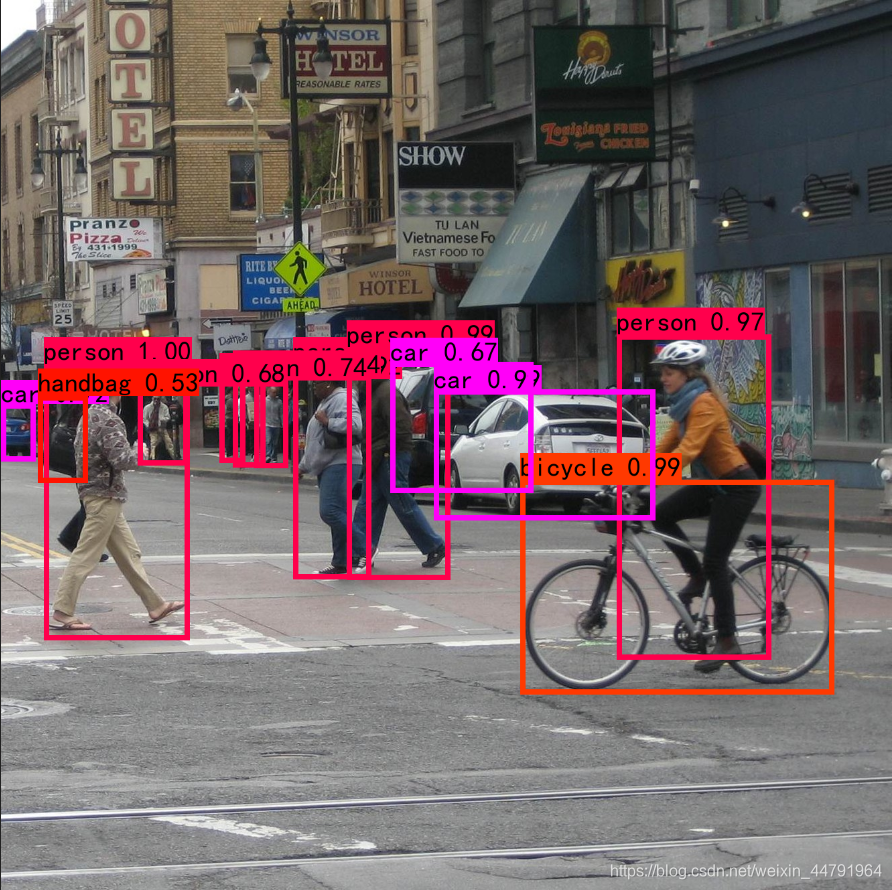
得分筛选与非极大抑制后的结果就可以用于绘制预测框了。
下图是经过非极大抑制的。
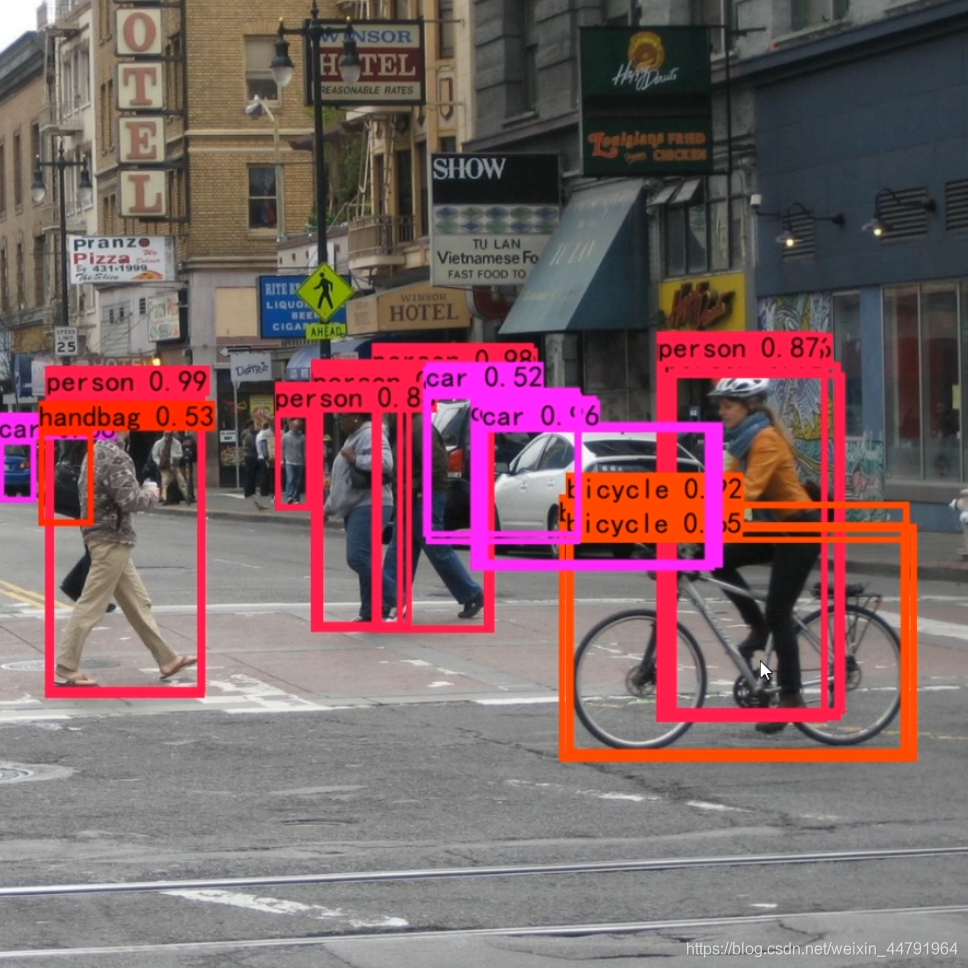
下图是未经过非极大抑制的。
    def non_max_suppression(self, prediction, num_classes, input_shape, image_shape, letterbox_image, conf_thres=0.5, nms_thres=0.4):
        #----------------------------------------------------------#
        #   将预测结果的格式转换成左上角右下角的格式。
        #   prediction  [batch_size, num_anchors, 85]
        #----------------------------------------------------------#
        box_corner          = prediction.new(prediction.shape)
        box_corner[:, :, 0] = prediction[:, :, 0] - prediction[:, :, 2] / 2
        box_corner[:, :, 1] = prediction[:, :, 1] - prediction[:, :, 3] / 2
        box_corner[:, :, 2] = prediction[:, :, 0] + prediction[:, :, 2] / 2
        box_corner[:, :, 3] = prediction[:, :, 1] + prediction[:, :, 3] / 2
        prediction[:, :, :4] = box_corner[:, :, :4]

        output = [None for _ in range(len(prediction))]
        for i, image_pred in enumerate(prediction):
            #----------------------------------------------------------#
            #   对种类预测部分取max。
            #   class_conf  [num_anchors, 1]    种类置信度
            #   class_pred  [num_anchors, 1]    种类
            #----------------------------------------------------------#
            class_conf, class_pred = torch.max(image_pred[:, 5:5 + num_classes], 1, keepdim=True)

            #----------------------------------------------------------#
            #   利用置信度进行第一轮筛选
            #----------------------------------------------------------#
            conf_mask = (image_pred[:, 4] * class_conf[:, 0] >= conf_thres).squeeze()

            #----------------------------------------------------------#
            #   根据置信度进行预测结果的筛选
            #----------------------------------------------------------#
            image_pred = image_pred[conf_mask]
            class_conf = class_conf[conf_mask]
            class_pred = class_pred[conf_mask]
            if not image_pred.size(0):
                continue
            #-------------------------------------------------------------------------#
            #   detections  [num_anchors, 7]
            #   7的内容为:x1, y1, x2, y2, obj_conf, class_conf, class_pred
            #-------------------------------------------------------------------------#
            detections = torch.cat((image_pred[:, :5], class_conf.float(), class_pred.float()), 1)

            #------------------------------------------#
            #   获得预测结果中包含的所有种类
            #------------------------------------------#
            unique_labels = detections[:, -1].cpu().unique()

            if prediction.is_cuda:
                unique_labels = unique_labels.cuda()
                detections = detections.cuda()

            for c in unique_labels:
                #------------------------------------------#
                #   获得某一类得分筛选后全部的预测结果
                #------------------------------------------#
                detections_class = detections[detections[:, -1] == c]

                #------------------------------------------#
                #   使用官方自带的非极大抑制会速度更快一些!
                #   筛选出一定区域内,属于同一种类得分最大的框
                #------------------------------------------#
                keep = nms(
                    detections_class[:, :4],
                    detections_class[:, 4] * detections_class[:, 5],
                    nms_thres
                )
                max_detections = detections_class[keep]

                # # 按照存在物体的置信度排序
                # _, conf_sort_index = torch.sort(detections_class[:, 4]*detections_class[:, 5], descending=True)
                # detections_class = detections_class[conf_sort_index]
                # # 进行非极大抑制
                # max_detections = []
                # while detections_class.size(0):
                #     # 取出这一类置信度最高的,一步一步往下判断,判断重合程度是否大于nms_thres,如果是则去除掉
                #     max_detections.append(detections_class[0].unsqueeze(0))
                #     if len(detections_class) == 1:
                #         break
                #     ious = bbox_iou(max_detections[-1], detections_class[1:])
                #     detections_class = detections_class[1:][ious < nms_thres]
                # # 堆叠
                # max_detections = torch.cat(max_detections).data

                # Add max detections to outputs
                output[i] = max_detections if output[i] is None else torch.cat((output[i], max_detections))

            if output[i] is not None:
                output[i]           = output[i].cpu().numpy()
                box_xy, box_wh      = (output[i][:, 0:2] + output[i][:, 2:4])/2, output[i][:, 2:4] - output[i][:, 0:2]
                output[i][:, :4]    = self.yolo_correct_boxes(box_xy, box_wh, input_shape, image_shape, letterbox_image)
        return output
版权归原作者 bulibuli蛋 所有, 如有侵权,请联系我们删除。