为什么要使用主动学习(Active Learning,AL)
针对有监督的学习任务,存在标记成本较为昂贵且标记难以大量获取的问题。
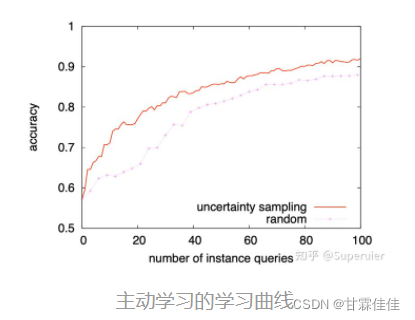
在此问题背景下,主动学习(Active Learning, AL)尝试通过选择性的标记较少数据而训练出表现较好的模型。
例如,此时我们有大量的猫和狗的数据,假设人为标记他们的类别是成本非常高的事情,这时需要用到主动学习从中挑选部分数据对他们进行标注以节约成本,用主动模型选取出的标注数据训练的模型比随机选取出的相同数量的标注数据训练的模型精度更高。
如图所示,图(a)是全部数据集,图©中使用主动学习策略仅选取30个样本训练出的逻辑回归模型即可达到90%的准确率,而图(b)中随机选取的30个样本训练出的模型却相对表现较差。

主动学习的工作流程
主动学习的关键是你选择的模型、使用的不确定性度量以及应用于请求标注的查询策略。
1.收集数据&选取模型
开始先选择一定数量的数据进行标注,选取我们需要训练的模型(比如逻辑回归模型)。
2.训练模型
将标注好的数据放入模型中进行训练,此时精度不会很高。
3.判断精度是否达到要求
①若精度达到要求(比如99%),则表示模型以及训练好,可以应用。
②若精度没有达到要求(比如只有12%),则表示模型未被训练好,这是需要利用主动学习选取对模型精度的提高最有用的数据进行人工标注。
4.定义查询策略
包括度量预测的不确定度和应用于请求标注的查询策略,返回策略选择出的需要标注的数据,进行人工标注,转至第2步。
例如:
defcustom_query_strategy(classifer, X):
    utility = utility_measure(classifer, X)#度量预测的不确定度
    query_idx = select_instances(utility)#应用于请求标注的查询策略return query_idx,X[query_idx]
主动学习的pytorch编码流程
主动学习的编写代码流程如下:

代码实战
接下来我们以一个主动回归例子为主,实现主动学习的编码。
1.导入相应的包
import numpy as np
import matplotlib.pyplot as plt
from sklearn.gaussian_process import GaussianProcessRegressor
from sklearn.gaussian_process.kernels import WhiteKernel, RBF
from modAL.models import ActiveLearner
%matplotlib inline
2.数据集准备以及初始数据集的选取
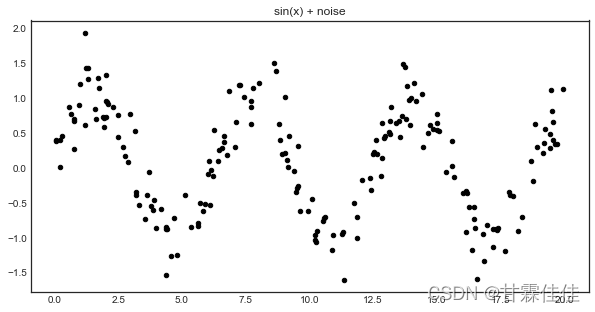
# 生成回归数据集 加高斯噪声
X = np.random.choice(np.linspace(0,20,10000), size=200, replace=False).reshape(-1,1)
y = np.sin(X)+ np.random.normal(scale=0.3, size=X.shape)
#原始数据集可视化with plt.style.context('seaborn-white'):
    plt.figure(figsize=(10,5))
    plt.scatter(X, y, c='k', s=20)
    plt.title('sin(x) + noise')
    plt.show()
# 初始数据集的选取
n_initial =5# 最开始随机选取5个标注好的数据集进行训练
initial_idx = np.random.choice(range(len(X)), size=n_initial, replace=False)
X_training, y_training = X[initial_idx], y[initial_idx]

3.定义主动学习器ActiveLeaner
(参数包括模型的选取estimator、应用于请求标注的查询策略query_stategy以及初始数据)
我们使用高斯回归作为模型进行训练GaussianProcessRegressor
#定义estimator高斯回归模型的核函数
kernel = RBF(length_scale=1.0, length_scale_bounds=(1e-2,1e3)) \
         + WhiteKernel(noise_level=1, noise_level_bounds=(1e-10,1e+1))
#定义query_stategy应用于请求标注的查询策略defGP_regression_std(regressor, X):
    _, std = regressor.predict(X, return_std=True)#不确定度度量
    query_idx = np.argmax(std)#样本的选取return query_idx, X[query_idx]
#定义ActiveLeaner 主动学习器
regressor = ActiveLearner(
    estimator=GaussianProcessRegressor(kernel=kernel),
    query_strategy=GP_regression_std,
    X_training=X_training.reshape(-1,1), y_training=y_training.reshape(-1,1))
#可视化初始模型的精度状况
X_grid = np.linspace(0,20,1000)
y_pred, y_std = regressor.predict(X_grid.reshape(-1,1), return_std=True)
y_pred, y_std = y_pred.ravel(), y_std.ravel()with plt.style.context('seaborn-white'):
    plt.figure(figsize=(10,5))
    plt.plot(X_grid, y_pred)
    plt.fill_between(X_grid, y_pred - y_std, y_pred + y_std, alpha=0.2)
    plt.scatter(X, y, c='k', s=20)
    plt.title('Initial prediction')
    plt.show()

4.定义n_queries(要标记数据的数量)进行主动学习
#定义n_queries(要标记数据的数量)进行主动学习
n_queries =10for idx inrange(n_queries):
    query_idx, query_instance = regressor.query(X)
    regressor.teach(X[query_idx].reshape(1,-1), y[query_idx].reshape(1,-1))
5.最终结果可视化
y_pred_final, y_std_final = regressor.predict(X_grid.reshape(-1,1), return_std=True)
y_pred_final, y_std_final = y_pred_final.ravel(), y_std_final.ravel()with plt.style.context('seaborn-white'):
    plt.figure(figsize=(10,8))
    plt.plot(X_grid, y_pred_final)
    plt.fill_between(X_grid, y_pred_final - y_std_final, y_pred_final + y_std_final, alpha=0.2)
    plt.scatter(X, y, c='k', s=20)
    plt.title('Prediction after active learning')
    plt.show()

可见,使用主动学习的方法让我们仅使用了25个点就拟合出1000个点生成的图像,大大节约了人工标记的成本。
版权归原作者 来包番茄沙司 所有, 如有侵权,请联系我们删除。