一、缓存类型
1、服务器端缓存

2、代理缓存

3、客户端缓存

代理缓存的原理:

二、代理缓存配置语法
2.1、代理缓存路径
proxy_cache_path path**[levels=levels][use_temp_path=on|off] keys_zone=name:*size [inactive=time][max_size=size]*
[manager_files=number][manager_sleep=time][manager_threshold=time]
[loader_files=number] [loader_sleep=time] [loader_threshold=time]
[purger=on|off][purger_files=number][purger_sleep=time]****[purger_threshold=time];
默认:-
配置块:http
解释:
- path 缓存文件路径
- levels 设置缓存文件目录层次;levels=1:2 表示两级目录
- keys_zone 设置缓存名字和共享内存大小
- inactive 在指定时间内没人访问则被删除
- max_size 最大缓存空间,如果缓存空间满,默认覆盖掉缓存时间最长的资源。
2.2、配置代理缓存
proxy_cache zone|off; # 是否开启缓存,是的话zone填写keys_zone后的name值,不开启off
默认:proxy_cache off;
配置块:http、server、location
2.3、缓存过期时间
proxy_cache_valid [code ...] time; # 缓存过期周期,code表示状态码
默认:-
配置块:http、server、location
例如配置 proxy_cache_valid 200 12h 意思是状态码为 200 的 缓存 12个小时。
2.4、缓存的维度
proxy_cache_key string; # 缓存的维度
默认:proxy_cache_key $scheme $proxy_host $request_uri; # http协议 + 主机名 + uri 把这三个作为一个单独的key来缓存。
配置块:http、server、location
三、示例
/etc/nginx/conf.d/cache.conf:
upstream imooc {
server 192.168.11.135:8001;
server 192.168.11.135:8002;
server 192.168.11.135:8003;
}
proxy_cache_path /etc/nginx/cache levels=1:2 keys_zone=imooc_cache:10m max_size=10g inactive=60m use_temp_path=off;
server {
listen 80;
server_name localhost;
#charset koi8-r;
#access_log /var/log/nginx/host.access.log main;
location / {
proxy_cache imooc_cache;
proxy_pass http://imooc;
proxy_cache_valid 200 304 12h;
proxy_cache_valid any 10m;
proxy_cache_key $host$uri$is_args$args;
add_header Nginx-Cache "$upstream_cache_status";
proxy_next_upstream error timeout invalid_header http_500 http_502 http_503 http_504;
}
}
proxy_cache_path /etc/nginx/cache: 存放缓存文件的目录levels=1:2: 目录分级,按照两层目录的方式来进行分级。keys_zone=imooc_cache:10m: zone空间的名字,后面配置 proxy_cache 后面配的就是这个名字。10m表示开辟key空间的大小, 一般1m大概能存放8000个key。max_size=10g: 表示缓存目录最大是多大,不能让缓存无限增长占满整个磁盘。当缓存空间满了后,Nginx就会触发淘汰规则,把不常访问的就会淘汰掉。inactive=60m: 这个60m是时间单位,表示60分钟, 表示如果在60分钟内如果某个缓存没有被访问过,就会把它清理掉 。use_temp_path=off:这个是用来存放临时文件的, **建议关闭**,如果打开的话,Nginx会另外建立一个目录和cache目录两个目录在更新缓存时容易出现一些性能方面的损耗。proxy_cache imooc_cache : 表示我们已经 开启了代理缓存 ,该值是proxy_cache_path中的 keys_zone 的值,如果不想使用代理缓存,将该值配置成 off。proxy_pass http://imooc: 代理的地址proxy_cache_valid 200 304 12h;: 状态码为200,304的响应过期时间为 12h。proxy_cache_valid any 10m;: 除了200和304状态码的其它状态码的缓存时间为10分钟。proxy_cache_key $host$uri$is_args$args;: 设置默认缓存的key。 $is_args表示请求中的URL是否带参数,如果带参数,$is_args值为"?"。如果不带参数,则是空字符串。 $args表示HTTP请求中的参数。add_header Nginx-Cache "$upstream_cache_status";: 增加一个http响应头信息,Nginx-Cache, 告诉客户端是否已经命中代理缓存 。proxy_next_upstream error timeout invalid_header http_500 http_502 http_503 http_504;: 当我们的后端其中一台服务器出现错误,超时,或者500,502,503,504等不正常的头返回时,就跳过这一台,去访问下一台。避免因为单台服务器的异常对前端产生影响。
三台服务器的配置:
第一台:
/etc/nginx/conf.d/server1.conf
server {
    listen       8001;
    server_name 127.0.0.1;
    location / {
        root /home/testzq/app/code1;
        index index.html;
    }
}
/home/testzq/app/code1/index.html
<html>
<head>
    <meta charset="utf-8">
    <title> server 1</title>
</head>
<body>
    <h1>server 1</h1>
</body>
</html>
第二台:
/etc/nginx/conf.d/server2.conf
server {
    listen       8002;
    server_name 127.0.0.1;
    location / {
        root /home/testzq/app/code2;
        index index.html;
    }
}
/home/testzq/app/code2/index.html
<html>
<head>
    <meta charset="utf-8">
    <title> server 2</title>
</head>
<body>
    <h1>server 2</h1>
</body>
</html>
第三台:
/etc/nginx/conf.d/server3.conf
server {
    listen       8003;
    server_name 127.0.0.1;
    location / {
        root /home/testzq/app/code3;
        index index.html;
    }
}
/home/testzq/app/code3/index.html
<html>
<head>
    <meta charset="utf-8">
    <title> server 3</title>
</head>
<body>
    <h1>server 3</h1>
</body>
</html>
重启nginx:
nginx -t -c /etc/nginx/nginx.conf            # 测试配置文件语法
nginx -s reload -c /etc/nginx/nginx.conf     # 重新加载配置项
先在代理服务器中将缓存关闭 (proxy_cache off),刷新页面,发现页面可以在三个站点间轮询显示:


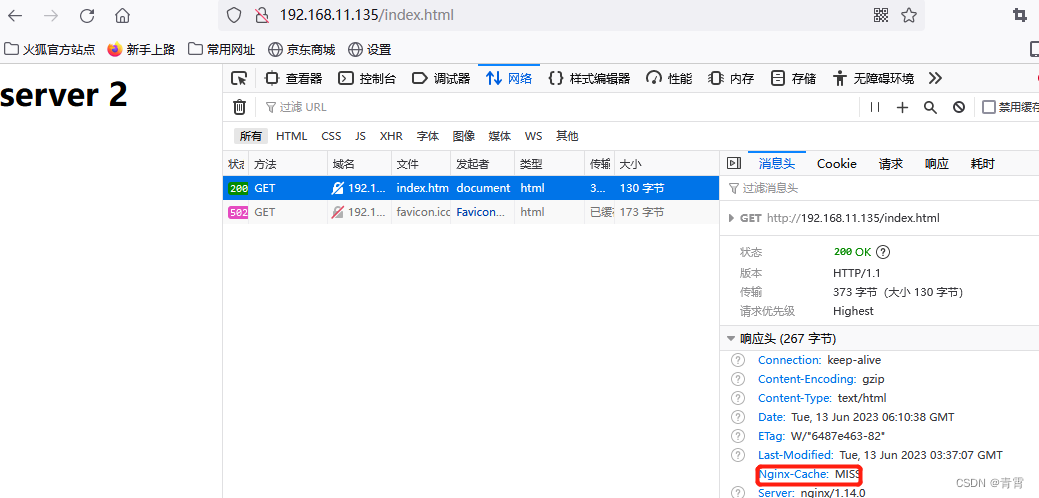
然后在把代理缓存打开,发现页面不在轮询了,请求头多了缓存头(这头是我们配置的):

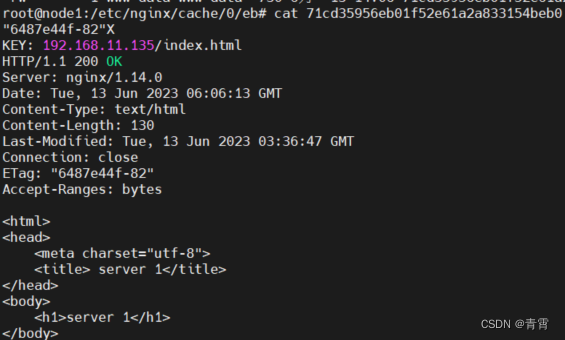
同时也会在我们配置的缓存目录(
/etc/nginx/cache)生成缓存目录:

缓存的内容如下:

四、清理指定缓存
如何清理指定缓存?
法1:rm -rf 缓存目录内容
法2:第三方扩展模块nginx_cache_purge

如何让部分页面不缓存:
proxy_no_cache string ...;
默认:-
配置块:http、server、location
比如:这里配置的意思就是当url中匹配到了 index.html , login, register, password 和 reset 时,不缓存该url所对应的页面

五、缓存命中分析
方式1:
通过设置 response 的头信息 Nginx**-**Cache:
add_header Nginx**-Cache "$upstream_cache_status";**
没缓存时,Nginx-Cache:Miss,有缓存时如下:

方式2:
通过设置 log_format,打印日志进行分析。(打印 $upstream_cache_status 这个Nginx默认的变量)
$upstream_cache_status这个变量有以下几种值:

缓存命中率 = HIT次数 / 总请求次数
1、首先在 /etc/nginx/nginx.conf 中的 log_format 中加入 $upstream_cache_status 这个变量:
log_format  main  '$remote_addr - $remote_user [$time_local] "$request" '
                  '$status $body_bytes_sent "$http_referer" '
                  '"$http_user_agent" "$http_x_forwarded_for" '
                  '"$upstream_cache_status"';
2、****然后配置缓存代理的 access_log 的路径

3、然后使用linux 的awk 命分析日志
awk '{if($NF=="\"HIT\""){hit++}}END{printf "%.2f", hit/NR}' /var/log/nginx/proxy_cache_access.log
命令解释:
- $NF : 日志每行的最后一个参数。
- hit:我们自定义的一个变量,用来记录被命中的次数。
- NR:AWK的内置变量,表示本次分析所扫描日志的总行数。
命令执行结果:

版权归原作者 青霄 所有, 如有侵权,请联系我们删除。