
官方的segformer源码是基于MMCV框架,整体包装较多,自己不便于阅读和学习,我这里使用的是Bubbliiiing大佬github复现的segformer版本。
Bubbliiiing大佬代码下载链接:
https://github.com/bubbliiiing/segformer-pytorch
大佬的代码很优秀简练,注释也很详细,代码里采用的是VOC数据集的格式,因此只需要把cityscapes数据格式修改即可。
目录
一、Segformer模型结构
Segformer特点:transformer + 特征融合 + 轻量级MLP + 选择3*3卷积并舍弃位置编码
1.OverlapPatchEmbed模块
分割输入图像,使用卷积操作将输入图像分成大小为 patch_size 的块,并使用步幅为 stride 移动这些块以创建重叠块。然后对每个块进行一维向量化,并通过标准化层进行标准化。该模块的输出包含一个形状为 (B, N, C) 的张量,其中 B 是批大小,N 是每个块中像素数量的数量,C 是嵌入维度。此外,该模块还返回 H W,这是输入图像的大小,因为在解码时需要了解原始图像的大小。
classOverlapPatchEmbed(nn.Module):def__init__(self, patch_size=7, stride=4, in_chans=3, embed_dim=768):super().__init__()
        patch_size  =(patch_size, patch_size)#7*7
        self.proj   = nn.Conv2d(in_chans, embed_dim, kernel_size=patch_size, stride=stride,
                              padding=(patch_size[0]//2, patch_size[1]//2))
        self.norm   = nn.LayerNorm(embed_dim)

        self.apply(self._init_weights)defforward(self, x):
        x = self.proj(x)
        _, _, H, W = x.shape
        x = x.flatten(2).transpose(1,2)
        x = self.norm(x)return x, H, W
2.Self-Attention模块
关于Self-Attention原理,可以去看这个大佬的文章,讲的很详细:https://zhuanlan.zhihu.com/p/410776234
核心为这个公式: Segformer中做了些改进。
classAttention(nn.Module):def__init__(self, dim, num_heads=8, qkv_bias=False, qk_scale=None, attn_drop=0., proj_drop=0., sr_ratio=1):super().__init__()assert dim % num_heads ==0,f"dim {dim} should be divided by num_heads {num_heads}."

        self.dim        = dim
        self.num_heads  = num_heads
        head_dim        = dim // num_heads
        self.scale      = qk_scale or head_dim **-0.5

        self.q          = nn.Linear(dim, dim, bias=qkv_bias)

        self.sr_ratio = sr_ratio
        if sr_ratio >1:
            self.sr     = nn.Conv2d(dim, dim, kernel_size=sr_ratio, stride=sr_ratio)
            self.norm   = nn.LayerNorm(dim)
        self.kv         = nn.Linear(dim, dim *2, bias=qkv_bias)

        self.attn_drop  = nn.Dropout(attn_drop)

        self.proj       = nn.Linear(dim, dim)
        self.proj_drop  = nn.Dropout(proj_drop)

        self.apply(self._init_weights)defforward(self, x, H, W):
        B, N, C = x.shape
        # bs, 16384, 32 => bs, 16384, 32 => bs, 16384, 8, 4 => bs, 8, 16384, 4
        q = self.q(x).reshape(B, N, self.num_heads, C // self.num_heads).permute(0,2,1,3)if self.sr_ratio >1:# bs, 16384, 32 => bs, 32, 128, 128
            x_ = x.permute(0,2,1).reshape(B, C, H, W)# bs, 32, 128, 128 => bs, 32, 16, 16 => bs, 256, 32
            x_ = self.sr(x_).reshape(B, C,-1).permute(0,2,1)
            x_ = self.norm(x_)# bs, 256, 32 => bs, 256, 64 => bs, 256, 2, 8, 4 => 2, bs, 8, 256, 4
            kv = self.kv(x_).reshape(B,-1,2, self.num_heads, C // self.num_heads).permute(2,0,3,1,4)else:
            kv = self.kv(x).reshape(B,-1,2, self.num_heads, C // self.num_heads).permute(2,0,3,1,4)
        k, v = kv[0], kv[1]# bs, 8, 16384, 4 @ bs, 8, 4, 256 => bs, 8, 16384, 256
        attn =(q @ k.transpose(-2,-1))* self.scale
        attn = attn.softmax(dim=-1)
        attn = self.attn_drop(attn)# bs, 8, 16384, 256  @ bs, 8, 256, 4 => bs, 8, 16384, 4 => bs, 16384, 32
        x =(attn @ v).transpose(1,2).reshape(B, N, C)# bs, 16384, 32 => bs, 16384, 32
        x = self.proj(x)
        x = self.proj_drop(x)return x
3.MixFFN模块

不同于VIT,segformer舍弃了位置编码,使用3x3的卷积构建了MixFFN模块。
classMlp(nn.Module):def__init__(self, in_features, hidden_features=None, out_features=None, act_layer=GELU, drop=0.):super().__init__()
        out_features    = out_features or in_features
        hidden_features = hidden_features or in_features

        self.fc1    = nn.Linear(in_features, hidden_features)
        self.dwconv = DWConv(hidden_features)
        self.act    = act_layer()

        self.fc2    = nn.Linear(hidden_features, out_features)

        self.drop   = nn.Dropout(drop)

        self.apply(self._init_weights)defforward(self, x, H, W):
        x = self.fc1(x)
        x = self.dwconv(x, H, W)
        x = self.act(x)
        x = self.drop(x)
        x = self.fc2(x)
        x = self.drop(x)return x
4.拼接融合与MLP解码
这部分就是把前面的拼接然后输出。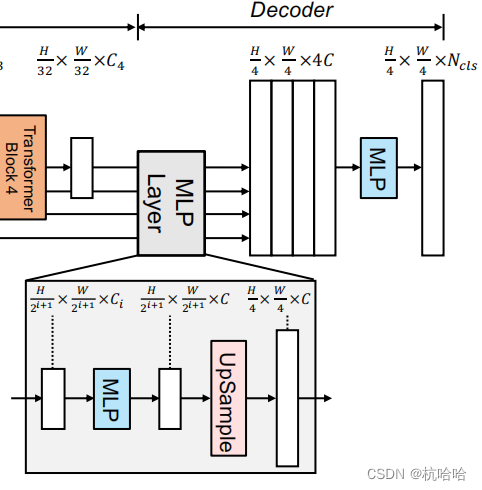
defforward(self, inputs):
        c1, c2, c3, c4 = inputs

        ############## MLP decoder on C1-C4 ###########
        n, _, h, w = c4.shape

        _c4 = self.linear_c4(c4).permute(0,2,1).reshape(n,-1, c4.shape[2], c4.shape[3])
        _c4 = F.interpolate(_c4, size=c1.size()[2:], mode='bilinear', align_corners=False)

        _c3 = self.linear_c3(c3).permute(0,2,1).reshape(n,-1, c3.shape[2], c3.shape[3])
        _c3 = F.interpolate(_c3, size=c1.size()[2:], mode='bilinear', align_corners=False)

        _c2 = self.linear_c2(c2).permute(0,2,1).reshape(n,-1, c2.shape[2], c2.shape[3])
        _c2 = F.interpolate(_c2, size=c1.size()[2:], mode='bilinear', align_corners=False)

        _c1 = self.linear_c1(c1).permute(0,2,1).reshape(n,-1, c1.shape[2], c1.shape[3])

        _c = self.linear_fuse(torch.cat([_c4, _c3, _c2, _c1], dim=1))

        x = self.dropout(_c)
        x = self.linear_pred(x)return x
二、cityscapes代码修改
1.数据集文件夹格式
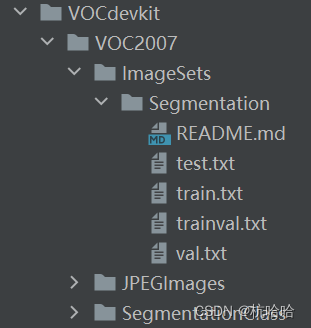
这里数据集标签图片需要为灰度图或者八位彩图,标签的每个像素点的值就是这个像素点所属的种类。
因此,使用cityscapes几个标签中的 _labelIds.png标签。
数据集划分按自己需求修改voc_annotation.py文件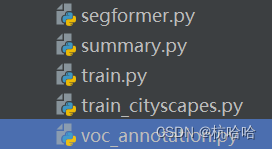
2.修改dataloader.py文件
原本的这个标签中的类别是0到33和-1,我做的19类别分割。修改dataloader.py文件:
我这里直接复制了我之前使用过的encode_target内容加入进去:
CityscapesClass = namedtuple('CityscapesClass',['name','id','train_id','category','category_id','has_instances','ignore_in_eval','color'])
    classes =[
        CityscapesClass('unlabeled',0,19,'void',0,False,True,(0,0,0)),
        CityscapesClass('ego vehicle',1,19,'void',0,False,True,(0,0,0)),
        CityscapesClass('rectification border',2,19,'void',0,False,True,(0,0,0)),
        CityscapesClass('out of roi',3,19,'void',0,False,True,(0,0,0)),
        CityscapesClass('static',4,19,'void',0,False,True,(0,0,0)),
        CityscapesClass('dynamic',5,19,'void',0,False,True,(111,74,0)),
        CityscapesClass('ground',6,19,'void',0,False,True,(81,0,81)),
        CityscapesClass('road',7,0,'flat',1,False,False,(128,64,128)),
        CityscapesClass('sidewalk',8,1,'flat',1,False,False,(244,35,232)),
        CityscapesClass('parking',9,19,'flat',1,False,True,(250,170,160)),
        CityscapesClass('rail track',10,19,'flat',1,False,True,(230,150,140)),
        CityscapesClass('building',11,2,'construction',2,False,False,(70,70,70)),
        CityscapesClass('wall',12,3,'construction',2,False,False,(102,102,156)),
        CityscapesClass('fence',13,4,'construction',2,False,False,(190,153,153)),
        CityscapesClass('guard rail',14,19,'construction',2,False,True,(180,165,180)),
        CityscapesClass('bridge',15,19,'construction',2,False,True,(150,100,100)),
        CityscapesClass('tunnel',16,19,'construction',2,False,True,(150,120,90)),
        CityscapesClass('pole',17,5,'object',3,False,False,(153,153,153)),
        CityscapesClass('polegroup',18,19,'object',3,False,True,(153,153,153)),
        CityscapesClass('traffic light',19,6,'object',3,False,False,(250,170,30)),
        CityscapesClass('traffic sign',20,7,'object',3,False,False,(220,220,0)),
        CityscapesClass('vegetation',21,8,'nature',4,False,False,(107,142,35)),
        CityscapesClass('terrain',22,9,'nature',4,False,False,(152,251,152)),
        CityscapesClass('sky',23,10,'sky',5,False,False,(70,130,180)),
        CityscapesClass('person',24,11,'human',6,True,False,(220,20,60)),
        CityscapesClass('rider',25,12,'human',6,True,False,(255,0,0)),
        CityscapesClass('car',26,13,'vehicle',7,True,False,(0,0,142)),
        CityscapesClass('truck',27,14,'vehicle',7,True,False,(0,0,70)),
        CityscapesClass('bus',28,15,'vehicle',7,True,False,(0,60,100)),
        CityscapesClass('caravan',29,19,'vehicle',7,True,True,(0,0,90)),
        CityscapesClass('trailer',30,19,'vehicle',7,True,True,(0,0,110)),
        CityscapesClass('train',31,16,'vehicle',7,True,False,(0,80,100)),
        CityscapesClass('motorcycle',32,17,'vehicle',7,True,False,(0,0,230)),
        CityscapesClass('bicycle',33,18,'vehicle',7,True,False,(119,11,32)),
        CityscapesClass('license plate',-1,19,'vehicle',7,False,True,(0,0,142)),]

    id_to_train_id = np.array([c.train_id for c in classes])defencode_target(cls, png):return cls.id_to_train_id[np.array(png)]
同时修改def getitem(self, index)函数:
修改一下split,原本的voc的标签和图像名称一样,加个image_name,然后加个png = self.encode_target(png)
def__getitem__(self, index):
        annotation_line = self.annotation_lines[index]
        name            = annotation_line.split()[0]#-------------------------------##   从文件中读取图像#-------------------------------#
        image_name = annotation_line.split('_gtFine_labelIds')[0]+'_leftImg8bit'
        jpg = Image.open(os.path.join(os.path.join(self.dataset_path,"VOC2007/JPEGImages"), image_name +".png"))#jpg         = Image.open(os.path.join(os.path.join(self.dataset_path, "VOC2007/JPEGImages"), name + ".png"))
        png         = Image.open(os.path.join(os.path.join(self.dataset_path,"VOC2007/SegmentationClass"), name +".png"))#-------------------------------##   数据增强#-------------------------------#
        jpg, png    = self.get_random_data(jpg, png, self.input_shape, random = self.train)

        jpg         = np.transpose(preprocess_input(np.array(jpg, np.float64)),[2,0,1])
        png         = np.array(png)
        png = self.encode_target(png)#png[png >= self.num_classes] = self.num_classes#-------------------------------------------------------##   转化成one_hot的形式#   在这里需要+1是因为voc数据集有些标签具有白边部分#   我们需要将白边部分进行忽略,+1的目的是方便忽略。#-------------------------------------------------------#
        seg_labels  = np.eye(self.num_classes +1)[png.reshape([-1])]
        seg_labels  = seg_labels.reshape((int(self.input_shape[0]),int(self.input_shape[1]), self.num_classes +1))return jpg, png, seg_labels
3.获取RGB预测图
get_miou.py文件中生成的图为灰度图,看到的是近似全黑的图。如果想要预测出来的是RGB图,将预测结果中每个像素的类别转换成RGB颜色值。因此另外写了一个映射函数,通过定义一个颜色映射表,将每个类别映射到一个RGB颜色值,并输出保存。
defCityscapesLABELtoRGB():# 定义RGB颜色映射关系
    color_map ={0:[128,64,128],1:[244,35,232],2:[70,70,70],3:[102,102,156],4:[190,153,153],5:[153,153,153],6:[250,170,30],7:[220,220,0],8:[107,142,35],9:[152,251,152],10:[70,130,180],11:[220,20,60],12:[255,0,0],13:[0,0,142],14:[0,0,70],15:[0,60,100],16:[0,80,100],17:[0,0,230],18:[119,11,32],19:[0,0,0]}# 加载类别标签图像
    label_path ="miou_out/detection-results"
    rgb_folder_path ="RGB"for file_name in os.listdir(label_path):# 加载类别标签图像
        rgb_path = os.path.join(label_path, file_name)
        img = Image.open(rgb_path)
        label_arr = np.array(img)# 将类别标签转换为RGB标签
        rgb_arr = np.zeros((label_arr.shape[0], label_arr.shape[1],3), dtype=np.uint8)for key, value in color_map.items():
            rgb_arr[label_arr == key]= value

        # 将RGB标签保存为PNG图像

        rgb_path = os.path.join(rgb_folder_path, os.path.splitext(file_name)[0]+".png")
        label_img = Image.fromarray(rgb_arr)
        label_img.save(rgb_path,"PNG", quality=100, bitdepth=8)
版权归原作者 杭哈哈 所有, 如有侵权,请联系我们删除。