
需要源码和图片集请点赞关注收藏后评论区留言或者私信~~~
一、VGG模型
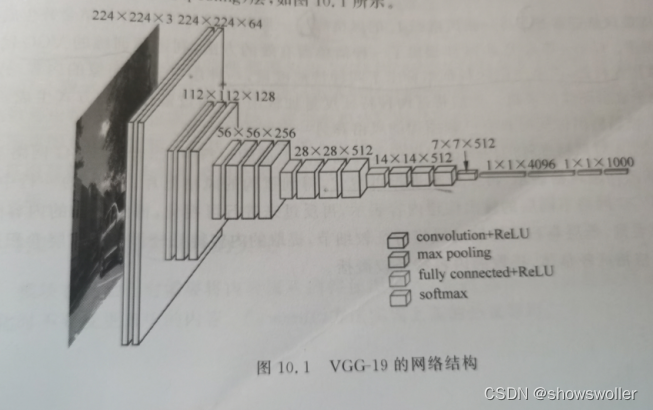
VGG模型是科学家们提出的图像分类模型,这一模型采用了简单粗暴的堆砌3×3卷积层的方式构建模型,并花费大量的时间逐层训练,最终在ImageNet图像分类比赛中获得了亚军,这一模型的优点是结构简单,容易理解,便于利用到其他任务当中
VGG-19网络的卷积部分由5哥卷积块构成,每个卷积块中有多个卷积层,结尾处有一个池化层 结构如下图所示
二、图像风格迁移介绍
图像风格迁移是指将一张风格图的风格与另一张内容图的内容想结合并生成新的图像,利用预训练的VGG网络提取图像特征,并基于图像特征组合出了两种特征度量,一种用于表示图像的内容,另一种用于表示图像的风格,它们将这两种特征度量加权组合,通过最优化的方式生成新的图像,使新的图像同时具有一幅图像的风格和另一幅图像的内容
风格图如下 是梵高著名的画作《星空》

内容图如下 选自意大利的一个街道(可以看出是个阳光晴朗的日子,非常的暖色调)
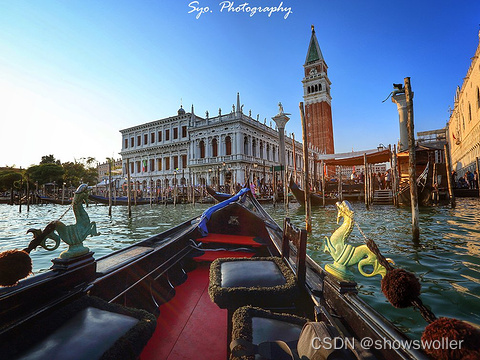
让我们来看看进行图像风格迁移,即把梵高的风格加到这幅图的内容上会是什么效果!
哈哈 显示是有一点抽象和模糊的感觉,但这也正是星空的风格!

三、内容损失函数
内容损失函数用于衡量两幅图像之间的内容差异大小,通过两幅图片由VGG网络某一卷积层提取的特征图来表示
四、风格损失函数
风格损失函数用于衡量两幅图像之间的风格差异大小,首先需要通过计算特征图的Gram矩阵得到图像风格的数学表示
五、主程序代码的实现
程序分为以下几部分
1:图像预处理 接收一个PIL图片,改变图片大小,转换为张量,进行标准化然后乘以255
2:参数定义
3:模型初始化
4:运行主函数
5:利用VGG网络建立损失函数
6:优化
7:可视化
最后 部分源码如下
import torch
import torch.nn as nn
import torchvision
import torchvision.transforms as transforms
from PIL import Image

def g = input.size()
    features = input.view(a * b, c * d)
    G = torch.mm(features, features.t())
    return G

class ContentLoss(nn.Module):

    def __init__(self, target):
        super(ContentLoss, self).__init__()
        self.target = target.detach()

    def forward(self, input):
        self.loss = torch.sum((input-self.target) ** 2) / 2.0
        return input

class Style
    def __init__(self, target_feature):
        super(StyleLoss, self).__init__()
        self.target = gram_matrix(target_feature).detach()

    def forward(self, input):
        a, b, c, d = input.size()
        G = gram_matrix(input)
        self.loss = torch.sum((G-self.target) ** 2) / (4.0 * b * b * c * d)
        return input

class ImagCder:

    def __init__(self, image_size, device):

        self.device = device

        self.preproc = transforms.Compose([
            transforms.Resize(image_size),  # 改变图像大小
            transforms.ToTensor(),
            transforms.Normalize(mean=[0.485, 0.456, 0.406],  # 标准化
                                 std=[1, 1, 1]),
            transforms.Lambda(lambda x: x.mul_(255))
        ])

        self.postproc = transforms.Compose([
            transforms.Lambda(lambda x: x.mul_(1./255)),
            transforms.Normalize(mean=[-0.485, -0.456, -0.406], std=[1,1,1])
        ])

        self.to_image = transforms.ToPILImage()

    def encode(self, image_path):
        image = Image.open(image_path)
        image = self.preproc(image)
        image = image.unsqueeze(0)
        return image.to(self.device, torch.float)

    def decode(self, image):
        image = image.cpu().clone()
        image = image.squeeze()
        image = self.postproc(image)
        image = image.clamp(0, 1)
        return self.to_image(image)

content_layers = ['conv_4_2'] # 内容损失函数使用的卷积层
style_layers = ['conv_1_1', 'conv2_1', 'conv_3_1', 'conv_4_1', 'conv5_1'] # 风格损失函数使用的卷积层
content_weights = [1] # 内容损失函数的权重
style_weights = [1e3, 1e3, 1e3, 1e3, 1e3] # 风格损失函数的权重
num_steps=200 # 最优化的步数

class Mo:

    def __init__(self, device, image_size):

        cnn = torchvision.models.vgg19(weights=True).features.to(device).eval()
        self.cnn = deepcopy(cnn) # 获取预训练的VGG19卷积神经网络
        self.device = device

        self.content_losses = []
        self.style_losses = []

        self.image_proc = ImageCoder(image_size, device)

    def run(self, content_image_path, style_image_path):

        content_image = self.image_proc.encode(content_image_path)
        style_image = self.image_proc.encode(style_image_path)

        self._build(content_image, style_image) # 建立损失函数
        output_image = self._transfer(content_image) # 进行最优化

        return self.image_proc.decode(output_image)

    def _bd(self, content_image, style_image):

        self.model = nn.Sequential()

        block_idx = 1
        conv_idx = 1

        # 逐层遍历VGG19,取用需要的卷积层
        for layer in self.cnn.children():

            # 识别该层类型并进行编号命名
            if= 'conv_{}_{}'.format(block_idx, conv_idx)
                conv_idx += 1
            elif isinstance(layer, nn.ReLU):
                name = 'relu_{}_{}'.format(block_idx, conv_idx)
                layer = nn.ReLU(inplace=False)
            elif isinstance(layer, nn.MaxPool2d):
                name = 'pool_{}'.format(block_idx)
                block_idx += 1
                conv_idx = 1
            elif isinstance(layer, nn.BatchNorm2d):
                name = 'bn_{}'.format(block_idx)
            else:
                raise Exception("invalid layer")

            self.model.add_module(name, layer)

            # 添加内容损失函数
            if name in content_layers:
                target = self.model(content_image).detach()
                content_loss = ContentLoss(target)
                self.model.add_module("content_loss_{}_{}".format(block_idx, conv_idx), content_loss)
                self.content_losses.append(content_loss)

            # 添加风格损失函数
            if name in style_layers:
                target_feature = self.model(style_image).detach()
                style_l StyleLoss(target_feature)
                self.model.add_module("style_loss_{}_{}".format(block_idx, conv_idx), style_loss)
                self.style_losses.append(style_loss)

        # 留下有用的部分
        i = 0
        for i in range(len(self.model) - 1, -1, -1):
            if isinstance(self.model[i], ContentLoss) or isinstance(self.model[i], StyleLoss):
                break
        self.model = self.model[:(i + 1)]

    def _transfer(self, content_image):

        output_image = content_image.clone()
        random_image = torch.randn(content_image.data.size(), device=self.device)
        output_image = 0.4 * output_image + 0.6 * random_image

        optimizer = torch.optim.LBFGS([output_image.requires_grad_()])

        print('Optimizing..')
        run = [0]
        while run[0] <= num_steps:

            def closure():

                optimizer.zero_grad()
                self.model(output_image)
                style_score = 0
                content_score = 0

                for sl, sw in zip(self.style_losses, style_weights):
                    style_score += sl.loss * sw
                for cl, cw in zip(self.content_losses, content_weights):
                    content_score += cl.loss * cw

                loss = style_score + content_score
                loss.backward()

                run[0] += 1
                if run[0] % 50 == 0:
                    print("iteration {}: Loss: {:4f} Style Loss: {:4f} Content Loss: {:4f}"
                          .format(run, loss.item(), style_score.item(), content_score.item()))
                return loss

            optimizer.step(closure)

        return output_image

device = torch.device("cuda" if torch.cuda.is_available() else "cpu")
image_size = 256
model = Model(device, image_size)

style_image_path =
content_image_path =
out_image = del.run(content_image_path, style_image_path)
plt.imshow(out_image)
plt.show()
** 创作不易 觉得有帮助请点赞关注收藏~~~**
本文转载自: https://blog.csdn.net/jiebaoshayebuhui/article/details/127809992
版权归原作者 showswoller 所有, 如有侵权,请联系我们删除。
版权归原作者 showswoller 所有, 如有侵权,请联系我们删除。