
一、背景与总概
    利用Python语言编写和调试一个识别手写数字图像的三层深度前馈网络,包括数据预处理,网络模型构建,模型参数初始化和正向推理,反向梯度下降参数寻优,最后模型预测的功能。目的是学会基本的深度网络模型建立、训练和推理过程,理解深度网络的实现原理。

    通过自己学习人工智能之后,发现了三个的重要经验和总结,第一个是你对你研究事物本质的理解;第二个是,将你研究事物进行数据化,找到一个合理的数据表示以及数据的结构;第三个是,寻找与这个数据表示的形式和结构合适的“模型”(即模型算法等)。依据上面数据到模型的这个思路,对下文进行一个描写

    首先,介绍一下MNIST手写数据集,这就是我们研究的事物了。该数据集包含60,000个用于训练的示例和10,000个用于测试的示例。数据集包含了0-9共10类手写数字图片,每张图片都做了尺寸归一化,都是28x28大小的灰度图。
训练集图像:train-images-idx3-ubyte.gz(9.9MB,包含60000个样本)
训练集标签:train-labels-idx1-ubyte.gz(29KB,包含60000个标签)
测试集图像:t10k-images-idx3-ubyte.gz(1.6MB,包含10000个样本)
测试集标签:t10k-labels-idx1-ubyte.gz(5KB,包含10000个标签)
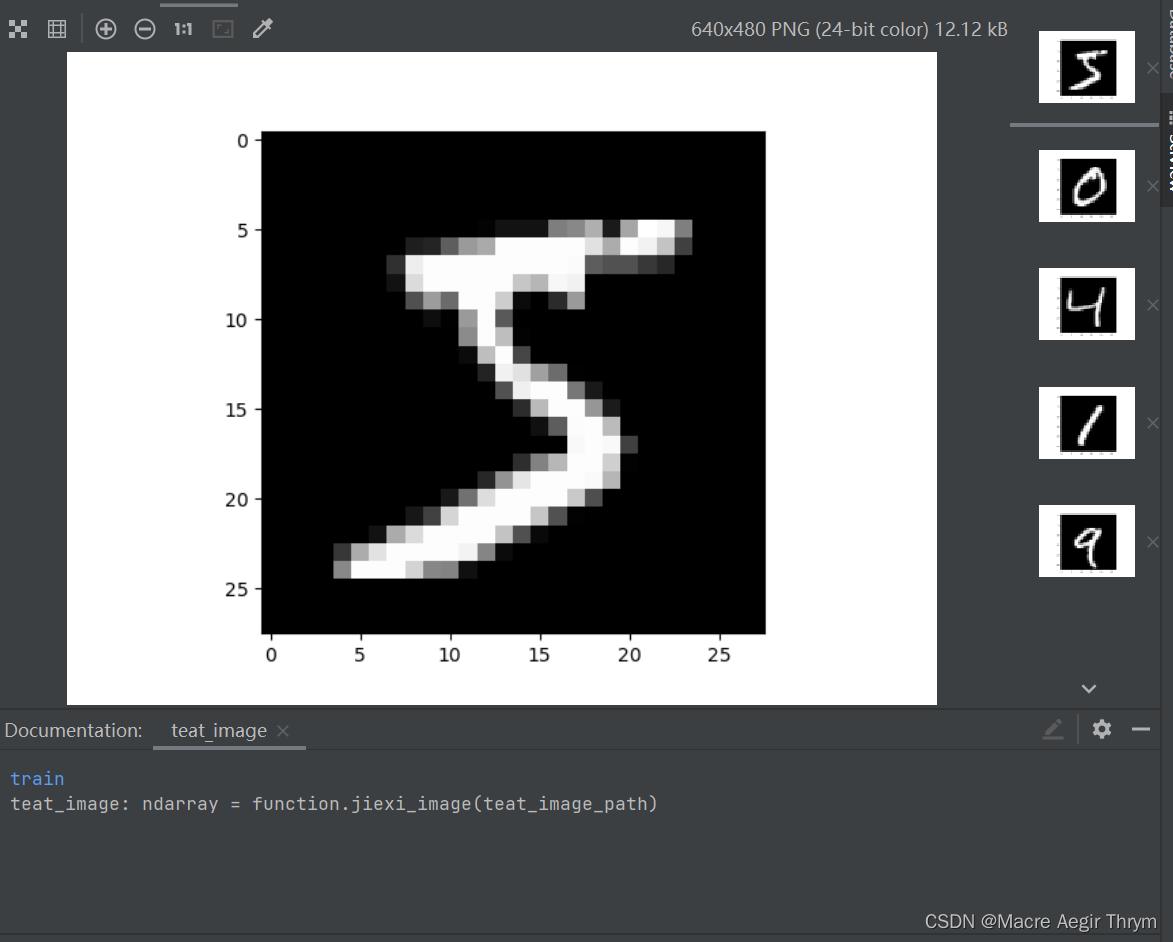
下图展示一些具体例子:
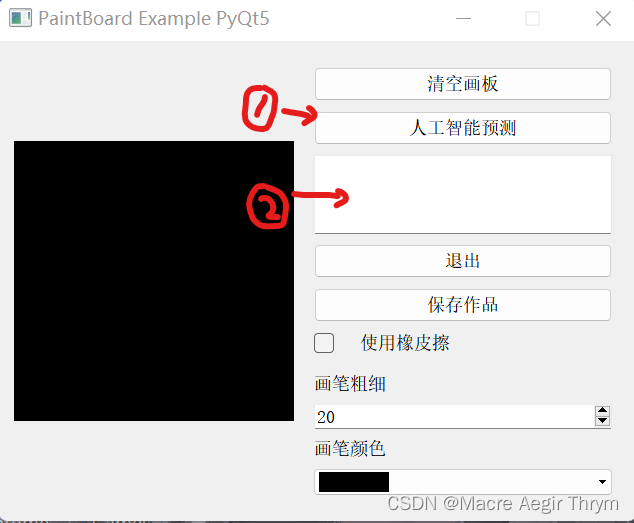
其次是手写板程序,在PyQt5实例 画板小程序_pyqt5画图板_CreatorGG的博客-CSDN博客的程序基础之上添加了,1人工智能预测,2预测结果展示的文本框。
传统机器学习的问题与缺陷随着深度学习的发展被得到解决,深度学习也可以说是神经网络的重命名,他是建立在多层非线性的神经网络结构之上,对数据表示进行抽象的一系列机器学习。深度学习的出现使得图像,语言得到突破性的发展。本此处理的数据为图像,所以最后我本次选用的模型是人工智能深度神经网络(一般的神经网络)。你也可以使用卷积神经网络模型,卷积神经网络是对将局部的特征十分的敏感,正确率会更高。
二、研究对象
    在你的PycharmIDE里创建一个function.py的文件,在里面定义如下函数:

     1:jiexi_image(path),此函数需要一个字符串对象的输入,是两个训练集和测试集的图像文件地址,返回的对象是一个numpy.array的对象。
def jiexi_image(path):
    # 用二进制读取
    data = open(path, 'rb').read()
    offset = 0
    fmt_header = '>iiii'
    magic_number, num_images, num_rows, num_cols = struct.unpack_from(fmt_header, data, offset)
    print('魔数:%d, 图片数量: %d张, 图片大小: %d*%d' % (magic_number, num_images, num_rows, num_cols))
    image_size = num_rows * num_cols
    offset += struct.calcsize(fmt_header)
    fmt_image = '>' + str(image_size) + 'B'
    images = np.empty((num_images, num_rows, num_cols))
    for i in range(num_images):
        if (i + 1) % 10000 == 0:
            print('已解析 %d' % (i + 1) + '张')
        images[i] = np.array(struct.unpack_from(fmt_image, data, offset)).reshape((num_rows, num_cols))
        offset += struct.calcsize(fmt_image)
    return images
2: jiexi_label(path) ,传入参数是训练集和测试集的两个label标签文件地址,是一个字符串对象,返回的也是一个numpy.array的对象。
def jiexi_label(path):
    data = open(path, 'rb').read()
    offset = 0
    fmt_header = '>ii'
    magic_number, num_images = struct.unpack_from(fmt_header, data, offset)
    print('魔数:%d, 图片数量: %d张' % (magic_number, num_images))
    # 解析数据集
    offset += struct.calcsize(fmt_header)
    fmt_image = '>B'
    labels = np.empty(num_images)
    for i in range(num_images):
        if (i + 1) % 10000 == 0:
            print('已解析 %d' % (i + 1) + '张')
        labels[i] = struct.unpack_from(fmt_image, data, offset)[0]
        offset += struct.calcsize(fmt_image)
    return labels
3:plot_data(images,labels,n,issave = False),传入图像,image是一个numpy.array对象;传入的标签,labels是一个numpy.array对象;传入的issave是一个判断逻辑值,如果是真就保存图片,但是一般是不保存的。
def plot_data(images,labels,n,issave = False):
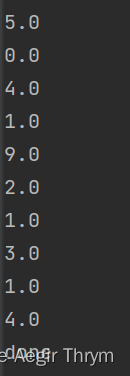
for i in range(n):
print(labels[i])
plt.imshow(images[i], cmap='gray')
plt.show()
# if(issave == True):
# plt.savefig(fname = "save"+str(datetime.datetime.now())+".jpg")
print('done')
接下来在你的工程文件夹下建立一个train.py 文件,在里面利用function.py里你设定的函数来解析训练集图像和测试集图像,训练集标签和测试集标签,然后利用plot_data函数打印数据,查看是否对应。
import function
#start1 = time.time()
train_image_path = './MNIST/train-images-idx3-ubyte/train-images.idx3-ubyte'
train_lable_path = './MNIST/train-labels-idx1-ubyte/train-labels.idx1-ubyte'
teat_image_path = './MNIST/t10k-images-idx3-ubyte/t10k-images.idx3-ubyte'
teat_lable_path = './MNIST/t10k-labels-idx1-ubyte/t10k-labels.idx1-ubyte'
# #加载数据
train_image = function.jiexi_image(train_image_path)
train_lable = function.jiexi_label(train_lable_path)
teat_image = function.jiexi_image(teat_image_path)
test_lable = function.jiexi_label(teat_lable_path)
# print(train_image.shape)

function.plot_data(train_image, train_lable, 10, True)
最终效果:
 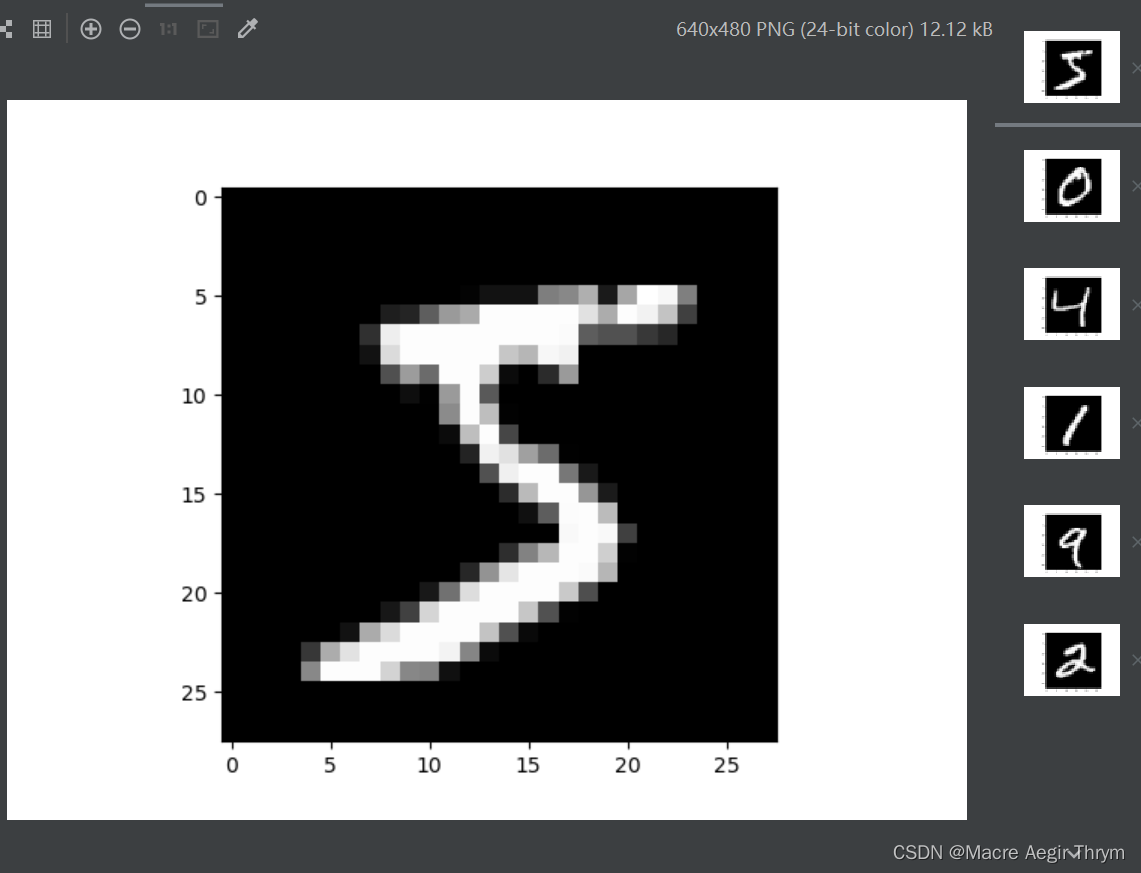
可以看出是正确的。
三、数据表示与结构
既然train_image, train_lable, teat_image , test_lable 是numpy.array对象,那么我们就可以对他进行操作,对他进行打印输出,print(train_image):
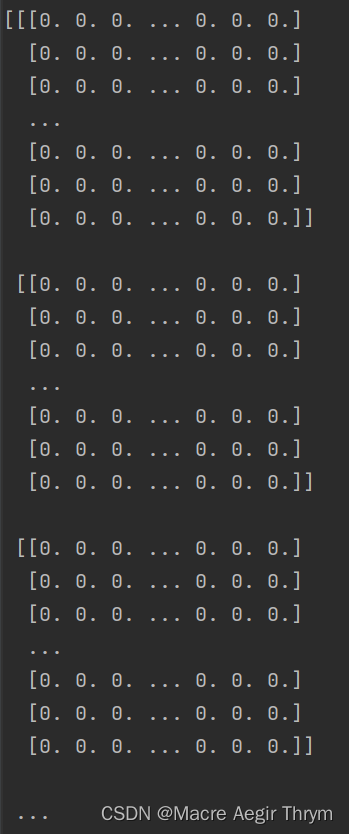
什么也看不出来,那我们打印一下他的维度来看看, 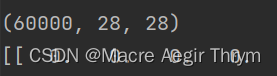,是一个三维数组。
打印train_image[0]来看:

然后可以推知,我们要处理的对象结构是如下图所示。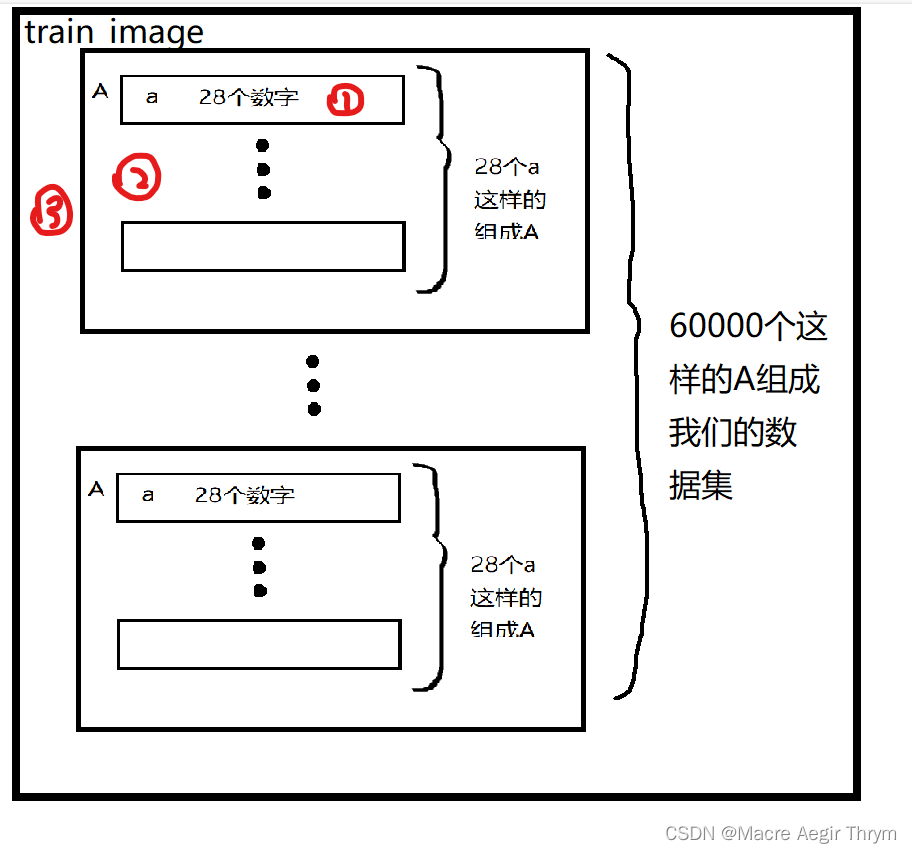
四、选择的模型
    传统机器学习的问题与缺陷随着深度学习的发展被得到解决,深度学习也可以说是神经网络的重命名,他是建立在多层非线性的神经网络结构之上,对数据表示进行抽象的一系列机器学习。深度学习的出现使得图像,语言得到突破性的发展。本此处理的数据为图像,所以最后我本次选用的模型是人工智能深度神经网络(一般的神经网络)。你也可以使用卷积神经网络模型,卷积神经网络是对将局部的特征十分的敏感,正确率会更高。

    在你的工程文件下创建一个DeepNET.py的文件,里面是深度神经网络所需要的各种函数。从零开始,从理论到代码实现无论是在研究和学习都是十分有帮助的,希望我和各位读者都保持住这个习惯。

    本次,假设你已经有一定的知识储备了,如梯度下降法的本质,神经网络结构基本清楚,如果不清楚就十分推荐,deeplearning的吴大师的视频教程 [双语字幕]吴恩达深度学习deeplearning.ai_哔哩哔哩_bilibili 教的非常细致。

    第一步,导入库,在DeepNET.py的文件里完善搭建深度神经网络所需要的函数。

    深度神经网络概述,Deep Neural Networks, 深度神经网络,以下简称DNN。DNN里最基本的单元是神经元模型。每个神经元与其他神经元相连,当他“兴奋”时,就会向相连的神经元发送物质,改变神经元的电位。如果某个神经元的电位超过了一个阀值,那么它就会被激活。结果抽象可以得到沿用至今的M_P神经元模型。

线性部分,是简单的相乘相加,激活部分是利用激活函数处理得到输出。常见的激活函数有sigmoid,relu等,本次采用的激活函数是relu函数。

由神经元组成的多层神经网络,如图所示。有输入层,输出层以及中间隐含层。每一个输入线性求合,通过激活函数,传到下一个神经元,我们大可不必一个个的去算,我们可以使用向量化来使得我们的程序更加简洁。

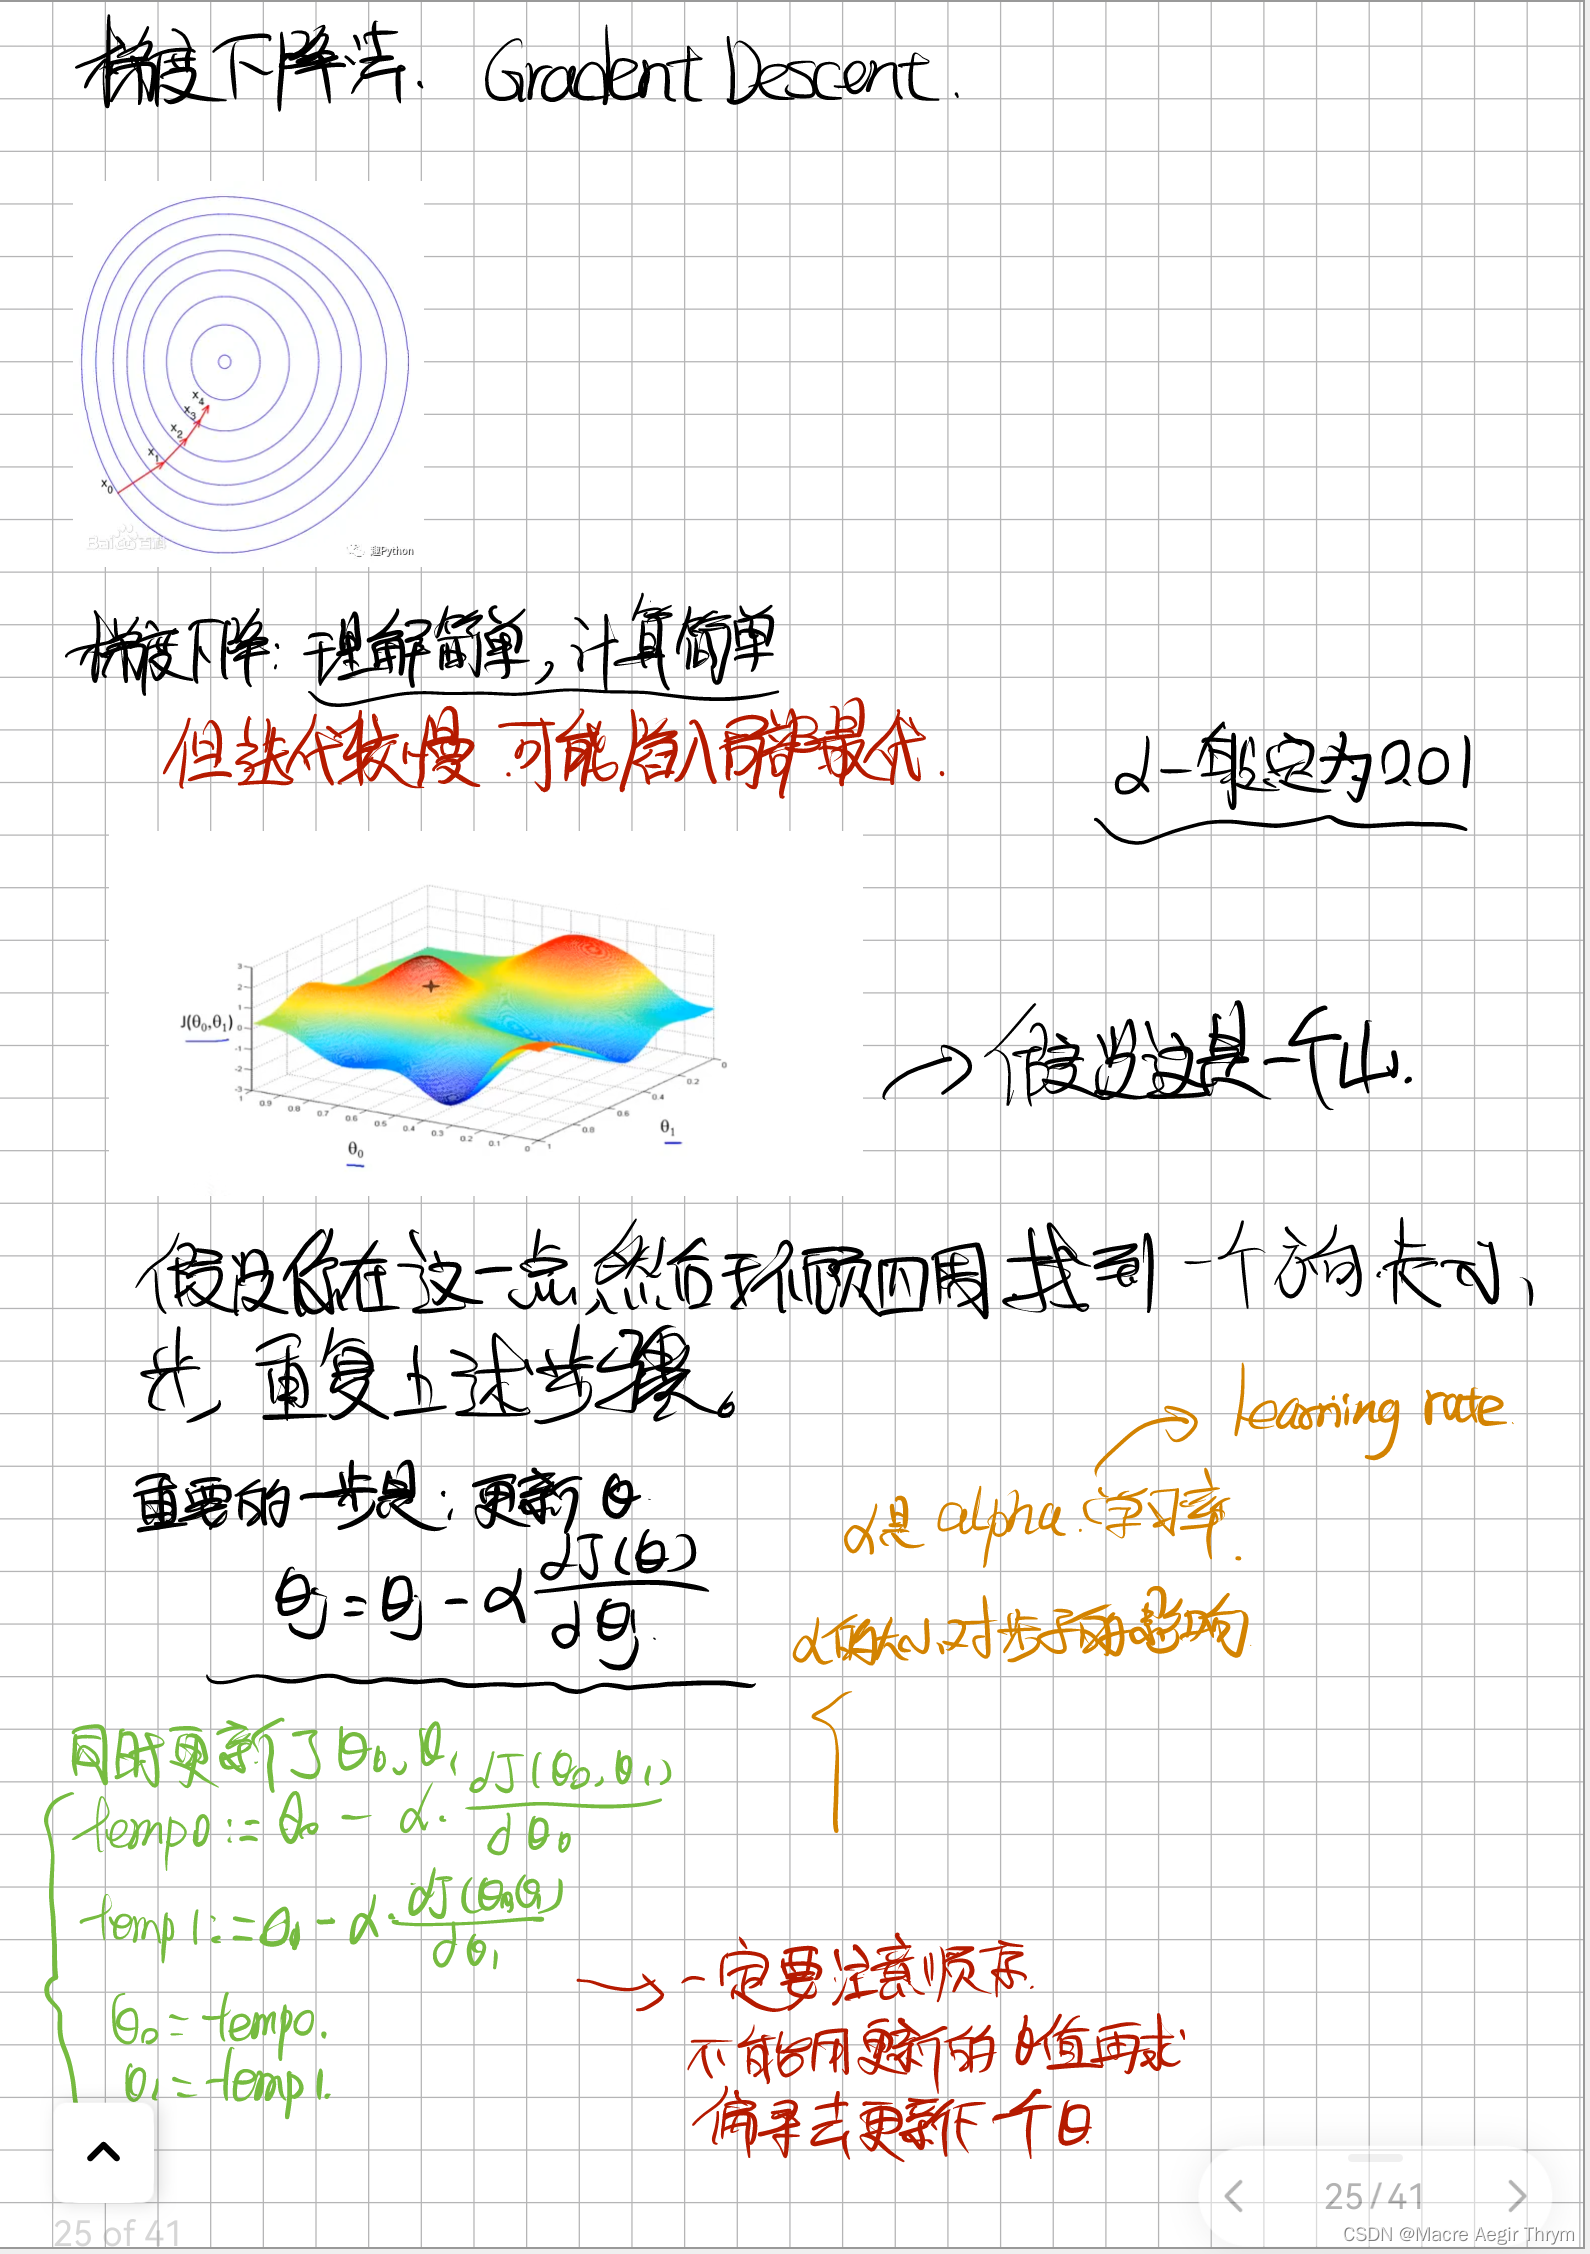
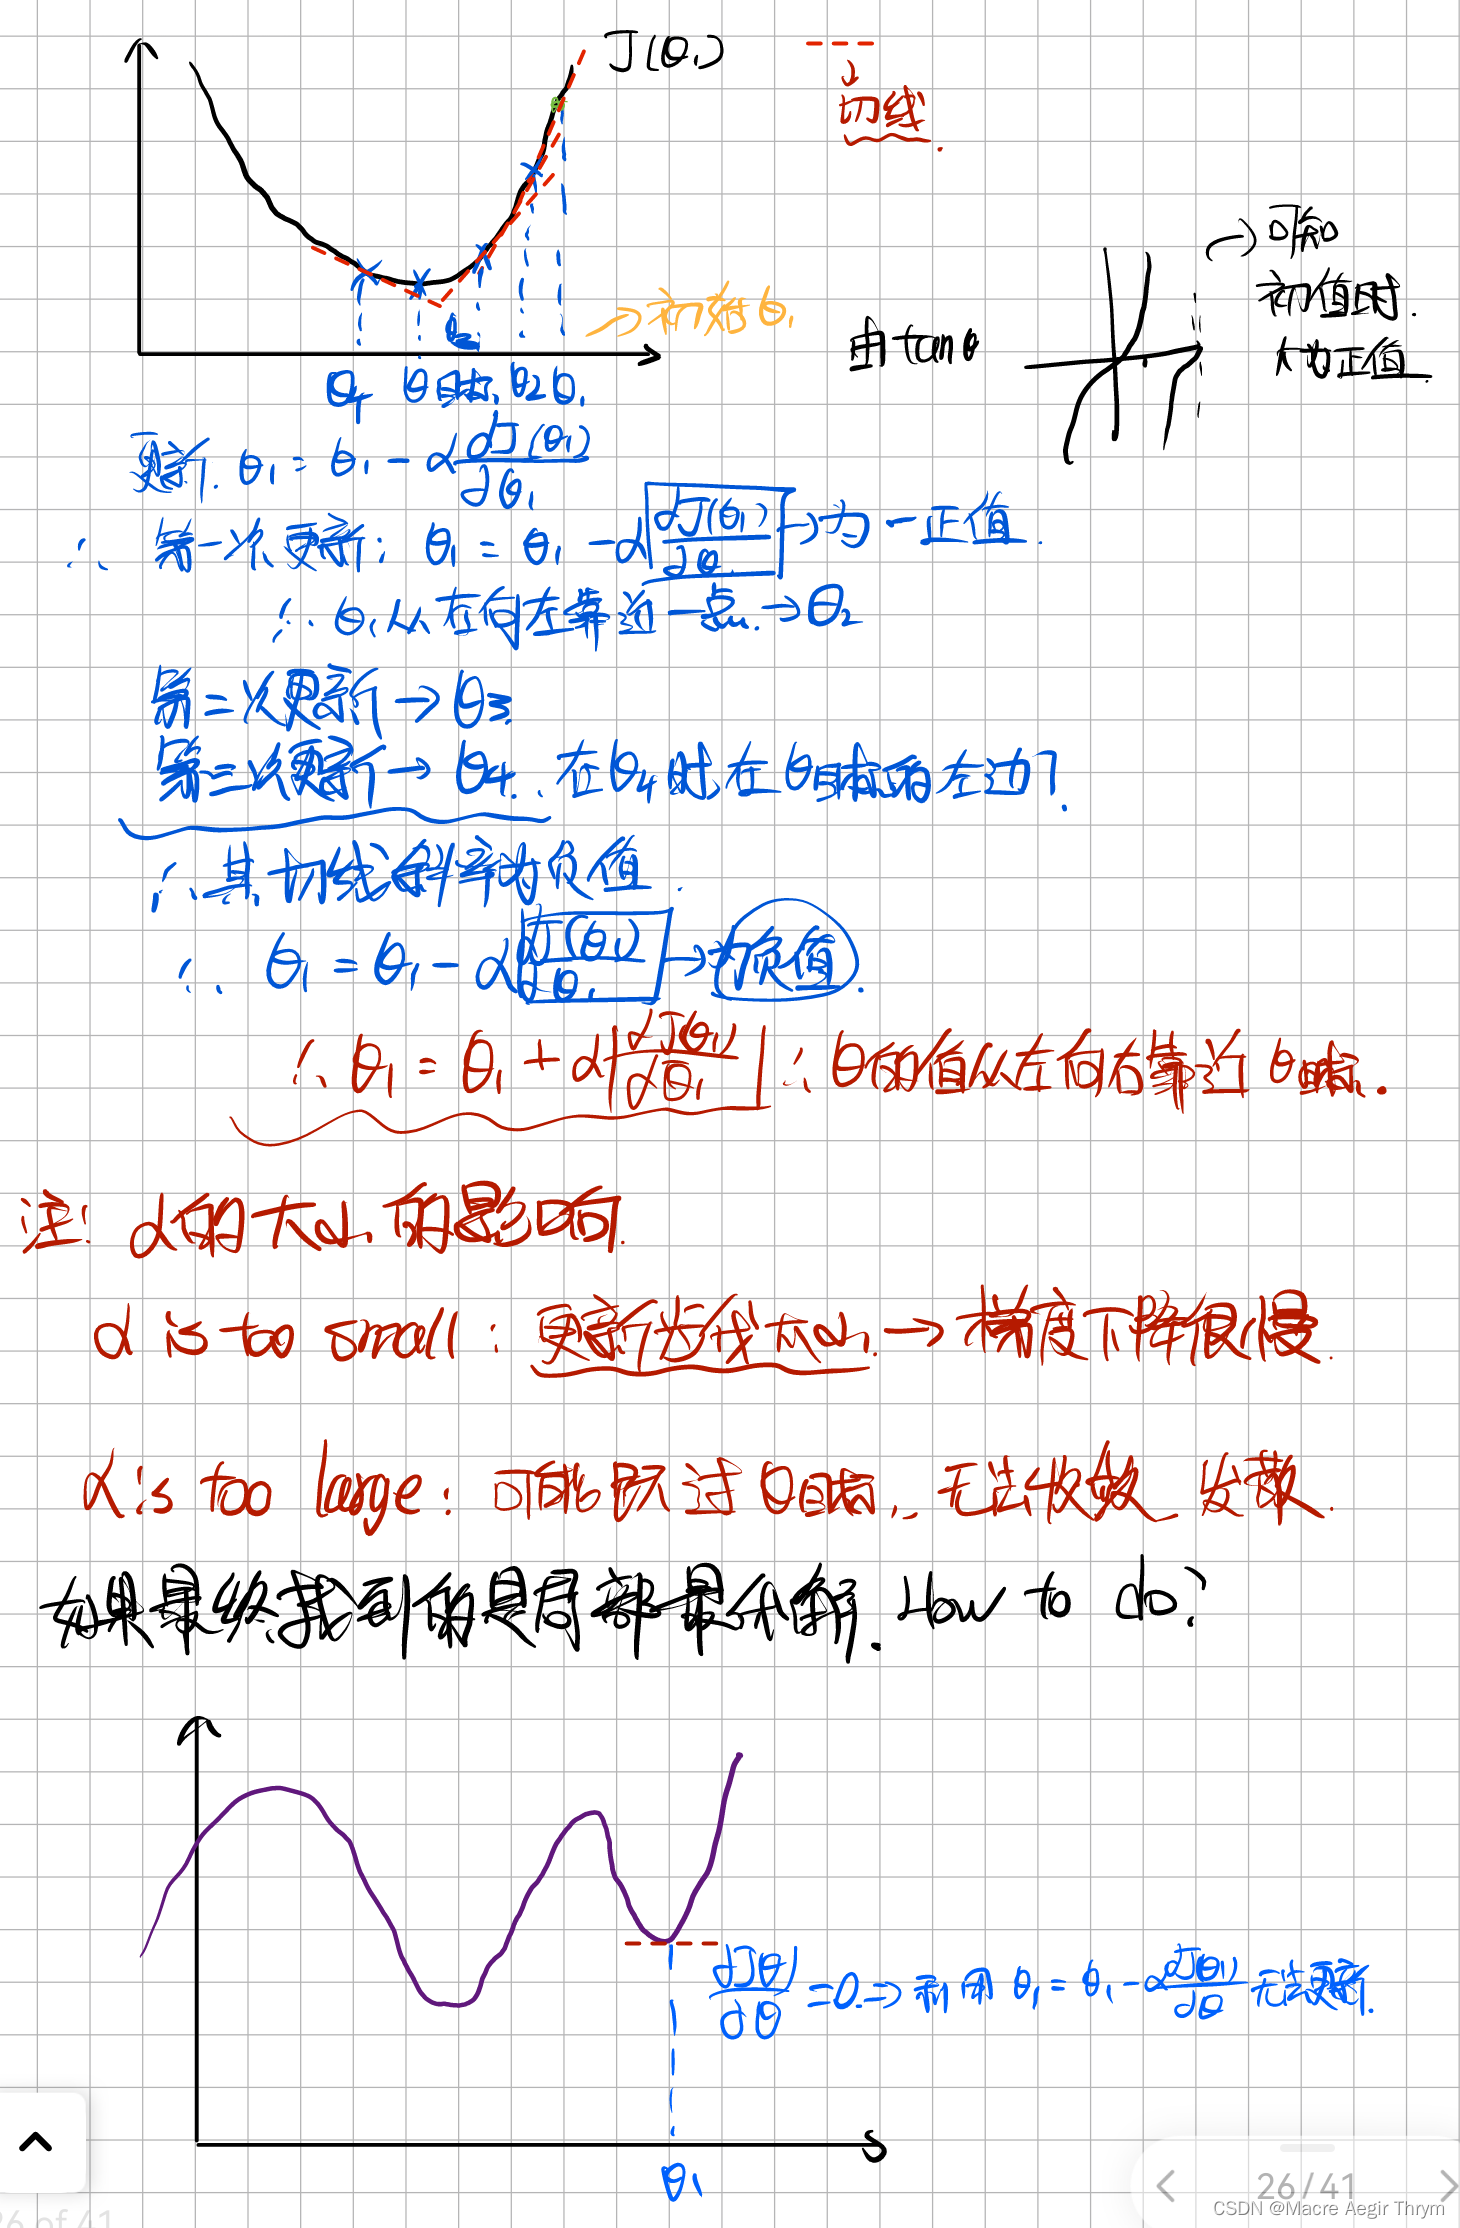
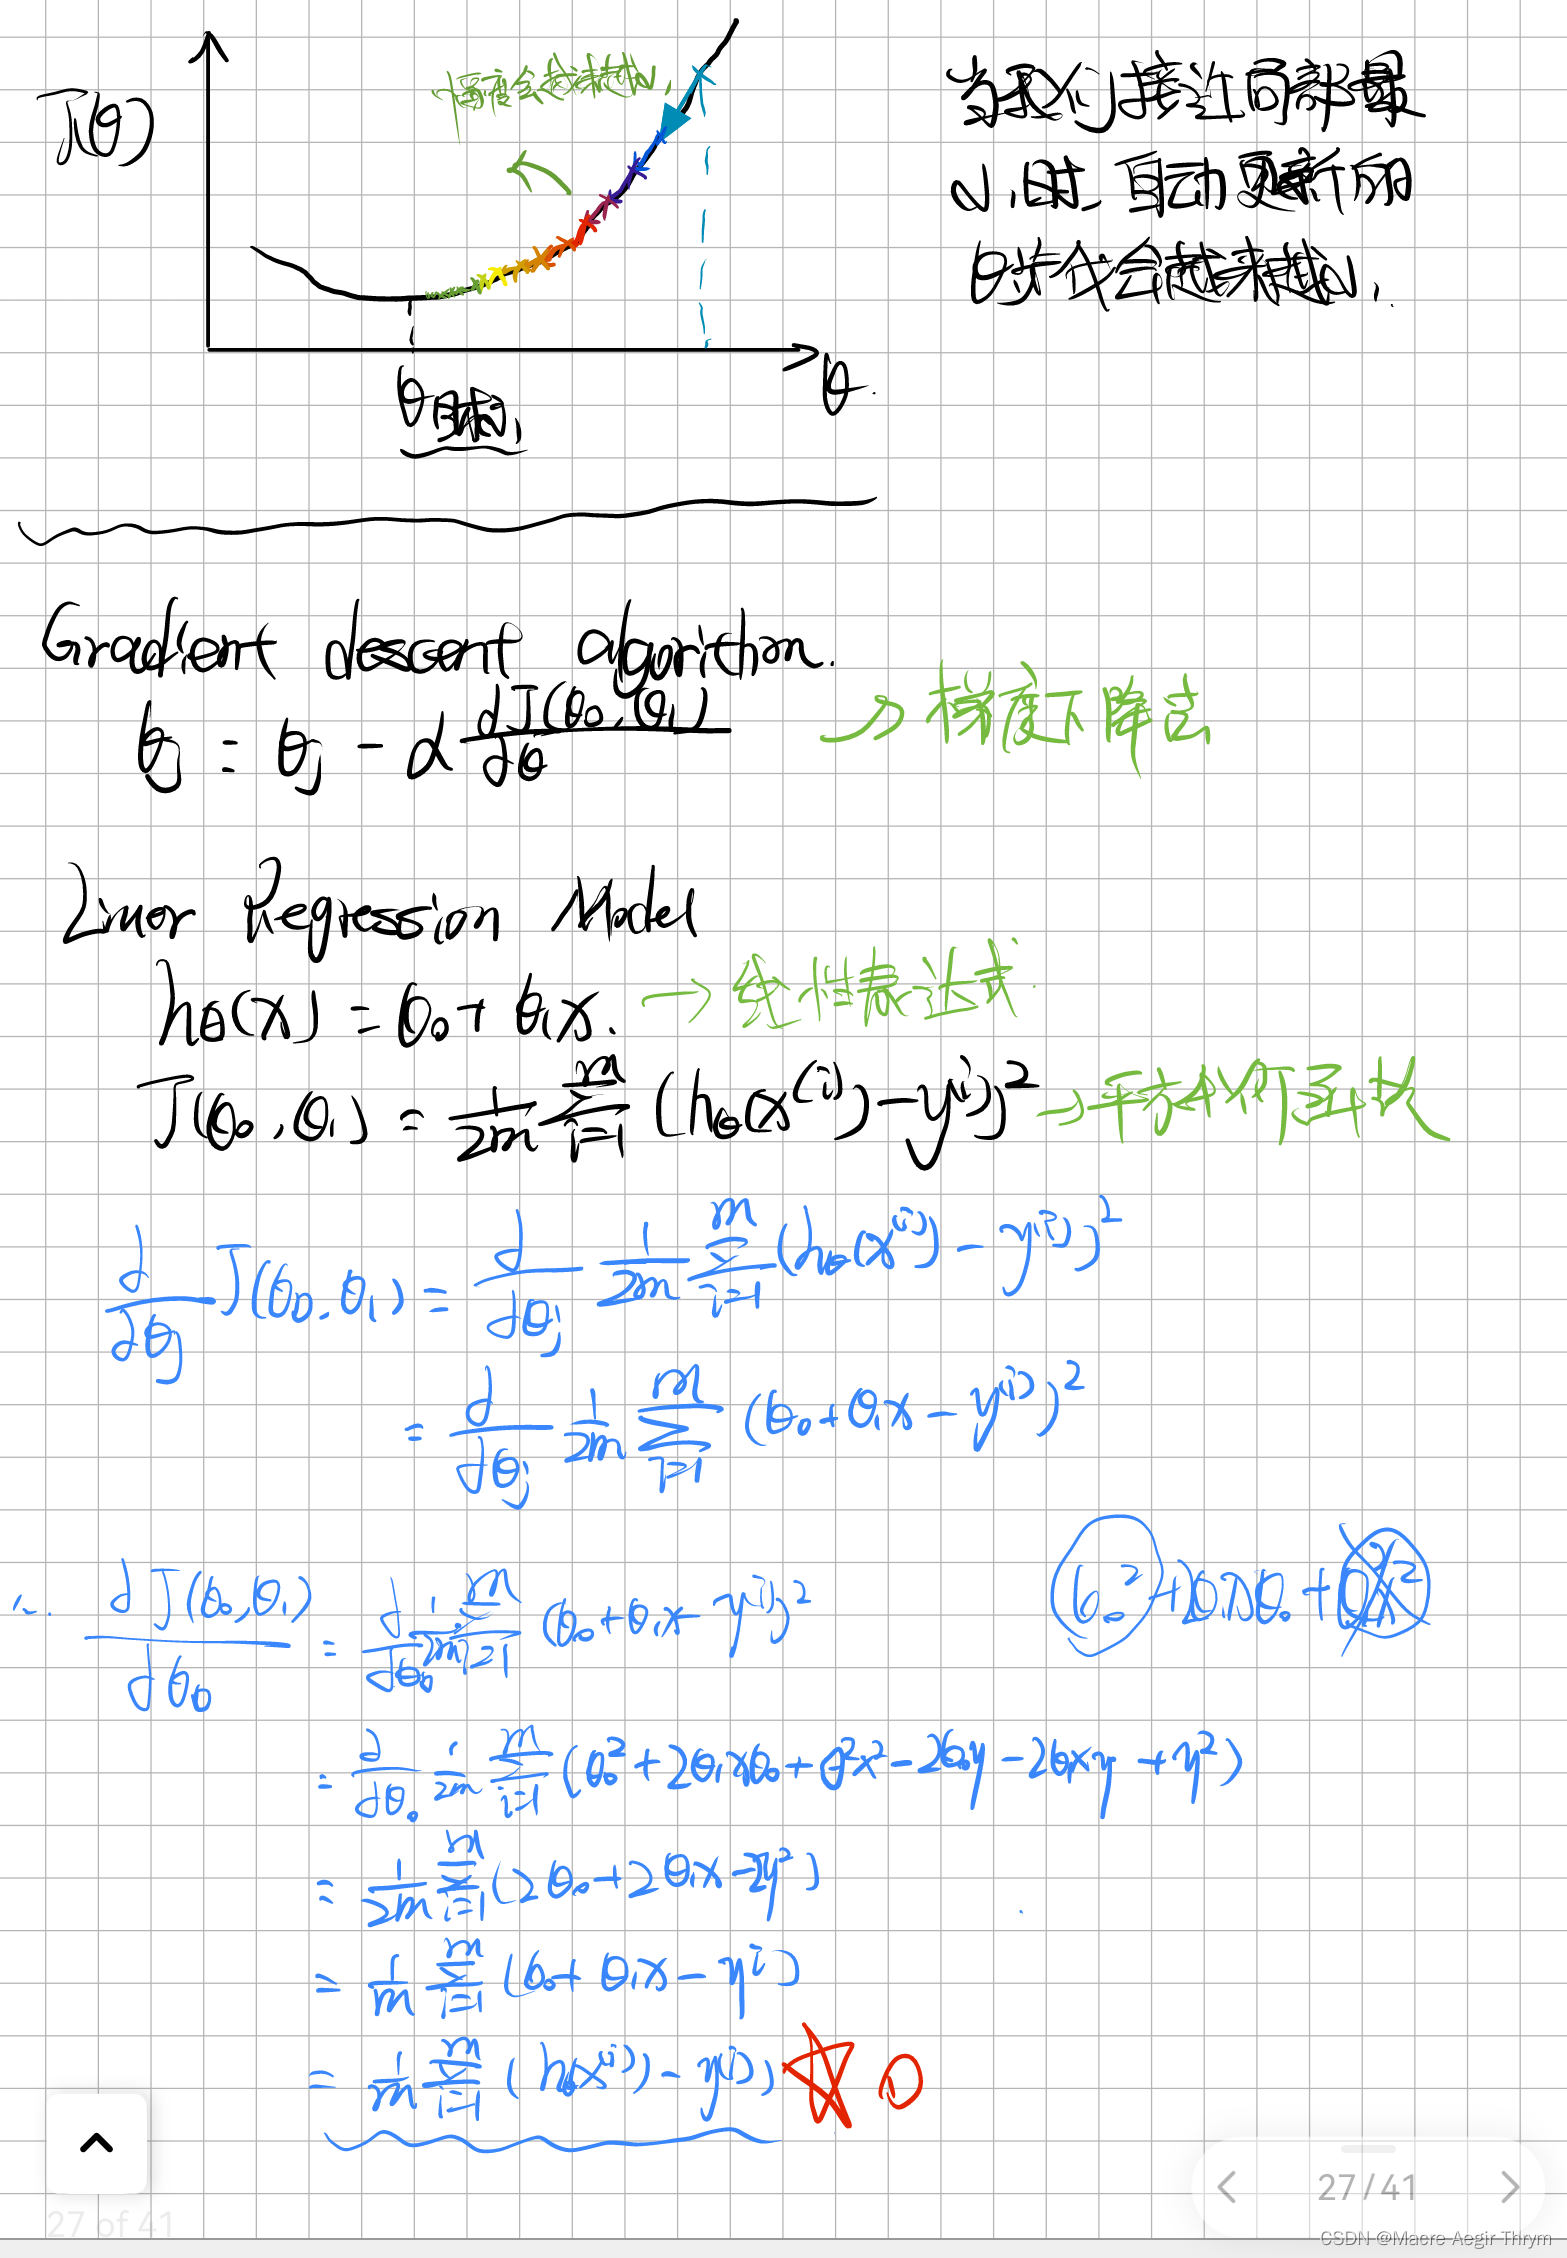
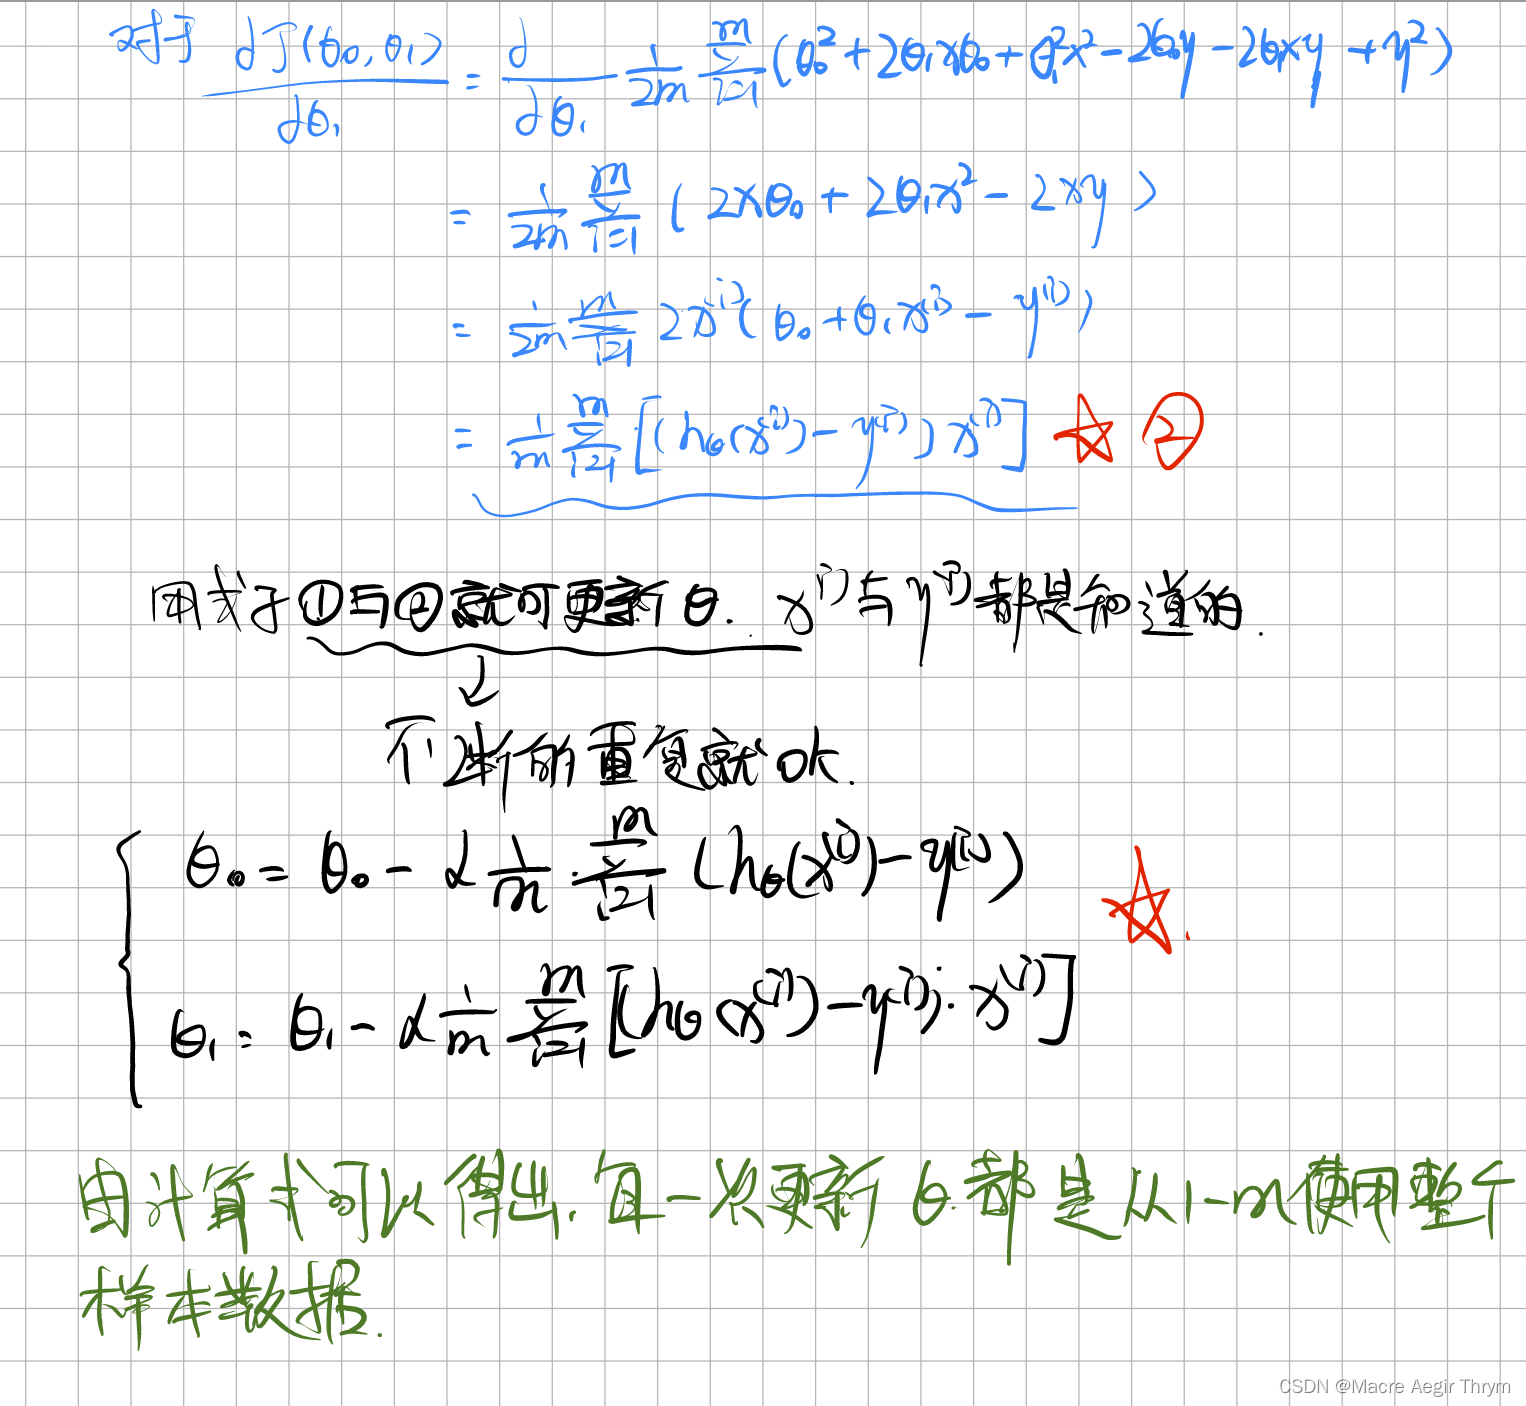
梯度下降法:
(下面为了简单我以输入的对象是28*28规格图片,第一层隐含单元有200个,第二层隐含单元是100个,输出层为10个的网络结构阐述。)
一般的构造网络的流程:
初始化超参数(包括启动深度神经网络的权值w,偏执b)--》向前传播(线性部分+激活函数)--》 计算代价 --》 反向传播 (激活函数反向,线性部分反向)--》更新超参数.
基础部分和总概 网络结构为 [28*28 200 100 10]
学习人工智能,应该理论应用于实践,应该多动手进行数学演算,将演算用代码实现,最后进行总结于改进。
(1)对这个网络的结构要有一个清楚的认识

在草稿本上进行矩阵维数的测试
下面是对于想要了解代码一个个看清楚流程的去看,如果想直接跑通,代码在最后!
1、导入库,是导入一些必要的库
import matplotlib.pyplot as plt
import numpy as np
import datetime
import os
import sys
import h5py
2、定义所需要的softmax函数
def sigmoid(Z):
    A = 1/(1+np.exp(-Z))
    cache = Z
    return A, cache

def sigmoid_backward(dA, cache):
    Z = cache
    s = 1/(1+np.exp(-Z))
    dZ = dA * s * (1-s)
    return dZ

# relu函数 和反向求导
def relu(Z):
    A = np.maximum(0,Z)
    cache = Z
    return A, cache

def relu_backward(dA, cache):
    Z = cache
    dZ = np.array(dA, copy=True)
    dZ[Z <= 0] = 0
    return dZ

# Softmax
def softmax(Z):
    A = np.exp(Z)/np.sum(np.exp(Z),axis=0)
    cache = Z
    return A, cache
在此我把relu和sigmoid函数也给出,方便读者后续的使用,可以利用这个去做逻辑回归啊什么什么的,增加泛用性。
3、初始化参数
    使用梯度下降法的首要步骤就是初始化参数,这个点是随机的。

    输入的是 layers_dims是一个向量,是你的网络结构。返回的是一个字典对象parameters,里面有超参数w和b。、

    恭喜你,走出了第一步,完成了初始化参数的步骤。
def init_W(layers_dims):
    np.random.seed(3)
    parameters = {}
    L = len(layers_dims)
    for l in range(1, L):
        parameters["W" + str(l)] = np.random.randn(layers_dims[l], layers_dims[l - 1]) / np.sqrt(layers_dims[l - 1])
        parameters["b" + str(l)] = np.zeros((layers_dims[l], 1))
    return parameters
4.1、向前传播之线性部分
,也就是输入x与权值相乘与偏执相加。是一层的线性部分。
def L_forword_sum(W,A,b):
    Z = np.dot(W,A)+b
    cache = (A,W,b)
    return Z,cache
4.2、向前传播之激活函数向前
隐含层使用的是relu函数,输出层使用的是softmax函数,参考(311条消息) 入门级都能看懂的softmax详解_bitcarmanlee的博客-CSDN博客。
(311条消息) ReLU函数简介_潇湘_AQ的博客-CSDN博客
本函数是基于线性部分建立的一个输入是A_prev是上一层的输出,W,b是本层的网络参数,activation是激活函数的名字,用于选择用哪一个函数。返回值是一个元组,包含A隐含层输出的激活值,和用于反向传播时的重要数据。
def L_activate_forworld(A_prev,W,b,activation):
    if activation == "relu":
        Z ,linear_cache =  L_forword_sum(W,A_prev,b)
        A, activation_cache = relu(Z)
    elif activation == "sigmoid":
        Z, linear_cache = L_forword_sum(W, A_prev, b)
        A, activation_cache = sigmoid(Z)
    elif activation == "softmax":
        Z, linear_cache = L_forword_sum(W, A_prev, b)
        A, activation_cache = softmax(Z)
    cache = (linear_cache, activation_cache)
    return A,cache
4.3、向前传播函数接口
    线性部分+激活函数组成一次向前传播,线性部分的输出输入到激活函数最后得到的最终值。

    函数输入x是初始的输入值即图片的大小,parameters是超参数字典。经过一个for循环可以完成整个向前传播。

    恭喜你,你的网络利用这个函数就可以进行向前传播了。
def L_forword(X, parameters):
    caches = []
    A = X
    L = len(parameters) // 2
    for l in range(1, L):
        A_prev = A
        A, cache = L_activate_forworld(A_prev, parameters['W' + str(l)], parameters['b' + str(l)], "relu")
        caches.append(cache)
    # 最后一层使用softmax
    AL, cache  = L_activate_forworld(A, parameters['W' + str(L)], parameters['b' + str(L)], "softmax")
    caches.append(cache)
    return AL, caches
5、计算代价之交叉熵代价函数
    (311条消息) 交叉熵损失函数(Cross Entropy Loss)_SongGu1996的博客-CSDN博客

    你可以计算你的网络的代价了,每个网络都希望做到收敛快,代价小。
def cost(Y_out,Y):
    cost = -np.sum(np.multiply(np.log(Y_out), Y)) / Y_out.shape[1]
    cost = np.squeeze(cost)
    return cost
5.1、反向传播之线性部分的反向
感兴趣的可以到我的草稿上看。
def linear_backward(dZ, cache):
    A_prev, W, b = cache
    m = A_prev.shape[1]
    dW = np.dot(dZ, A_prev.T) / m
    db = np.sum(dZ, axis=1, keepdims=True) / m
    dA_prev = np.dot(W.T, dZ)
    return dA_prev, dW, db
5.2、反向传播之激活函数的反向
感兴趣的可以到我的草稿上看。
def linear_activation_backward(dA, cache, Y,activation="relu"):
    linear_cache, activation_cache = cache
    if activation == "relu":
        dZ = relu_backward(dA, activation_cache)
        dA_prev, dW, db = linear_backward(dZ, linear_cache)
    elif activation == "sigmoid":
        dZ = sigmoid_backward(dA, activation_cache)
        dA_prev, dW, db = linear_backward(dZ, linear_cache)
    elif activation == "softmax":
        dZ = dA - Y
        dA_prev, dW, db = linear_backward(dZ, linear_cache)
    return dA_prev, dW, db
5.3、 反向传播函数接口
    将激活函数的反向和线性部分的反向组织好后,封装为一个反向函数接口。

    恭喜你,你已经做好了反向传播了。
def L_model_backward(AL, Y, caches,case):
    grads = {}
    L = len(caches)
    m = AL.shape[1]
    Y = Y.reshape(AL.shape)
    dAL = - (np.divide(Y, AL) - np.divide(1 - Y, 1 - AL))
    if case == "softmax":
        current_cache = caches[L - 1]
        grads["dA" + str(L)], grads["dW" + str(L)], grads["db" + str(L)] = linear_activation_backward(AL, current_cache,Y,"softmax")

    elif case  == "sigmoid":
        current_cache = caches[L - 1]
        grads["dA" + str(L)], grads["dW" + str(L)], grads["db" + str(L)] = linear_activation_backward(AL, current_cache,Y, "sigmoid")

    for l in reversed(range(L - 1)):
        current_cache = caches[l]
        dA_prev_temp, dW_temp, db_temp = linear_activation_backward(grads["dA" + str(l + 2)], current_cache, Y ,"relu")
        grads["dA" + str(l + 1)] = dA_prev_temp
        grads["dW" + str(l + 1)] = dW_temp
        grads["db" + str(l + 1)] = db_temp
    return grads
6、利用梯度下降法 更新参数
梯度下降法是一个十分好的优化算法,他的目的更改参数使代价优化到最小。
def update_parameters(parameters, grads, learning_rate):
    L = len(parameters) // 2  # 整除
    for l in range(L):
        parameters["W" + str(l + 1)] = parameters["W" + str(l + 1)] - learning_rate * grads["dW" + str(l + 1)]
        parameters["b" + str(l + 1)] = parameters["b" + str(l + 1)] - learning_rate * grads["db" + str(l + 1)]
    return parameters
7、神经网络搭建
   依据下面的过程,将你的函数,像拼拼图一样做出来。

    初始化超参数(包括启动深度神经网络的权值w,偏执b)--》向前传播(线性部分+激活函数)--》 计算代价 --》 反向传播 (激活函数反向,线性部分反向)--》更新超参数

    for循环是来进行重复训练的。.

    X, 输入的样本集;Y,label集;

    net_layers,网络结构;learning_rate=0.0075, 学习率;num_iterations=3000,迭代次数;step =1, 步长;print_cost=False, 是否打印代价;isPlot=True,是否绘制代价—迭代次数图;
def deepnet(X, Y,net_layers,learning_rate=0.0075, num_iterations=3000,step =1, print_cost=False, isPlot=True):
np.random.seed(1) #设计种子
costs = [] #用于画图
parameters = init_W(net_layers)
for i in range(0, num_iterations):
# 迭代
AL, caches = L_forword(X, parameters)
costi = cost(AL, Y) #这里的Y是标准化的Y
grads = L_model_backward(AL, Y, caches,"softmax")
parameters = update_parameters(parameters, grads, learning_rate)
if i % step == 0:
# 记录成本
costs.append(costi)
# 是否打印成本值
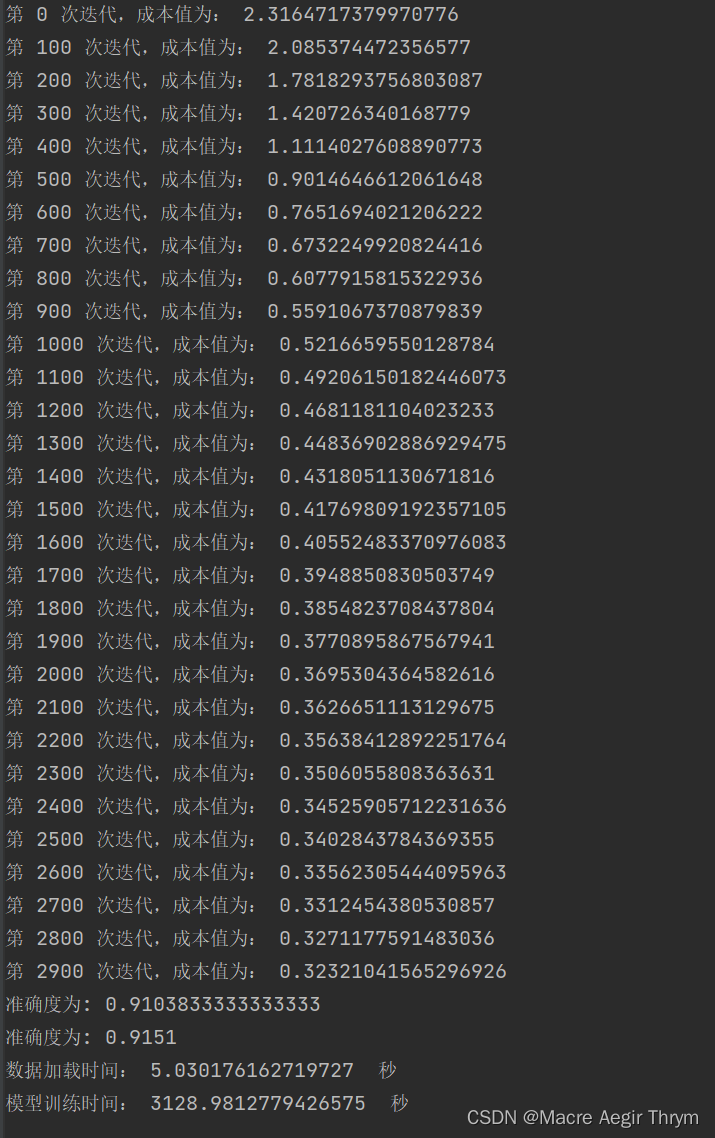
if print_cost:
print("第", i, "次迭代,成本值为:", np.squeeze(costi))
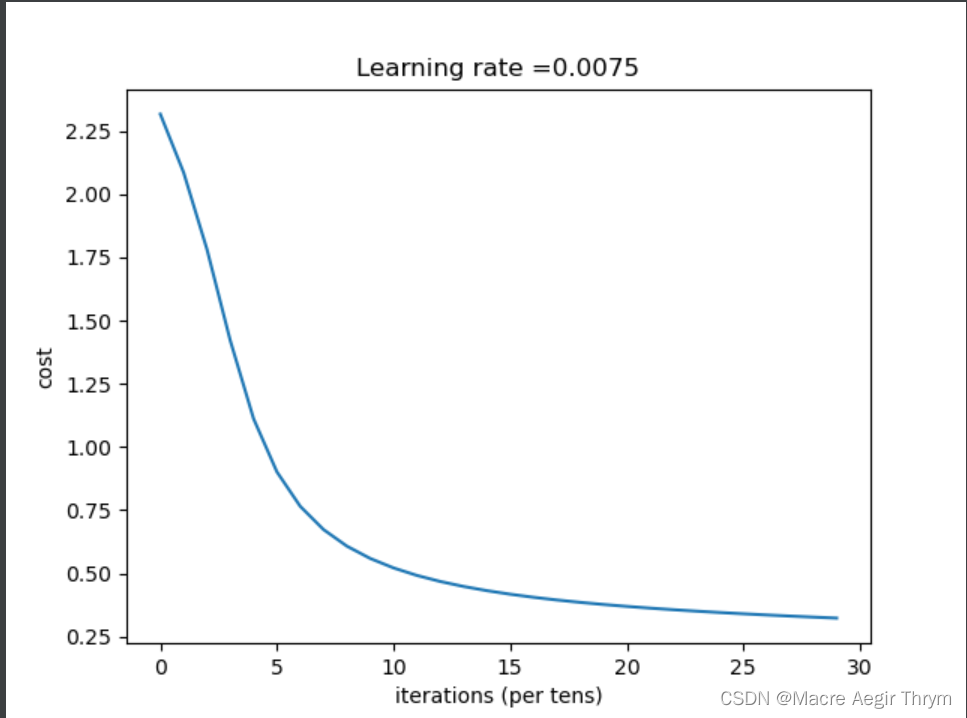
if isPlot:
plt.plot(np.squeeze(costs))
plt.ylabel('cost')
plt.xlabel('iterations (per tens)')
plt.title("Learning rate =" + str(learning_rate))
plt.show()
# plt.savefig(fnme = "cast"+str(datetime.datetime.now())+".jig")
return parameters
8、测试集合测试
将得到的模型,用于测试集看准确率。
def predict(X, y, parameters,Y_org):

    m = X.shape[1]
    n = len(parameters) // 2  # 神经网络的层数
    p = np.zeros((1, m))

    # 根据参数前向传播
    probas, caches = L_forword(X, parameters)
    p = np.argmax(probas,axis=0)
    zql = float(np.sum((p == Y_org)) / m)
    print("准确度为: " + str(float(np.sum((p == Y_org)) / m)))

    error_list = []
    for i in range(m):
        if p[i] != Y_org[i]:
            error_list.append(i)
    return p,error_list,zql
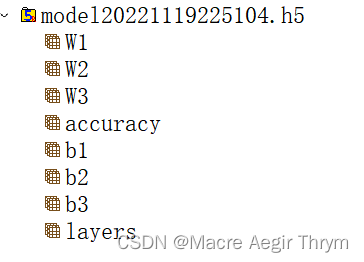
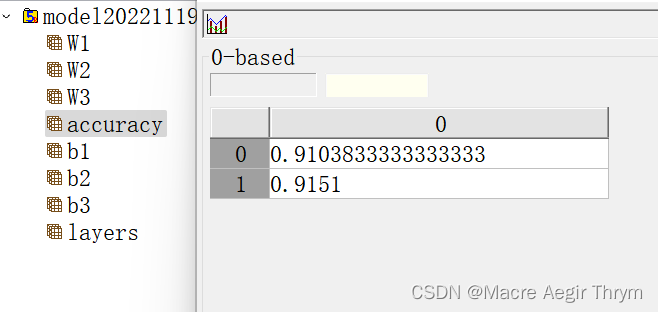
9、保存模型
你所训练好的网络不仅仅只是训练好就完了,你要应用它,就得保存下来,我这里有两个保存函数,一个是保存为txt文本,一个是保存为h5文件,建议使用h5文件,也可以像vvg19那样使用.mat文件数据,只要是数据,你就可以打开,打开的接口可以自己写,如果自己写的话一般是学习其结构,转化为二进制在转化为你想要的数据,不过,基本有大佬写出来了,不要闭门造车。
def save_model(parameters):
    np.set_printoptions(threshold=sys.maxsize)

    model_number = 0
    f = open("model/model" + str(model_number) + ".txt", "a+")
    f.write(str(datetime.datetime.now()) + "\n")
    f.write("model_number " + str(model_number) + "\n")
    for i, j in parameters.items():
        f.write(str(i) + "\n")
        f.write(str(j) + "\n")
    f.close()
    return 0

#保存为h5数据格式
def save_h5(data,layers,zql):
    str1 = "./model/model"+str(datetime.datetime.now().strftime("%Y%m%d%H%M%S"))+".h5"
    f = h5py.File(str1, "w")
    ID = ["model layer "]
    f.create_dataset("layers",data = layers)
    i = len(data) // 2
    for j in range(i):
        f.create_dataset("W"+str(j+1),data = data["W"+str(j+1)])
        f.create_dataset("b"+str(j+1),data = data["b"+str(j+1)])
    f.create_dataset("accuracy",data = zql)
    f.close()
10、利用模型预测和读取h5数据格式的模型
保存好了数据,就是如何读取我们的网络参数,进行运用人工智能深度神经网络。利用这两个函数就可以。
def predict1(X, parameters):
    # 根据参数前向传播
    probas, caches = L_forword(X, parameters)
    p = np.argmax(probas,axis=0)
    return p

def read_ccs(path):
    w = h5py.File(path, "r")
    layers = w["layers"][:]
    l = len(layers)
    p = {}
    # print(l)
    for i in range(1, l):
        p["W" + str(i)] = w["W" + str(i)][:]
        p["b" + str(i)] = w["b" + str(i)][:]
    return p, layers
第二步,有了相应功能的函数,我们就可以进行训练。train.py里的具体内容如下。
import DeepNET
import time

import function

if __name__ == '__main__':
    # 计时开始
    start1 = time.time()
    train_image_path = './MNIST/train-images-idx3-ubyte/train-images.idx3-ubyte'
    train_lable_path = './MNIST/train-labels-idx1-ubyte/train-labels.idx1-ubyte'
    teat_image_path = './MNIST/t10k-images-idx3-ubyte/t10k-images.idx3-ubyte'
    teat_lable_path = './MNIST/t10k-labels-idx1-ubyte/t10k-labels.idx1-ubyte'
    # #加载数据
    train_image = function.jiexi_image(train_image_path)
    train_lable = function.jiexi_label(train_lable_path)
    teat_image = function.jiexi_image(teat_image_path)
    test_lable = function.jiexi_label(teat_lable_path)
    # print(train_image.shape)

    function.plot_data(train_image,train_lable,10,True)

    train_image = train_image.reshape(train_image.shape[0], -1).T / 255
    teat_image = teat_image.reshape(teat_image.shape[0], -1).T / 255
    train_lable1 = function.label_init(train_lable)
    test_lable1 =  function.label_init(test_lable)

    print(train_image.shape)

    end1 = time.time()

    start2 = time.time()
    layers = [784, 200, 150, 10]
    parameters = DeepNET.deepnet(train_image, train_lable1,layers , learning_rate=0.0075, num_iterations=3000,
                                 step=100, print_cost=True, isPlot=True)
    end2 = time.time()

    p ,error_list_train,zql1 = DeepNET.predict(train_image, train_lable1, parameters, train_lable)
    p0 ,error_list_test ,zql2 = DeepNET.predict(teat_image,test_lable1,parameters,test_lable)
    zql = [[zql1],[zql2]]
    print("数据加载时间:",end1-start1," 秒")
    print("模型训练时间:",end2-start2," 秒")

    DeepNET.save_h5(parameters,layers,zql)
五、效果展示
(1)训练情况
(2)模型保存情况 h5数据情况


最终效果


综合来说,没有加优化正确率也是不错的,感兴趣的可以对网络进行优化。
六、画板部分
这里参考的是(311条消息) PyQt5实例 画板小程序_pyqt5画图板_CreatorGG的博客-CSDN博客
对qtpy5感兴趣的可以去学习一下。
整个手绘板加训练的程序在最后给出。
七、直接抄,直接方向跑!
训练网络,运行train.py。
训练出自己的网络后,使用main.py运行利用使用你的模型。
文件结构和目录:
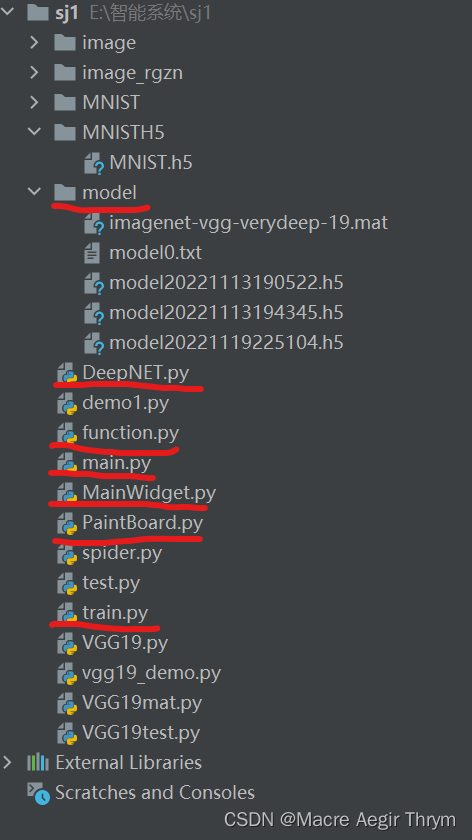
创建我红线的文件。
(1)function.py代码:
#此文件是一些函数 有加载数据模块
import datetime
import struct
import numpy as np
import matplotlib.pyplot as plt
from PIL import Image
import os

def jiexi_image(path):
    # 用二进制读取
    data = open(path, 'rb').read()
    offset = 0
    fmt_header = '>iiii'
    magic_number, num_images, num_rows, num_cols = struct.unpack_from(fmt_header, data, offset)
    print('魔数:%d, 图片数量: %d张, 图片大小: %d*%d' % (magic_number, num_images, num_rows, num_cols))
    image_size = num_rows * num_cols
    offset += struct.calcsize(fmt_header)
    fmt_image = '>' + str(image_size) + 'B'
    images = np.empty((num_images, num_rows, num_cols))
    for i in range(num_images):
        if (i + 1) % 10000 == 0:
            print('已解析 %d' % (i + 1) + '张')
        images[i] = np.array(struct.unpack_from(fmt_image, data, offset)).reshape((num_rows, num_cols))
        offset += struct.calcsize(fmt_image)
    return images

def jiexi_label(path):
    data = open(path, 'rb').read()
    offset = 0
    fmt_header = '>ii'
    magic_number, num_images = struct.unpack_from(fmt_header, data, offset)
    print('魔数:%d, 图片数量: %d张' % (magic_number, num_images))
    # 解析数据集
    offset += struct.calcsize(fmt_header)
    fmt_image = '>B'
    labels = np.empty(num_images)
    for i in range(num_images):
        if (i + 1) % 10000 == 0:
            print('已解析 %d' % (i + 1) + '张')
        labels[i] = struct.unpack_from(fmt_image, data, offset)[0]
        offset += struct.calcsize(fmt_image)
    return labels

def plot_data(images,labels,n,issave = False):
    for i in range(n):
        print(labels[i])
        plt.imshow(images[i], cmap='gray')
        plt.show()
        # if(issave == True):
            # plt.savefig(fname = "save"+str(datetime.datetime.now())+".jpg")

    print('done')

## 说明:输入原始图像路径和新建图像文件夹名称 默认修改出长度宽度为64*64
def stdimage(pathorg, name, pathnew=None, width=64, length=64):
    # 检查文件是否建立
    if pathnew == None:  # 如果没有手动创建
        tage = os.path.exists(os.getcwd() + '\\' + name)  # 检查一下是否属实
        if not tage:  # 没有整个新文件夹
            os.mkdir(os.getcwd() + "\\" + name)  # 创建文件夹,name
        image_path = os.getcwd() + "\\" + name + "\\"
    else:  # 已经手动创建
        tage = os.path.exists(pathnew + "\\" + name)
        if not tage:
            path = os.getcwd()
            os.mkdir(path + "\\" + name)
        image_path = path + "\\" + name + "\\"

    ## 开始处理
    i = 1  # 从一开始
    list_name = os.listdir(pathorg)  # 获取图片名称列表
    for item in list_name:
        # 检查是否有图片
        tage = os.path.exists(pathorg + str(i) + '.png')
        if not tage:
            image = Image.open(pathorg + '\\' + item)
            std = image.resize((width, length), Image.ANTIALIAS)
            ## 模式为RGB
            if not std.mode == "RGB":
                std = std.convert('RGB')
            std.save(image_path + str(i) + '.png')
        i += 1

def label_init(lable):
    n = lable.shape[0]
    label_Y = np.zeros([10, n])
    res = lable.astype(int)
    for i in range(0, label_Y.shape[1]):
        label_Y[res[i], i] = 1
    return label_Y

def get_X(path):
    im_name_list = os.listdir(path)
    all_data = []
    for item in im_name_list:
        try:
            all_data.append(plt.imread(path + '\\' + item).tolist())
        except:
            print(item + " open error ")
    return all_data
(2)DeepNet.py
import matplotlib.pyplot as plt
import numpy as np
import datetime
import os
import sys
import h5py

# sigmoid
def sigmoid(Z):
    A = 1/(1+np.exp(-Z))
    cache = Z
    return A, cache

def sigmoid_backward(dA, cache):
    Z = cache
    s = 1/(1+np.exp(-Z))
    dZ = dA * s * (1-s)
    return dZ

# relu函数 和反向求导
def relu(Z):
    A = np.maximum(0,Z)
    cache = Z
    return A, cache

def relu_backward(dA, cache):
    Z = cache
    dZ = np.array(dA, copy=True)
    dZ[Z <= 0] = 0
    return dZ

# Softmax
def softmax(Z):
    A = np.exp(Z)/np.sum(np.exp(Z),axis=0)
    cache = Z
    return A, cache
# 初始化w
# def INIT_W(n_x,n_h1,n_h2,n_y):
#     W1 = np.random.randn(n_h1, n_x ) * 0.01
#     b1 = np.zeros((n_h1, 1))
#     W2 = np.random.randn(n_h2,n_h1)*0.01
#     b2 = np.zeros((n_h2,1))
#     W3 = np.random.randn(n_y, n_h2) * 0.01
#     b3 = np.zeros((n_y, 1))
#     INIT = {
#         "W1" : W1,
#         "b1" : b1,
#         "W2" : W2,
#         "b2" : b2,
#         "W3" : W3,
#         "b3" : b3
#     }
#     return INIT

def init_W(layers_dims):
    np.random.seed(3)
    parameters = {}
    L = len(layers_dims)
    for l in range(1, L):
        parameters["W" + str(l)] = np.random.randn(layers_dims[l], layers_dims[l - 1]) / np.sqrt(layers_dims[l - 1])
        parameters["b" + str(l)] = np.zeros((layers_dims[l], 1))
    return parameters

# 向前
def L_forword_sum(W,A,b):
    Z = np.dot(W,A)+b
    cache = (A,W,b)
    return Z,cache

def L_activate_forworld(A_prev,W,b,activation):
    if activation == "relu":
        Z ,linear_cache =  L_forword_sum(W,A_prev,b)
        A, activation_cache = relu(Z)
    elif activation == "sigmoid":
        Z, linear_cache = L_forword_sum(W, A_prev, b)
        A, activation_cache = sigmoid(Z)
    elif activation == "softmax":
        Z, linear_cache = L_forword_sum(W, A_prev, b)
        A, activation_cache = softmax(Z)
    cache = (linear_cache, activation_cache)
    return A,cache

def L_forword(X, parameters):
    caches = []
    A = X
    L = len(parameters) // 2
    for l in range(1, L):
        A_prev = A
        A, cache = L_activate_forworld(A_prev, parameters['W' + str(l)], parameters['b' + str(l)], "relu")
        caches.append(cache)
    # 最后一层使用softmax
    AL, cache  = L_activate_forworld(A, parameters['W' + str(L)], parameters['b' + str(L)], "softmax")
    caches.append(cache)
    return AL, caches

#计算代价
def cost(Y_out,Y):
    cost = -np.sum(np.multiply(np.log(Y_out), Y)) / Y_out.shape[1]
    cost = np.squeeze(cost)
    return cost

#线性返回
def linear_backward(dZ, cache):
    A_prev, W, b = cache
    m = A_prev.shape[1]
    dW = np.dot(dZ, A_prev.T) / m
    db = np.sum(dZ, axis=1, keepdims=True) / m
    dA_prev = np.dot(W.T, dZ)
    return dA_prev, dW, db

def linear_activation_backward(dA, cache, Y,activation="relu"):
    linear_cache, activation_cache = cache
    if activation == "relu":
        dZ = relu_backward(dA, activation_cache)
        dA_prev, dW, db = linear_backward(dZ, linear_cache)
    elif activation == "sigmoid":
        dZ = sigmoid_backward(dA, activation_cache)
        dA_prev, dW, db = linear_backward(dZ, linear_cache)
    elif activation == "softmax":
        dZ = dA - Y
        dA_prev, dW, db = linear_backward(dZ, linear_cache)
    return dA_prev, dW, db

def L_model_backward(AL, Y, caches,case):
    grads = {}
    L = len(caches)
    m = AL.shape[1]
    Y = Y.reshape(AL.shape)
    dAL = - (np.divide(Y, AL) - np.divide(1 - Y, 1 - AL))
    if case == "softmax":
        current_cache = caches[L - 1]
        grads["dA" + str(L)], grads["dW" + str(L)], grads["db" + str(L)] = linear_activation_backward(AL, current_cache,Y,"softmax")

    elif case  == "sigmoid":
        current_cache = caches[L - 1]
        grads["dA" + str(L)], grads["dW" + str(L)], grads["db" + str(L)] = linear_activation_backward(AL, current_cache,Y, "sigmoid")

    for l in reversed(range(L - 1)):
        current_cache = caches[l]
        dA_prev_temp, dW_temp, db_temp = linear_activation_backward(grads["dA" + str(l + 2)], current_cache, Y ,"relu")
        grads["dA" + str(l + 1)] = dA_prev_temp
        grads["dW" + str(l + 1)] = dW_temp
        grads["db" + str(l + 1)] = db_temp
    return grads

def update_parameters(parameters, grads, learning_rate):
    L = len(parameters) // 2  # 整除
    for l in range(L):
        parameters["W" + str(l + 1)] = parameters["W" + str(l + 1)] - learning_rate * grads["dW" + str(l + 1)]
        parameters["b" + str(l + 1)] = parameters["b" + str(l + 1)] - learning_rate * grads["db" + str(l + 1)]
    return parameters

def deepnet(X, Y,net_layers,learning_rate=0.0075, num_iterations=3000,step =1, print_cost=False, isPlot=True):
    np.random.seed(1) #设计种子
    costs = [] #用于画图
    parameters = init_W(net_layers)
    for i in range(0, num_iterations):
        # 迭代
        AL, caches = L_forword(X, parameters)

        costi = cost(AL, Y) #这里的Y是标准化的Y

        grads = L_model_backward(AL, Y, caches,"softmax")

        parameters = update_parameters(parameters, grads, learning_rate)

        if i % step == 0:
            # 记录成本
            costs.append(costi)
            # 是否打印成本值
            if print_cost:
                print("第", i, "次迭代,成本值为:", np.squeeze(costi))

    if isPlot:
        plt.plot(np.squeeze(costs))
        plt.ylabel('cost')
        plt.xlabel('iterations (per tens)')
        plt.title("Learning rate =" + str(learning_rate))
        plt.show()
        # plt.savefig(fnme = "cast"+str(datetime.datetime.now())+".jig")
    return parameters

def predict(X, y, parameters,Y_org):

    m = X.shape[1]
    n = len(parameters) // 2  # 神经网络的层数
    p = np.zeros((1, m))

    # 根据参数前向传播
    probas, caches = L_forword(X, parameters)
    p = np.argmax(probas,axis=0)
    zql = float(np.sum((p == Y_org)) / m)
    print("准确度为: " + str(float(np.sum((p == Y_org)) / m)))

    error_list = []
    for i in range(m):
        if p[i] != Y_org[i]:
            error_list.append(i)
    return p,error_list,zql

def save_model(parameters):
    np.set_printoptions(threshold=sys.maxsize)

    model_number = 0
    f = open("model/model" + str(model_number) + ".txt", "a+")
    f.write(str(datetime.datetime.now()) + "\n")
    f.write("model_number " + str(model_number) + "\n")
    for i, j in parameters.items():
        f.write(str(i) + "\n")
        f.write(str(j) + "\n")
    f.close()
    return 0

#保存为h5数据格式
def save_h5(data,layers,zql):
    str1 = "./model/model"+str(datetime.datetime.now().strftime("%Y%m%d%H%M%S"))+".h5"
    f = h5py.File(str1, "w")
    ID = ["model layer "]
    f.create_dataset("layers",data = layers)
    i = len(data) // 2
    for j in range(i):
        f.create_dataset("W"+str(j+1),data = data["W"+str(j+1)])
        f.create_dataset("b"+str(j+1),data = data["b"+str(j+1)])
    f.create_dataset("accuracy",data = zql)
    f.close()

def predict1(X, parameters):
    # 根据参数前向传播
    probas, caches = L_forword(X, parameters)
    p = np.argmax(probas,axis=0)
    return p

def read_ccs(path):
    w = h5py.File(path, "r")
    layers = w["layers"][:]
    l = len(layers)
    p = {}
    # print(l)
    for i in range(1, l):
        p["W" + str(i)] = w["W" + str(i)][:]
        p["b" + str(i)] = w["b" + str(i)][:]
    return p, layers
(3)train.py
import DeepNET
import time

import function

if __name__ == '__main__':
    # 计时开始
    start1 = time.time()
    train_image_path = './MNIST/train-images-idx3-ubyte/train-images.idx3-ubyte'
    train_lable_path = './MNIST/train-labels-idx1-ubyte/train-labels.idx1-ubyte'
    teat_image_path = './MNIST/t10k-images-idx3-ubyte/t10k-images.idx3-ubyte'
    teat_lable_path = './MNIST/t10k-labels-idx1-ubyte/t10k-labels.idx1-ubyte'
    # #加载数据
    train_image = function.jiexi_image(train_image_path)
    train_lable = function.jiexi_label(train_lable_path)
    teat_image = function.jiexi_image(teat_image_path)
    test_lable = function.jiexi_label(teat_lable_path)
    # print(train_image.shape)

    function.plot_data(train_image,train_lable,10,True)

    train_image = train_image.reshape(train_image.shape[0], -1).T / 255
    teat_image = teat_image.reshape(teat_image.shape[0], -1).T / 255
    train_lable1 = function.label_init(train_lable)
    test_lable1 =  function.label_init(test_lable)

    print(train_image.shape)

    end1 = time.time()

    start2 = time.time()
    layers = [784, 200, 150, 10]
    parameters = DeepNET.deepnet(train_image, train_lable1,layers , learning_rate=0.0075, num_iterations=3000,
                                 step=100, print_cost=True, isPlot=True)
    end2 = time.time()

    p ,error_list_train,zql1 = DeepNET.predict(train_image, train_lable1, parameters, train_lable)
    p0 ,error_list_test ,zql2 = DeepNET.predict(teat_image,test_lable1,parameters,test_lable)
    zql = [[zql1],[zql2]]
    print("数据加载时间:",end1-start1," 秒")
    print("模型训练时间:",end2-start2," 秒")

    DeepNET.save_h5(parameters,layers,zql)
(4) main.py
# 加载库
from MainWidget import MainWidget
from PyQt5.QtWidgets import QApplication
import sys

def main():
    app = QApplication(sys.argv)

    mainWidget = MainWidget()  # 新建一个主界面
    mainWidget.show()  # 显示主界面

    exit(app.exec_())  # 进入消息循环

if __name__ == '__main__':
    main()
(5)mainwidget.py
使用画板程序之前得跟该你的模型路径名字。就是红色部分。
def yuce(self):
# #标准化图片 获取Y
savePath = "./image_rgzn/test.png"
image = self.__paintBoard.GetContentAsQImage()
image.save(savePath)
img = Image.open(savePath)
img = img.convert("I")
img = img.resize((28, 28))
x = np.array(img)
train_image = x.reshape(1, -1).T / 255
w,layer = DeepNET.read_ccs("./model/model20221119225104.h5")
p = DeepNET.predict1(train_image,w)
self._text_out.setText(str(p[0]))
print(p)
# print("hello")
# res = QMessageBox.information(self,"人工智能判断为:",str(p),QMessageBox.Yes|QMessageBox.No)
# res.exec()
# 读取数据权重
# 预测并输出
'''
Created on 2018年8月8日

@author: Freedom
'''
from PyQt5.Qt import QWidget, QColor, QPixmap, QIcon, QSize, QCheckBox
from PyQt5.QtWidgets import QHBoxLayout, QVBoxLayout, QPushButton, QSplitter, \
    QComboBox, QLabel, QSpinBox, QFileDialog,QTextEdit
from PaintBoard import PaintBoard
import numpy as np
from PIL import Image
import DeepNET

class MainWidget(QWidget):

    def __init__(self, Parent=None):
        '''
        Constructor
        '''
        super().__init__(Parent)

        self.__InitData()  # 先初始化数据,再初始化界面
        self.__InitView()

    def __InitData(self):
        '''
                  初始化成员变量
        '''
        self.__paintBoard = PaintBoard(self)
        # 获取颜色列表(字符串类型)
        self.__colorList = QColor.colorNames()

    def __InitView(self):
        '''
                  初始化界面
        '''
        self.setFixedSize(640, 480)
        self.setWindowTitle("PaintBoard Example PyQt5")

        # 新建一个水平布局作为本窗体的主布局
        main_layout = QHBoxLayout(self)
        # 设置主布局内边距以及控件间距为10px
        main_layout.setSpacing(10)

        # 在主界面左侧放置画板
        main_layout.addWidget(self.__paintBoard)

        # 新建垂直子布局用于放置按键
        sub_layout = QVBoxLayout()

        # 设置此子布局和内部控件的间距为10px
        sub_layout.setContentsMargins(10, 10, 10, 10)

        self.__btn_Clear = QPushButton("清空画板")
        self.__btn_Clear.setParent(self)  # 设置父对象为本界面
        # 将按键按下信号与画板清空函数相关联
        self.__btn_Clear.clicked.connect(self.__paintBoard.Clear)
        sub_layout.addWidget(self.__btn_Clear)

        self.__btn_yuce = QPushButton("人工智能预测")
        self.__btn_yuce.setParent(self)  # 设置父对象为本界面
        self.__btn_yuce.clicked.connect(lambda:self.yuce())
        sub_layout.addWidget(self.__btn_yuce)

        self.__text_out = QTextEdit(self)
        self.__text_out.setParent(self)
        self.__text_out.setObjectName("预测结果为:")
        sub_layout.addWidget(self.__text_out)

        self.__btn_Quit = QPushButton("退出")
        self.__btn_Quit.setParent(self)  # 设置父对象为本界面
        self.__btn_Quit.clicked.connect(self.Quit)
        sub_layout.addWidget(self.__btn_Quit)

        self.__btn_Save = QPushButton("保存作品")
        self.__btn_Save.setParent(self)
        self.__btn_Save.clicked.connect(self.on_btn_Save_Clicked)
        sub_layout.addWidget(self.__btn_Save)

        self.__cbtn_Eraser = QCheckBox("  使用橡皮擦")
        self.__cbtn_Eraser.setParent(self)
        self.__cbtn_Eraser.clicked.connect(self.on_cbtn_Eraser_clicked)
        sub_layout.addWidget(self.__cbtn_Eraser)

        splitter = QSplitter(self)  # 占位符
        sub_layout.addWidget(splitter)

        self.__label_penThickness = QLabel(self)
        self.__label_penThickness.setText("画笔粗细")
        self.__label_penThickness.setFixedHeight(20)
        sub_layout.addWidget(self.__label_penThickness)

        self.__spinBox_penThickness = QSpinBox(self)
        self.__spinBox_penThickness.setMaximum(40)
        self.__spinBox_penThickness.setMinimum(2)
        self.__spinBox_penThickness.setValue(20)  # 默认粗细为10
        self.__spinBox_penThickness.setSingleStep(2)  # 最小变化值为2
        self.__spinBox_penThickness.valueChanged.connect(
            self.on_PenThicknessChange)  # 关联spinBox值变化信号和函数on_PenThicknessChange
        sub_layout.addWidget(self.__spinBox_penThickness)

        self.__label_penColor = QLabel(self)
        self.__label_penColor.setText("画笔颜色")
        self.__label_penColor.setFixedHeight(20)
        sub_layout.addWidget(self.__label_penColor)

        self.__comboBox_penColor = QComboBox(self)
        self.__fillColorList(self.__comboBox_penColor)  # 用各种颜色填充下拉列表
        self.__comboBox_penColor.currentIndexChanged.connect(
            self.on_PenColorChange)  # 关联下拉列表的当前索引变更信号与函数on_PenColorChange
        sub_layout.addWidget(self.__comboBox_penColor)

        main_layout.addLayout(sub_layout)  # 将子布局加入主布局

    def __fillColorList(self, comboBox):

        index_black = 0
        index = 0
        for color in self.__colorList:
            if color == "black":
                index_black = index
            index += 1
            pix = QPixmap(70, 20)
            pix.fill(QColor(color))
            comboBox.addItem(QIcon(pix), None)
            comboBox.setIconSize(QSize(70, 20))
            comboBox.setSizeAdjustPolicy(QComboBox.AdjustToContents)

        comboBox.setCurrentIndex(index_black)

    def on_PenColorChange(self):
        color_index = self.__comboBox_penColor.currentIndex()
        color_str = self.__colorList[color_index]
        self.__paintBoard.ChangePenColor(color_str)

    def on_PenThicknessChange(self):
        penThickness = self.__spinBox_penThickness.value()
        self.__paintBoard.ChangePenThickness(penThickness)

    def on_btn_Save_Clicked(self):
        savePath = QFileDialog.getSaveFileName(self, 'Save Your Paint', '.\\', '*.png')
        print(savePath)
        if savePath[0] == "":
            print("Save cancel")
            return
        image = self.__paintBoard.GetContentAsQImage()
        image.save(savePath[0])

    def on_cbtn_Eraser_clicked(self):
        if self.__cbtn_Eraser.isChecked():
            self.__paintBoard.EraserMode = True  # 进入橡皮擦模式
        else:
            self.__paintBoard.EraserMode = False  # 退出橡皮擦模式

    def Quit(self):
        self.close()

    def yuce(self):
        # #标准化图片 获取Y
        savePath = "./image_rgzn/test.png"
        image = self.__paintBoard.GetContentAsQImage()
        image.save(savePath)
        img = Image.open(savePath)
        img = img.convert("I")
        img = img.resize((28, 28))
        x = np.array(img)
        train_image = x.reshape(1, -1).T / 255
        w,layer = DeepNET.read_ccs("./model/model20221119225104.h5")
        p = DeepNET.predict1(train_image,w)
        self.__text_out.setText(str(p[0]))
        print(p)
        # print("hello")
        # res = QMessageBox.information(self,"人工智能判断为:",str(p),QMessageBox.Yes|QMessageBox.No)
        # res.exec_()
        # 读取数据权重

        # 预测并输出
(6)paintboard.py
'''
Created on 2018年8月9日

@author: Freedom
'''
from PyQt5.QtWidgets import QWidget
from PyQt5.Qt import QPixmap, QPainter, QPoint, QPaintEvent, QMouseEvent, QPen, \
    QColor, QSize
from PyQt5.QtCore import Qt

class PaintBoard(QWidget):

    def __init__(self, Parent=None):
        '''
        Constructor
        '''
        super().__init__(Parent)

        self.__InitData()  # 先初始化数据,再初始化界面
        self.__InitView()

    def __InitData(self):

        self.__size = QSize(280, 280)

        # 新建QPixmap作为画板,尺寸为__size
        self.__board = QPixmap(self.__size)
        self.__board.fill(Qt.black)  # 用白色填充画板

        self.__IsEmpty = True  # 默认为空画板
        self.EraserMode = False  # 默认为禁用橡皮擦模式

        self.__lastPos = QPoint(0, 0)  # 上一次鼠标位置
        self.__currentPos = QPoint(0, 0)  # 当前的鼠标位置

        self.__painter = QPainter()  # 新建绘图工具

        self.__thickness = 10  # 默认画笔粗细为10px
        self.__penColor = QColor("white")  # 设置默认画笔颜色为黑色
        self.__colorList = QColor.colorNames()  # 获取颜色列表

    def __InitView(self):
        # 设置界面的尺寸为__size
        self.setFixedSize(self.__size)

    def Clear(self):
        # 清空画板
        self.__board.fill(Qt.black)
        self.update()
        self.__IsEmpty = True

    def ChangePenColor(self, color="black"):
        # 改变画笔颜色
        self.__penColor = QColor(color)

    def ChangePenThickness(self, thickness=10):
        # 改变画笔粗细
        self.__thickness = thickness

    def IsEmpty(self):
        # 返回画板是否为空
        return self.__IsEmpty

    def GetContentAsQImage(self):
        # 获取画板内容(返回QImage)
        image = self.__board.toImage()
        return image

    def paintEvent(self, paintEvent):
        # 绘图事件
        # 绘图时必须使用QPainter的实例,此处为__painter
        # 绘图在begin()函数与end()函数间进行
        # begin(param)的参数要指定绘图设备,即把图画在哪里
        # drawPixmap用于绘制QPixmap类型的对象
        self.__painter.begin(self)
        # 0,0为绘图的左上角起点的坐标,__board即要绘制的图
        self.__painter.drawPixmap(0, 0, self.__board)
        self.__painter.end()

    def mousePressEvent(self, mouseEvent):
        # 鼠标按下时,获取鼠标的当前位置保存为上一次位置
        self.__currentPos = mouseEvent.pos()
        self.__lastPos = self.__currentPos

    def mouseMoveEvent(self, mouseEvent):
        # 鼠标移动时,更新当前位置,并在上一个位置和当前位置间画线
        self.__currentPos = mouseEvent.pos()
        self.__painter.begin(self.__board)

        if self.EraserMode == False:
            # 非橡皮擦模式
            self.__painter.setPen(QPen(self.__penColor, self.__thickness))  # 设置画笔颜色,粗细
        else:
            # 橡皮擦模式下画笔为纯白色,粗细为10
            self.__painter.setPen(QPen(Qt.white, 10))

        # 画线
        self.__painter.drawLine(self.__lastPos, self.__currentPos)
        self.__painter.end()
        self.__lastPos = self.__currentPos

        self.update()  # 更新显示

    def mouseReleaseEvent(self, mouseEvent):
        self.__IsEmpty = False  # 画板不再为空
感谢看完的读者,希望你们都可以对编程产生热爱!
版权归原作者 Macre Aegir Thrym 所有, 如有侵权,请联系我们删除。