
用300行Python代码实现一个人脸识别系统
最近又多了不少朋友关注,先在这里谢谢大家。关注我的朋友大多数都是大学生,而且我简单看了一下,低年级的大学生居多,大多数都是为了完成课程设计,作为一个过来人,还是希望大家平时能多抽出点时间学习一下,这种临时抱佛脚的策略要少用嗷。今天我们来python实现一个人脸识别系统,主要是借助了dlib这个库,相当于我们直接调用现成的库来进行人脸识别,就省去了之前教程中的数据收集和模型训练的步骤了。
B站视频:用300行代码实现人脸识别系统_哔哩哔哩_bilibili
CSDN博客:用300行Python代码实现一个人脸识别系统_dejahu的博客-CSDN博客
码云地址:face_dlib_py37_42: 用300行代码开发一个人脸识别系统-42 (gitee.com)
预编译dlib库下载地址:人脸识别系统+windows64位-dlib-19.17.0-cp37-cp37m-win_amd64.zip-深度学习文档类资源-CSDN文库
注:直接安装dlib库可能会有编译错误,可以通过下列方式获取编译好的dlib库
- 获取方式1: 直接从付费资源下载人脸识别系统+windows64位-dlib-19.17.0-cp37-cp37m-win_amd64.zip-深度学习文档类资源-CSDN文库
- 获取方式2: 在B站视频三连并在评论区留下你的邮箱地址用300行代码实现人脸识别系统_哔哩哔哩_bilibili
- **获取方式3:**在CSDN博客中三连并在评论区留下你的邮箱地址用300行Python代码实现一个人脸识别系统_dejahu的博客-CSDN博客
基本原理
人脸识别和目标检测这些还不太一样,比如大家传统的训练一个目标检测模型,你只有对这个目标训练了之后,你的模型才能找到这样的目标,比如你的目标检测模型如果是检测植物的,那显然就不能检测动物。但是人脸识别就不一样,以你的手机为例,你发现你只录入了一次你的人脸信息,不需要训练,他就能准确的识别你,这里识别的原理是通过人脸识别的模型提取你脸部的特征向量,然后将实时检测到的你的人脸同数据库中保存的人脸进行比对,如果相似度超过一定的阈值之后,就认为比对成功。不过我这里说的只是简化版本的人脸识别,现在手机和门禁这些要复杂和安全的多,也不是简单平面上的人脸识别。
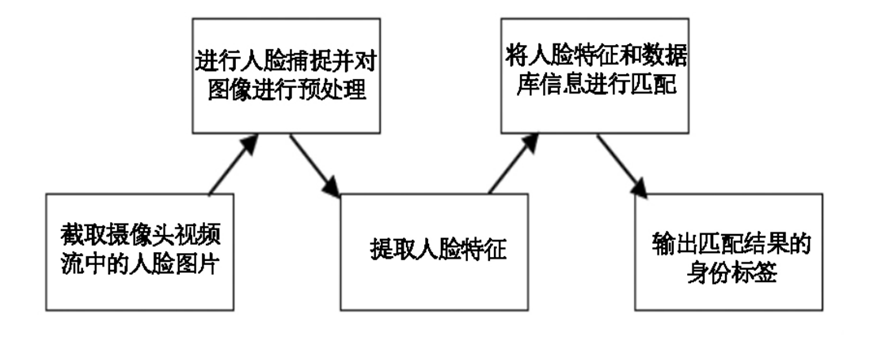
总结下来可以分为下面的步骤:
- 上传人脸到数据库
- 人脸检测
- 数据库比对并返回结果
这里我做了一个简答的示意图,可以帮助大家简单理解一下。
代码实现
废话不多说,这里就是我们的代码实现,代码我已经上传到码云,大家直接下载就行,地址就在博客开头。
不会安装python环境的兄弟请看这里:如何在pycharm中配置anaconda的虚拟环境_dejahu的博客-CSDN博客_如何在pycharm中配置anaconda
创建虚拟环境
创建虚拟环境前请大家先下载博客开头的码云源码到本地。
本次我们需要使用到python3.7的虚拟环境,命令如下:
conda create -n face python==3.7.3
conda activate face
安装必要的库
pip install -r requirements.txt
愉快地开始你的人脸识别吧!
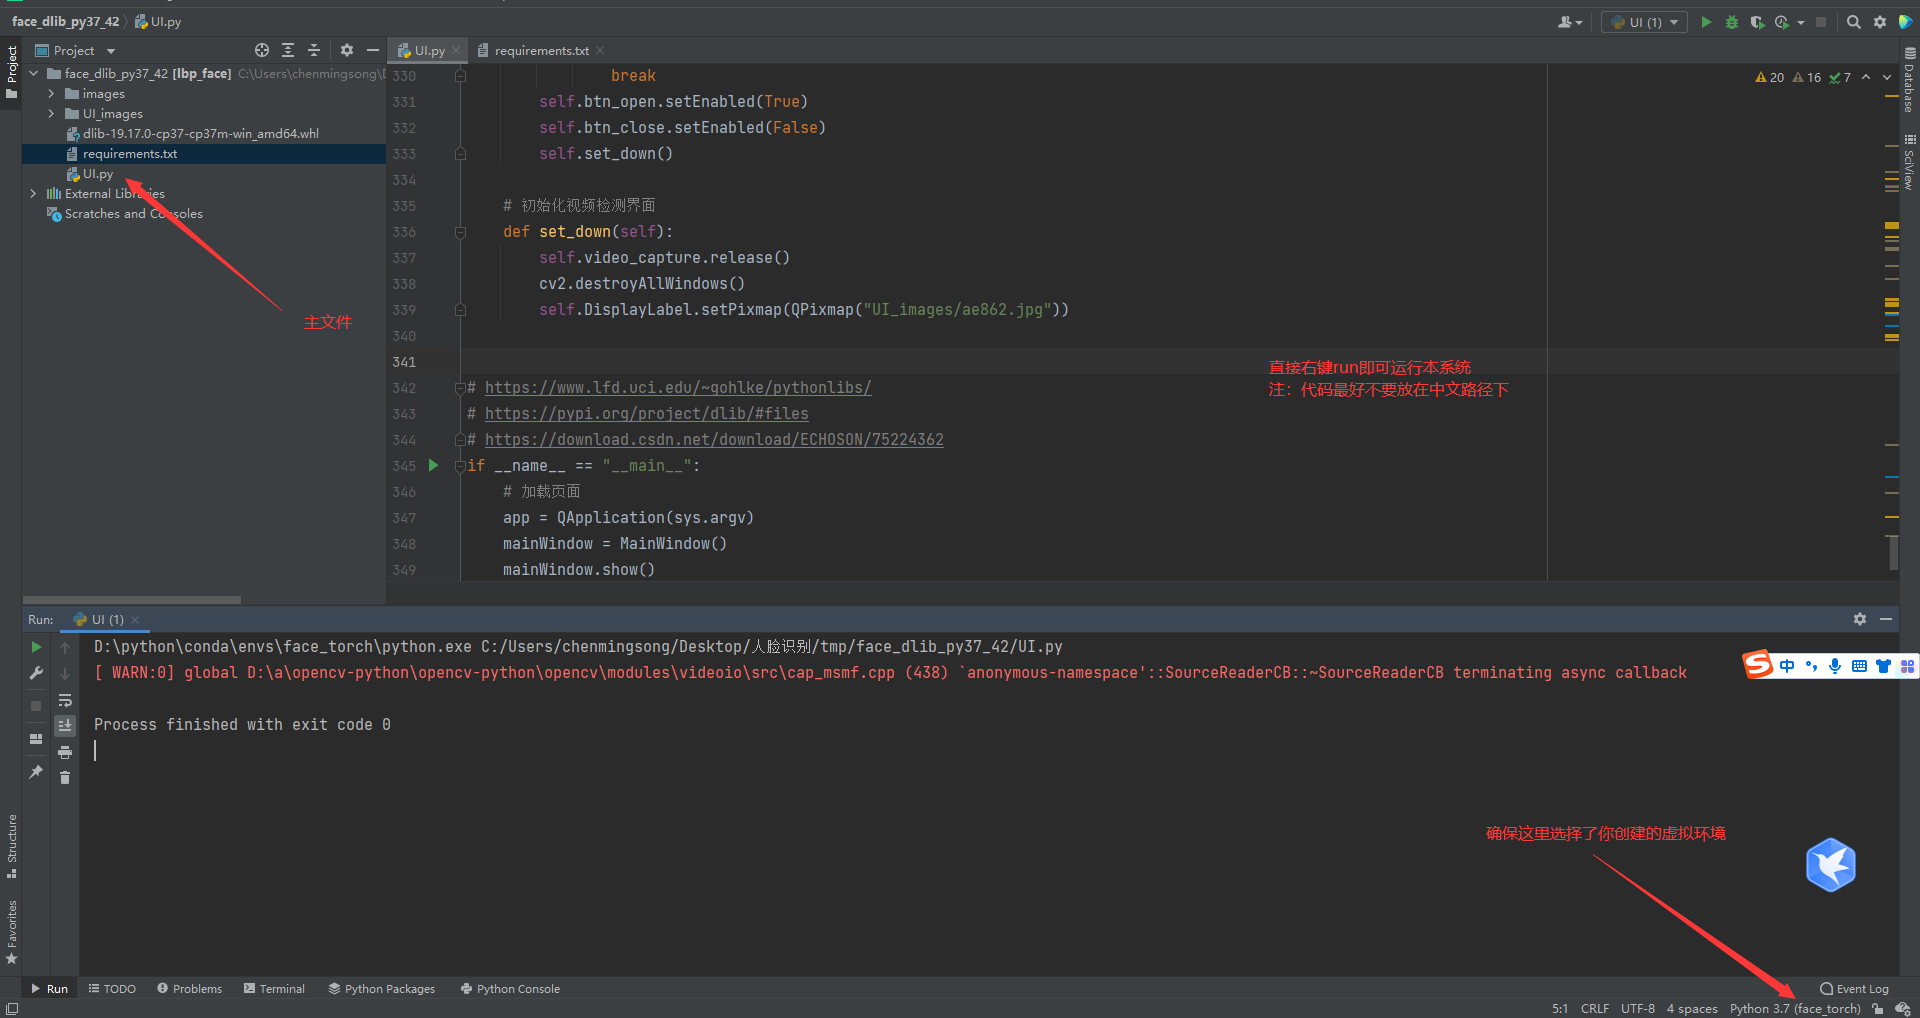
执行下面的主文件即可
python UI.py
或者在pycharm中按照下面的方式直接运行即可
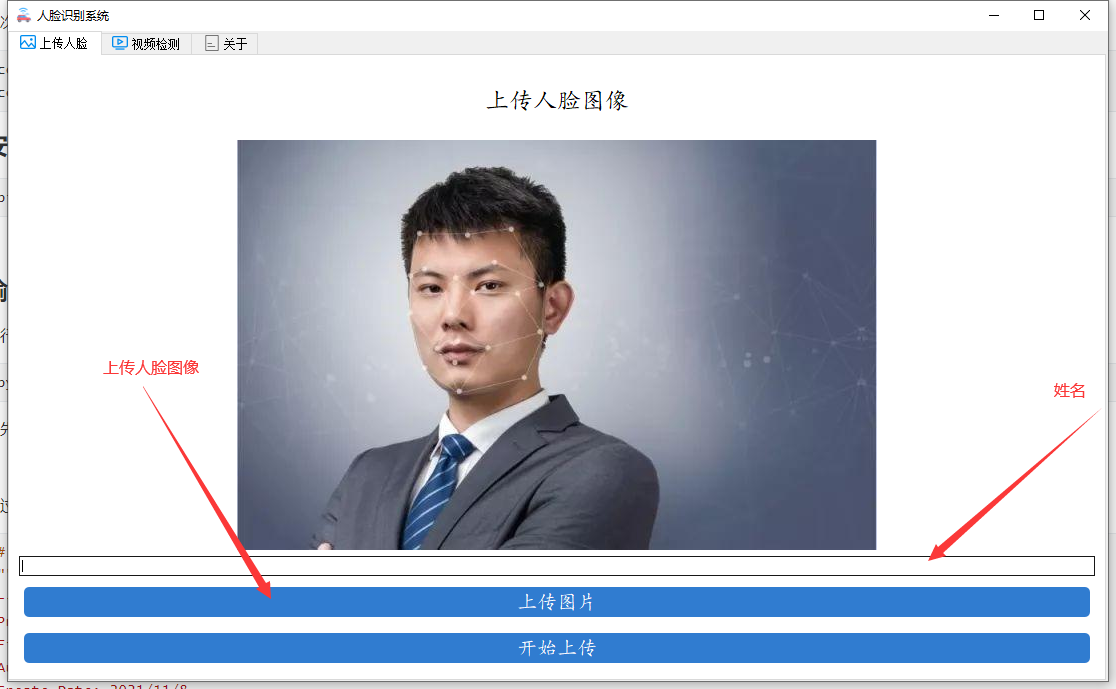
首先将你需要识别的人脸上传到数据库中
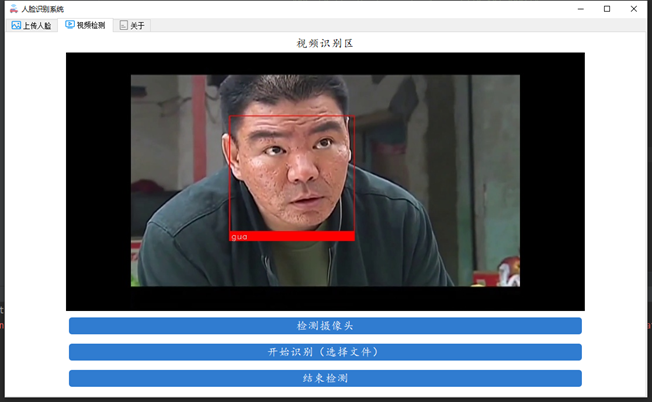
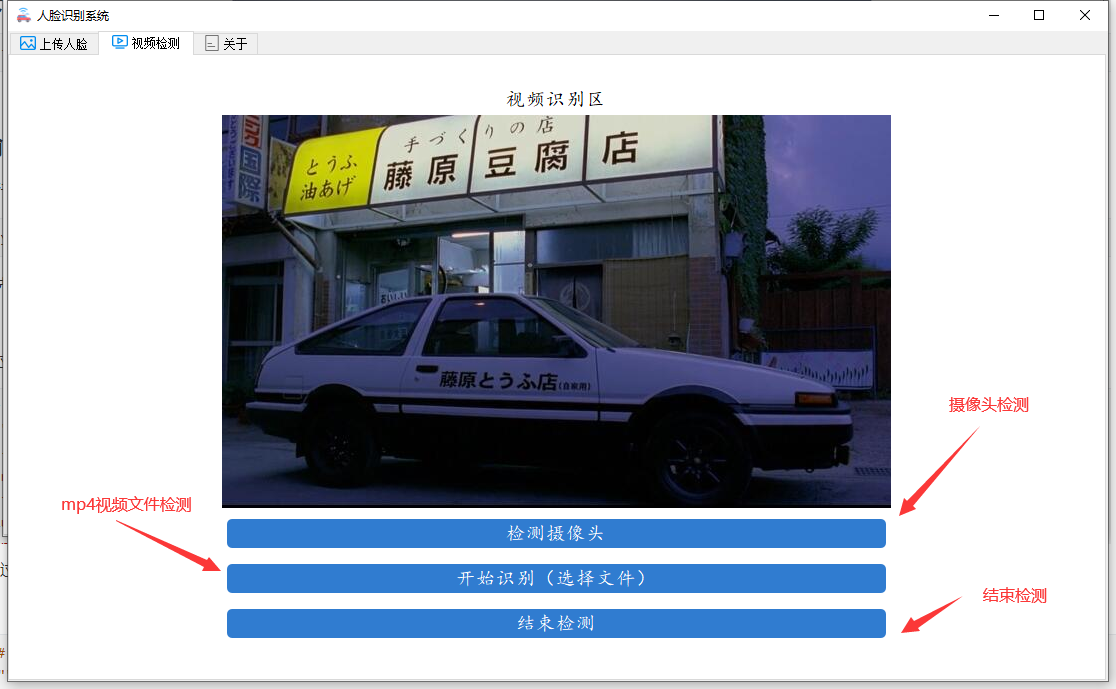
通过第二个视频检测功能识别实时的人脸
详细的代码如下:
# -*- coding: utf-8 -*-"""
-------------------------------------------------
Project Name: yolov5-jungong
File Name: window.py.py
Author: chenming
Create Date: 2021/11/8
Description:图形化界面,可以检测摄像头、视频和图片文件
-------------------------------------------------
"""# 应该在界面启动的时候就将模型加载出来,设置tmp的目录来放中间的处理结果import shutil
import PyQt5.QtCore
from PyQt5.QtGui import*from PyQt5.QtCore import*from PyQt5.QtWidgets import*import threading
import argparse
import os
import sys
from pathlib import Path
import cv2
import torch
import torch.backends.cudnn as cudnn
import os.path as osp
FILE = Path(__file__).resolve()
ROOT = FILE.parents[0]# YOLOv5 root directoryifstr(ROOT)notin sys.path:
    sys.path.append(str(ROOT))# add ROOT to PATH
ROOT = Path(os.path.relpath(ROOT, Path.cwd()))# relativefrom models.common import DetectMultiBackend
from utils.datasets import IMG_FORMATS, VID_FORMATS, LoadImages, LoadStreams
from utils.general import(LOGGER, check_file, check_img_size, check_imshow, check_requirements, colorstr,
                           increment_path, non_max_suppression, print_args, scale_coords, strip_optimizer, xyxy2xywh)from utils.plots import Annotator, colors, save_one_box
from utils.torch_utils import select_device, time_sync

# 添加一个关于界面# 窗口主类classMainWindow(QTabWidget):# 基本配置不动,然后只动第三个界面def__init__(self):# 初始化界面super().__init__()
        self.setWindowTitle('Target detection system')
        self.resize(1200,800)
        self.setWindowIcon(QIcon("images/UI/lufei.png"))# 图片读取进程
        self.output_size =480
        self.img2predict =""
        self.device ='cpu'# # 初始化视频读取线程
        self.vid_source ='0'# 初始设置为摄像头
        self.stopEvent = threading.Event()
        self.webcam =True
        self.stopEvent.clear()
        self.model = self.model_load(weights="runs/train/exp_yolov5s/weights/best.pt",
                                     device="cpu")# todo 指明模型加载的位置的设备
        self.initUI()
        self.reset_vid()'''
    ***模型初始化***
    '''@torch.no_grad()defmodel_load(self, weights="",# model.pt path(s)
                   device='',# cuda device, i.e. 0 or 0,1,2,3 or cpu
                   half=False,# use FP16 half-precision inference
                   dnn=False,# use OpenCV DNN for ONNX inference):
        device = select_device(device)
        half &= device.type!='cpu'# half precision only supported on CUDA
        device = select_device(device)
        model = DetectMultiBackend(weights, device=device, dnn=dnn)
        stride, names, pt, jit, onnx = model.stride, model.names, model.pt, model.jit, model.onnx
        # Half
        half &= pt and device.type!='cpu'# half precision only supported by PyTorch on CUDAif pt:
            model.model.half()if half else model.model.float()print("模型加载完成!")return model

    '''
    ***界面初始化***
    '''definitUI(self):# 图片检测子界面
        font_title = QFont('楷体',16)
        font_main = QFont('楷体',14)# 图片识别界面, 两个按钮,上传图片和显示结果
        img_detection_widget = QWidget()
        img_detection_layout = QVBoxLayout()
        img_detection_title = QLabel("图片识别功能")
        img_detection_title.setFont(font_title)
        mid_img_widget = QWidget()
        mid_img_layout = QHBoxLayout()
        self.left_img = QLabel()
        self.right_img = QLabel()
        self.left_img.setPixmap(QPixmap("images/UI/up.jpeg"))
        self.right_img.setPixmap(QPixmap("images/UI/right.jpeg"))
        self.left_img.setAlignment(Qt.AlignCenter)
        self.right_img.setAlignment(Qt.AlignCenter)
        mid_img_layout.addWidget(self.left_img)
        mid_img_layout.addStretch(0)
        mid_img_layout.addWidget(self.right_img)
        mid_img_widget.setLayout(mid_img_layout)
        up_img_button = QPushButton("上传图片")
        det_img_button = QPushButton("开始检测")
        up_img_button.clicked.connect(self.upload_img)
        det_img_button.clicked.connect(self.detect_img)
        up_img_button.setFont(font_main)
        det_img_button.setFont(font_main)
        up_img_button.setStyleSheet("QPushButton{color:white}""QPushButton:hover{background-color: rgb(2,110,180);}""QPushButton{background-color:rgb(48,124,208)}""QPushButton{border:2px}""QPushButton{border-radius:5px}""QPushButton{padding:5px 5px}""QPushButton{margin:5px 5px}")
        det_img_button.setStyleSheet("QPushButton{color:white}""QPushButton:hover{background-color: rgb(2,110,180);}""QPushButton{background-color:rgb(48,124,208)}""QPushButton{border:2px}""QPushButton{border-radius:5px}""QPushButton{padding:5px 5px}""QPushButton{margin:5px 5px}")
        img_detection_layout.addWidget(img_detection_title, alignment=Qt.AlignCenter)
        img_detection_layout.addWidget(mid_img_widget, alignment=Qt.AlignCenter)
        img_detection_layout.addWidget(up_img_button)
        img_detection_layout.addWidget(det_img_button)
        img_detection_widget.setLayout(img_detection_layout)# todo 视频识别界面# 视频识别界面的逻辑比较简单,基本就从上到下的逻辑
        vid_detection_widget = QWidget()
        vid_detection_layout = QVBoxLayout()
        vid_title = QLabel("视频检测功能")
        vid_title.setFont(font_title)
        self.vid_img = QLabel()
        self.vid_img.setPixmap(QPixmap("images/UI/up.jpeg"))
        vid_title.setAlignment(Qt.AlignCenter)
        self.vid_img.setAlignment(Qt.AlignCenter)
        self.webcam_detection_btn = QPushButton("摄像头实时监测")
        self.mp4_detection_btn = QPushButton("视频文件检测")
        self.vid_stop_btn = QPushButton("停止检测")
        self.webcam_detection_btn.setFont(font_main)
        self.mp4_detection_btn.setFont(font_main)
        self.vid_stop_btn.setFont(font_main)
        self.webcam_detection_btn.setStyleSheet("QPushButton{color:white}""QPushButton:hover{background-color: rgb(2,110,180);}""QPushButton{background-color:rgb(48,124,208)}""QPushButton{border:2px}""QPushButton{border-radius:5px}""QPushButton{padding:5px 5px}""QPushButton{margin:5px 5px}")
        self.mp4_detection_btn.setStyleSheet("QPushButton{color:white}""QPushButton:hover{background-color: rgb(2,110,180);}""QPushButton{background-color:rgb(48,124,208)}""QPushButton{border:2px}""QPushButton{border-radius:5px}""QPushButton{padding:5px 5px}""QPushButton{margin:5px 5px}")
        self.vid_stop_btn.setStyleSheet("QPushButton{color:white}""QPushButton:hover{background-color: rgb(2,110,180);}""QPushButton{background-color:rgb(48,124,208)}""QPushButton{border:2px}""QPushButton{border-radius:5px}""QPushButton{padding:5px 5px}""QPushButton{margin:5px 5px}")
        self.webcam_detection_btn.clicked.connect(self.open_cam)
        self.mp4_detection_btn.clicked.connect(self.open_mp4)
        self.vid_stop_btn.clicked.connect(self.close_vid)# 添加组件到布局上
        vid_detection_layout.addWidget(vid_title)
        vid_detection_layout.addWidget(self.vid_img)
        vid_detection_layout.addWidget(self.webcam_detection_btn)
        vid_detection_layout.addWidget(self.mp4_detection_btn)
        vid_detection_layout.addWidget(self.vid_stop_btn)
        vid_detection_widget.setLayout(vid_detection_layout)# todo 关于界面
        about_widget = QWidget()
        about_layout = QVBoxLayout()
        about_title = QLabel('欢迎使用目标检测系统\n\n 提供付费指导:有需要的好兄弟加下面的QQ即可')# todo 修改欢迎词语
        about_title.setFont(QFont('楷体',18))
        about_title.setAlignment(Qt.AlignCenter)
        about_img = QLabel()
        about_img.setPixmap(QPixmap('images/UI/qq.png'))
        about_img.setAlignment(Qt.AlignCenter)# label4.setText("<a href='https://oi.wiki/wiki/学习率的调整'>如何调整学习率</a>")
        label_super = QLabel()# todo 更换作者信息
        label_super.setText("<a href='https://blog.csdn.net/ECHOSON'>或者你可以在这里找到我-->肆十二</a>")
        label_super.setFont(QFont('楷体',16))
        label_super.setOpenExternalLinks(True)# label_super.setOpenExternalLinks(True)
        label_super.setAlignment(Qt.AlignRight)
        about_layout.addWidget(about_title)
        about_layout.addStretch()
        about_layout.addWidget(about_img)
        about_layout.addStretch()
        about_layout.addWidget(label_super)
        about_widget.setLayout(about_layout)

        self.left_img.setAlignment(Qt.AlignCenter)
        self.addTab(img_detection_widget,'图片检测')
        self.addTab(vid_detection_widget,'视频检测')
        self.addTab(about_widget,'联系我')
        self.setTabIcon(0, QIcon('images/UI/lufei.png'))
        self.setTabIcon(1, QIcon('images/UI/lufei.png'))
        self.setTabIcon(2, QIcon('images/UI/lufei.png'))'''
    ***上传图片***
    '''defupload_img(self):# 选择录像文件进行读取
        fileName, fileType = QFileDialog.getOpenFileName(self,'Choose file','','*.jpg *.png *.tif *.jpeg')if fileName:
            suffix = fileName.split(".")[-1]
            save_path = osp.join("images/tmp","tmp_upload."+ suffix)
            shutil.copy(fileName, save_path)# 应该调整一下图片的大小,然后统一防在一起
            im0 = cv2.imread(save_path)
            resize_scale = self.output_size / im0.shape[0]
            im0 = cv2.resize(im0,(0,0), fx=resize_scale, fy=resize_scale)
            cv2.imwrite("images/tmp/upload_show_result.jpg", im0)# self.right_img.setPixmap(QPixmap("images/tmp/single_result.jpg"))
            self.img2predict = fileName
            self.left_img.setPixmap(QPixmap("images/tmp/upload_show_result.jpg"))# todo 上传图片之后右侧的图片重置,
            self.right_img.setPixmap(QPixmap("images/UI/right.jpeg"))'''
    ***检测图片***
    '''defdetect_img(self):
        model = self.model
        output_size = self.output_size
        source = self.img2predict  # file/dir/URL/glob, 0 for webcam
        imgsz =640# inference size (pixels)
        conf_thres =0.25# confidence threshold
        iou_thres =0.45# NMS IOU threshold
        max_det =1000# maximum detections per image
        device = self.device  # cuda device, i.e. 0 or 0,1,2,3 or cpu
        view_img =False# show results
        save_txt =False# save results to *.txt
        save_conf =False# save confidences in --save-txt labels
        save_crop =False# save cropped prediction boxes
        nosave =False# do not save images/videos
        classes =None# filter by class: --class 0, or --class 0 2 3
        agnostic_nms =False# class-agnostic NMS
        augment =False# ugmented inference
        visualize =False# visualize features
        line_thickness =3# bounding box thickness (pixels)
        hide_labels =False# hide labels
        hide_conf =False# hide confidences
        half =False# use FP16 half-precision inference
        dnn =False# use OpenCV DNN for ONNX inferenceprint(source)if source =="":
            QMessageBox.warning(self,"请上传","请先上传图片再进行检测")else:
            source =str(source)
            device = select_device(self.device)
            webcam =False
            stride, names, pt, jit, onnx = model.stride, model.names, model.pt, model.jit, model.onnx
            imgsz = check_img_size(imgsz, s=stride)# check image size
            save_img =not nosave andnot source.endswith('.txt')# save inference images# Dataloaderif webcam:
                view_img = check_imshow()
                cudnn.benchmark =True# set True to speed up constant image size inference
                dataset = LoadStreams(source, img_size=imgsz, stride=stride, auto=pt andnot jit)
                bs =len(dataset)# batch_sizeelse:
                dataset = LoadImages(source, img_size=imgsz, stride=stride, auto=pt andnot jit)
                bs =1# batch_size
            vid_path, vid_writer =[None]* bs,[None]* bs
            # Run inferenceif pt and device.type!='cpu':
                model(torch.zeros(1,3,*imgsz).to(device).type_as(next(model.model.parameters())))# warmup
            dt, seen =[0.0,0.0,0.0],0for path, im, im0s, vid_cap, s in dataset:
                t1 = time_sync()
                im = torch.from_numpy(im).to(device)
                im = im.half()if half else im.float()# uint8 to fp16/32
                im /=255# 0 - 255 to 0.0 - 1.0iflen(im.shape)==3:
                    im = im[None]# expand for batch dim
                t2 = time_sync()
                dt[0]+= t2 - t1
                # Inference# visualize = increment_path(save_dir / Path(path).stem, mkdir=True) if visualize else False
                pred = model(im, augment=augment, visualize=visualize)
                t3 = time_sync()
                dt[1]+= t3 - t2
                # NMS
                pred = non_max_suppression(pred, conf_thres, iou_thres, classes, agnostic_nms, max_det=max_det)
                dt[2]+= time_sync()- t3
                # Second-stage classifier (optional)# pred = utils.general.apply_classifier(pred, classifier_model, im, im0s)# Process predictionsfor i, det inenumerate(pred):# per image
                    seen +=1if webcam:# batch_size >= 1
                        p, im0, frame = path[i], im0s[i].copy(), dataset.count
                        s +=f'{i}: 'else:
                        p, im0, frame = path, im0s.copy(),getattr(dataset,'frame',0)
                    p = Path(p)# to Path
                    s +='%gx%g '% im.shape[2:]# print string
                    gn = torch.tensor(im0.shape)[[1,0,1,0]]# normalization gain whwh
                    imc = im0.copy()if save_crop else im0  # for save_crop
                    annotator = Annotator(im0, line_width=line_thickness, example=str(names))iflen(det):# Rescale boxes from img_size to im0 size
                        det[:,:4]= scale_coords(im.shape[2:], det[:,:4], im0.shape).round()# Print resultsfor c in det[:,-1].unique():
                            n =(det[:,-1]== c).sum()# detections per class
                            s +=f"{n}{names[int(c)]}{'s'*(n >1)}, "# add to string# Write resultsfor*xyxy, conf, cls inreversed(det):if save_txt:# Write to file
                                xywh =(xyxy2xywh(torch.tensor(xyxy).view(1,4))/ gn).view(-1).tolist()# normalized xywh
                                line =(cls,*xywh, conf)if save_conf else(cls,*xywh)# label format# with open(txt_path + '.txt', 'a') as f:#     f.write(('%g ' * len(line)).rstrip() % line + '\n')if save_img or save_crop or view_img:# Add bbox to image
                                c =int(cls)# integer class
                                label =Noneif hide_labels else(names[c]if hide_conf elsef'{names[c]}{conf:.2f}')
                                annotator.box_label(xyxy, label, color=colors(c,True))# if save_crop:#     save_one_box(xyxy, imc, file=save_dir / 'crops' / names[c] / f'{p.stem}.jpg',#                  BGR=True)# Print time (inference-only)
                    LOGGER.info(f'{s}Done. ({t3 - t2:.3f}s)')# Stream results
                    im0 = annotator.result()# if view_img:#     cv2.imshow(str(p), im0)#     cv2.waitKey(1)  # 1 millisecond# Save results (image with detections)
                    resize_scale = output_size / im0.shape[0]
                    im0 = cv2.resize(im0,(0,0), fx=resize_scale, fy=resize_scale)
                    cv2.imwrite("images/tmp/single_result.jpg", im0)# 目前的情况来看,应该只是ubuntu下会出问题,但是在windows下是完整的,所以继续
                    self.right_img.setPixmap(QPixmap("images/tmp/single_result.jpg"))# 视频检测,逻辑基本一致,有两个功能,分别是检测摄像头的功能和检测视频文件的功能,先做检测摄像头的功能。'''
    ### 界面关闭事件 ###
    '''defcloseEvent(self, event):
        reply = QMessageBox.question(self,'quit',"Are you sure?",
                                     QMessageBox.Yes | QMessageBox.No,
                                     QMessageBox.No)if reply == QMessageBox.Yes:
            self.close()
            event.accept()else:
            event.ignore()'''
    ### 视频关闭事件 ###
    '''defopen_cam(self):
        self.webcam_detection_btn.setEnabled(False)
        self.mp4_detection_btn.setEnabled(False)
        self.vid_stop_btn.setEnabled(True)
        self.vid_source ='0'
        self.webcam =True
        th = threading.Thread(target=self.detect_vid)
        th.start()'''
    ### 开启视频文件检测事件 ###
    '''defopen_mp4(self):
        fileName, fileType = QFileDialog.getOpenFileName(self,'Choose file','','*.mp4 *.avi')if fileName:
            self.webcam_detection_btn.setEnabled(False)
            self.mp4_detection_btn.setEnabled(False)# self.vid_stop_btn.setEnabled(True)
            self.vid_source = fileName
            self.webcam =False
            th = threading.Thread(target=self.detect_vid)
            th.start()'''
    ### 视频开启事件 ###
    '''# 视频和摄像头的主函数是一样的,不过是传入的source不同罢了defdetect_vid(self):# pass
        model = self.model
        output_size = self.output_size
        # source = self.img2predict  # file/dir/URL/glob, 0 for webcam
        imgsz =640# inference size (pixels)
        conf_thres =0.25# confidence threshold
        iou_thres =0.45# NMS IOU threshold
        max_det =1000# maximum detections per image# device = self.device  # cuda device, i.e. 0 or 0,1,2,3 or cpu
        view_img =False# show results
        save_txt =False# save results to *.txt
        save_conf =False# save confidences in --save-txt labels
        save_crop =False# save cropped prediction boxes
        nosave =False# do not save images/videos
        classes =None# filter by class: --class 0, or --class 0 2 3
        agnostic_nms =False# class-agnostic NMS
        augment =False# ugmented inference
        visualize =False# visualize features
        line_thickness =3# bounding box thickness (pixels)
        hide_labels =False# hide labels
        hide_conf =False# hide confidences
        half =False# use FP16 half-precision inference
        dnn =False# use OpenCV DNN for ONNX inference
        source =str(self.vid_source)
        webcam = self.webcam
        device = select_device(self.device)
        stride, names, pt, jit, onnx = model.stride, model.names, model.pt, model.jit, model.onnx
        imgsz = check_img_size(imgsz, s=stride)# check image size
        save_img =not nosave andnot source.endswith('.txt')# save inference images# Dataloaderif webcam:
            view_img = check_imshow()
            cudnn.benchmark =True# set True to speed up constant image size inference
            dataset = LoadStreams(source, img_size=imgsz, stride=stride, auto=pt andnot jit)
            bs =len(dataset)# batch_sizeelse:
            dataset = LoadImages(source, img_size=imgsz, stride=stride, auto=pt andnot jit)
            bs =1# batch_size
        vid_path, vid_writer =[None]* bs,[None]* bs
        # Run inferenceif pt and device.type!='cpu':
            model(torch.zeros(1,3,*imgsz).to(device).type_as(next(model.model.parameters())))# warmup
        dt, seen =[0.0,0.0,0.0],0for path, im, im0s, vid_cap, s in dataset:
            t1 = time_sync()
            im = torch.from_numpy(im).to(device)
            im = im.half()if half else im.float()# uint8 to fp16/32
            im /=255# 0 - 255 to 0.0 - 1.0iflen(im.shape)==3:
                im = im[None]# expand for batch dim
            t2 = time_sync()
            dt[0]+= t2 - t1
            # Inference# visualize = increment_path(save_dir / Path(path).stem, mkdir=True) if visualize else False
            pred = model(im, augment=augment, visualize=visualize)
            t3 = time_sync()
            dt[1]+= t3 - t2
            # NMS
            pred = non_max_suppression(pred, conf_thres, iou_thres, classes, agnostic_nms, max_det=max_det)
            dt[2]+= time_sync()- t3
            # Second-stage classifier (optional)# pred = utils.general.apply_classifier(pred, classifier_model, im, im0s)# Process predictionsfor i, det inenumerate(pred):# per image
                seen +=1if webcam:# batch_size >= 1
                    p, im0, frame = path[i], im0s[i].copy(), dataset.count
                    s +=f'{i}: 'else:
                    p, im0, frame = path, im0s.copy(),getattr(dataset,'frame',0)
                p = Path(p)# to Path# save_path = str(save_dir / p.name)  # im.jpg# txt_path = str(save_dir / 'labels' / p.stem) + (#     '' if dataset.mode == 'image' else f'_{frame}')  # im.txt
                s +='%gx%g '% im.shape[2:]# print string
                gn = torch.tensor(im0.shape)[[1,0,1,0]]# normalization gain whwh
                imc = im0.copy()if save_crop else im0  # for save_crop
                annotator = Annotator(im0, line_width=line_thickness, example=str(names))iflen(det):# Rescale boxes from img_size to im0 size
                    det[:,:4]= scale_coords(im.shape[2:], det[:,:4], im0.shape).round()# Print resultsfor c in det[:,-1].unique():
                        n =(det[:,-1]== c).sum()# detections per class
                        s +=f"{n}{names[int(c)]}{'s'*(n >1)}, "# add to string# Write resultsfor*xyxy, conf, cls inreversed(det):if save_txt:# Write to file
                            xywh =(xyxy2xywh(torch.tensor(xyxy).view(1,4))/ gn).view(-1).tolist()# normalized xywh
                            line =(cls,*xywh, conf)if save_conf else(cls,*xywh)# label format# with open(txt_path + '.txt', 'a') as f:#     f.write(('%g ' * len(line)).rstrip() % line + '\n')if save_img or save_crop or view_img:# Add bbox to image
                            c =int(cls)# integer class
                            label =Noneif hide_labels else(names[c]if hide_conf elsef'{names[c]}{conf:.2f}')
                            annotator.box_label(xyxy, label, color=colors(c,True))# if save_crop:#     save_one_box(xyxy, imc, file=save_dir / 'crops' / names[c] / f'{p.stem}.jpg',#                  BGR=True)# Print time (inference-only)
                LOGGER.info(f'{s}Done. ({t3 - t2:.3f}s)')# Stream results# Save results (image with detections)
                im0 = annotator.result()
                frame = im0
                resize_scale = output_size / frame.shape[0]
                frame_resized = cv2.resize(frame,(0,0), fx=resize_scale, fy=resize_scale)
                cv2.imwrite("images/tmp/single_result_vid.jpg", frame_resized)
                self.vid_img.setPixmap(QPixmap("images/tmp/single_result_vid.jpg"))# self.vid_img# if view_img:# cv2.imshow(str(p), im0)# self.vid_img.setPixmap(QPixmap("images/tmp/single_result_vid.jpg"))# cv2.waitKey(1)  # 1 millisecondif cv2.waitKey(25)& self.stopEvent.is_set()==True:
                self.stopEvent.clear()
                self.webcam_detection_btn.setEnabled(True)
                self.mp4_detection_btn.setEnabled(True)
                self.reset_vid()break# self.reset_vid()'''
    ### 界面重置事件 ###
    '''defreset_vid(self):
        self.webcam_detection_btn.setEnabled(True)
        self.mp4_detection_btn.setEnabled(True)
        self.vid_img.setPixmap(QPixmap("images/UI/up.jpeg"))
        self.vid_source ='0'
        self.webcam =True'''
    ### 视频重置事件 ###
    '''defclose_vid(self):
        self.stopEvent.set()
        self.reset_vid()if __name__ =="__main__":
    app = QApplication(sys.argv)
    mainWindow = MainWindow()
    mainWindow.show()
    sys.exit(app.exec_())
找到我
你可以通过这些方式来寻找我。
B站:肆十二-
CSDN:肆十二
知乎:肆十二
微博:肆十二-
现在关注以后就是老朋友喽!

版权归原作者 肆十二 所有, 如有侵权,请联系我们删除。