
对于图像相关的任务,对图像进行旋转、模糊或调整大小是常见的数据增强的方法。 因为图像的自身属性与其他数据类型数据增强相比,图像的数据增强是非常直观的,我们只需要查看图像就可以看到特定图像是如何转换的,并且使用肉眼就能对效果有一个初步的评判结果。 尽管增强在图像域中很常见,但在其他的领域中也是可以进行数据增强的操作的,本篇文章将介绍音频方向的数据增强方法。
在这篇文章中,将介绍如何将增强应用到 TensorFlow 中的数据集的两种方法。 第一种方式直接修改数据; 第二种方式是在网络的前向传播期间这样做的。除此以外我们还会介绍使用torchaudio的内置方法实现与TF相同的功能。
直接音频增强
首先需要生成一个人工音频数据集。 我们不需要加载预先存在的数据集,而是根据需要重复 librosa 库中的一个样本:
import librosa
import tensorflow as tf

def build_artificial_dataset(num_samples: int):
    data = []
    sampling_rates = []

    for i in range(num_samples):
        y, sr = librosa.load(librosa.ex('nutcracker'))
        data.append(y)
        sampling_rates.append(sr)
    features_dataset = tf.data.Dataset.from_tensor_slices(data)
    labels_dataset = tf.data.Dataset.from_tensor_slices(sampling_rates)
    dataset = tf.data.Dataset.zip((features_dataset, labels_dataset))

    return dataset

ds = build_artificial_dataset(10)
在此过程中创建了一个 Dataset 对象,我们也可以使用纯 NumPy 数组这个可以根据实际需求选择。
现在小数据集已经可以使用,可以开始应用增强了。对于这一步,为了简单起见,本文中使用 audiomentations 库,我们只使用三个增强方式, PitchShift、Shift 和 ApplyGaussianNoise。前两个移动音高(PitchShift)和数据(Shift,可以认为是滚动数据;例如,狗的叫声将移动 + 5 秒)。最后一次转换使信号更嘈杂,增加了神经网络的挑战。接下来,将所有三个增强功能组合到一个管道中:
from audiomentations import Compose, AddGaussianNoise, PitchShift, Shift

augmentations_pipeline = Compose(
    [
        AddGaussianNoise(min_amplitude=0.001, max_amplitude=0.015, p=0.5),
        PitchShift(min_semitones=-4, max_semitones=4, p=0.5),
        Shift(min_fraction=-0.5, max_fraction=0.5, p=0.5),
    ]
)
在输入数据之前,必须编写一些额外的代码。这因为我们正在使用一个 Dataset 对象,这些代码告诉 TensorFlow 临时将张量转换为 NumPy 数组,然后再输入到数据增强的处理流程中:
def apply_pipeline(y, sr):
    shifted = augmentations_pipeline(y, sr)
    return shifted


@tf.function
def tf_apply_pipeline(feature, sr, ):
    """
    Applies the augmentation pipeline to audio files
    @param y: audio data
    @param sr: sampling rate
    @return: augmented audio data
    """
    augmented_feature = tf.numpy_function(
        apply_pipeline, inp=[feature, sr], Tout=tf.float32, name="apply_pipeline"
    )

    return augmented_feature, sr


def augment_audio_dataset(dataset: tf.data.Dataset):
    dataset = dataset.map(tf_apply_pipeline)

    return dataset
有了这些辅助函数,就可以扩充我们的数据集了。 最后,还需要再末尾添加维度来添加一个维度,这会将单个音频样本从 (num_data_point,) 转换为 (num_data_points, 1),表明我们有单声道音频:
ds = augment_audio_dataset(ds)
ds = ds.map(lambda y, sr: (tf.expand_dims(y, axis=-1), sr))
这样就完成了直接的音频数据增强
前向传播期间进行音频增强
上面的方式相比,在网络中增加音频数据会将计算负载放在前向传递上。
为了达到这个目的,这里使用提供自定义 TensorFlow 层的 kapre 库。我们使用 MelSpectrogram 层,它接受原始(即未修改的)音频数据并在 GPU 上计算 Mel 频谱图。
虽然与数据增强没有直接关系,但这有两个好处:
1、我们可以在例如超参数搜索期间优化频谱图生成的参数,从而无需重复将音频生成频谱图。
2、转换直接在 GPU 上进行,因此在原始转换速度和设备内存放置方面都会更快。
首先加载由 kapre 库提供的音频层。这些层获取原始音频数据并计算频谱图表示:
import kapre

input_layer = tf.keras.layers.Input(shape=input_shape, dtype=tf.float32)

melspectrogram = kapre.composed.get_melspectrogram_layer(
    n_fft=1024,
    return_decibel=True,
    n_mels=256,
    input_data_format='channels_last',
    output_data_format='channels_last')(input_layer)
然后,我们从 spec-augment 包中添加一个增强层。 这个包实现了 SpecAugment 论文。 [1],它掩盖了频谱图的一部分。 掩蔽混淆了神经网络所需的信息,增加了学习的效果。 这种修改迫使网络关注其他特征,从而扩展其泛化到看不见的数据的能力:
from spec_augment import SpecAugment

spec_augment = SpecAugment(freq_mask_param=27,  # F in paper
                           time_mask_param=100,  # T in paper
                           n_freq_mask=1,  # mF in paper
                           n_time_mask=2,  # mT in paper
                           mask_value=-1, )(melspectrogram)
最后,对于我们的案例,添加了一个未经训练的残差网络,其中包含任意十个类来将数据分类:
spec_augment = tf.keras.applications.resnet_v2.preprocess_input(spec_augment)
core = tf.keras.applications.resnet_v2.ResNet152V2(
        input_tensor=spec_augment,
        include_top=False,
        pooling="avg",
        weights=None,
    )
core = core.output

output = tf.keras.layers.Dense(units=10)(core)

resnet_model = tf.keras.Model(inputs=[input_layer], outputs=[output], name="audio_model")
这样我们就有了一个深度神经网络,可以在前向传播期间增强音频数据。
torchaudio
上面介绍的都是tf的方法,那么对于pytorch我们怎么办?可以直接使用官方提供的torchaudio包
torchaudio 实现了TimeStrech, TimeMasking 和FrequencyMasking.三种方式,我们看看官方给的代码
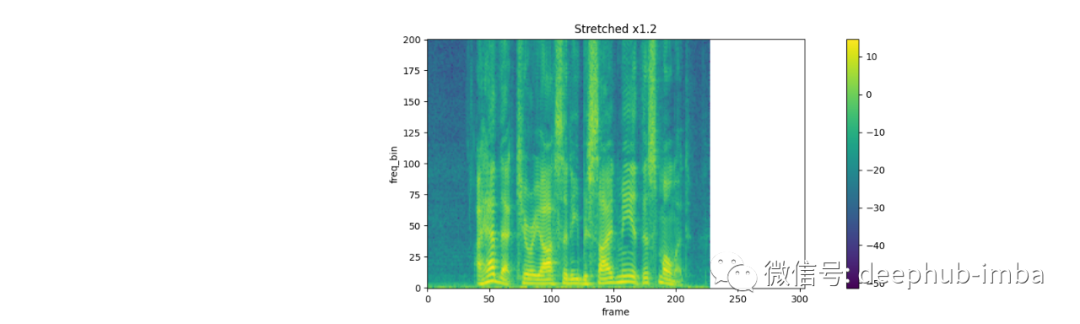
TimeStrech:
spec = get_spectrogram(power=None)
strech = T.TimeStretch()

rate = 1.2
spec_ = strech(spec, rate)
plot_spectrogram(spec_[0].abs(), title=f"Stretched x{rate}", aspect='equal', xmax=304)

plot_spectrogram(spec[0].abs(), title="Original", aspect='equal', xmax=304)

rate = 0.9
spec_ = strech(spec, rate)
plot_spectrogram(spec_[0].abs(), title=f"Stretched x{rate}", aspect='equal', xmax=304)
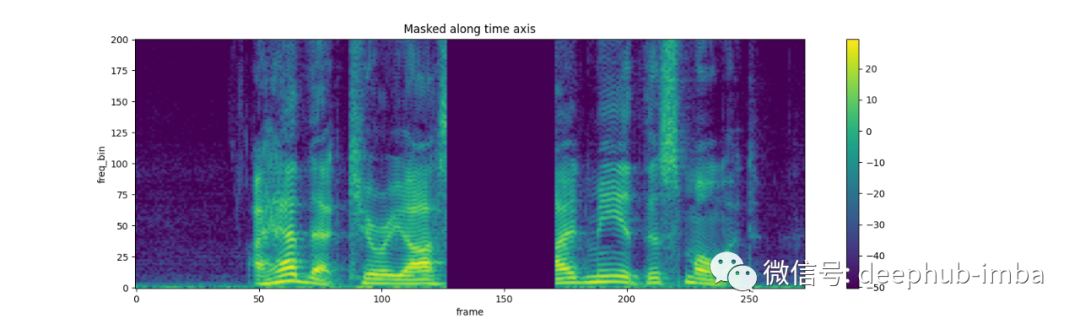
TimeMasking:
torch.random.manual_seed(4)

spec = get_spectrogram()
plot_spectrogram(spec[0], title="Original")

masking = T.TimeMasking(time_mask_param=80)
spec = masking(spec)

plot_spectrogram(spec[0], title="Masked along time axis")
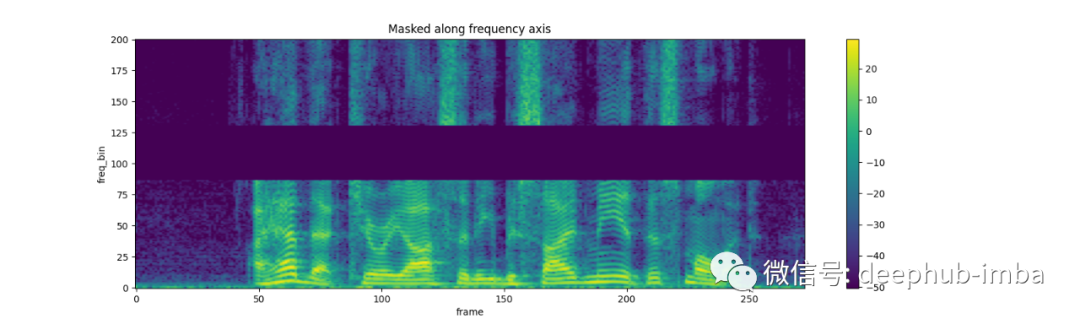
FrequencyMasking:
torch.random.manual_seed(4)

spec = get_spectrogram()
plot_spectrogram(spec[0], title="Original")

masking = T.FrequencyMasking(freq_mask_param=80)
spec = masking(spec)

plot_spectrogram(spec[0], title="Masked along frequency axis")
总结
在这篇博文中,我们介绍了2个主流深度学习框架的音频增强的方法,所以如果你是TF的爱好者,可以使用我们介绍的两种方法进行测试,如果你是pytorch的爱好者,直接使用官方的torchaudio包就可以了。
引用
[1] Park et al., Specaugment: A simple data augmentation method for automatic speech recognition, 2019, Proc. Interspeech 2019
https://ai.googleblog.com/2019/04/specaugment-new-data-augmentation.html
作者:Pascal Janetzky