   之前跑很多项目没有记录,后来再弄就不行了。这次特别记录一下,在梳理流程的同时希望给大家带来小小的帮助!我自己是在cuda11.2,windows环境下成功的,过程十分详细,有需要的朋友耐心看完。有问题可以评论区交流

    首先,本文nerf是基于pytorch训练的,代码来源于yenchenlin大佬,GitHub地址:GitHub - yenchenlin/nerf-pytorch: A PyTorch implementation of NeRF (Neural Radiance Fields) that reproduces the results.
一、配置nerf环境
在每弄一个新项目之前,建议创建一个新的环境,本文利用conda命令创建名为nerf的环境,指令如下:
conda create --name nerf -y python=3.8 #创建名为nerf的环境
conda activate nerf #切换到nerf环境
然后安装需要的库,都在nerf代码文件的requirements.txt里
cd nerf-pytorch #进入到你nerf的文件夹,根据自己的文件位置调整
python -m pip install --upgrade pip #升级一下pip,防止莫名其妙的错误
pip install -r requirements.txt #安装需要的库
结束之后建议测试一下pytorch是否为GPU版本,有时候默认安装会装成CPU版本,用以下代码测试,输出版本号和True则没有问题。否则卸载安装的torch版本,用wheel离线安装。
import torch

print(torch.__version__)
print(torch.cuda.is_available())
然后先用作者提供的数据跑一下nerf,保证环境没有问题。这里如果用的是windows系统,需要下载Gitbash来使用linux的命令,先在代码文件夹下下载数据:
bash download_example_data.sh #下载作者提供的数据
结束后在data文件夹下有个名为nerf_example_data的压缩包,解压后在nerf代码文件夹下使用如下命令开始训练:
python run_nerf.py --config configs/fern.txt
二、创建llff格式的数据集
   接下来的步骤请务必注意文件夹的命名,未打括号说明则最好按照我的名字命名,然后注意是在哪个文件夹下操作的,否则后面训练可能找不到对应文件而报错!

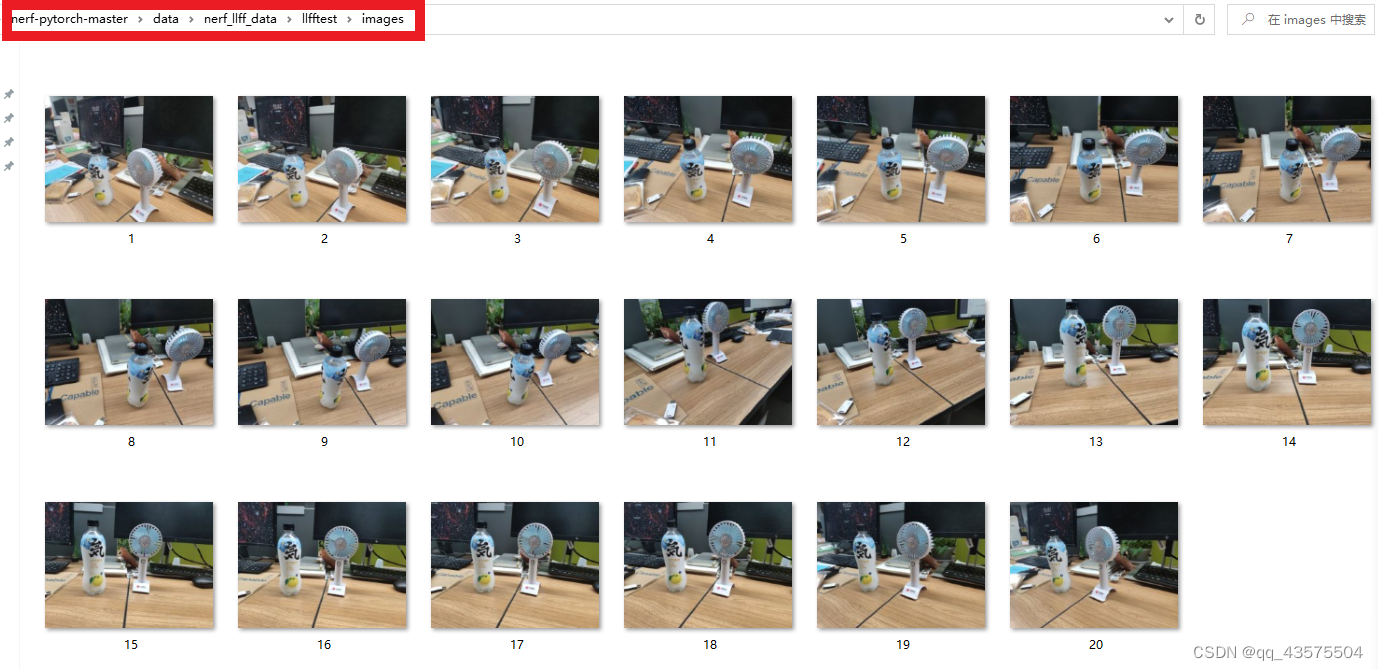
    先在nerf_llff_data文件夹下创建一个自己的数据文件夹,我命名为llfftest(这个名字可以自取),接着在llfftest文件夹下创建名为images的文件夹,将拍摄的图片放置到此文件夹,下面给出我的示例:
接着需要下载COLMAP软件,(地址:Release 3.8 · colmap/colmap · GitHub),拉到最下面选择cuda版本:

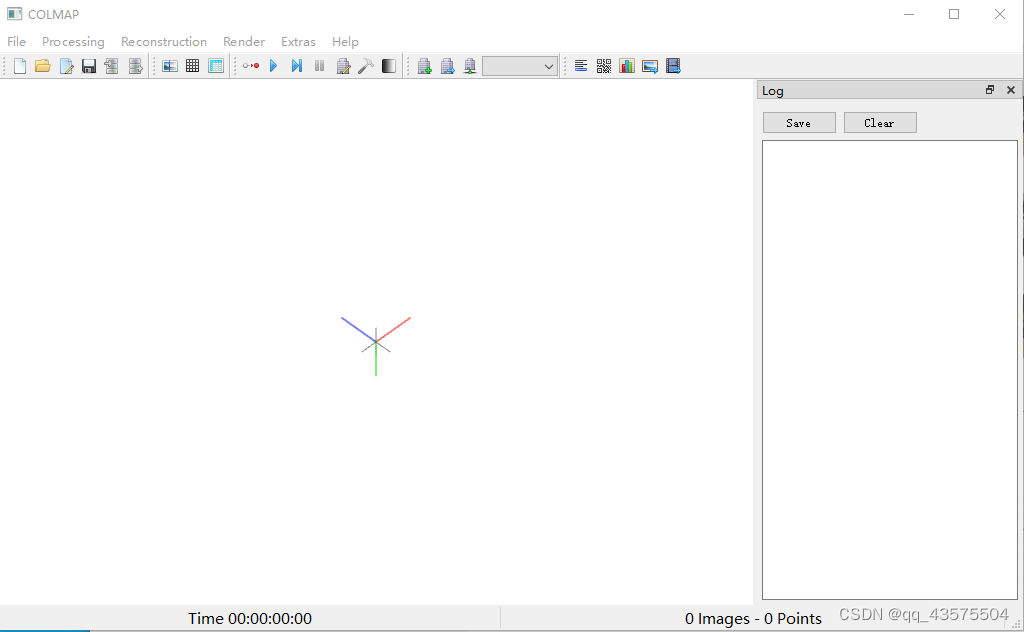
下载解压后打开COLMAP.bat文件得到以下界面:
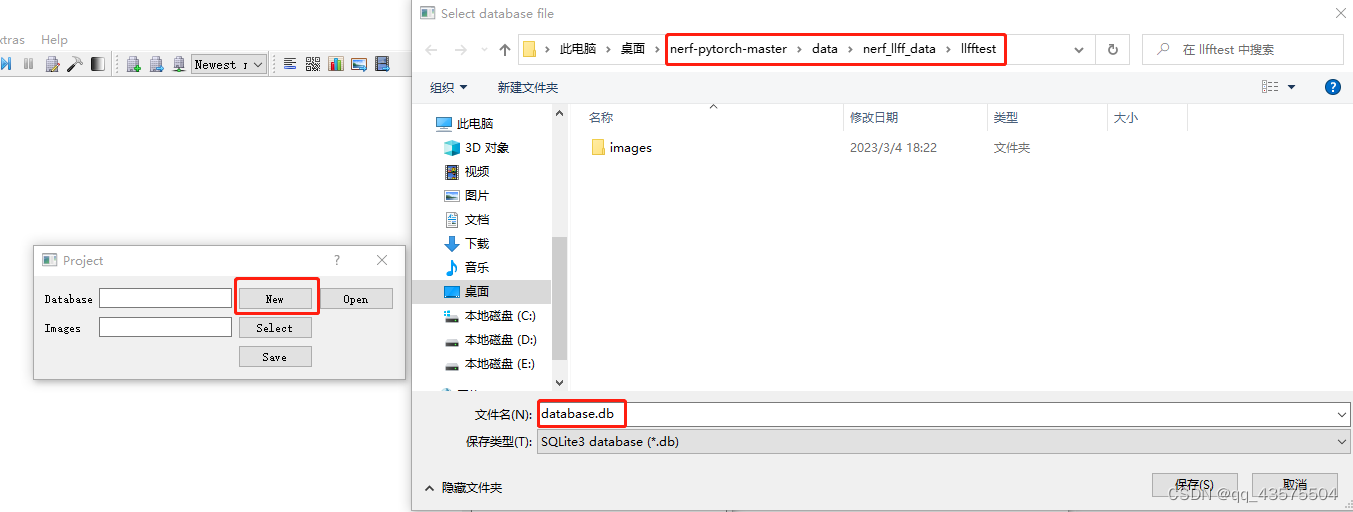
然后点击File,选择New Project,继续点击new,在llfftest文件夹下手动输入文件名database.db后,点击保存:
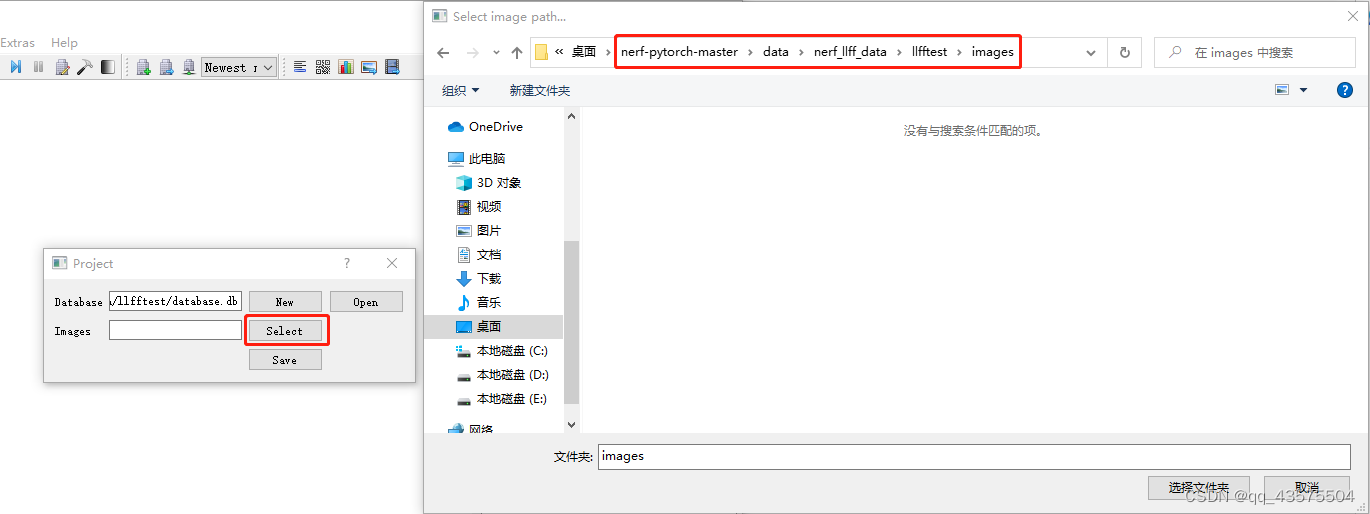
接着点击Select,选择保存图片的那个images文件夹,点击Save:
接下来点击File右边的Processing,选择Feature extraction,出现如下界面,只需要配置第一个选项,然后点击下面Extract。
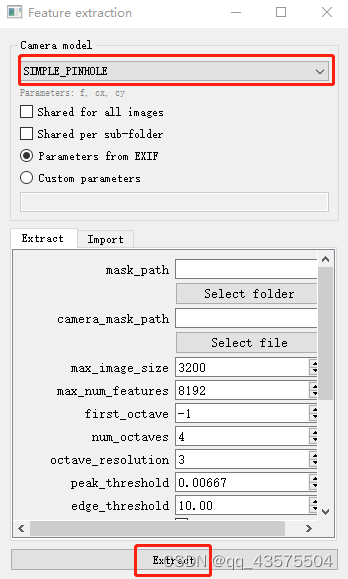
结束后点击关闭,接着点击Processing下的Feature matching,直接run即可,然后等待匹配结束。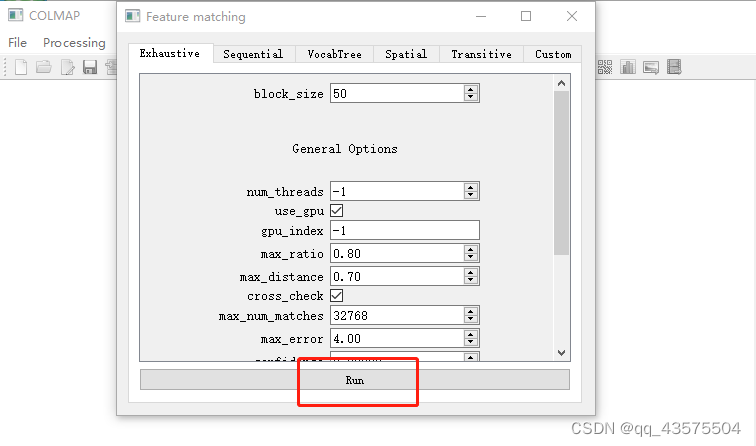
结束后点击Processing旁边的Reconstruction,选择Start Reconstruction,等待结束。。。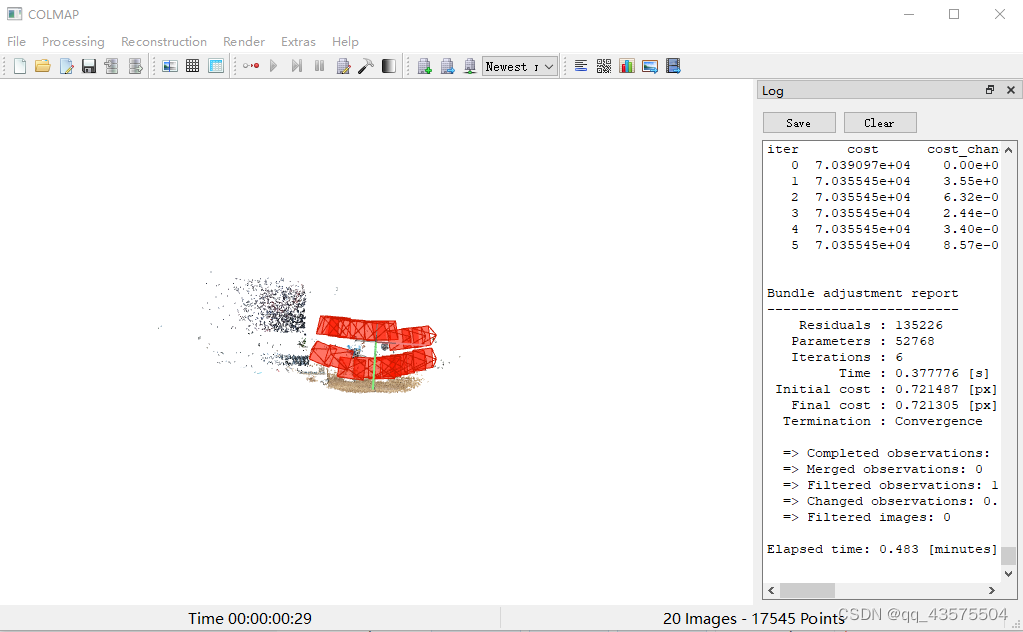
结束后,点击File,选择Export model,这里一定注意不要直接保存,需要新建两个文件夹,名字很重要,请跟我保持一致! 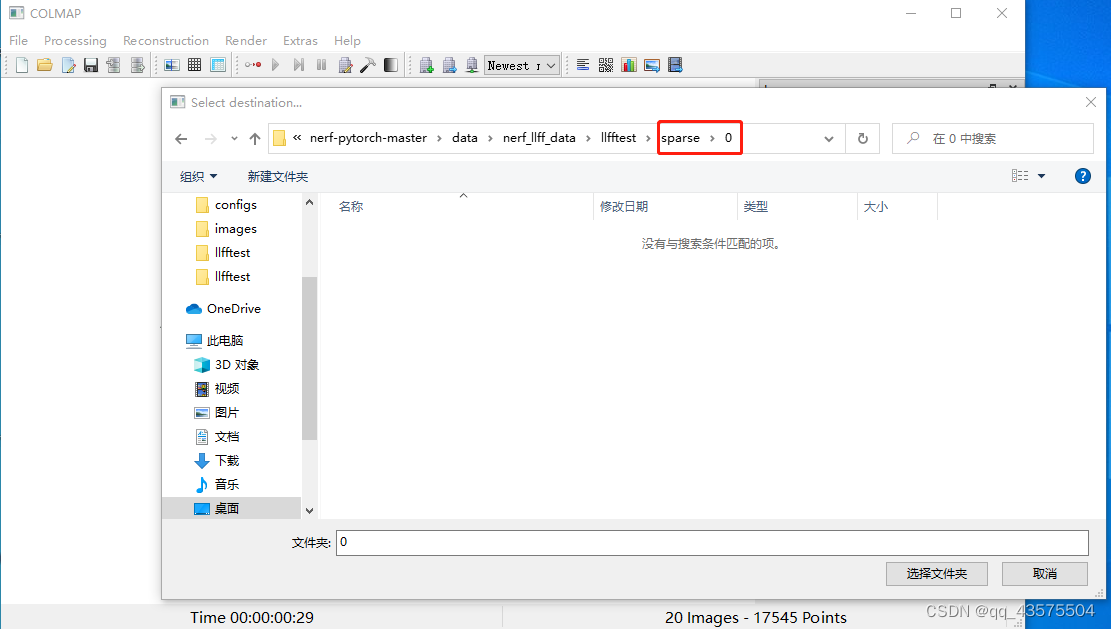
完成后检查一下文件下的东西:


接下来,将获取的位姿等数据转化为llff格式,需要下载llff脚本,(地址:GitHub - Fyusion/LLFF: Code release for Local Light Field Fusion at SIGGRAPH 2019)
为了防止库冲突和报错,我又创建了名为llff的环境,将此项目需要的库进行安装,方法跟创建nerf环境是一样的
conda create --name llff -y python=3.8
conda activate llff
pip install -r requirements.txt  #在llff代码文件夹下运行
然后在此环境和llff代码文件夹下运行python imgs2poses.py (红框部分改为自己的文件路径): 
结束后就能在llfftest下得到一个.npy文件:
三、训练自己的nerf
首先在nerf代码中,我们要在config文件夹下创建我们自己的配置文件,只需要将config文件夹下的fern复制一份,名字改为llftest,datadir后面也改成llftest即可
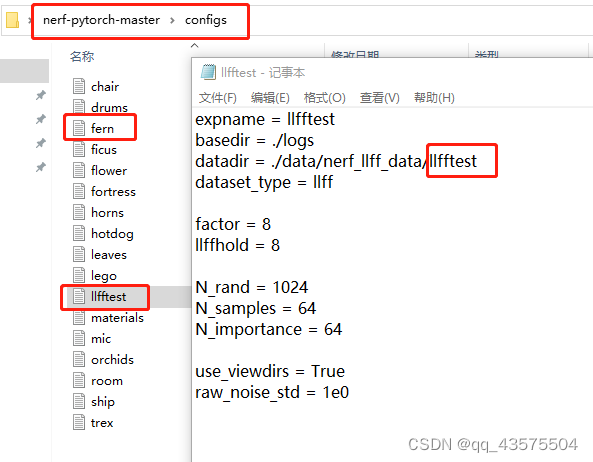
然后就可以在nerf环境和nerf代码下开始训练啦,(建议用Gitbash运行):
python run_nerf.py --config configs/llfftest.txt
效果如下:
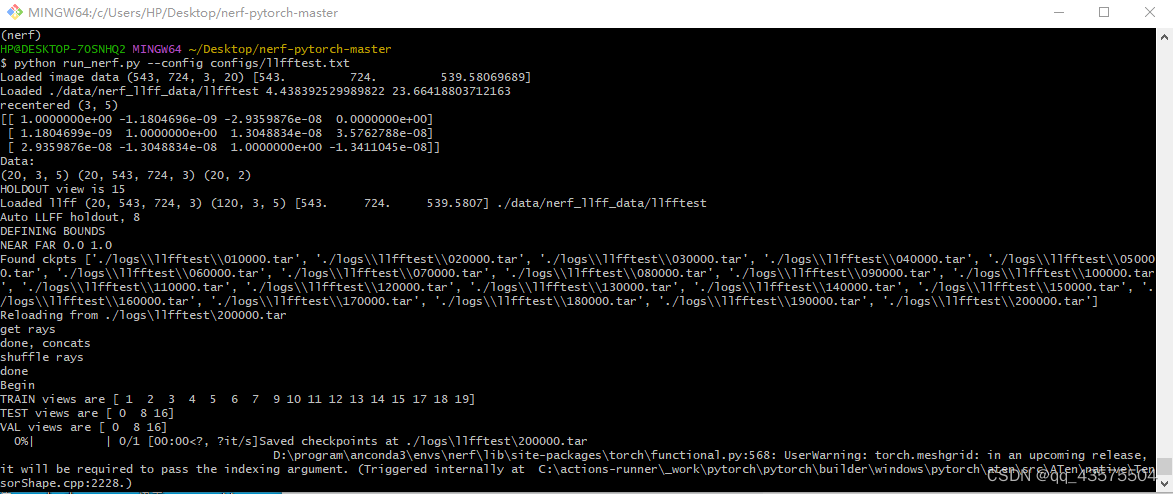
最后,如果你在训练时遇到
Mismatch between imgs 0 and poses 55 !!!!
Traceback (most recent call last):
File "run_nerf.py", line 878, in <module>
train()
File "run_nerf.py", line 544, in train
spherify=args.spherify)
File "C:\Users\HP\Desktop\nerf-pytorch-master\load_llff.py", line 246, in load_llff_data
poses, bds, imgs = _load_data(basedir, factor=factor) # factor=8 downsamples original imgs by 8x
TypeError: cannot unpack non-iterable NoneType object
可能是因为函数不兼容,解决方法是,在llfftest文件夹下新建一个images_8的文件夹,将八倍下采样的图片放到这。

下采样代码我也放出来,注意更改自己的路径:
import cv2
# import def_Gaussian as dg
# import time
import os.path

# import glob

#####################################################################################################################
# 读取文件夹里面的图像数量 并返回filenum
def countFile(dir):
    # 输入文件夹
    tmp = 0
    for item in os.listdir(dir):
        if os.path.isfile(os.path.join(dir, item)):
            tmp += 1
        else:
            tmp += countFile(os.path.join(dir, item))
    return tmp

filenum = countFile("C:\\Users\\HP\\Desktop\\nerf-pytorch-master\\data\\nerf_llff_data\\llfftest\\images")  # 返回的是图片的张数
print(filenum)

# filenum
n = 8
index = 1  # 保存图片编号
num = 0  # 处理图片计数
for i in range(1, filenum + 1):
    ########################################################
    # 1.读取原始图片
    if index < 10:
        filename = "C:\\Users\\HP\\Desktop\\nerf-pytorch-master\\data\\nerf_llff_data\\llfftest\\images\\" + str(i) + ".jpg"
    elif index < 100:
        filename = "C:\\Users\\HP\\Desktop\\nerf-pytorch-master\\data\\nerf_llff_data\\llfftest\\images\\" + str(i) + ".jpg"
    else:
        filename = "C:\\Users\\HP\\Desktop\\nerf-pytorch-master\\data\\nerf_llff_data\\llfftest\\images\\" + str(i) + ".jpg"
    print(filename)
    original_image = cv2.imread(filename)
    # 2.下采样
    if n == 4:
        img_1 = cv2.pyrDown(original_image)
        img_1 = cv2.pyrDown(img_1)
    if n == 8:
        img_1 = cv2.pyrDown(original_image)
        img_1 = cv2.pyrDown(img_1)
        img_1 = cv2.pyrDown(img_1)
    # 3.将下采样图片保存到指定路径当中
    if index < 10:
        cv2.imwrite("C:\\Users\\HP\\Desktop\\nerf-pytorch-master\\data\\nerf_llff_data\\llfftest\\images_8\\" + str(index) + ".jpg", img_1)
    elif index < 100:
        cv2.imwrite("C:\\Users\\HP\\Desktop\\nerf-pytorch-master\\data\\nerf_llff_data\\llfftest\\images_8\\" + str(index) + ".jpg", img_1)
    else:
        cv2.imwrite("C:\\Users\\HP\\Desktop\\nerf-pytorch-master\\data\\nerf_llff_data\\llfftest\\images_8\\" + str(index) + ".jpg", img_1)

    num = num + 1
    print("正在为第" + str(num) + "图片采样......")
    index = index + 1
最后的最后,本来是准备让大家看看我的结果的,但视频插入不了,那就祝各位小伙伴顺利吧。遇到什么奇奇怪怪的问题欢迎评论区讨论交流!
版权归原作者 三维小菜鸟 所有, 如有侵权,请联系我们删除。