
一,场景
A页面是表单页面,填写后需要跳转B页面。如果B页面不操作返回的话,应该能还原A页面的内容,而如果B页面点击提交,再回到A页面的时候,应该清除缓存。
二,实现方法
A页面要缓存数据,则需要用keep-alive包裹。
B页面点击提交后需要清空缓存,则需要清除A页面的keep-alive缓存。
于是可以利用keep-alive的:include属性,只有在这个列表中的页面才具备缓存,不在这个列表中的页面不具备缓存,下次进入时重新渲染。
被 keep-alive 包裹的组件的生命周期是有区别于普通的组件。
被 keep-alive 包裹的组件中,会多出两个生命周期 activated、deactivated。
第一次进入被 keep-alive 包裹的组件中的时候会依次调用 beforeCreate -> created -> beforeMount -> mounted -> activated,其后的进入皆只会调用 activated,因为组件被缓存了,再次进入的时候,就不会走 创建、挂载 的流程了。
被 keep-alive 包裹的组件退出的时候就不会再执行 beforeDestroy、destroyed 了,因为组件不会真正意义上被销毁,相对应的组件退出的时候会执行 deactivated 作为替代。
于是可以想到:
第一步:路由发生改变时(例如跳转A页面时),将A页面加入keep-alive缓存include,然后页面开始渲染
第二步:A页面填写表单完成后跳转B页面
第三步:B页面提交表单完成后把A页面从include中移除。
第四步:这时候无论从哪里进入A页面,都需要重新加入include缓存,并重新渲染了(重新走第一步)。而如果没有第三步的移除缓存,则再进入A时会拿缓存的A页面。
三,具体的实现代码逻辑
因为我是拿vue-template-admin做演示的,就讲这里面是如何实现的。
第一步:keep-alive包裹组件
主布局页面:
<template><section class="app-main"><transition name="fade-transform" mode="out-in"><keep-alive :include="cachedViews"><router-view :key="key"/></keep-alive></transition></section></template><script>exportdefault{
  name:"AppMain",
  computed:{cachedViews(){returnthis.$store.state.tagsView.cachedViews
    },key(){returnthis.$route.path
    }}}</script>
第二步:看vuex中的tagsView模块:
const state ={
  cachedViews:[]}const mutations ={
  ADD_CACHED_VIEW:(state, view)=>{if(state.cachedViews.includes(view.name))returnif(!view.meta.noCache){
      state.cachedViews.push(view.name)}},
  DEL_CACHED_VIEW:(state, view)=>{const index = state.cachedViews.indexOf(view.name)
    index >-1&& state.cachedViews.splice(index,1)},}exportdefault{
  namespaced:true,
  state,
  mutations,
  actions
}
这里就是添加include和移除的方法。
第三步:看router.js文件中的配置
{
    path:"/test",
    component: Layout,
    redirect:"/test/test-one",
    children:[{
        path:"test-one",
        component:()=>import("@/views/test-one/index"),
        name:"TestOne",
        meta:{ title:"表单测试", icon:"el-icon-warning", noCache:false}},{
        path:"test-two",
        hidden:true,
        component:()=>import("@/views/test-two/index.vue"),
        name:"TestTwo",
        meta:{
          title:"表单提交",
          activeMenu:"/test/test-one",
          noCache:true}}]}
主要就是name属性和meta中的noCache属性。
第四步:看keep-alive的include缓存是啥时候加上的
看下图,可以知道,是监听了当前路由的变化。当路由发生变化时,就调用vuex中的ADD_CACHED_VIEW方法,把当前页面对应的name加入数组中。因为路由变化时,页面还没有渲染,所以这时候加入,页面渲染时是能够缓存起来的。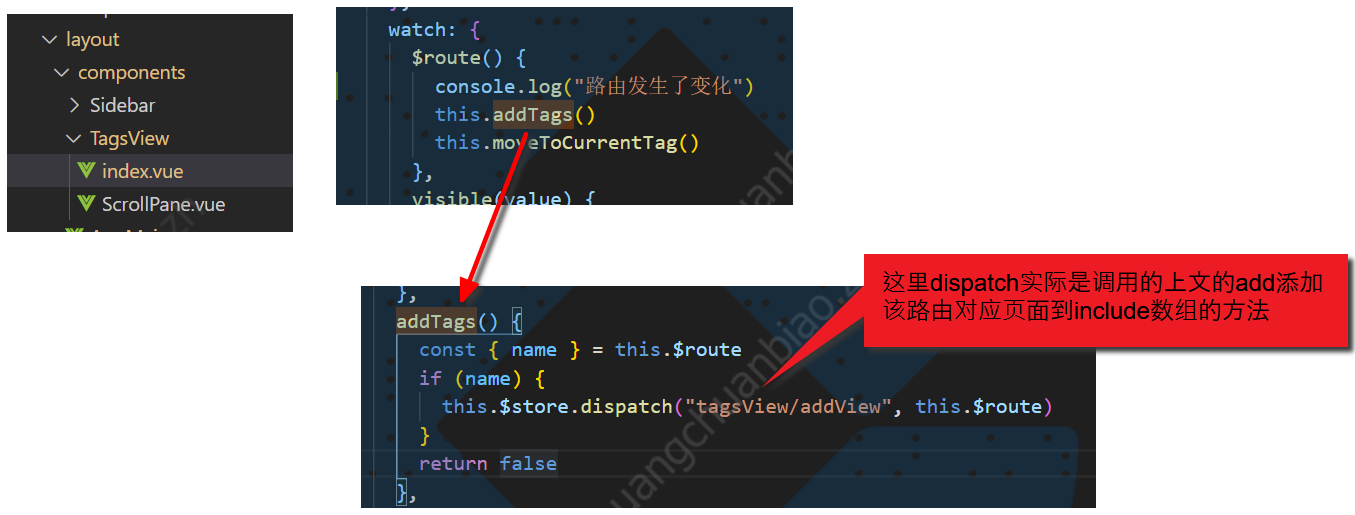
第五步:看提交表单页移除缓存
当A页面已经被缓存,填写表单后进入B页面,这时提交表单,则需要移除A的缓存。于是B页面:
<template><div class="activity-list">
    第二个测试页面
    <button @click="back">提交代码</button></div></template><script>exportdefault{
  name:"TestTwo",data(){return{}},created(){},mounted(){},
  methods:{back(){this.$store.commit("tagsView/DEL_CACHED_VIEW",{ name:"TestOne"})this.$router.go(-1)}}}</script><style scoped lang="scss"></style>
可以注意到,它是调用tagsView/DEL_CACHED_VIEW移除的。因为先移除了,所以这时候返回A页面,会重新将A页面加入缓存,且重新开始渲染。
本文转载自: https://blog.csdn.net/weixin_42349568/article/details/129322557
版权归原作者 笑道三千 所有, 如有侵权,请联系我们删除。
版权归原作者 笑道三千 所有, 如有侵权,请联系我们删除。