
一.redis的发布订阅
1、什么 是发布和订阅
Redis 发布订阅 (pub/sub) 是一种消息通信模式:发送者 (pub) 发送消息,订阅者 (sub) 接收消息。
Redis 客户端可以订阅任意数量的频道。
2、Redis的发布和订阅
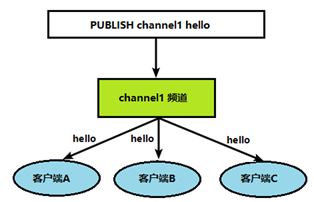
客户端订阅频道发布的消息
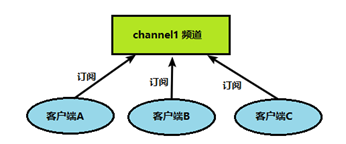
频道发布消息 订阅者就可以收到消息
3、发布订阅的代码实现
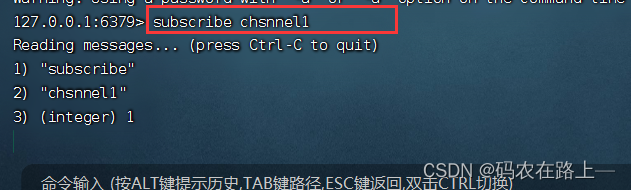
(1) 打开一个客户端订阅channel1
subscribe channel1
(2)打开另一个客户端,给channel1发布消息hello
publish channel1 hello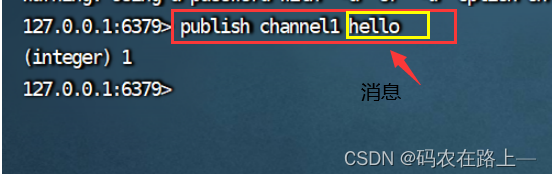
返回的1是订阅者数量
(3)打开第一个客户端可以看到发送的消息

二.Redis事务
1.事务简介
可以一次执行多个命令,本质是一组命令的集合。一个事务中的 所有命令都会序列化,按顺序地串行化执行而不会被其它命令插入,不许加塞。
单独的隔离的操作
官网说明
https://redis.io/docs/interact/transactions/
MULTI、EXEC、DISCARD、WATCH。这四个指令构成了 redis 事务处理的基础。

1.MULTI 用来组装一个事务;将命令存放到一个队列里面
2.EXEC 用来执行一个事务;//commit
3.DISCARD 用来取消一个事务;//rollback
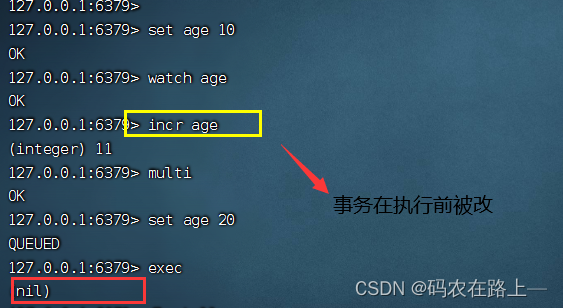
4.WATCH 用来监视一些 key,一旦这些 key 在事务执行之前被改变,则取消事务的执行。
例子:
1、在事务执行之前 如果监听的key的值有变化就不能执行
2、在事务执行之前 如果监听的key的值没有变化就能执行

3、Exec之前就出现错误
执行的时候所有的语句都不执行

4、Exec之后出现的错误
将错误的语句不执行 其他的语句依旧执行

2.redis事务冲突
双十一去购物的时候使用同一张银行卡去付款
10000
一个请求想给金额减8000
一个请求想给金额减5000
一个请求想给金额减1000
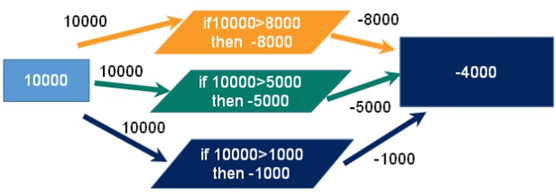
解决方案:
(1)悲观锁
select * from biao where 1=1 for update;
悲观锁(Pessimistic Lock), 顾名思义,就是很悲观,
每次去拿数据的时候都认为别人会修改,所以每次在拿数据的时候都会上锁,
这样别人想拿这个数据就会block直到它拿到锁。
传统的关系型数据库里边就用到了很多这种锁机制,
比如行锁,表锁等,读锁,写锁等,都是在做操作之前先上锁。
每次操作数据的时候都上锁只操作一个放止发生冲突导致数据发生错误,效率比较低
12306抢票
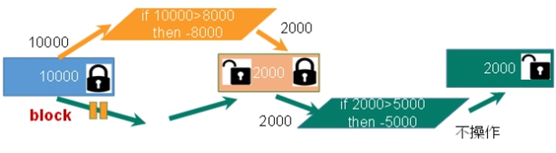
(2)乐观锁
version 1
查余额 10000 version:1
10000>8000 -8000 update uuuu set moner-=8000 where version=1 1.1
10000 -5000 UPDATE uuuuu SET MONTY-=5000 WHERE VERSION=1
2000 2000>1000 UPDATE uuuu SET MONTY-=1000 WHERE VERSION=1.1 1.2

version
select * from ttt where uid =1
version money
1 10000
乐观锁(Optimistic Lock), 顾名思义,就是很乐观,
每次去拿数据的时候都认为别人不会修改,所以不会上锁,
但是在更新的时候会判断一下在此期间别人有没有去更新这个数据,
可以使用版本号等机制。乐观锁适用于多读的应用类型,
这样可以提高吞吐量。Redis就是利用这种check-and-set机制实现事务的。
version字段代表乐观锁
根据version的字段来操作数据,当三人同时操作同一数据,第一人操作时version就会发生改变
,第二、三的version字段就不再是1,只能重新操作
3.WATCH
“WATCH”可以帮我们实现类似于“乐观锁”的效果,即 CAS(check and set)。
WATCH 本身的作用是“监视 key 是否被改动过”,而且支持同时监视多个 key,只要还没真正触发事务,WATCH 都会尽职尽责的监视,一旦发现某个 key 被修改了,在执行 EXEC 时就会返回 nil,表示事务无法触发。
代码如下:
127.0.0.1:6379> set age 23
OK
127.0.0.1:6379> watch age //开始监视 age
OK
127.0.0.1:6379> set age 24 //在 EXEC 之前,age 的值被修改了
OK
127.0.0.1:6379> multi
OK
127.0.0.1:6379> set age 25
QUEUED
127.0.0.1:6379> get age
QUEUED
127.0.0.1:6379> exec //触发 EXEC
(nil) //事务无法被执行
事务回滚:
192.168.109.34:6379> multi
OK
192.168.109.34:6379> set testsy testq
QUEUED
192.168.109.34:6379> set testsy2 test2
QUEUED
192.168.109.34:6379> discard
OK

三.Redis的使用
1、redis 的 基本 Java 操作
1.1 新建maven项目,导入pom依赖
<dependency>
    <groupId>redis.clients</groupId>
    <artifactId>jedis</artifactId>
    <version>2.9.0</version>
</dependency>
1.2新建java类,操作redis
package redis;

import redis.clients.jedis.Jedis;


public class Demo1 {
    public static void main(String[] args) {
//      建立链接
        Jedis jedis = new Jedis("1902.168.195.33",6379);//IP地址+端口号
//      设置密码
        jedis.auth("root");
//      测试链接是否成功
        System.out.println(jedis.ping());
//        ok
//      String的操作
        jedis.select(1);//指定数据库
        jedis.set("toto","才天波");//往指定的数据库中添加数据
    }
}
或者
public class MyTest {
    JedisPool pool = null;
    @BeforeEach
    public void before(){
        pool = new JedisPool("192.168.195.33",6379);
    }
    @Test
    public void testConn(){
        try (Jedis jedis = pool.getResource()) {
            jedis.auth("root"); // 设置密码
            String ping = jedis.ping();
            System.out.println("测试是不是通:"+ping);
        }
    }
}
2、操作String
redis中string的命令
 @Test
    public void testString(){
        try (Jedis jedis = pool.getResource()) {
            jedis.auth("root");
            jedis.set("naem","lc");
            String s = jedis.get("naem");
            System.out.println("s="+s);
            jedis.setex("age",30,"80");
        }
    }
3、操作hash
添加
  @Test
    public void testHash(){
        try (Jedis jedis = pool.getResource()) {
            jedis.auth("root");
            //单个添加
            jedis.hset("testHash","id","1");
            jedis.hset("testHash","name","lc");
            jedis.hset("testHash","age","10");
            //批量添加

        }
    }
批量添加
   @Test
    public void testHash1(){
        try (Jedis jedis = pool.getResource()) {
            jedis.auth("root");
            //批量添加
            Map map = new HashMap();
            map.put("testid","1");
            map.put("testname","lc");
            map.put("testage","10");
            map.put("testheidht","199");
            jedis.hmset("testHashs",map);
            String hget = jedis.hget("testHashs","testname");
            System.out.println(hget);

        }
4、相关API
(1)key的api
 @Test
  public  void testRedis() {
        //设置连接的服务器 端口号默认是6379
        // 服务器的默认值是localhost
        Jedis jedis=new Jedis("8.140.27.154");
        // redis的服务器的密码
        jedis.auth("lh"); //设置密码
        // 设置选中的数据库的下标
        jedis.select(15);
        // 设置键值对
        jedis.set("k1", "v1");
        jedis.set("k2", "v2");
        jedis.set("k3", "v3");
        //获取所有的key值
        Set<String> keys = jedis.keys("*");
        System.out.println(keys.size());
        for (String key : keys) {
            System.out.println(key);
        }
        // 判断key是否存在
        System.out.println(jedis.exists("k1"));
        //获取key的过期时间
        System.out.println(jedis.ttl("k1"));
        // 获取key对应的值
        System.out.println(jedis.get("k1"));
    }
  }
(2)string-api
// 批量设置
jedis.mset("str1","v1","str2","v2","str3","v3");
//批量获取key
System.out.println(jedis.mget("str1","str2","str3"));
(3)hash-api
//设置 一个key叫做hash1 对应的field是username,value是lisi
jedis.hset("hash1","userName","lisi");
//获取key为hash1的对应的fileld为username的值
System.out.println(jedis.hget("hash1","userName"));
Map<String,String> map = new HashMap<String,String>();
map.put("telphone","13838389438");
map.put("address","郑州");
map.put("email","[email protected]");
//批量设置
jedis.hmset("hash2",map);
//批量获取
List<String> result = jedis.hmget("hash2", "telphone","email");
for (String element : result) {
    System.out.println(element);
}
(4)set-api
jedis.sadd("orders", "order01");
jedis.sadd("orders", "order02");
jedis.sadd("orders", "order03");
jedis.sadd("orders", "order04");
Set<String> smembers = jedis.smembers("orders");
for (String order : smembers) {
    System.out.println(order);
}
//删除集合中的元素
jedis.srem("orders", "order02");
(5)zset-api
jedis.zadd("zset01", 100d, "z3");
jedis.zadd("zset01", 90d, "l4");
jedis.zadd("zset01", 80d, "w5");
jedis.zadd("zset01", 70d, "z6");

Set<String> zrange = jedis.zrange("zset01", 0, -1);
for (String e : zrange) {
    System.out.println(e);
}
(6)list-api
//添加
jedis.lpush("mylist","test1","test2","test3");
//获取list里面的值
List<String> mylist = jedis.lrange("mylist", 0, -1);
for (String s : mylist) {
    System.out.println(s);
}
四、redis整合springboot
1、创建springboot项目
2、加入redis的依赖
 <!-- springboot连接redsi-->
        <dependency>
            <groupId>org.springframework.boot</groupId>
            <artifactId>spring-boot-starter-data-redis</artifactId>
        </dependency>
       <!-- commons解析包-->
        <dependency>
            <groupId>org.apache.commons</groupId>
            <artifactId>commons-pool2</artifactId>
        </dependency>
     <!--   redis依赖-->
        <dependency>
            <groupId>redis.clients</groupId>
            <artifactId>jedis</artifactId>
            <version>3.2.0</version>
        </dependency>
3、配置yml.properties
spring:
  redis:
    host: 192.168.195.33
    password: root
    database: 1
4、设置配置类
加注解**@Configuration**
@Bean
    public RedisTemplate<String, Object> redisTemplate(RedisConnectionFactory factory) {
        RedisTemplate<String, Object> template = new RedisTemplate<>();
        RedisSerializer<String> redisSerializer = new StringRedisSerializer();
        Jackson2JsonRedisSerializer jackson2JsonRedisSerializer = new Jackson2JsonRedisSerializer(Object.class);
        ObjectMapper om = new ObjectMapper();
        // 指定要序列化的域,field,get和set,以及修饰符范围,ANY是都有包括private和public
        om.setVisibility(PropertyAccessor.ALL, JsonAutoDetect.Visibility.ANY);
        // 指定序列化输入的类型,类必须是非final修饰的,final修饰的类,比如String,Integer等会跑出异常
        om.enableDefaultTyping(ObjectMapper.DefaultTyping.NON_FINAL);
        jackson2JsonRedisSerializer.setObjectMapper(om);
        template.setConnectionFactory(factory);
        //key序列化方式
        template.setKeySerializer(redisSerializer);
        //value序列化
        template.setValueSerializer(jackson2JsonRedisSerializer);
        //value hashmap序列化
        template.setHashValueSerializer(jackson2JsonRedisSerializer);
        return template;
    }
5、测试代码
@SpringBootTest
public class RedisTemplateTest  {

    @Resource
    private RedisTemplate redisTemplate;

    @Test
    void testRdis(){
        //opsForValue()获取String类型
        redisTemplate.opsForValue().set("name","ctb");
    }
}
(1)String类型常用方法
判断是否有key所对应的值,有则返回true,没有则返回false
redisTemplate.hasKey(key)
有则取出key值所对应的值
redisTemplate.opsForValue().get(key)
redisTemplate.opsForValue().set("key","val")
删除单个key值
redisTemplate.delete(key)
批量删除key
redisTemplate.delete(keys) //其中keys:Collection<K> keys
 void set(K key, V value);
    redisTemplate.opsForValue().set("num","123");
    redisTemplate.opsForValue().get("num")  输出结果为123


 void set(K key, V value, long timeout, TimeUnit unit);

    redisTemplate.opsForValue().set("num","123",10, TimeUnit.SECONDS);
    redisTemplate.opsForValue().get("num")设置的是10秒失效,十秒之内查询有结果,十秒之后返回为null

            TimeUnit.DAYS          //天
            TimeUnit.HOURS         //小时
            TimeUnit.MINUTES       //分钟
            TimeUnit.SECONDS       //秒
            TimeUnit.MILLISECONDS  //毫秒


 void set(K key, V value, long offset);

覆写(overwrite)给定 key 所储存的字符串值,从偏移量 offset 开始

    template.opsForValue().set("key","hello world");
    template.opsForValue().set("key","redis", 6);
    System.out.println("***************"+template.opsForValue().get("key"));
    结果:***************hello redis


 V get(Object key);

    template.opsForValue().set("key","hello world");
    System.out.println("***************"+template.opsForValue().get("key"));
    结果:***************hello world


getAndSet V getAndSet(K key, V value);

设置键的字符串值并返回其旧值

    template.opsForValue().set("getSetTest","test");
    System.out.println(template.opsForValue().getAndSet("getSetTest","test2"));
    结果:test

append Integer append(K key, String value);

如果key已经存在并且是一个字符串,则该命令将该值追加到字符串的末尾。如果键不存在,则它被创建并设置为空字符串,因此APPEND在这种特殊情况下将类似于SET。

    template.opsForValue().append("test","Hello");
    System.out.println(template.opsForValue().get("test"));
    template.opsForValue().append("test","world");
    System.out.println(template.opsForValue().get("test"));
    Hello
    Helloworld

size Long size(K key);
返回key所对应的value值得长度

    template.opsForValue().set("key","hello world");
    System.out.println("***************"+template.opsForValue().size("key"));
    ***************11
(2)List类型
通过索引获取列表中的元素
redisTemplate.opsForList().index(key, index)

获取列表指定范围内的元素(start开始位置, 0是开始位置,end 结束位置, -1返回所有)
redisTemplate.opsForList().range(key, start, end)

存储在list的头部,即添加一个就把它放在最前面的索引处
redisTemplate.opsForList().leftPush(key, value)

把多个值存入List中(value可以是多个值,也可以是一个Collection value)
redisTemplate.opsForList().leftPushAll(key, value)

List存在的时候再加入
redisTemplate.opsForList().leftPushIfPresent(key, value)

如果pivot处值存在则在pivot前面添加
redisTemplate.opsForList().leftPush(key, pivot, value)

按照先进先出的顺序来添加(value可以是多个值,或者是Collection var2)
redisTemplate.opsForList().rightPush(key, value)

redisTemplate.opsForList().rightPushAll(key, value)
在pivot元素的右边添加值

redisTemplate.opsForList().rightPush(key, pivot, value)

设置指定索引处元素的值

redisTemplate.opsForList().set(key, index, value)

移除并获取列表中第一个元素(如果列表没有元素会阻塞列表直到等待超时或发现可弹出元素为止)

redisTemplate.opsForList().leftPop(key)

redisTemplate.opsForList().leftPop(key, timeout, unit)

移除并获取列表最后一个元素

redisTemplate.opsForList().rightPop(key)

redisTemplate.opsForList().rightPop(key, timeout, unit)
从一个队列的右边弹出一个元素并将这个元素放入另一个指定队列的最左边

redisTemplate.opsForList().rightPopAndLeftPush(sourceKey, destinationKey)

redisTemplate.opsForList().rightPopAndLeftPush(sourceKey, destinationKey, timeout, unit)

删除集合中值等于value的元素(index=0, 删除所有值等于value的元素; index>0, 从头部开始删除第一个值等于value的元素; index<0, 从尾部开始删除第一个值等于value的元素)

redisTemplate.opsForList().remove(key, index, value)

将List列表进行剪裁

redisTemplate.opsForList().trim(key, start, end)

获取当前key的List列表长度
redisTemplate.opsForList().size(key)
(3)Set类型
添加元素
redisTemplate.opsForSet().add(key, values)
移除元素(单个值、多个值)
redisTemplate.opsForSet().remove(key, values)

删除并且返回一个随机的元素

redisTemplate.opsForSet().pop(key)

获取集合的大小

redisTemplate.opsForSet().size(key)

判断集合是否包含value
redisTemplate.opsForSet().isMember(key, value)

获取两个集合的交集(key对应的无序集合与otherKey对应的无序集合求交集)
redisTemplate.opsForSet().intersect(key, otherKey)

获取多个集合的交集(Collection var2)

redisTemplate.opsForSet().intersect(key, otherKeys)

key集合与otherKey集合的交集存储到destKey集合中(其中otherKey可以为单个值或者集合)

redisTemplate.opsForSet().intersectAndStore(key, otherKey, destKey)

key集合与多个集合的交集存储到destKey无序集合中

redisTemplate.opsForSet().intersectAndStore(key, otherKeys, destKey)

获取两个或者多个集合的并集(otherKeys可以为单个值或者是集合)

redisTemplate.opsForSet().union(key, otherKeys)

key集合与otherKey集合的并集存储到destKey中(otherKeys可以为单个值或者是集合)

redisTemplate.opsForSet().unionAndStore(key, otherKey, destKey)

获取两个或者多个集合的差集(otherKeys可以为单个值或者是集合)

redisTemplate.opsForSet().difference(key, otherKeys)

差集存储到destKey中(otherKeys可以为单个值或者集合)

redisTemplate.opsForSet().differenceAndStore(key, otherKey, destKey)

随机获取集合中的一个元素

redisTemplate.opsForSet().randomMember(key)

获取集合中的所有元素

redisTemplate.opsForSet().members(key)

随机获取集合中count个元素

redisTemplate.opsForSet().randomMembers(key, count)

获取多个key无序集合中的元素(去重),count表示个数

redisTemplate.opsForSet().distinctRandomMembers(key, count)

遍历set类似于Interator(ScanOptions.NONE为显示所有的)

redisTemplate.opsForSet().scan(key, options)
(4)Hash类型
Long delete(H key, Object... hashKeys);
删除给定的哈希hashKeys

    System.out.println(template.opsForHash().delete("redisHash","name"));
    System.out.println(template.opsForHash().entries("redisHash"));
    1
    {class=6, age=28.1}

Boolean hasKey(H key, Object hashKey);
确定哈希hashKey是否存在
    System.out.println(template.opsForHash().hasKey("redisHash","666"));
    System.out.println(template.opsForHash().hasKey("redisHash","777"));
    true
    false

HV get(H key, Object hashKey);
从键中的哈希获取给定hashKey的值
    System.out.println(template.opsForHash().get("redisHash","age"));
    26

 Set<HK> keys(H key);
获取key所对应的散列表的key
    System.out.println(template.opsForHash().keys("redisHash"));
    //redisHash所对应的散列表为{class=1, name=666, age=27}
    [name, class, age]

Long size(H key);
获取key所对应的散列表的大小个数
    System.out.println(template.opsForHash().size("redisHash"));
    //redisHash所对应的散列表为{class=1, name=666, age=27}
    3

 void putAll(H key, Map<? extends HK, ? extends HV> m);
使用m中提供的多个散列字段设置到key对应的散列表中

    Map<String,Object> testMap = new HashMap();
    testMap.put("name","666");
    testMap.put("age",27);
    testMap.put("class","1");
    template.opsForHash().putAll("redisHash1",testMap);
    System.out.println(template.opsForHash().entries("redisHash1"));
    {class=1, name=jack, age=27}

 void put(H key, HK hashKey, HV value);
设置散列hashKey的值

    template.opsForHash().put("redisHash","name","666");
    template.opsForHash().put("redisHash","age",26);
    template.opsForHash().put("redisHash","class","6");
    System.out.println(template.opsForHash().entries("redisHash"));
    {age=26, class=6, name=666}

 List<HV> values(H key);
获取整个哈希存储的值根据密钥
    System.out.println(template.opsForHash().values("redisHash"));
    [tom, 26, 6]

 Map<HK, HV> entries(H key);
获取整个哈希存储根据密钥
    System.out.println(template.opsForHash().entries("redisHash"));
    {age=26, class=6, name=tom}

 Cursor<Map.Entry<HK, HV>> scan(H key, ScanOptions options);
使用Cursor在key的hash中迭代,相当于迭代器。
    Cursor<Map.Entry<Object, Object>> curosr = template.opsForHash().scan("redisHash",
      ScanOptions.ScanOptions.NONE);
        while(curosr.hasNext()){
            Map.Entry<Object, Object> entry = curosr.next();
            System.out.println(entry.getKey()+":"+entry.getValue());
        }
    age:27
    class:6
    name:666
命令
操作
返回值
hash.delete(H key, Object... hashKeys)
删除,可以传入多个map的key【hdel】
Long
hash.hasKey(key, hashKey)
查看hash中的某个hashKey是否存在【hexists】
Boolean
hash.get(key, hashKey)
获取值【hget】
Object(HV 泛型约束对象)
hash.multiGet(H key, Collection<HK> hashKeys)
批量获取集合中的key对应的值【hmget】
List<HV>
hash.increment(H key, HK hashKey, long delta)
对值进行+(delta值)操作【】
Long
hash.increment(H key, HK hashKey, double delta)
~
double
hash.keys(key)
返回map内hashKey的集合【hkeys】
Set<HK>
hash.lengthOfValue(H key, HK hashKey)
返回查询键关联的值的长度,为null则返回0【hstrlen】
Long
hash.size(H key)
获取hashKey的个数【hlen】
Long
hash.putAll(H key, Map<? extends HK, ? extends HV> m)
相当于map的putAll【hmset】
void
hash.put(H key, HK hashKey, HV value)
设置值,添加hashKey-value,hashKay相当于map的key 【hset】
void
hash.putIfAbsent(H key, HK hashKey, HV value)
仅当hashKey不存在时设置值
Boolean
hash.values(key)
返回value的集合【hvals】
List<HV>
hase.entries(H key)
获取map【hgetall】
Map<HK, HV>
hash.scan(H key, ScanOptions options)
基于游标的迭代查询【hscan】
Cursor<Map.Entry<HK, HV>>(返回的Cursor要手动关闭,见下面示例2)
hash.getOperations()
返回RedisOperation,它就是redis操作的接口
RedisOperations<H, ?>
(5)ZSet类型
Boolean add(K key, V value, double score);
新增一个有序集合,存在的话为false,不存在的话为true

  System.out.println(template.opsForZSet().add("zset1","zset-1",1.0));
  true
 Long add(K key, Set<TypedTuple<V>> tuples);
新增一个有序集合
    ZSetOperations.TypedTuple<Object> objectTypedTuple1 = new DefaultTypedTuple<>("zset-5",9.6);
    ZSetOperations.TypedTuple<Object> objectTypedTuple2 = new DefaultTypedTuple<>("zset-6",9.9);
    Set<ZSetOperations.TypedTuple<Object>> tuples = new HashSet<ZSetOperations.TypedTuple<Object>>();
    tuples.add(objectTypedTuple1);
    tuples.add(objectTypedTuple2);
    System.out.println(template.opsForZSet().add("zset1",tuples));
    System.out.println(template.opsForZSet().range("zset1",0,-1));
    [zset-1, zset-2, zset-3, zset-4, zset-5, zset-6]
Long remove(K key, Object... values);
从有序集合中移除一个或者多个元素
   System.out.println(template.opsForZSet().range("zset1",0,-1));
   System.out.println(template.opsForZSet().remove("zset1","zset-6"));
    System.out.println(template.opsForZSet().range("zset1",0,-1));
    [zset-1, zset-2, zset-3, zset-4, zset-5, zset-6]
    1
    [zset-1, zset-2, zset-3, zset-4, zset-5]
 Long rank(K key, Object o);
返回有序集中指定成员的排名,其中有序集成员按分数值递增(从小到大)顺序排列

    System.out.println(template.opsForZSet().range("zset1",0,-1));
    System.out.println(template.opsForZSet().rank("zset1","zset-2"));
    [zset-2, zset-1, zset-3, zset-4, zset-5]
    0   //表明排名第一

Set<V> range(K key, long start, long end);
通过索引区间返回有序集合成指定区间内的成员,其中有序集成员按分数值递增(从小到大)顺序排列
    System.out.println(template.opsForZSet().range("zset1",0,-1));
    [zset-2, zset-1, zset-3, zset-4, zset-5]
Long count(K key, double min, double max);
通过分数返回有序集合指定区间内的成员个数

    System.out.println(template.opsForZSet().rangeByScore("zset1",0,5));
    System.out.println(template.opsForZSet().count("zset1",0,5));
    [zset-2, zset-1, zset-3]
    3

Long size(K key);
获取有序集合的成员数,内部调用的就是zCard方法

    System.out.println(template.opsForZSet().size("zset1"));
    6


 Double score(K key, Object o);
获取指定成员的score值

    System.out.println(template.opsForZSet().score("zset1","zset-1"));
    2.2


Long removeRange(K key, long start, long end);
移除指定索引位置的成员,其中有序集成员按分数值递增(从小到大)顺序排列

    System.out.println(template.opsForZSet().range("zset2",0,-1));
    System.out.println(template.opsForZSet().removeRange("zset2",1,2));
    System.out.println(template.opsForZSet().range("zset2",0,-1));
    [zset-1, zset-2, zset-3, zset-4]
    2
    [zset-1, zset-4]


Cursor<TypedTuple<V>> scan(K key, ScanOptions options);
遍历zset
    Cursor<ZSetOperations.TypedTuple<Object>> cursor = template.opsForZSet().scan("zzset1", ScanOptions.NONE);
        while (cursor.hasNext()){
           ZSetOperations.TypedTuple<Object> item = cursor.next();
           System.out.println(item.getValue() + ":" + item.getScore());
        }
    zset-1:1.0
    zset-2:2.0
    zset-3:3.0
    zset-4:6.0
五、集成 Spring Cache
1、@Cacheable
@Cacheable可以标记在一个方法上,也可以标记在一个类上。
当标记在一个方法上时表示该方法是支持缓存的,当标记在一个类上时则表示该类所有的方法都是支持缓存的。对于一个支持缓存的方法,Spring会在其被调用后将其返回值缓存起来,以保证下次利用同样的参数来执行该方法时可以直接从缓存中获取结果,而不需要再次执行该方法。
@Cacheable 的作用 主要针对方法配置,能够根据方法的请求参数对其结果进行缓存
@Cacheable可以指定三个属性,value、key和condition。
参数
解释
example
value
缓存的名称,在 spring 配置文件中定义,必须指定至少一个
例如:
@Cacheable(value=”mycache”)
@Cacheable(value={”cache1”,”cache2”}
key
缓存的 key,可以为空,如果指定要按照 SpEL 表达式编写,如果不指定,则缺省按照方法的所有参数进行组合
@Cacheable(value=”testcache”,key=”#userName”)
condition
缓存的条件,可以为空,使用 SpEL 编写,返回 true 或者 false,只有为 true 才进行缓存
@Cacheable(value=”testcache”,condition=”#userName.length()>2”)
2、value属性指定Cache名称
value其表示当前方法的返回值是会被缓存在哪个Cache上的,对应Cache的名称。其可以是一个Cache也可以是多个Cache,当需要指定多个Cache时其是一个数组。
   @Cacheable("cache1")//Cache是发生在cache1上的
   public User find(Integer id) {
      returnnull;
   }

   @Cacheable({"cache1", "cache2"})//Cache是发生在cache1和cache2上的
   public User find(Integer id) {
      returnnull;
   }
3、使用key属性自定义key
key属性是用来指定Spring缓存方法的返回结果时对应的key的。该属性支持SpringEL表达式。当我们没有指定该属性时,Spring将使用默认策略生成key。我们这里先来看看自定义策略
自定义策略是指我们可以通过Spring的EL表达式来指定我们的key。这里的EL表达式可以使用方法参数及它们对应的属性。使用方法参数时我们可以直接使用“#参数名”或者“#p参数index”。下面是几个使用参数作为key的示例。
   @Cacheable(value="users", key="#id")
   public User find(Integer id) {
      return  null;
   }

// p  param 参数   0
   @Cacheable(value="users", key="#p0")
   public User find(Integer id) {
      returnnull;
   }

   @Cacheable(value="users", key="#user.id")
   public User find(User user) {
      returnnull;
   }

   @Cacheable(value="users", key="#p0.id")
   public User find(User user) {
      returnnull;
   }
除了上述使用方法参数作为key之外,Spring还为我们提供了一个root对象可以用来生成key。通过该root对象我们可以获取到以下信息。
属性名称
描述
示例
methodName
当前方法名
#root.methodName
method
当前方法
#root.method.name
target
当前被调用的对象
#root.target
targetClass
当前被调用的对象的class
#root.targetClass
args
当前方法参数组成的数组
#root.args[0]
caches
当前被调用的方法使用的Cache
#root.caches[0].name
当我们要使用root对象的属性作为key时我们也可以将“#root”省略,因为Spring默认使用的就是root对象的属性。如:
   @Cacheable(value={"users", "xxx"}, key="caches[1].name")
   public User find(User user) {
      returnnull;
   }
4、condition属性指定发生的条件
有的时候我们可能并不希望缓存一个方法所有的返回结果。通过condition属性可以实现这一功能。condition属性默认为空,表示将缓存所有的调用情形。其值是通过SpringEL表达式来指定的,当为true时表示进行缓存处理;当为false时表示不进行缓存处理,即每次调用该方法时该方法都会执行一次。如下示例表示只有当user的id为偶数时才会进行缓存。
   @Cacheable(value={"users"}, key="#user.id", condition="#user.id%2==0")
   public User find(User user) {
      System.out.println("find user by user " + user);
      return user;
   }
5、@CachePut
在支持Spring Cache的环境下,对于使用@Cacheable标注的方法,Spring在每次执行前都会检查Cache中是否存在相同key的缓存元素,如果存在就不再执行该方法,而是直接从缓存中获取结果进行返回,否则才会执行并将返回结果存入指定的缓存中。@CachePut也可以声明一个方法支持缓存功能。与@Cacheable不同的是使用@CachePut标注的方法在执行前不会去检查缓存中是否存在之前执行过的结果,而是每次都会执行该方法,并将执行结果以键值对的形式存入指定的缓存中。
一般使用在保存,更新方法中。
@CachePut也可以标注在类上和方法上。使用@CachePut时我们可以指定的属性跟 @Cacheable是一样的。
    @Cacheable(cacheNames = "user", key = "#id")//每次都会执行方法,并将结果存入指定的缓存中
   public User find(Integer id) {
      return null;
   }
6、@CacheEvict
@CacheEvict是用来标注在需要清除缓存元素的方法或类上的。当标记在一个类上时表示其中所有的方法的执行都会触发缓存的清除操作。@CacheEvict可以指定的属性有value、key、condition、allEntries和beforeInvocation。其中value、key和condition的语义与@Cacheable对应的属性类似。即value表示清除操作是发生在哪些Cache上的(对应Cache的名称);key表示需要清除的是哪个key,如未指定则会使用默认策略生成的key;condition表示清除操作发生的条件。下面我们来介绍一下新出现的两个属性allEntries和beforeInvocation。
7、 allEntries属性
allEntries是boolean类型,表示是否需要清除缓存中的所有元素。默认为false,表示不需要。当指定了allEntries为true时,Spring Cache将忽略指定的key。有的时候我们需要Cache一下清除所有的元素,这比一个一个清除元素更有效率。
@CacheEvict(value="users",key = "#id", allEntries=true)
public void delete(Integer id) {
   System.out.println("delete user by id: " + id);
}
8、 beforeInvocation属性
清除操作默认是在对应方法成功执行之后触发的,即方法如果因为抛出异常而未能成功返回时也不会触发清除操作。使用beforeInvocation可以改变触发清除操作的时间,当我们指定该属性值为true时,Spring会在调用该方法之前清除缓存中的指定元素。
@CacheEvict(value="users",key = "#id", beforeInvocation=true)
public void delete(Integer id) {
   System.out.println("delete user by id: " + id);
}
六、springboot基于注解的redis缓存
此项目是在已搭配好的springboot项目基础完成
1、在配置类添加
  /**
     * 缓存处理
     * @param factory
     * @return
     */
    @Bean
    public CacheManager cacheManager(RedisConnectionFactory factory) {
        RedisSerializer<String> redisSerializer = new StringRedisSerializer();
        Jackson2JsonRedisSerializer jackson2JsonRedisSerializer = new Jackson2JsonRedisSerializer(Object.class);
//解决查询缓存转换异常的问题
        ObjectMapper om = new ObjectMapper();
        om.setVisibility(PropertyAccessor.ALL, JsonAutoDetect.Visibility.ANY);
        om.enableDefaultTyping(ObjectMapper.DefaultTyping.NON_FINAL);
        jackson2JsonRedisSerializer.setObjectMapper(om);
// 配置序列化(解决乱码的问题),过期时间600秒
        RedisCacheConfiguration config = RedisCacheConfiguration.defaultCacheConfig()
                .entryTtl(Duration.ofSeconds(600))
                .serializeKeysWith(RedisSerializationContext.SerializationPair.fromSerializer(redisSerializer))
                .serializeValuesWith(RedisSerializationContext.SerializationPair.fromSerializer(jackson2JsonRedisSerializer))
                .disableCachingNullValues();
        RedisCacheManager cacheManager = RedisCacheManager.builder(factory)
                .cacheDefaults(config)
                .build();
        return cacheManager;
    }
并在配置类中加入**@EnableCaching 启动缓存**
2、controller添加
@RestController
@RequestMapping("/dept")
public class DeptController {
@Resource
private IDeptService deptService;
@GetMapping
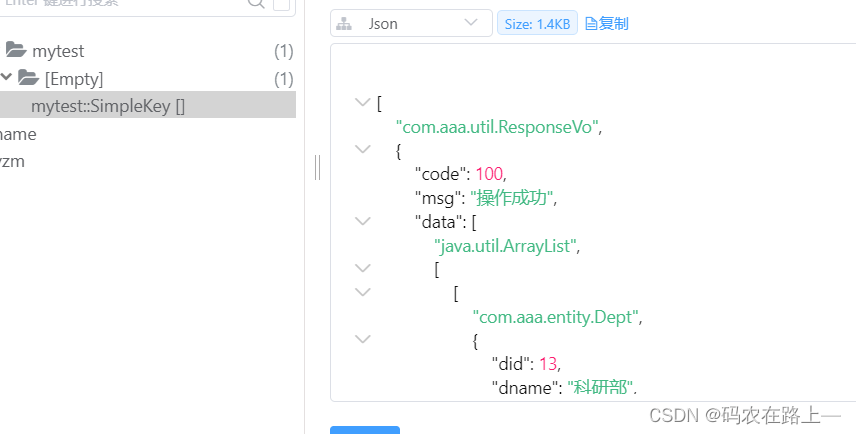
@Cacheable(value = "mytest")
//@Cacheable 的作用 主要针对方法配置,能够根据方法的请求参数对其结果进行缓存
//@Cacheable可以指定三个属性,value、key和condition。
public ResponseVo findAll(){
return ResponseVo.SUCCESS(deptService.Mylist());
}
** @Cacheable(value = "mytest") 查询的时候缓存,**
Value 指定 Key Condition 条件

serviceimpl

service接口

启动后访问dept第二次就直接访问redis缓存
七、验证码
1、使用阿里云
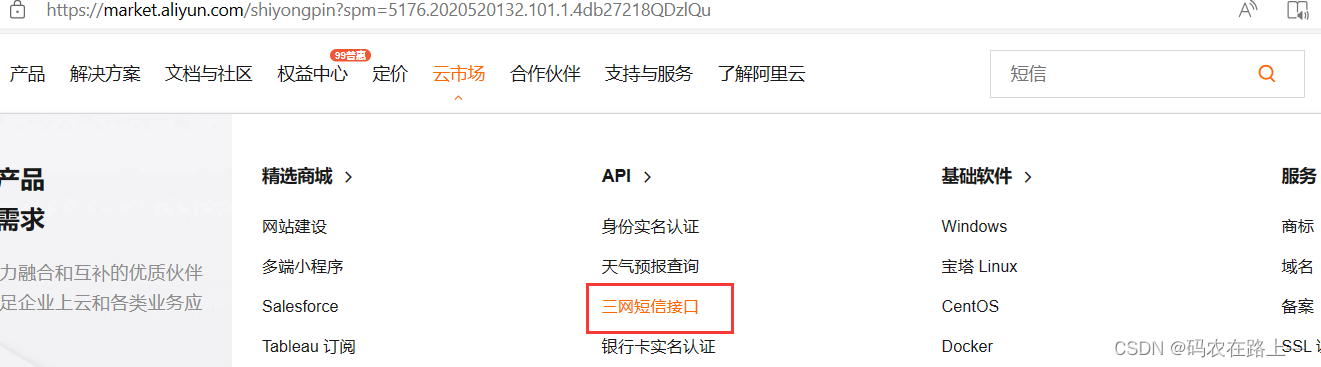
2、控制台复制AppCode

阿里云管控中心-工具与镜像 (aliyun.com)
3、进入商品找到示例代码
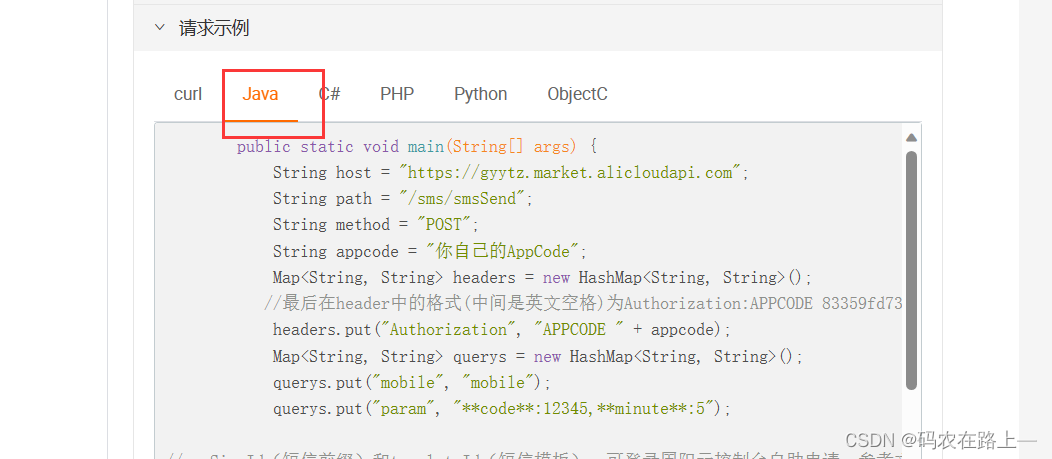
4、示例
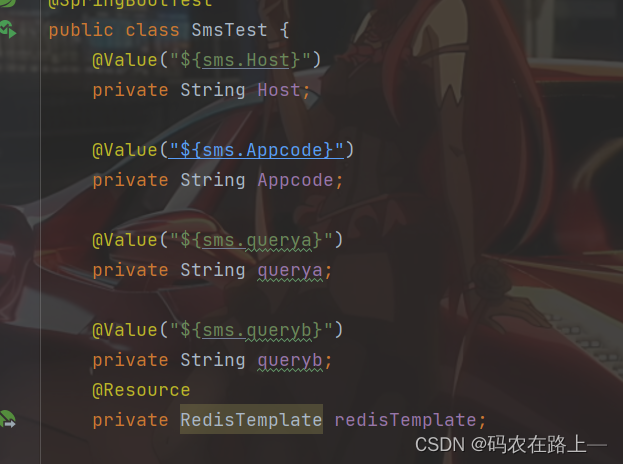
@SpringBootTest
public class SmsTest {
@Resource
private RedisTemplate redisTemplate;
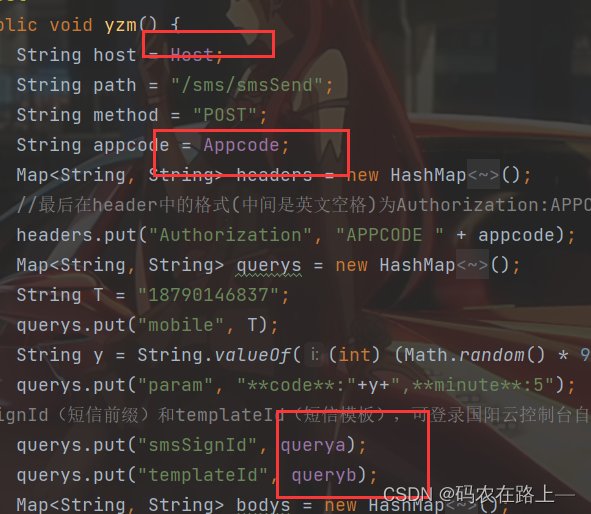
@Test
public void yzm() {
String host = "https://gyytz.market.alicloudapi.com";
String path = "/sms/smsSend";
String method = "POST";
String appcode = "自己的appcode";
Map<String, String> headers = new HashMap<String, String>();
//最后在header中的格式(中间是英文空格)为Authorization:APPCODE 83359fd73fe94948385f570e3c139105
headers.put("Authorization", "APPCODE " + appcode);
Map<String, String> querys = new HashMap<String, String>();
String T = "18790146837";
querys.put("mobile", T);
String y = String.valueOf((int) (Math.random() * 90000) + 10000);;
querys.put("param", "**code**:"+y+",**minute**:5");
//smsSignId(短信前缀)和templateId(短信模板),可登录国阳云控制台自助申请。参考文档:http://help.guoyangyun.com/Problem/Qm.html
querys.put("smsSignId", "2e65b1bb3d054466b82f0c9d125465e2");
querys.put("templateId", "908e94ccf08b4476ba6c876d13f084ad");
Map<String, String> bodys = new HashMap<String, String>();
redisTemplate.opsForValue().set(T,y,300, TimeUnit.MINUTES);//缓存redis
try {
/**
* 重要提示如下:
* HttpUtils请从\r\n\t \t* https://github.com/aliyun/api-gateway-demo-sign-java/blob/master/src/main/java/com/aliyun/api/gateway/demo/util/HttpUtils.java\r\n\t \t* 下载
*
* 相应的依赖请参照
* https://github.com/aliyun/api-gateway-demo-sign-java/blob/master/pom.xml
*/
HttpResponse response = HttpUtils.doPost(host, path, method, headers, querys, bodys);
System.out.println(response.toString());
//获取response的body
//System.out.println(EntityUtils.toString(response.getEntity()));
} catch (Exception e) {
e.printStackTrace();
}
}
}
** redisTemplate.opsForValue().set(T,y,300, TimeUnit.MINUTES);**
将验证码以手机号的唯一方式存储到redis中,可以自定义时间
5、HttpUtils类
package com.aaa.test;

import org.apache.commons.lang.StringUtils;
import org.apache.http.HttpResponse;
import org.apache.http.NameValuePair;
import org.apache.http.client.HttpClient;
import org.apache.http.client.entity.UrlEncodedFormEntity;
import org.apache.http.client.methods.HttpDelete;
import org.apache.http.client.methods.HttpGet;
import org.apache.http.client.methods.HttpPost;
import org.apache.http.client.methods.HttpPut;
import org.apache.http.conn.ClientConnectionManager;
import org.apache.http.conn.scheme.Scheme;
import org.apache.http.conn.scheme.SchemeRegistry;
import org.apache.http.conn.ssl.SSLSocketFactory;
import org.apache.http.entity.ByteArrayEntity;
import org.apache.http.entity.StringEntity;
import org.apache.http.impl.client.DefaultHttpClient;
import org.apache.http.message.BasicNameValuePair;

import javax.net.ssl.SSLContext;
import javax.net.ssl.TrustManager;
import javax.net.ssl.X509TrustManager;
import java.io.UnsupportedEncodingException;
import java.net.URLEncoder;
import java.security.KeyManagementException;
import java.security.NoSuchAlgorithmException;
import java.security.cert.X509Certificate;
import java.util.ArrayList;
import java.util.List;
import java.util.Map;

public class HttpUtils {

    /**
     * get
     *
     * @param host
     * @param path
     * @param method
     * @param headers
     * @param querys
     * @return
     * @throws Exception
     */
    public static HttpResponse doGet(String host, String path, String method,
                                     Map<String, String> headers,
                                     Map<String, String> querys)
            throws Exception {
        HttpClient httpClient = wrapClient(host);

        HttpGet request = new HttpGet(buildUrl(host, path, querys));
        for (Map.Entry<String, String> e : headers.entrySet()) {
            request.addHeader(e.getKey(), e.getValue());
        }

        return httpClient.execute(request);
    }

    /**
     * post form
     *
     * @param host
     * @param path
     * @param method
     * @param headers
     * @param querys
     * @param bodys
     * @return
     * @throws Exception
     */
    public static HttpResponse doPost(String host, String path, String method,
                                      Map<String, String> headers,
                                      Map<String, String> querys,
                                      Map<String, String> bodys)
            throws Exception {
        HttpClient httpClient = wrapClient(host);

        HttpPost request = new HttpPost(buildUrl(host, path, querys));
        for (Map.Entry<String, String> e : headers.entrySet()) {
            request.addHeader(e.getKey(), e.getValue());
        }

        if (bodys != null) {
            List<NameValuePair> nameValuePairList = new ArrayList<NameValuePair>();

            for (String key : bodys.keySet()) {
                nameValuePairList.add(new BasicNameValuePair(key, bodys.get(key)));
            }
            UrlEncodedFormEntity formEntity = new UrlEncodedFormEntity(nameValuePairList, "utf-8");
            formEntity.setContentType("application/x-www-form-urlencoded; charset=UTF-8");
            request.setEntity(formEntity);
        }

        return httpClient.execute(request);
    }

    /**
     * Post String
     *
     * @param host
     * @param path
     * @param method
     * @param headers
     * @param querys
     * @param body
     * @return
     * @throws Exception
     */
    public static HttpResponse doPost(String host, String path, String method,
                                      Map<String, String> headers,
                                      Map<String, String> querys,
                                      String body)
            throws Exception {
        HttpClient httpClient = wrapClient(host);

        HttpPost request = new HttpPost(buildUrl(host, path, querys));
        for (Map.Entry<String, String> e : headers.entrySet()) {
            request.addHeader(e.getKey(), e.getValue());
        }

        if (StringUtils.isNotBlank(body)) {
            request.setEntity(new StringEntity(body, "utf-8"));
        }

        return httpClient.execute(request);
    }

    /**
     * Post stream
     *
     * @param host
     * @param path
     * @param method
     * @param headers
     * @param querys
     * @param body
     * @return
     * @throws Exception
     */
    public static HttpResponse doPost(String host, String path, String method,
                                      Map<String, String> headers,
                                      Map<String, String> querys,
                                      byte[] body)
            throws Exception {
        HttpClient httpClient = wrapClient(host);

        HttpPost request = new HttpPost(buildUrl(host, path, querys));
        for (Map.Entry<String, String> e : headers.entrySet()) {
            request.addHeader(e.getKey(), e.getValue());
        }

        if (body != null) {
            request.setEntity(new ByteArrayEntity(body));
        }

        return httpClient.execute(request);
    }

    /**
     * Put String
     * @param host
     * @param path
     * @param method
     * @param headers
     * @param querys
     * @param body
     * @return
     * @throws Exception
     */
    public static HttpResponse doPut(String host, String path, String method,
                                     Map<String, String> headers,
                                     Map<String, String> querys,
                                     String body)
            throws Exception {
        HttpClient httpClient = wrapClient(host);

        HttpPut request = new HttpPut(buildUrl(host, path, querys));
        for (Map.Entry<String, String> e : headers.entrySet()) {
            request.addHeader(e.getKey(), e.getValue());
        }

        if (StringUtils.isNotBlank(body)) {
            request.setEntity(new StringEntity(body, "utf-8"));
        }

        return httpClient.execute(request);
    }

    /**
     * Put stream
     * @param host
     * @param path
     * @param method
     * @param headers
     * @param querys
     * @param body
     * @return
     * @throws Exception
     */
    public static HttpResponse doPut(String host, String path, String method,
                                     Map<String, String> headers,
                                     Map<String, String> querys,
                                     byte[] body)
            throws Exception {
        HttpClient httpClient = wrapClient(host);

        HttpPut request = new HttpPut(buildUrl(host, path, querys));
        for (Map.Entry<String, String> e : headers.entrySet()) {
            request.addHeader(e.getKey(), e.getValue());
        }

        if (body != null) {
            request.setEntity(new ByteArrayEntity(body));
        }

        return httpClient.execute(request);
    }

    /**
     * Delete
     *
     * @param host
     * @param path
     * @param method
     * @param headers
     * @param querys
     * @return
     * @throws Exception
     */
    public static HttpResponse doDelete(String host, String path, String method,
                                        Map<String, String> headers,
                                        Map<String, String> querys)
            throws Exception {
        HttpClient httpClient = wrapClient(host);

        HttpDelete request = new HttpDelete(buildUrl(host, path, querys));
        for (Map.Entry<String, String> e : headers.entrySet()) {
            request.addHeader(e.getKey(), e.getValue());
        }

        return httpClient.execute(request);
    }

    private static String buildUrl(String host, String path, Map<String, String> querys) throws UnsupportedEncodingException {
        StringBuilder sbUrl = new StringBuilder();
        sbUrl.append(host);
        if (!StringUtils.isBlank(path)) {
            sbUrl.append(path);
        }
        if (null != querys) {
            StringBuilder sbQuery = new StringBuilder();
            for (Map.Entry<String, String> query : querys.entrySet()) {
                if (0 < sbQuery.length()) {
                    sbQuery.append("&");
                }
                if (StringUtils.isBlank(query.getKey()) && !StringUtils.isBlank(query.getValue())) {
                    sbQuery.append(query.getValue());
                }
                if (!StringUtils.isBlank(query.getKey())) {
                    sbQuery.append(query.getKey());
                    if (!StringUtils.isBlank(query.getValue())) {
                        sbQuery.append("=");
                        sbQuery.append(URLEncoder.encode(query.getValue(), "utf-8"));
                    }
                }
            }
            if (0 < sbQuery.length()) {
                sbUrl.append("?").append(sbQuery);
            }
        }

        return sbUrl.toString();
    }

    private static HttpClient wrapClient(String host) {
        HttpClient httpClient = new DefaultHttpClient();
        if (host.startsWith("https://")) {
            sslClient(httpClient);
        }

        return httpClient;
    }

    private static void sslClient(HttpClient httpClient) {
        try {
            SSLContext ctx = SSLContext.getInstance("TLS");
            X509TrustManager tm = new X509TrustManager() {
                public X509Certificate[] getAcceptedIssuers() {
                    return null;
                }
                public void checkClientTrusted(X509Certificate[] xcs, String str) {

                }
                public void checkServerTrusted(X509Certificate[] xcs, String str) {

                }
            };
            ctx.init(null, new TrustManager[] { tm }, null);
            SSLSocketFactory ssf = new SSLSocketFactory(ctx);
            ssf.setHostnameVerifier(SSLSocketFactory.ALLOW_ALL_HOSTNAME_VERIFIER);
            ClientConnectionManager ccm = httpClient.getConnectionManager();
            SchemeRegistry registry = ccm.getSchemeRegistry();
            registry.register(new Scheme("https", 443, ssf));
        } catch (KeyManagementException ex) {
            throw new RuntimeException(ex);
        } catch (NoSuchAlgorithmException ex) {
            throw new RuntimeException(ex);
        }
    }
}
5、添加pom依赖
        <dependency>
            <groupId>org.apache.httpcomponents</groupId>
            <artifactId>httpcore</artifactId>
        </dependency>
        <dependency>
            <groupId>org.apache.httpcomponents</groupId>
            <artifactId>httpclient</artifactId>
            <version>4.5.14</version>
        </dependency>
        <dependency>
            <groupId>com.alibaba</groupId>
            <artifactId>fastjson</artifactId>
            <version>1.2.15</version>
        </dependency>
        <dependency>
            <groupId>org.apache.httpcomponents</groupId>
            <artifactId>httpclient</artifactId>
            <version>4.2.1</version>
        </dependency>
        <dependency>
            <groupId>org.apache.httpcomponents</groupId>
            <artifactId>httpcore</artifactId>
            <version>4.2.1</version>
        </dependency>
        <dependency>
            <groupId>commons-lang</groupId>
            <artifactId>commons-lang</artifactId>
            <version>2.6</version>
        </dependency>
        <dependency>
            <groupId>org.eclipse.jetty</groupId>
            <artifactId>jetty-util</artifactId>
            <version>9.3.7.v20160115</version>
        </dependency>
7、将重要信息写入application.properties

版权归原作者 码农在路上— 所有, 如有侵权,请联系我们删除。