
一、人脸皮肤诊断方法
近年来,随着计算机技术和人工智能的不断发展,中医领域开始逐渐探索利用这些先进技术来辅助面诊和诊断。在皮肤望诊方面,也出现了一些现代研究,尝试通过图像分析技术和人工智能算法来客观化地获取皮肤相关的色形参数,从而辅助中医面诊。
一些研究将计算机视觉和图像处理技术应用于皮肤望诊,旨在提取皮肤颜色、纹理、斑点等特征,然后通过模式识别算法来进行分析和诊断。这些研究通常需要大量的医学图像数据作为基础,使用机器学习和深度学习技术,如卷积神经网络(CNN),来训练模型以识别不同的皮肤状况和问题。
在中医面诊中,色形参数是评估患者身体状况的重要指标之一。这些参数通常包括皮肤颜色的变化、皮肤纹理的变化、斑点的出现等。通过对这些参数进行量化分析,可以帮助中医医生更客观地了解患者的身体状况,并作出相应的诊断和治疗建议。
然而,需要注意的是,虽然现代技术可以在一定程度上辅助中医面诊,但中医诊断是一门复杂的艺术和科学,它涉及到诸多因素,包括患者的整体状况、舌诊脉诊等。因此,尽管现代技术可以提供一些有用的信息,但在中医面诊中仍需要结合传统的临床经验和知识进行综合判断。
1.颜色
现代色度学研究认为,颜色的基本要素包括色调、饱和度和亮度。在医学领域,特别是在中医色诊客观化研究中,选择适当的颜色模型以准确地描述望诊五色特征是一个具有挑战性的问题。虽然多种颜色模型可供选择,如RGB、YCrCb、Lab、YUV、HLS、Ohta和Hue模型等,但目前还没有统一的标准确定哪种模型最适合中医色诊的研究,能够更准确地表达中医的望诊五色特征。
尽管各种颜色模型都具有优势,但确切地确定哪种模型在中医色诊客观化研究中更适用仍然是一个待解决的问题。RGB模型在应用中较为广泛,但它可能并不完全符合人类视觉感知的特性。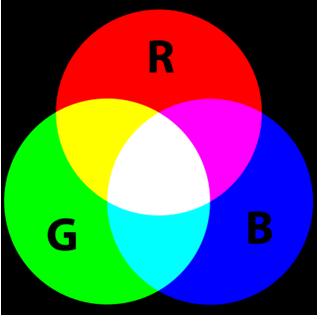
Lab模型是一个更符合人类视觉感知的颜色空间,可能在中医色诊的客观化研究中具有优势,但在实际应用中仍需深入研究。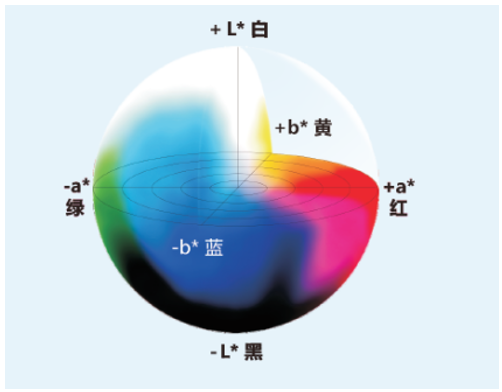
另一方面,肤色在YCbCr空间可能具有一定的聚类特性和稳定性,这为中医望诊提供了一种可能性,但也需要进一步的实证研究来验证其在中医面色望诊中的可行性和准确性。
2.纹理和皱纹
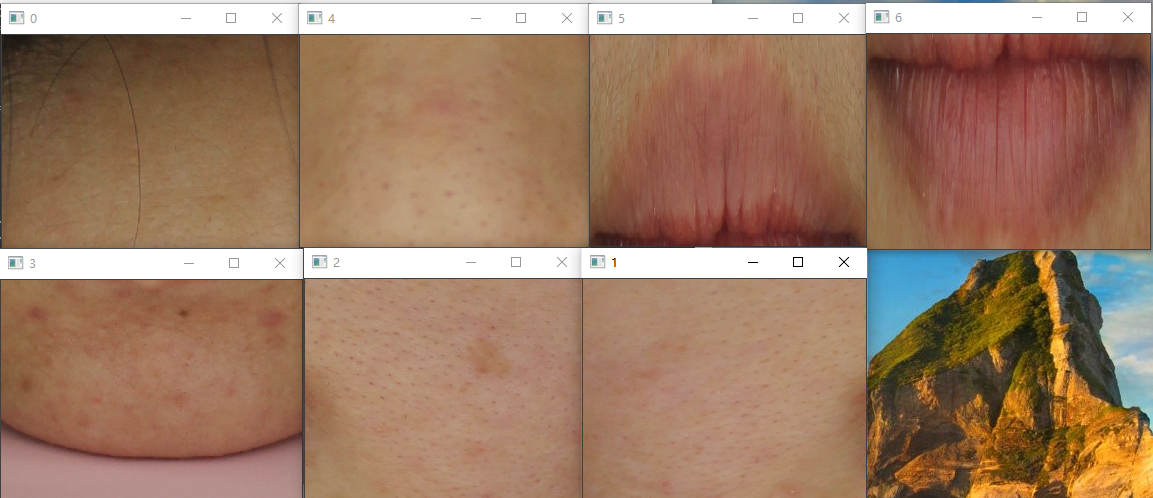
人体皮肤表面的纹理和皱纹是生理和年龄变化的结果。皮肤纹理是由微小的皮丘和皮沟组成的,而随着时间的推移和外部环境的影响,皮肤纹理可能会发生变化,形成皱纹。这些变化可能是由于皮肤的自然衰老、过度暴晒太阳、重复的肌肉运动等因素引起的。在现代研究中,关于皮肤纹理和皱纹的特征提取已经逐渐完善。
在面部纹理特征的提取方面,研究者已经提出了多种方法。一些方法包括使用灰度信息,如基于Gabor滤波的方法,用于人脸和掌纹的识别。此外,灰度共生矩阵(GLCM)和局部二值模式(LBP)等统计学方法也被用来提取纹理特征。这些方法可以帮助描绘纹理的细节特征,对皮肤纹理进行精细评价。
特别是,采用灰度共生矩阵法提取皮肤纹理特征被认为是合理有效的方法。灰度共生矩阵通过分析像素之间的灰度关系来捕捉纹理信息,这种方法能够较好地刻画出皮肤纹理的细节特征。
在研究皱纹时,常见的皱纹部位包括额纹、眼角纹、川字纹、法令纹、嘴角纹等。研究者们采用不同的方法来评价和提取皱纹特征,包括主观评分、图像处理软件(如Photoshop)的评价以及一些特定设备的评价,如Visioscan。这些方法在不同的环境下,从不同的角度提取皱纹特征,可以帮助更好地理解和评估皮肤纹理的变化。
总体而言,现代研究通过多种方法来研究皮肤纹理和皱纹的特征提取,这些方法在皮肤疾病诊断、美容医学等领域具有潜在的应用前景。但要注意,纹理和皱纹的变化是复杂的生理过程,综合考虑多种特征和方法可能有助于更准确地评价皮肤的状态和健康状况。
3.毛孔
根据皮肤学研究,毛孔是皮肤表面的微小凹孔,其尺寸范围通常在50到500微米之间。对毛孔的评价方法包括等级评分法、标准照片评分法、皮肤镜检测、Visia皮肤检测仪以及算法识别等多种方式。
针对毛孔的研究,研究者们提出了不同的方法来评估和描述毛孔的特征。其中,一些研究基于数字化手段,提出了一些精细的参数来描述毛孔的情况。例如,研究者提出了“皮肤毛孔整体粗糙度”这一参数,通过数字化的方式更准确地评估面部毛孔的粗糙程度。另外,一些研究利用改进的算法来分割毛孔,从而获得毛孔的色调、形状和尺寸等特征。这些方法都旨在通过数字化分析来获得关于毛孔的更精确的信息。
此外,皮肤镜检测也被应用于毛孔的研究。皮肤镜可以识别计算毛孔的平均面积,并通过比较毛孔内部颜色与周围区域的颜色差异来表示毛孔的特征。这些方法都帮助了毛孔特征的客观化分析。
对于色斑的研究,研究者们也提出了多种方法。颜色直方图中的HSV空间模型被应用于描述色斑的颜色信息。同时,通过摄像机获取图像并对色斑进行量化分析,可以得出色斑的几何信息,如面积、周长、最大直径、几何形状和对称性等。
总的来说,图像分析法在皮肤学研究中具有许多优点,如客观性、操作简便、重复性好等。通过这些方法,可以定量地获取皮肤特征的信息,用于医学诊断、皮肤评价以及化妆品和皮肤病治疗前后的比较。不过,这些方法的应用还需要进一步的研究和验证,以确保其准确性和可靠性。
二、人脸皮肤区域获取
1.人脸皮肤分割
在做皮肤检测前提前条件是先把人脸分割出来,人脸皮肤分割是指将人脸图像中的皮肤部分从其他背景或物体中分离出来的过程。常用的方向有以下几种:
- 基于颜色阈值的方法: 人脸皮肤通常具有特定的颜色范围,比如在RGB颜色空间中,皮肤可能落在一定的红色、绿色和蓝色通道值范围内。通过设置适当的颜色阈值,可以将皮肤像素从其他像素中分离出来。然而,这种方法容易受到光照变化和肤色多样性的影响,导致分割效果不稳定。
- 基于机器学习的方法: 使用机器学习算法,如支持向量机(SVM)、随机森林、卷积神经网络(CNN)等,可以训练一个分类器,将皮肤像素与非皮肤像素分开。这需要大量的标注数据进行训练,但结果通常更准确。
- 基于深度学习的方法: 使用深度学习技术,特别是卷积神经网络(CNN),可以更精确地进行皮肤分割。可以设计一个CNN架构,输入人脸图像,输出一个相应大小的二值分割掩码,其中皮肤区域被标记为1,非皮肤区域被标记为0。
- 基于图像分割算法的方法: 图像分割算法,如基于区域的分割(如区域增长、分水岭算法)、基于边缘的分割(如Canny边缘检测)等,也可以应用于人脸皮肤分割。这些方法通过分析像素之间的相似性或差异性来确定皮肤区域。
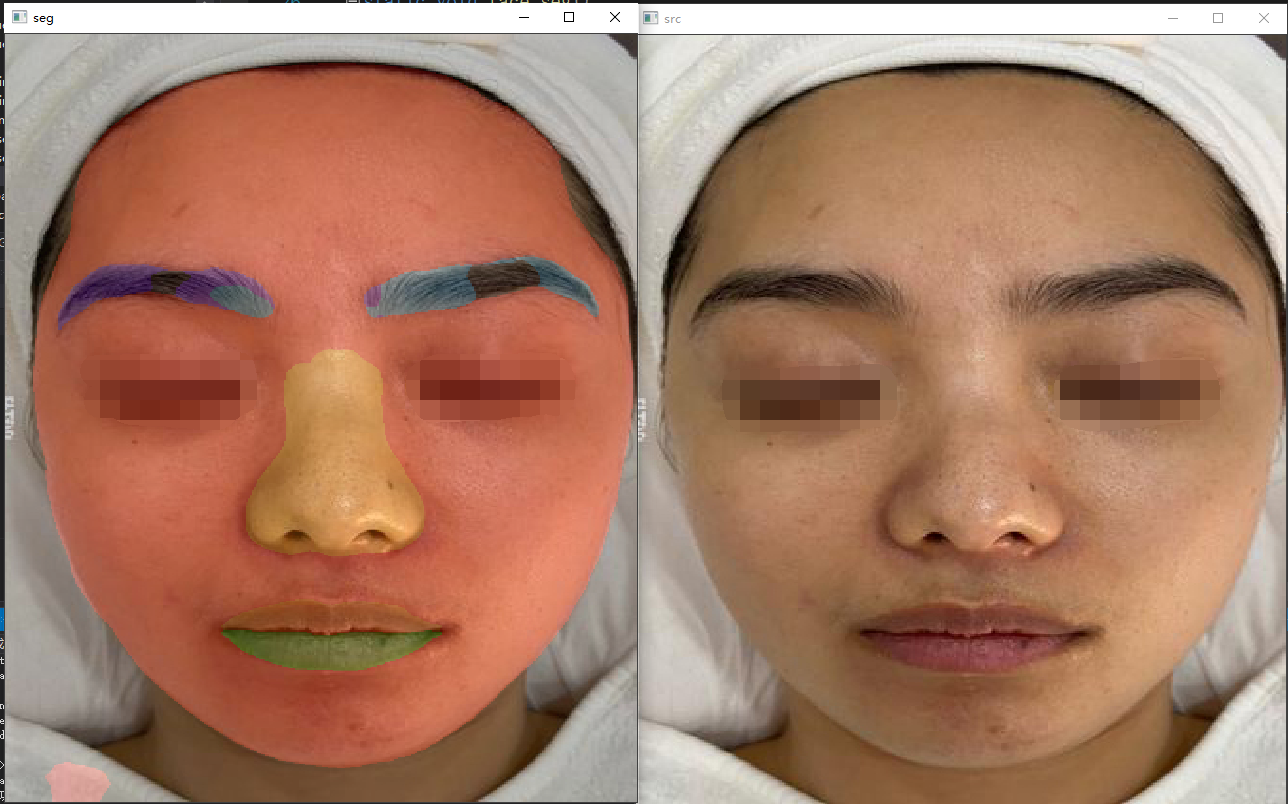
这里使用的基于深度学习的face-parsing 。训练出模型之后,转成onnx,然后使用onnxruntime进行推理:
#include"face_parsing_bisenet.h"#include"../core/ort_utils.h"using ortcv::FaceParsingBiSeNet;

Ort::Value FaceParsingBiSeNet::transform(const cv::Mat &mat){
  cv::Mat canvas;
  cv::resize(mat, canvas, cv::Size(input_node_dims.at(3), input_node_dims.at(2)));
  cv::cvtColor(canvas, canvas, cv::COLOR_BGR2RGB);// e.g (1,3,512,512)
  ortcv::utils::transform::normalize_inplace(canvas, mean_vals, scale_vals);return ortcv::utils::transform::create_tensor(
      canvas, input_node_dims, memory_info_handler,
      input_values_handler, ortcv::utils::transform::CHW);// deepcopy inside}voidFaceParsingBiSeNet::detect(const cv::Mat &mat, types::FaceParsingContent &content,
    std::vector<cv::Mat>& cv_features,bool minimum_post_process){if(mat.empty())return;// 1. make input tensor
  Ort::Value input_tensor =this->transform(mat);// 2. inferenceauto output_tensors = ort_session->Run(
      Ort::RunOptions{nullptr}, input_node_names.data(),&input_tensor,1, output_node_names.data(), num_outputs
  );// 3. generate maskthis->generate_mask(output_tensors, mat, content,cv_features, minimum_post_process);}staticinline uchar argmax(float*mutable_ptr,constunsignedint&step){
  std::vector<float>logits(19,0.f);for(unsignedint i =0; i <19;++i)
    logits[i]=*(mutable_ptr + i * step);
  uchar label =0;float max_logit = logits[0];for(unsignedint i =1; i <19;++i){if(logits[i]> max_logit){
      max_logit = logits[i];
      label =(uchar) i;}}return label;}staticconst uchar part_colors[20][3]={{0,0,0},{0,0,255},//脸{255,170,0},//右眉毛{255,0,85},//左眉毛{0,0,0},{0,0,0},{0,0,0},{0,0,0},{0,0,0},//耳朵{0,0,0},{0,170,255},//鼻子{0,0,0},{0,125,255},//上嘴唇{0,255,0},//下嘴唇{0,0,0},{0,0,0},{0,0,0},{0,0,0},//头发{0,0,0},{0,0,0}};voidFaceParsingBiSeNet::generate_mask(std::vector<Ort::Value>&output_tensors,const cv::Mat &mat,
                                       types::FaceParsingContent &content, std::vector<cv::Mat>& cv_features,bool minimum_post_process){
  cv_features.clear();
  Ort::Value &output = output_tensors.at(0);// (1,19,h,w)constunsignedint h = mat.rows;constunsignedint w = mat.cols;auto output_dims = output.GetTypeInfo().GetTensorTypeAndShapeInfo().GetShape();constunsignedint out_h = output_dims.at(2);constunsignedint out_w = output_dims.at(3);constunsignedint channel_step = out_h * out_w;float*output_ptr = output.GetTensorMutableData<float>();
  std::vector<uchar>elements(channel_step,0);// allocatefor(unsignedint i =0; i < channel_step;++i){
      elements[i]=argmax(output_ptr + i, channel_step);}

  cv::Mat label(out_h, out_w, CV_8UC1, elements.data());

  cv::Mat cv_EB(out_h, out_w, CV_8UC1, cv::Scalar(0));
  cv::Mat cv_face = cv_EB.clone();
  cv::Mat cv_nose = cv_EB.clone();
  cv::Mat cv_ulip = cv_EB.clone();
  cv::Mat cv_dlip = cv_EB.clone();
  cv::Mat cv_all = cv_EB.clone();if(!minimum_post_process){const uchar *label_ptr = label.data;
    cv::Mat color_mat(out_h, out_w, CV_8UC3, cv::Scalar(0,0,0));for(unsignedint i =0; i < cv_EB.rows;++i){
      cv::Vec3b* p = color_mat.ptr<cv::Vec3b>(i);
      uchar* EP = cv_EB.ptr<uchar>(i);
      uchar* face = cv_face.ptr<uchar>(i);
      uchar* nose = cv_nose.ptr<uchar>(i);
      uchar* ulip = cv_ulip.ptr<uchar>(i);
      uchar* dlip = cv_dlip.ptr<uchar>(i);
      uchar* all = cv_all.ptr<uchar>(i);for(unsignedint j =0; j < cv_EB.cols;++j){if(label_ptr[i * out_w + j]==0)continue;
        p[j][0]= part_colors[label_ptr[i * out_w + j]][0];
        p[j][1]= part_colors[label_ptr[i * out_w + j]][1];
        p[j][2]= part_colors[label_ptr[i * out_w + j]][2];switch(label_ptr[i * out_w + j]){case1://脸
            all[j]=255;
            face[j]=255;break;case2://眉毛
            all[j]=255;
            EP[j]=255;break;case3:
            all[j]=255;
            EP[j]=255;break;case10://鼻子
            all[j]=255;
            nose[j]=255;break;case12:
            all[j]=255;
            ulip[j]=255;break;case13:
            all[j]=255;
            dlip[j]=255;break;default:break;}}}/* cv::Mat cv_ulipm, cv_dlipm;

    morph(cv_dlip, cv_ulipm);*/

    cv_features.push_back(cv_face);
    cv_features.push_back(cv_nose);
    cv_features.push_back(cv_ulip);
    cv_features.push_back(cv_dlip);
    cv_features.push_back(cv_EB);
    cv_features.push_back(cv_all);for(int i =0; i < cv_features.size(); i++){
        cv::resize(cv_features[i], cv_features[i], cv::Size(w, h));}//cv::resize(color_mat, color_mat, mat.size());//cv::addWeighted(mat, 0.8, color_mat, 0.2, 3, content.merge);//cv::namedWindow("src", 0);//cv::imshow("src", mat);//cv::namedWindow("seg", 0);//cv::imshow("seg", content.merge);}// already allocated a new continuous memory after resize.if(out_h != h || out_w != w) cv::resize(label, label, cv::Size(w, h),cv::INTER_LANCZOS4);// need clone to allocate a new continuous memory if not performed resize.// The memory elements point to will release after return.else label = label.clone();
  content.label = label;// auto handle the memory inside ocv with smart ref.
  content.flag =true;}
2.区域获取
分割之后就要获取要诊断的皮肤区域,一般要获取额头、左颊、右颊、下巴、鼻头、嘴唇这六个区域的皮肤颜色值,然后对这些区域的皮肤的颜色值进行分析。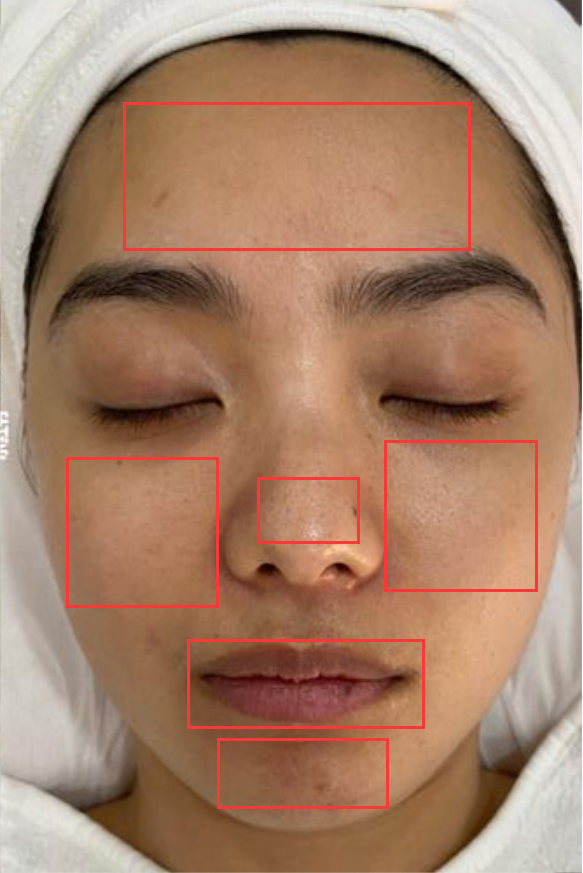
在面部皮肤分析方面,黄指数(Y)、白指数(W)、青指数(C)、红指数(R)和黑指数(B)以及面色指数用于量化面部不同颜色成分的强度。光泽指数则描述了皮肤表面的光泽程度,从有光泽、少光泽到无光泽。还要提到了多种颜色空间(RGB、Lab、YCbCr值),这些颜色空间能够更精确地表示不同颜色的特征。
对于唇部,想要通过H、S、I值以及Lab值来描述颜色特征。这些参数可以帮助描绘唇部色调、饱和度、亮度和在颜色空间中的位置,从而实现更精确的分析和处理。
另外,可能还要够分割上下嘴唇以及检测唇纹,这需要使用图像分割和边缘检测等技术来实现。通过对唇部不同区域进行更详细的分析,可以获得更精准的颜色特征。
上面的代码已经分割出五官的大体位置,要根据五官的位置获取到算法需要用到的6个区域。
#include"features_seg.h"staticboolsortArea(const std::vector<cv::Point>& v1,const std::vector<cv::Point>& v2){double v1Area =fabs(contourArea(cv::Mat(v1)));double v2Area =fabs(contourArea(cv::Mat(v2)));return v1Area > v2Area;}

cv::Rect findContoursArea(cv::Mat& cv_src){
    std::vector<std::vector<cv::Point>> contours;
    std::vector<cv::Vec4i> hierarcy;

    cv::Mat  cv_canny_e, cv_canny_d;
    cv::Mat element_d =getStructuringElement(cv::MORPH_RECT, cv::Size(7,7));
    cv::dilate(cv_src, cv_canny_d, element_d);

    cv::Mat element_e =getStructuringElement(cv::MORPH_RECT, cv::Size(5,5));
    cv::erode(cv_canny_d, cv_canny_e, element_e);
    cv::findContours(cv_canny_e, contours, hierarcy, cv::RETR_EXTERNAL, cv::CHAIN_APPROX_NONE);

    std::sort(contours.begin(), contours.end(), sortArea);returnboundingRect(cv::Mat(contours[0]));}

cv::Point getCenterPoint(cv::Rect rect){
    cv::Point cpt;
    cpt.x = rect.x +cvRound(rect.width /2.0);
    cpt.y = rect.y +cvRound(rect.height /2.0);return cpt;}voidseg_featurs(std::vector<cv::Mat>& cv_featurs){
    cv::Mat cv_nose;
    cv::resize(cv_featurs[2], cv_nose, cv::Size(512,512));
    cv::Rect nose_rect =findContoursArea(cv_nose);

    cv::Point c_p =getCenterPoint(nose_rect);

    std::vector<Line> lines;

    lines.push_back(Line{ cv::Point(c_p.x,0),cv::Point(c_p.x,cv_nose.rows)});

    cv::Mat cv_eb;
    cv::resize(cv_featurs[4], cv_eb, cv::Size(512,512));
    cv::Mat cv_leb(cv_eb.size(), CV_8UC1, cv::Scalar(0));
    cv::Mat cv_reb(cv_eb.size(), CV_8UC1, cv::Scalar(0));

    cv::Rect l_rect = cv::Rect(cv::Point(0,0), lines[0]._p2);
    cv::Rect r_rect = cv::Rect(lines[0]._p1,
        cv::Point(cv_eb.cols, cv_eb.rows));

    cv::Mat cv_lc =cv_eb(l_rect);
    cv::Mat cv_rc =cv_eb(r_rect);

    cv::Mat cv_roi1 =cv_leb(l_rect);
    cv_lc.copyTo(cv_roi1);

    cv::Mat cv_roi2 =cv_reb(r_rect);
    cv_rc.copyTo(cv_roi2);

    cv::resize(cv_leb, cv_leb, cv_featurs[4].size());
    cv::resize(cv_reb, cv_reb, cv_featurs[4].size());
    cv_featurs.push_back(cv_leb);
    cv_featurs.push_back(cv_reb);}intdrawpoly(cv::Mat& cv_src, cv::Mat& cv_dst, cv::Size size){
    cv::Mat cv_dilate;
    cv::Mat element_d =getStructuringElement(cv::MORPH_RECT,
        size, cv::Point(-1,-1));
    cv::dilate(cv_src, cv_dilate, element_d);
    cv::Mat element_e =getStructuringElement(cv::MORPH_RECT,
        size, cv::Point(-1,-1));
    cv::erode(cv_dilate, cv_dilate, element_e);

    std::vector<std::vector<cv::Point>> contours;
    std::vector<std::vector<cv::Point>> f_contours;
    std::vector<cv::Point> approx2;//注意第5个参数为CV_RETR_EXTERNAL,只检索外框findContours(cv_dilate, f_contours, cv::RETR_EXTERNAL, cv::CHAIN_APPROX_NONE);//找轮廓//求出面积最大的轮廓int max_area =0;int index =0;for(int i =0; i < f_contours.size(); i++){double tmparea =fabs(contourArea(f_contours[i]));if(tmparea > max_area){
            index = i;
            max_area = tmparea;}}

    contours.push_back(f_contours[index]);

    std::vector<cv::Point> tmp = contours[0];

    cv_dst = cv::Mat(cv_src.size(), CV_8UC1, cv::Scalar(0));drawContours(cv_dst, contours,0, cv::Scalar(255),4, cv::LINE_AA);//注意线的厚度,不要选择太细的return0;}//两条线的交点static cv::Point2f computeIntersect(Line& l1, Line& l2){int x1 = l1._p1.x;int x2 = l1._p2.x;int y1 = l1._p1.y;int y2 = l1._p2.y;int x3 = l2._p1.x, x4 = l2._p2.x, y3 = l2._p1.y, y4 = l2._p2.y;if(float d =(x1 - x2)*(y3 - y4)-(y1 - y2)*(x3 - x4)){
        cv::Point2f pt;
        pt.x =((x1 * y2 - y1 * x2)*(x3 - x4)-(x1 - x2)*(x3 * y4 - y3 * x4))/ d;
        pt.y =((x1 * y2 - y1 * x2)*(y3 - y4)-(y1 - y2)*(x3 * y4 - y3 * x4))/ d;return pt;}return cv::Point2f(-1,-1);}

cv::Rect rectScale(cv::Rect& rect,float x_scale,float y_scale,int i){
    cv::Rect cv_rect;if(i >=0){
        cv_rect.x = rect.x * x_scale;
        cv_rect.y = rect.y * y_scale;
        cv_rect.width = rect.width * x_scale;
        cv_rect.height = rect.height * y_scale;}else{
        cv_rect.x = rect.x / x_scale;
        cv_rect.y = rect.y / y_scale;
        cv_rect.width = rect.width / x_scale;
        cv_rect.height = rect.height / y_scale;}return cv_rect;}voidface_subarea(std::vector<cv::Mat>& cv_parts,std::vector<cv::Rect>&parts){float x_s = cv_parts[0].cols /512.00;float y_s = cv_parts[0].rows /512.00;
    std::vector<cv::Mat>cv_featurs(cv_parts.size());for(int i =0; i < cv_parts.size(); i++){
        cv::resize(cv_parts[i], cv_featurs[i], cv::Size(512,512));}

    cv::Mat cv_eb;drawpoly(cv_featurs[4], cv_eb,cv::Size(115,3));

    cv::Rect eb_rect =findContoursArea(cv_eb);

    cv::Rect face_rect =findContoursArea(cv_featurs[0]);
    cv::Rect nose_rect =findContoursArea(cv_featurs[1]);
    cv::Rect leb_rect =findContoursArea(cv_featurs[5]);
    cv::Rect reb_rect =findContoursArea(cv_featurs[6]);
    cv::Rect dlip_rect =findContoursArea(cv_featurs[3]);
    cv::Rect ulip_rect =findContoursArea(cv_featurs[2]);int b = leb_rect.tl().y - reb_rect.tl().y;
    Line L4(cv::Point(0,0),cv::Point(0,0));if(b <=0){
        L4 =Line(cv::Point(0, leb_rect.tl().y +abs((b /2))),
            cv::Point(cv_featurs[0].cols, leb_rect.tl().y +abs((b /2))));}else{
        L4 =Line(cv::Point(0, leb_rect.tl().y -(b /2)),
            cv::Point(cv_featurs[0].cols, leb_rect.tl().y -(b /2)));}

    cv::Point c_leb =getCenterPoint(leb_rect);
    cv::Point c_reb =getCenterPoint(reb_rect);//额头
    Line L1(cv::Point(c_leb.x,0),cv::Point(c_leb.x, cv_featurs[0].rows));
    Line L0(cv::Point(0, face_rect.tl().y),
        cv::Point(cv_featurs[0].cols, face_rect.tl().y));
    cv::Point p0 =computeIntersect(L0,L1);

    Line L3(cv::Point(c_reb.x,0),cv::Point(c_reb.x, cv_featurs[0].rows));

    cv::Point p2 =computeIntersect(L3, L4);int s = cv::Rect(p0, p2).width /7;
    Line L2(cv::Point(0, face_rect.tl().y + s),
        cv::Point(cv_featurs[0].cols, face_rect.tl().y + s));
    cv::Point p1 =computeIntersect(L2, L1);int p = nose_rect.height /2;int x = eb_rect.width /13;//左脸
    Line L5(cv::Point(0, nose_rect.tl().y + p),
        cv::Point(cv_featurs[0].cols, nose_rect.tl().y + p));
    Line L6(cv::Point(eb_rect.tl().x + x,0),
        cv::Point(eb_rect.tl().x + x, cv_featurs[0].rows));

    cv::Point p3 =computeIntersect(L5, L6);

   Line L7(cv::Point(0, nose_rect.br().y),
       cv::Point(cv_featurs[0].cols, nose_rect.br().y));
   Line L8(cv::Point(nose_rect.tl().x,0),
       cv::Point(nose_rect.tl().x, cv_featurs[0].rows));

   cv::Point p4 =computeIntersect(L7, L8);

   Line L9(cv::Point(0, nose_rect.tl().y + p),
       cv::Point(cv_featurs[0].cols, nose_rect.tl().y + p));
   Line L10(cv::Point(nose_rect.br().x,0),
       cv::Point(nose_rect.br().x, cv_featurs[0].rows));
   Line L11(cv::Point(0, nose_rect.br().y),
       cv::Point(cv_featurs[0].cols, nose_rect.br().y));
   Line L12(cv::Point(eb_rect.br().x - x,0),
       cv::Point(eb_rect.br().x - x, cv_featurs[0].rows));

   cv::Point p5 =computeIntersect(L9, L10);
   cv::Point p6 =computeIntersect(L11, L12);

   Line L13( cv::Point(nose_rect.tl().x,0),
       cv::Point(nose_rect.tl().x, cv_featurs[0].rows));
   Line L14(cv::Point(0, dlip_rect.br().y),
       cv::Point(cv_featurs[0].cols, dlip_rect.br().y));

   cv::Point p7 =computeIntersect(L13, L14);

   Line L15(cv::Point(nose_rect.br().x,0),
       cv::Point(nose_rect.br().x, cv_featurs[0].rows));
   Line L16(cv::Point(0, face_rect.br().y),
       cv::Point(cv_featurs[0].cols, face_rect.br().y));

   cv::Point p8 =computeIntersect(L15, L16);int n_h = nose_rect.height /6;int n_w = nose_rect.width /4;

   Line L17(cv::Point(0, nose_rect.tl().y +(n_h *3)),
       cv::Point(cv_featurs[0].cols, nose_rect.tl().y +(n_h *3)));
   Line L18(cv::Point(nose_rect.tl().x + n_w,0),
       cv::Point(nose_rect.tl().x + n_w, cv_featurs[0].rows));
   cv::Point p9 =computeIntersect(L17, L18);

   Line L19(cv::Point(0, nose_rect.br().y - n_h),
       cv::Point(cv_featurs[0].cols, nose_rect.br().y - n_h));
   Line L20(cv::Point(nose_rect.br().x - n_w,0),
       cv::Point(nose_rect.br().x - n_w, cv_featurs[0].rows));
   cv::Point p10 =computeIntersect(L19, L20);

   parts.push_back(cv::Rect(p1, p2));
   parts.push_back(cv::Rect(p3, p4));
   parts.push_back(cv::Rect(p5, p6));
   parts.push_back(cv::Rect(p7, p8));
   parts.push_back(cv::Rect(p9, p10));
   parts.push_back(ulip_rect);
   parts.push_back(dlip_rect);for(int i =0; i < parts.size(); i++){
       parts[i]=rectScale(parts[i], x_s, y_s,1);}}voidmorph(cv::Mat& cv_src, cv::Mat& cv_dst){
    cv::Mat cv_dilate;
    cv::Mat element_d =getStructuringElement(cv::MORPH_RECT,
        cv::Size(211,211), cv::Point(-1,-1));
    cv::dilate(cv_src, cv_dilate, element_d);
    cv::Mat element_e =getStructuringElement(cv::MORPH_RECT,
        cv::Size(211,211), cv::Point(-1,-1));
    cv::erode(cv_dilate, cv_dst, element_e);}voidlip_seg(cv::Mat& cv_src, std::vector<cv::Mat>& cv_featurs,
    std::vector<cv::Mat>&cv_parts,std::vector<cv::Rect>&parts){
    cv::Mat cv_dlip, cv_ulip, cv_dlipc, cv_ulipc;

    cv_src.copyTo(cv_dlip, cv_featurs[3]);
    cv_src.copyTo(cv_ulip, cv_featurs[2]);

    cv_parts.push_back(cv_src(parts[0]));
    cv_parts.push_back(cv_src(parts[1]));
    cv_parts.push_back(cv_src(parts[2]));
    cv_parts.push_back(cv_src(parts[3]));
    cv_parts.push_back(cv_src(parts[4]));
    cv_parts.push_back(cv_dlip(parts[6]));
    cv_parts.push_back(cv_ulip(parts[5]));}voiddraw_line(std::vector<cv::Mat> cv_featurs,cv::Mat &cv_face){
    cv::Mat cv_eb;drawpoly(cv_featurs[4], cv_eb,cv::Size(115,3));

    cv::Rect eb_rect =findContoursArea(cv_eb);
    cv::Rect face_rect =findContoursArea(cv_featurs[0]);
    cv::Rect nose_rect =findContoursArea(cv_featurs[1]);
    cv::Rect leb_rect =findContoursArea(cv_featurs[5]);
    cv::Rect reb_rect =findContoursArea(cv_featurs[6]);
    cv::Rect dlip_rect =findContoursArea(cv_featurs[3]);

    cv::Point c_leb =getCenterPoint(leb_rect);
    cv::Point c_reb =getCenterPoint(reb_rect);

    cv::line(cv_face, cv::Point(c_leb.x,0),
       cv::Point(c_leb.x, cv_face.rows), cv::Scalar(255));
   cv::line(cv_face, cv::Point(0, face_rect.tl().y),
       cv::Point(512, face_rect.tl().y), cv::Scalar(255));
   cv::line(cv_face, cv::Point(c_reb.x,0),
       cv::Point(c_reb.x, cv_face.rows), cv::Scalar(255));

  cv::line(cv_face, cv::Point(0, eb_rect.tl().y),cv::Point(512, eb_rect.tl().y), cv::Scalar(255));int p = nose_rect.height /3;int x = eb_rect.width /15;

  cv::line(cv_face, cv::Point(eb_rect.tl().x + x,0),
      cv::Point(eb_rect.tl().x + x,512), cv::Scalar(255));//眼睛下的横线
   cv::line(cv_face, cv::Point(0,nose_rect.tl().y + p),
      cv::Point(512, nose_rect.tl().y + p),cv::Scalar(255));//鼻子旁边右竖线
   cv::line(cv_face, cv::Point(nose_rect.br().x,0),
       cv::Point(nose_rect.br().x,512), cv::Scalar(255));

   cv::line(cv_face, cv::Point(0, nose_rect.br().y),
             cv::Point(512,nose_rect.br().y), cv::Scalar(255));
   cv::line(cv_face, cv::Point(nose_rect.tl().x,0),
                   cv::Point(nose_rect.tl().x,512), cv::Scalar(255));//横线
   cv::line(cv_face, cv::Point(0, face_rect.br().y),
      cv::Point(512, face_rect.br().y), cv::Scalar(255));

   cv::line(cv_face, cv::Point(0, dlip_rect.br().y),
          cv::Point(512, dlip_rect.br().y), cv::Scalar(255));

   cv::line(cv_face, cv::Point(eb_rect.br().x - x,0),
         cv::Point(eb_rect.br().x - x,512), cv::Scalar(255));int n_h = nose_rect.height /6;int n_w = nose_rect.width /4;

   cv::line(cv_face, cv::Point(0, nose_rect.tl().y +(n_h *3)),
       cv::Point(512, nose_rect.tl().y +(n_h *3)), cv::Scalar(255));
   cv::line(cv_face, cv::Point(0, nose_rect.br().y - n_h),
       cv::Point(512, nose_rect.br().y -n_h), cv::Scalar(255));
   cv::line(cv_face, cv::Point(nose_rect.tl().x + n_w,0),
       cv::Point(nose_rect.tl().x + n_w,512), cv::Scalar(255));
   cv::line(cv_face, cv::Point(nose_rect.br().x - n_w,0),
       cv::Point(nose_rect.br().x - n_w,512), cv::Scalar(255));}
二、皮肤分析
1.纹理
1.1 面部纹理和皱纹分析:
面部区域的皱纹,如额纹、川字纹、眼下纹、法令纹、嘴角纹等。这些的参数包括数量、长度、深浅,以及角二阶矩、对比度、相关、熵等来描述这些皱纹的特征。这些参数能够帮助定量地衡量皱纹的不同方面,从而更准确地分析和描述面部皮肤的老化和纹理特征。
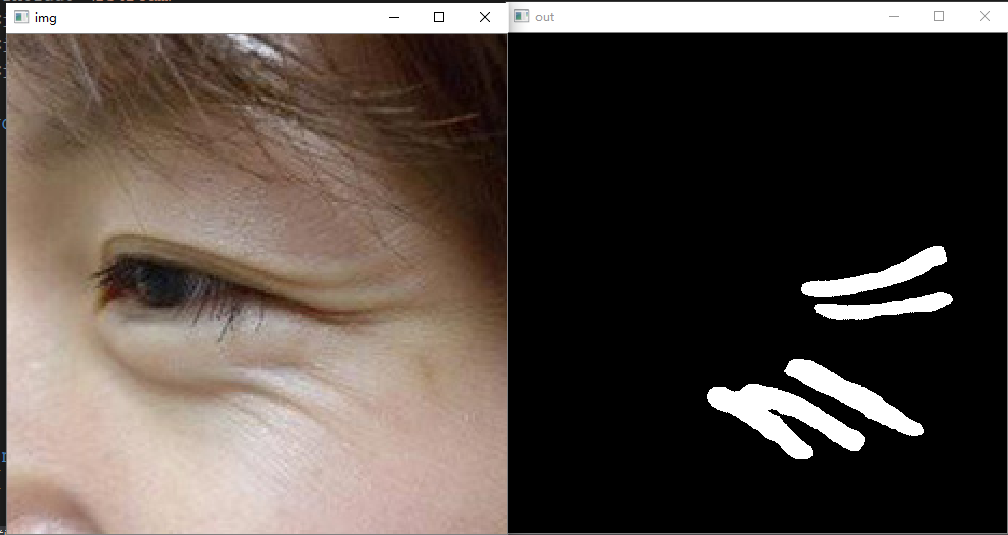
还可以使用灰度共生矩阵来计算纹理特征,如角二阶矩、对比度、相关、熵等。这些参数可以帮助捕捉图像中不同区域的纹理差异,进而区分纹理和皱纹。需要注意的是,纹理和皱纹确实在某种程度上是相关的,但纹理主要关注整体表面特征,而皱纹更侧重于特定区域的褶皱。
在进行定量检测时。要提取面部的纹理,可参考我之前的博客:基于语义分割实现人脸图像的皱纹检测定位与分割
#include<iostream>#include<string>#include<vector>#include<fstream>#include<sstream>#include<opencv2/opencv.hpp>#include<opencv2/dnn.hpp>voidshow_img(std::string name,const cv::Mat& img){
    cv::namedWindow(name,0);int max_rows =500;int max_cols =600;if(img.rows >= img.cols){
        cv::resizeWindow(name, cv::Size(img.cols * max_rows / img.rows, max_rows));}else{
        cv::resizeWindow(name, cv::Size(max_cols, img.rows * max_cols / img.cols));}
    cv::imshow(name, img);}intmain(int argc,char* argv[]){
    std::string path ="demo";
    std::vector<std::string> filenames;
    cv::glob(path, filenames,false);for(auto img_name : filenames){
        cv::Mat img = cv::imread(img_name);
        cv::Size reso(512,512);
        cv::Mat blob = cv::dnn::blobFromImage(img,1.0/255, reso,
            cv::Scalar(0,0,0),false,false);
        cv::dnn::Net net = cv::dnn::readNet("model/Enet.onnx");
        net.setInput(blob);auto t0 = cv::getTickCount();
        cv::Mat out = net.forward();

        std::cout << out.size << std::endl;

        cv::Mat segm = cv::Mat::zeros(cv::Size(512,512), CV_8UC1);
        std::cout << out.size[3]<< std::endl;for(int i =0; i <512*512;++i){if(out.ptr<float>(0,0)[i]< out.ptr<float>(0,1)[i]){
                segm.data[i]=255;}}show_img("img", img);show_img("out", segm);
        cv::waitKey();}return0;}
1.2 唇纹分析:
对于唇纹,定量的参数包括数量、长度、深浅,以及角二阶矩、对比度、相关、熵等,用于描述唇纹的特征。这些参数可以帮助准确地评估唇部区域的纹理和皱纹。
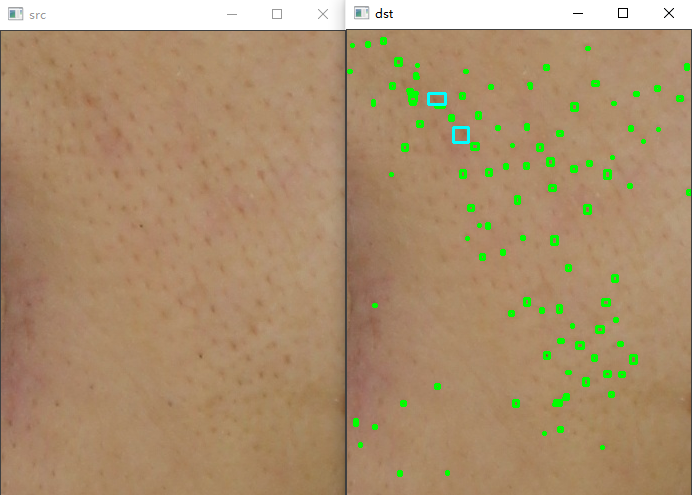
2.毛孔、黑头
#include"PoreDetect.h"PoreDetect::PoreDetect(){}PoreDetect::~PoreDetect(){}PoreDetect::PoreDetect(bool use_gpu){bool has_GPU =false;#ifNCNN_VULKAN
    ncnn::create_gpu_instance();
    has_GPU = ncnn::get_gpu_count()>0;#endifbool to_use_GPU = has_GPU && use_gpu;
    net.opt.use_vulkan_compute = to_use_GPU;#ifFT_MEMFP16
    net.opt.use_fp16_arithmetic =true;
    ncnn_net.load_param(__TB210218FP16_param_bin);
    ncnn_net.load_model(__TB210218FP16_bin);#else
    net.load_param("porefp.param");
    net.load_model("porefp.bin");#endif}voidPoreDetect::detect(const cv::Mat& cv_src, cv::Mat& cv_dst,int in_size,int num_threads){
    cv::Mat cv_gray;
    cv::cvtColor(cv_src, cv_gray, cv::COLOR_BGR2GRAY);
    ncnn::Mat nc_in = ncnn::Mat::from_pixels_resize(cv_gray.data,
        ncnn::Mat::PIXEL_GRAY, cv_gray.cols, cv_gray.rows, in_size, in_size);constfloat norm_vals[3]={1/255.f,1/255.f,1/255.f};
    nc_in.substract_mean_normalize(0, norm_vals);
    ncnn::Extractor ex = net.create_extractor();
    ex.set_num_threads(num_threads);
    ncnn::Mat out;#ifFT_MEMFP16usingnamespace __TB210218FP16_param_id;
    ex.input(BLOB_input, nc_in);
    ex.extract(BLOB_output, out);#else
    ex.input("input", nc_in);
    ex.extract("output", out);#endif

    cv::Mat cv_seg = cv::Mat::zeros(cv::Size(out.w, out.h), CV_8UC1);for(int i =0; i < out.h;++i){for(int j =0; j < out.w;++j){constfloat* bg = out.channel(1);constfloat* fg = out.channel(0);if(bg[i * out.w + j]< fg[i * out.w + j]){
                cv_seg.data[i * out.w + j]=255;}}}

    cv::resize(cv_seg, cv_dst, cv_src.size());}voidPoreDetect::draw(const cv::Mat& cv_src,cv::Mat &cv_unet, cv::Mat& cv_draw){
    cv::Mat cv_dst =~cv_unet.clone();
    cv::threshold(cv_dst, cv_dst,0,255, cv::THRESH_OTSU);

    std::vector<std::vector<cv::Point>> contours;
    std::vector<cv::Vec4i> hierarcy;findContours(cv_dst, contours, hierarcy,
        cv::RETR_EXTERNAL, cv::CHAIN_APPROX_NONE);//查找轮廓

    cv_draw = cv_src.clone();

    std::vector<cv::Rect>boundRect(contours.size());//定义外接矩形集合int x0 =0, y0 =0, w0 =0, h0 =0, num =0;for(int i =0; i < contours.size(); i++){
        boundRect[i]= cv::boundingRect((cv::Mat)contours[i]);//查找每个轮廓的外接矩形//drawContours(cv_src, contours, i, cv::Scalar(0, 0, 255), 2, 8);  //绘制轮廓
        x0 = boundRect[i].x;
        y0 = boundRect[i].y;
        w0 = boundRect[i].width;
        h0 = boundRect[i].height;if(w0 >1&& h0 >1&& w0 <10&& h0 <10)//筛选{
            cv::rectangle(cv_draw, cv::Point(x0, y0),
                cv::Point(x0 + w0, y0 + h0), cv::Scalar(0,255,0),2,8);//绘制第i个外接矩形}elseif(w0 >10&& h0 >10){
            cv::rectangle(cv_draw, cv::Point(x0, y0),
                cv::Point(x0 + w0, y0 + h0), cv::Scalar(255,255,0),2,8);//绘制第i个外接矩形}}}
注:如果对该项目感兴趣或者在安装的过程中遇到什么错误的的可以加我的企鹅群:487350510,大家一起探讨。
版权归原作者 知来者逆 所有, 如有侵权,请联系我们删除。