
👦👦一个帅气的boy,你可以叫我Love And Program
🖱 ⌨个人主页:Love And Program的个人主页
💖💖如果对你有帮助的话希望三连💨💨支持一下博主
电影评论文本分类
前言
最近发现我的大作业系列被疯狂收藏,我明白了,大作业来了!!这几天我会介绍几个大作业级别的文章进行保姆级讲解,轻松过关,当然想拿优秀的话需要一点自己添加点东西,具体可以往后看哦。
电影评论文本分类
本次讲解Tensorflow初级教程的内容,将电影评论进行分类,将文本分为积极、消极两类,是一种二分类问题,这一块可以和老师简要一说,
附上源码地址,但是可能版本原因,建议大家跟着我的代码过一遍。
Pycharm版本tensorflow版本3.82.4 、2.5(推荐使用2.3版本,不同版本会出现不同Warming,但不影响结果)
导入数据部分
使用 IMDB 数据集,大家可以这么介绍:这个数据集是
keras
库中内置的网络电影数据库,可以直接调用。
先把数据集下载下来,如下图(
num_words
表示保留10000个数据,可以理解为保留10000个高频词汇,此处可以自行更改)
imdb = keras.datasets.imdb
(train_data, train_labels),(test_data, test_labels)= imdb.load_data(num_words=10000)

若出现类似于
VisibleDeprecationWarning: Creating an ndarray from ragged nested sequences (which is a list-or-tuple of lists-or-tuples-or ndarrays with different lengths or...
的报错,这是
numpy
不兼容的小warming,进入
imdb.load_data
包中第140行加入,若没出现则跳过这一段。
x_train = np.array(x_train, dtype=object)
x_test = np.array(x_test, dtype=object)

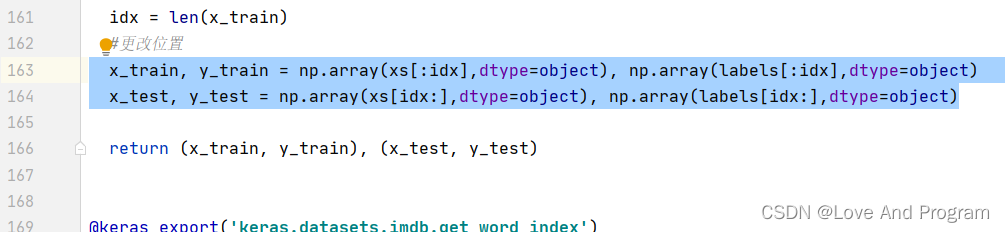
160行左右更改代码
  x_train, y_train = np.array(xs[:idx],dtype=object), np.array(labels[:idx],dtype=object)
  x_test, y_test = np.array(xs[idx:],dtype=object), np.array(labels[idx:],dtype=object)
然后查看数据,第二条数据不知道大家能不能理解,对应的词典中具体的位置,举个例子,如果这个词是
is
->字典中第1位,如果是
are
->字典中第14位。
#全部数据print(train_data)#第一条数据,每个整数代表词典中的一个单词print(train_data[0])#结果:[1, 14, 22, 16, 43, 530, 973, 1622, 1385, 65, 458, 4468, 66, 3941, 4, 173, 36, 256, 5, 25, 100, 43, 838, 112, 50, 670, 2, 9, 35, 480, 284, 5, 150, 4, 172, 112, 167, 2, 336, 385, 39, 4, 172, 4536, 1111, 17, 546, 38, 13, 447, 4, 192, 50, 16, 6, 147, 2025, 19, 14, 22, 4, 1920, 4613, 469, 4, 22, 71, 87, 12, 16, 43, 530, 38, 76, 15, 13, 1247, 4, 22, 17, 515, 17, 12, 16, 626, 18, 2, 5, 62, 386, 12, 8, 316, 8, 106, 5, 4, 2223, 5244, 16, 480, 66, 3785, 33, 4, 130, 12, 16, 38, 619, 5, 25, 124, 51, 36, 135, 48, 25, 1415, 33, 6, 22, 12, 215, 28, 77, 52, 5, 14, 407, 16, 82, 2, 8, 4, 107, 117, 5952, 15, 256, 4, 2, 7, 3766, 5, 723, 36, 71, 43, 530, 476, 26, 400, 317, 46, 7, 4, 2, 1029, 13, 104, 88, 4, 381, 15, 297, 98, 32, 2071, 56, 26, 141, 6, 194, 7486, 18, 4, 226, 22, 21, 134, 476, 26, 480, 5, 144, 30, 5535, 18, 51, 36, 28, 224, 92, 25, 104, 4, 226, 65, 16, 38, 1334, 88, 12, 16, 283, 5, 16, 4472, 113, 103, 32, 15, 16, 5345, 19, 178, 32]#电影评论长度print(len(train_data[0]),len(train_data[1]))
将数据转换成单词
首先获取全部单词,这一步的意义是让你了解每个单词对应一个数字,上面也说到了,最后的形式如这样
65117: 'sakal', 44868: 'marveling'...
,至于为什么会出现
v+3
就请接着往下看。
word_index = imdb.get_word_index()
word_index ={k:(v+3)for k,v in word_index.items()}
我尝试打印出
train_data[0]
内的具体内容,而不是一串数字,用了如下代码。
注意:我将
(v+3)
换成
v
。
让数据从
'gussied': 65114, "bullock's": 32069...
–>
65117: 'sakal', 44868: 'marveling'...
的形式,代码如下:
word_index = imdb.get_word_index()#'gussied': 65114, "bullock's": 32069...
word_index ={k:(v)for k,v in word_index.items()}#此处为了更好的使用数据,将他转换成 65117: 'sakal', 44868: 'marveling',的形式
reverse_word_index =dict([(value, key)for(key, value)in word_index.items()])#print(reverse_word_index)defdecode_review(text):return' '.join([reverse_word_index.get(i,'?')for i in text])print(decode_review(train_data[0]))
可是当你打印完你会发现下面这串代码是啥,狗屁不通????为什么??接着往下看,你会对文本信息处理网络快速入门
the as you with out themselves powerful lets loves their becomes reaching had journalist of lot from anyone to have after out atmosphere never more room and it so heart shows to years of every never going andhelp moments or of every chest visual movie except her was several of enough more withis now current film as you of mine potentially unfortunately of you than him that with out themselves her get for was camp of you movie sometimes movie that with scary but and to story wonderful that in seeing in character to of 70s musicians with heart had shadows they of here that with her serious to have does when from why what have critics they is you that isn't one will very to as itself with other and in of seen over landed for anyone of and br show's to whether from than out themselves history he name half some br of and odd was two most of mean for1any an boat she he should is thought frog but of script you notwhile history he heart to real at barrel but when from one bit then have two of script their with her nobody most that with wasn't to with armed acting watch an forwith heartfelt film want an
我从官网上可以看到需要一串这样的代码,话不多说,直接解释这一段意思。
word_index["<PAD>"]=0
word_index["<START>"]=1
word_index["<UNK>"]=2# unknown
word_index["<UNUSED>"]=3
<PAD>
:在处理数据时此批次都应具有相同长度,可以理解为将数据扩充为同样长度的文本,举个例子:
My name is LoveAndProgram
->
My name is LoveAndProgram _pad_ _pad_ _pad_ _pad_
,强行将序列扩充到设定的最大长度8。
<START>
:加于文本开头
<UNK>
:用于替换不适合已知词汇的单词,什么意思呢?
My name is LoveAndProgram
会被翻译为
My name is _unk_
<UNUSED>
:我理解为无用信息(没有找到类似的信息介绍)
这下知道为啥
(v+3)
了吧,就是在这用的
经过上述处理后代码如下:
word_index = imdb.get_word_index()
word_index ={k:(v+3)for k,v in word_index.items()}
word_index["<PAD>"]=0#开始
word_index["<START>"]=1
word_index["<UNK>"]=2# unknown
word_index["<UNUSED>"]=3
reverse_word_index =dict([(value, key)for(key, value)in word_index.items()])defdecode_review(text):return' '.join([reverse_word_index.get(i,'?')for i in text])print(decode_review(train_data[0]))
最终出现如下数据,完成数据转换。
<START> this film was just brilliant casting location scenery story direction everyone's really suited the part they played and you could just imagine being there robert <UNK> is an amazing actor and now the same being director <UNK> father came from the same scottish island as myself so i loved the fact there was a real connection with this film the witty remarks throughout the film were great it was just brilliant so much that i bought the film as soon as it was released for <UNK> and would recommend it to everyone to watch and the fly fishing was amazing really cried at the end it was so sad and you know what they say if you cry at a film it must have been good and this definitely was also <UNK> to the two little boy's that played the <UNK> of norman and paul they were just brilliant children are often left out of the <UNK>list i think because the stars that play them all grown up are such a big profile for the whole film but these children are amazing and should be praised for what they have done don't you think the whole story was so lovely because it was true and was someone's life after all that was shared with us all
进入神经网络前的数据操作
整数数组必须在输入神经网络之前转换为张量,在这部分中我们选择填充数组来保证输入数据具有相同的长度,然后创建一个大小为 max_length * num_reviews 的整型张量,我们可以使用能够处理此形状数据的嵌入层作为网络中的第一层。
序列预处理
pad_sequences()
函数对序列进行填充,来使文本长度标准化。返回的是个2维张量,长度为maxlen的张量,里面
value
参数是不是很熟悉,上面介绍过,对应着0,用来填充不足的信息。(0不代表任何特定词,而用来编码任何未知的单词)
max_sequence_len =256#print(decode_review(train_data[0]))
train_data = keras.preprocessing.sequence.pad_sequences(train_data,
                                                        value=word_index["<PAD>"],
                                                        padding='post',
                                                        maxlen=max_sequence_len)print(train_data,train_data.shape)
test_data = keras.preprocessing.sequence.pad_sequences(test_data,
                                                       value=word_index["<PAD>"],
                                                       padding='post',
                                                       maxlen=max_sequence_len)#Training entries: 25000, labels: 25000#[[   1   14   22 ...    0    0    0]# [   1  194 1153 ...    0    0    0]# [   1   14   47 ...    0    0    0]# ...# [   1   11    6 ...    0    0    0]# [   1 1446 7079 ...    0    0    0]# [   1   17    6 ...    0    0    0]] (25000, 256)
我们来看看最后的数据,用如下代码(
len(train_data)
是25000个,上面已经说了):
for i inrange(len(train_data)):print(len(train_data[i]))#256#.#.#.#256#256
构建模型
搭建序列模型用到了
Sequential()
函数,此处
vocab_size
最好与上面词汇数目一致,10000是文本中不同词汇的词汇量,用16维的向量来表示文本,改成64维也可以,运算量会加大。
- 第一层是嵌入层,只需在开头添加即可,该层为了转换成一个你想要的维度。
- 第二层是平均池化层,这里主要就是求一个平均值,允许模型以尽可能最简单的方式处理变长输入。
- 第三、四层是全连接层,可以更改里面数值,可以使模型学到更复杂的表示,但这也带来计算量大大增加,请酌情修改,这一块可以和老师详细讲解,可以自行添加层数,出现代码无法运行则与
batch_size有关,下文红字已经标识。
vocab_size =10000

model = keras.Sequential()
model.add(keras.layers.Embedding(vocab_size,16))
model.add(keras.layers.GlobalAveragePooling1D())
model.add(keras.layers.Dense(16, activation='relu'))
model.add(keras.layers.Dense(1, activation='sigmoid'))

model.summary()
构建损失函数、优化函数并训练模型
optimizer
指优化器,可以说自己选择多个优化器进行比较,最终选择Adam优化器,并放上对比数据。这里我举个例子:下面使用了
Adadelta
优化器进行比较,可以明显看出准确率变化,完全不如
Adam
优化器。
(主要是让老师看看你的工作量,最后列几个优化器:Rmsprop、Adadelta、Adadelta、SGD,我是按准确率排序的哦)
loss
指损失函数,还可以更换为
mean_squared_error
,不过一般来说
binary_crossentropy
更适合处理概率,可以看看这补充一下知识。
model.compile(optimizer='adam',
              loss='binary_crossentropy',
              metrics=['accuracy'])
x_val = train_data[:10000]
partial_x_train = train_data[10000:]
y_val = train_labels[:10000]
partial_y_train = train_labels[10000:]#以下四行出现如下报错添加,不同版本tensorflow的问题,我用的版本需要我手动更改类型#ValueError: Failed to convert a NumPy array to a Tensor (Unsupported object type int).#partial_x_train = partial_x_train.astype(np.int64)#partial_y_train = partial_y_train.astype(np.int64)#x_val = x_val.astype(np.int64)#y_val = y_val.astype(np.int64)print(type(partial_x_train))
history = model.fit(partial_x_train,
                    partial_y_train,
                    epochs=40,
                    batch_size=512,
                    validation_data=(x_val, y_val),
                    verbose=1)

用
Adagrad
优化器运算,准确率是越高越好,
val_accuracy
指验证集准确率;
loss
损失函数是越小越好,可以更改
epochs
,在一定情况下越大越好
model.compile(optimizer='Adagrad',
              loss='binary_crossentropy',
              metrics=['accuracy'])
x_val = train_data[:10000]
partial_x_train = train_data[10000:]
y_val = train_labels[:10000]
partial_y_train = train_labels[10000:]#ValueError: Failed to convert a NumPy array to a Tensor (Unsupported object type int).#partial_x_train = partial_x_train.astype(np.int64)#partial_y_train = partial_y_train.astype(np.int64)#x_val = x_val.astype(np.int64)#y_val = y_val.astype(np.int64)#以下代码出现上述报错添加则需添加上面四行代码,这是不同版本tensorflow的问题,我用的版本需要我手动更改类型
history = model.fit(partial_x_train,
                    partial_y_train,
                    epochs=40,
                    batch_size=512,
                    validation_data=(x_val, y_val),
                    verbose=1)
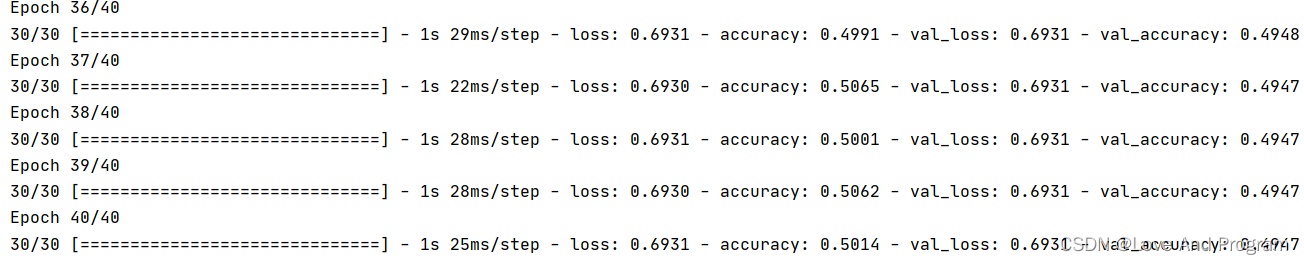
注意:若出现epoch卡死,无法训练数据时要把batch_size变小,改成64或是更小,这里和层数有直接关系,是因为本身电脑带不动引发的问题。
评估函数
直接调用即可,返回
loss
值和
metrics
中指定的值,之前指定accuracy,那么显示的便是准确率。
#ValueError: Failed to convert a NumPy array to a Tensor (Unsupported object type int).#test_data = test_data.astype(np.int64)#test_labels = test_labels.astype(np.int64)#以下2行出现上述报错则添加上面两行代码,这是不同版本tensorflow的问题,我用的版本需要我手动更改类型
results = model.evaluate(test_data,  test_labels, verbose=2)print(results)

👏👏预测函数查看详细数据
能看到这说明同学有很轻的毅力,你已经完成模型训练咯,下面我们来看看如何用模型训练结果吧!!
print(decode_review(test_data[0]))print(test_labels[0])print(decode_review(test_data[1]))print(test_labels[1])
predictions = model.predict(test_data)print(predictions)
通过翻译软件翻译第一句话,确实是消极的言论;第二句话翻译过来后夸奖的话,属于积极言论,自此教学完成。
<START> please give this one a miss br br <UNK><UNK>and the rest of the cast rendered terrible performances the show is flat flat flat br br i don't know how michael madison could have allowed this one on his plate he almost seemed to know this wasn't going to work out and his performance was quite <UNK> so all you madison fans give this a miss <PAD><PAD><PAD><PAD><PAD><PAD><PAD><PAD><PAD><PAD><PAD><PAD><PAD><PAD><PAD><PAD><PAD><PAD><PAD><PAD><PAD><PAD><PAD><PAD><PAD><PAD><PAD><PAD><PAD><PAD><PAD><PAD><PAD><PAD><PAD><PAD><PAD><PAD><PAD><PAD><PAD><PAD><PAD><PAD><PAD><PAD><PAD><PAD><PAD><PAD><PAD><PAD><PAD><PAD><PAD><PAD><PAD><PAD><PAD><PAD><PAD><PAD><PAD><PAD><PAD><PAD><PAD><PAD><PAD><PAD><PAD><PAD><PAD><PAD><PAD><PAD><PAD><PAD><PAD><PAD><PAD><PAD><PAD><PAD><PAD><PAD><PAD><PAD><PAD><PAD><PAD><PAD><PAD><PAD><PAD><PAD><PAD><PAD><PAD><PAD><PAD><PAD><PAD><PAD><PAD><PAD><PAD><PAD><PAD><PAD><PAD><PAD><PAD><PAD><PAD><PAD><PAD><PAD><PAD><PAD><PAD><PAD><PAD><PAD><PAD><PAD><PAD><PAD><PAD><PAD><PAD><PAD><PAD><PAD><PAD><PAD><PAD><PAD><PAD><PAD><PAD><PAD><PAD><PAD><PAD><PAD><PAD><PAD><PAD><PAD><PAD><PAD><PAD><PAD><PAD><PAD><PAD><PAD><PAD><PAD><PAD><PAD><PAD><PAD><PAD><PAD><PAD><PAD><PAD><PAD><PAD><PAD><PAD><PAD><PAD><PAD><PAD><PAD><PAD><PAD><PAD><PAD><PAD><PAD><PAD><PAD><PAD><PAD>0
a lot of patience because it focuses on mood and character development the plot is very simple and many of the scenes take place on the same setin frances <UNK> the sandy dennis character apartment but the film builds to a disturbing climax br br the characters create an atmosphere <UNK>with sexual tension and psychological <UNK> it's very interesting that robert altman directed this considering the style and structure of his other films still the trademark altman audio style is evident here and there i think what really makes this film work is the brilliant performance by sandy dennis it's definitely one of her darker characters but she plays it so perfectly and convincingly that it's scary michael burns does a good job as the mute young man regular altman player michael murphy has a small part the <UNK> moody set fits the content of the story very well in short this movie is a powerful study of loneliness sexual <UNK> and desperation be patient <UNK> up the atmosphere and pay attention to the wonderfully written script br br i praise robert altman this is one of his many films that deals with unconventional fascinating subject matter this film is disturbing but it's sincere and it's sure to <UNK> a strong emotional response from the viewer if you want to see an unusual film some might even say bizarre this is worth the time br br unfortunately it's very difficult to find in video stores you may have to buy it off the internet
1[[0.41339412]#第一句,小于0.5属于消极[0.9098137]#第二句,大于0.5属于积极[0.6236479]...[0.30431408][0.48930165][0.63445085]]
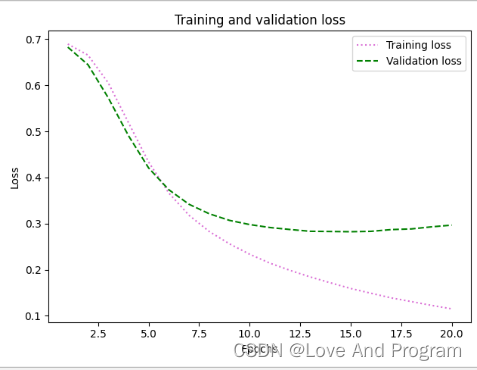
最后可以添加一个损失函数和准确率曲线进行数据可视化
这里直接沿用官网上的代码即可,无任何错误,但是可以做一些不同,以损失函数作为例子来详细说明
color
有
red,blue,yellow,tan,lime,g,cyan
等形式。
linestyle
有
'-', '--', '-.', ':', 'None', ' ', '', 'solid', 'dashed', 'dashdot', 'dotted'
这些形式。
import matplotlib.pyplot as plt
#保留训练历史记录
history_dict = history.history
history_dict.keys()
acc = history_dict['accuracy']
val_acc = history_dict['val_accuracy']
loss = history_dict['loss']
val_loss = history_dict['val_loss']

epochs =range(1,len(acc)+1)

plt.plot(epochs, loss, color ="orchid",linestyle='sad', label='Training loss')
plt.plot(epochs, val_loss, color ="blue",linestyle='--', label='Validation loss')
plt.title('Training and validation loss')
plt.xlabel('Epochs')
plt.ylabel('Loss')
plt.legend()

plt.show()
完整代码
import tensorflow as tf
from tensorflow import keras
import numpy as np
import os
os.environ["CUDA_VISIBLE_DEVICES"]="0"
imdb = keras.datasets.imdb
(train_data, train_labels),(test_data, test_labels)= imdb.load_data(num_words=10000)print("Training entries: {}, labels: {}".format(len(train_data),len(train_labels)))
word_index = imdb.get_word_index()
word_index ={k:(v+3)for k,v in word_index.items()}
word_index["<PAD>"]=0
word_index["<START>"]=1
word_index["<UNK>"]=2# unknown
word_index["<UNUSED>"]=3
reverse_word_index =dict([(value, key)for(key, value)in word_index.items()])defdecode_review(text):return' '.join([reverse_word_index.get(i,'?')for i in text])
max_sequence_len =256
train_data = keras.preprocessing.sequence.pad_sequences(train_data,
                                                        value=word_index["<PAD>"],
                                                        padding='post',
                                                        maxlen=max_sequence_len)
test_data = keras.preprocessing.sequence.pad_sequences(test_data,
                                                       value=word_index["<PAD>"],
                                                       padding='post',
                                                       maxlen=max_sequence_len)
vocab_size =10000
model = keras.Sequential()
model.add(keras.layers.Embedding(vocab_size,16))
model.add(keras.layers.GlobalAveragePooling1D())

model.add(keras.layers.Dense(16, activation='relu'))
model.add(keras.layers.Dense(1, activation='sigmoid'))# model = keras.Sequential()# model.add(keras.layers.Embedding(vocab_size, 160))# model.add(keras.layers.GlobalAveragePooling1D())# model.add(keras.layers.Dense(160, activation='relu'))# model.add(keras.layers.Dense(80, activation='relu'))# model.add(keras.layers.Dense(10, activation='relu'))# model.add(keras.layers.Dense(1, activation='sigmoid'))# model.summary()

model.summary()
model.compile(optimizer='Adam',
              loss='binary_crossentropy',
              metrics=['accuracy'])

x_val = train_data[:10000]
partial_x_train = train_data[10000:]

y_val = train_labels[:10000]
partial_y_train = train_labels[10000:]
partial_x_train = partial_x_train.astype(np.int64)
partial_y_train = partial_y_train.astype(np.int64)
x_val = x_val.astype(np.int64)
y_val = y_val.astype(np.int64)#print(type(partial_x_train))
history = model.fit(partial_x_train,
                    partial_y_train,
                    epochs=20,
                    batch_size=256,
                    validation_data=(x_val, y_val),
                    verbose=1)
test_data = test_data.astype(np.int64)
test_labels = test_labels.astype(np.int64)
results = model.evaluate(test_data,  test_labels, verbose=2)print(results)import matplotlib.pyplot as plt
history_dict = history.history
history_dict.keys()
acc = history_dict['accuracy']
val_acc = history_dict['val_accuracy']
loss = history_dict['loss']
val_loss = history_dict['val_loss']

epochs =range(1,len(acc)+1)

plt.plot(epochs, loss, color ="orchid",linestyle='dotted', label='Training loss')
plt.plot(epochs, val_loss, color ="g",linestyle='--', label='Validation loss')
plt.title('Training and validation loss')
plt.xlabel('Epochs')
plt.ylabel('Loss')
plt.legend()

plt.show()
plt.clf()

plt.plot(epochs, acc,'bo', label='Training acc')
plt.plot(epochs, val_acc,'g', label='Validation acc')
plt.title('Training and validation accuracy')
plt.xlabel('Epochs')
plt.ylabel('Accuracy')
plt.legend()

plt.show()#预测函数检验#print(decode_review(test_data[0]))#print(test_labels[0])#print(decode_review(test_data[1]))#print(test_labels[1])#predictions = model.predict(test_data)#print(predictions)
版权归原作者 Love And Program 所有, 如有侵权,请联系我们删除。