
文章目录
1 常用 API 介绍
1.1 rknn初始化及释放
初始化函数:
rknn = RKNN(verbose,verbose_file)
初始化RKNN对象时,可以设置verbose和verbose_file参数,以打印详细的日志信息。
参数解析verbose指定是否要在屏幕上打印详细日志信息verbose_file如果verbose参数为True,日志信息将写到该参数指定的文件中,一般将verbose设置为True,verbose_file不设置,将日志显示到终端上。
1.2 rknn模型配置
转化模型之前需要先配置RKNN-Toolkit。使用到的API是config,使用示例如下:
ret = rknn.config(
        reorder_channel='2 1 0',
        mean_values=[123.675, 116.28, 103.53],
         std_values=[58.395, 57.12, 57.375],
        optimization_level=3,
        target_platform='rk1808,
        quantize_input_node=False
        output_optimize=1,
        force_builtin_perm=False,
)
参数解析reorder_channel对输入图像RGB通道的调整,’ 0 1 2 ’ 表示不做调整,此处若设 ‘2 1 0’,那么在前处理时就不用调整通道,否则就重复调整了mean_values输入的均值,参数是一个列表。表示输入图像的三个通道值分别减去[123.675, 116.28, 103.53]std_values输入的归一化值,参数是一个列表。表示输入图像的三个通道值分别减去[123.675, 116.28, 103.53]再分别除以[58.395, 57.12, 57.375]optimization_level设置代码的优化等级,0:不优化;1:Fast;2:Faster; 3:Fastesttarget_platform运行平台,这里用到的是rk1808quantize_input_nodeoutput_optimizeforce_builtin_perm***
1.3 PT模型加载
将Pytorch进行处理,API是load_pytorch,示例:
ret = rknn.load_pytorch(model=pt_model, inputs=['Preprocessor/sub'], outputs=['concat_1', 'concat_2'], input_size_list=[[3,416, 416]])
参数解析pt_model是yolox算法(Pytorch开发)模型的路径inputs模型的输入节点(操作数名),按照官方例子写[‘Preprocessor/sub’]outputs模型的输出节点(操作数名),按照官方例子写[‘concat’, ‘concat_1’]input_size_list每个输入节点对应的图片的尺寸和通道数
1.4 rknn模型转化
将Pytorch模型转化为rknn模型,需要使用的API是build,示例:
ret = rknn.build(do_quantization, dataset, pre_compile)
这个就是将Pytorch模型转化成rknn。
参数解析do_quantization是否对模型进行量化,值为True 或Falsedataset量化校正数据的数据集。可以理解为用来进行测试的图像路径名的集合。每一个图像路径放一行。我这里就用一个图像进行测试。所以dataset.txt内如为 road.bmppre_compile预编译开关,如果设置成 True,可以减小模型大小,及模型在硬件设备上的首次启动速度。但是打开这个开关后,构建出来的模型就只能在硬件平台上运行,无法通过模拟器进行推理或性能评估。如果硬件有更新,则对应的模型要重新构建
1.5 模型导出
模型的导出需要使用export_rknn函数,参数为导出模型所在的路径,后缀名为‘.rknn’。
ret = rknn.export_rknn('./rknn_model.rknn')
1.6 rknn运行环境初始化
ret = rknn.init_runtime(target='rk1808', device_id=DEVICE_ID, perf_debug=True,eval_mem=True)
参数解析target目标平台,这里是rk1808device_id设备的ID号perf_debug评估模型使用时间,默认为Falseeval_mem评估模型使用的内存,这两个配置为True后,才可以使用模型评估相关的API
1.7rknn模型推理
outputs = rknn.inference(inputs=[img],data_type,data_format,inputs_pass_through)
参数解析img:cv2读取、处理好的图像inputs待推理的输入,如经过 cv2 处理的图片。格式是 ndarray listdata_type输入数据的类型,可填以下值: ’float32’, ‘float16’, ‘int8’, ‘uint8’, ‘int16’。默认值为’uint8’data_format数据模式,可以填以下值: “nchw”, “nhwc”。默认值为’nhwc’。这两个的不同之处在于 channel 放置的位置inputs_pass_through将输入透传给 NPU 驱动。非透传模式下,在将输入传给 NPU 驱动之前,工具会对输入进行减均值、除方差等操作;而透传模式下,不会做这些操作。这个参数的值是一个数组,比如要透传 input0,不透彻 input1,则这个参数的值为[1,0]。默认值为 None,即对所有输入都不透传
1.8 rknn性能评估
ret = rknn.eval_perf(inputs=[img], is_print=True)
memory_detail = rknn.eval_memory()
2 pth2pt
Pytorch训练的模型转换成RKNN,只能通过 .pt 转成 .rknn ,且需通过torch.jit.trace()函数保存的 .pt 。
目前只支持 torch.jit.trace 导出的模型。torch.save 接口仅保存权重参数字典,缺乏网络结构信息,故无法被正常导入并转成 RKNN 模型。
import torch
import torchvision
from nets.yolo2rknn import YoloBody

model_path  = 'model_data/7150_nano.pth'   # 训练后保存的模型文件
num_classes = 3                                            # 检测类别数
phi         = 'nano'                                            # 模型类型

model = YoloBody(num_classes, phi)             #导入模型
#device = torch.device('cuda' if torch.cuda.is_available() else 'cpu')
#model.load_state_dict(torch.load(model_path, map_location=device)) #初始化权重
model.load_state_dict(torch.load(model_path))
model.eval()

example = torch.rand(1, 3, 416, 416)
traced_script_module = torch.jit.trace(model, example)
traced_script_module.save("model_data/MySelf_Nano.pt")
3 pt2rknn
3.1 界面转换
在终端中输入:python3 -m rknn.bin.visualization ,然后出现如下界面:
根据自己原始模型格式选择,这里的原始模型是onnx模型,所以选择onnx,进去后各个选项的意思自己翻译过来对照一下不难懂(rknn toolkit 1.7.1版本界面好像是中文),需要注意的是预编译选项(Whether To Enable Pre-Compile),预编译 RKNN 模型可以减少模型初始化时间,但是无法通过模拟器进行推理或性能评估。
3.2 代码转换
模型转换时API调用流程如下: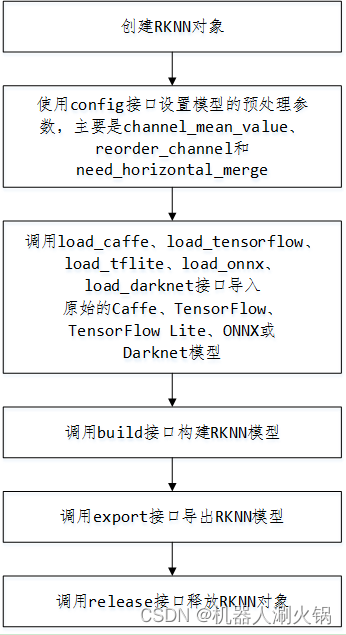
在Ubuntu的虚拟环境RKNN中进行转换,其中特别需要注意的是rknn.config()中参数的设置,转换代码如下:
import os
import numpy as np
from rknn.api import RKNN

pt_model        = '/home/liu/RKNN/model/myself_nano.pt'
rknn_model      = '/home/liu/RKNN/model/myself_nano.rknn'
DATASET         = '/home/liu/RKNN/model/JPEGImages.txt'
QUANTIZE_ON     = False        # 是否对模型进行量化

if __name__ == '__main__':
    # Create RKNN object
    rknn = RKNN(verbose=False)

    if not os.path.exists(pt_model):
        print('model not exist')
        exit(-1)
    _force_builtin_perm = False
    # pre-process config
    print('--> Config model')
    rknn.config(
                reorder_channel='2 1 0',
                mean_values=[[123.675, 116.28, 103.53]],
                std_values=[[58.395, 57.12, 57.375]],
                optimization_level=3,
                target_platform = 'rk1808',
                # target_platform='rv1109',
                quantize_input_node= QUANTIZE_ON,
                batch_size = 200,
                output_optimize=1,
                force_builtin_perm=_force_builtin_perm
               )

    print('done')

    # Load PT model
    print('--> Loading model')
    ret = rknn.load_pytorch(model=pt_model, input_size_list=[[3,416, 416]])
    if ret != 0:
        print('Load model failed!')
        exit(ret)
    print('done')

    # Build model
    print('--> Building model')
    ret = rknn.build(do_quantization=QUANTIZE_ON, dataset=DATASET, pre_compile=False)
    if ret != 0:
        print('Build model failed!')
        exit(ret)
    print('done')

    # Export RKNN model
    print('--> Export RKNN model')
    ret = rknn.export_rknn(rknn_model)
    if ret != 0:
        print('Export rknn failed!')
        exit(ret)
    print('done')

    exit(0)

    #rknn.release()
转换后得到MySelf_Nano.rknn模型。
4 测试
4.1 模型推理
模型推理时API调用流程如下:
RKNN-Toolkit 通过 PC 的 USB 连接到开发板硬件,将构建或导入的 RKNN 模型传到 RK1808 上运行,并从 RK1808 上获取推理结果、性能信息。使用 RKNN 模型时请先将设备的 NPU 驱动更新至最新的 release 版本。
请执行以下步骤:
1、确保开发板的 USB OTG 连接到 PC,并且 ADB 能够正确识别到设备,即在 PC 上执行adb devices -l命令能看到目标设备。
2、调用init_runtime 接口初始化运行环境时需要指定 target 参数和 device_id 参数。其中 target 参数表明硬件类型, 选值为 rk1808, 当 PC 连接多个设备时,还需要指定 device_id 参数,即设备编号,可以通过adb devics命令查看,举例如下:
$ adb devices
List of devices attached
0123456789ABCDEF        device
即可以改为:
ret = rknn.init_runtime(target='rk1808', device_id='0123456789ABCDEF')
3、运行测试代码
该测试代码包括前处理、后处理,前处理与后处理都与训练时的处理尽量保持一致,需要注意的是,torch中有些函数与numpy的函数略有不同,若检测的Bbox存在不准确的情况,可能是其中一些函数造成的。
例如:
- torch.stack((grid_x, grid_y), 2) 改成 np.transpose(np.stack((grid_x, grid_y), 2), (1, 0, 2))
- prediction.new(prediction.shape) 改成 np.copy(prediction)
- class_conf, class_pred = torch.max(image_pred[:, 5:5 + num_classes], 1, keepdim=True) 改成 class_conf = np.max(image_pred[:, 5:5 + num_classes], axis=1, keepdims=True) class_pred = np.expand_dims(np.argmax(image_pred[:, 5:5 + num_classes], axis=1), axis=1)
- boxes.batched_nms() 改成 nms_boxes()
import os
from re import T
import numpy as np
import cv2
import time
from rknn.api import RKNN
mode            = 'image'     # 模式:image、video,分别为用图片测试和用摄像头测试
#pt_model        = '/home/liu/RKNN/model/myself_nano.pt'
rknn_model      = '/home/liu/RKNN/model/myself_nano.rknn'
img_path        = '/home/liu/RKNN/model/JPEGImages/04245.jpg'
#DATASET         = '/home/liu/RKNN/model/JPEGImages.txt'
#QUANTIZE_ON     = False        # 是否对模型进行量化
box_thresh      = 0.7           # 置信度 阈值
nms_thresh      = 0.3           # nms 阈值
input_shape     = [416, 416]
letterbox_image = True          # resize是否保持原长宽比例

num_classes     = 3
class_names     = ("iris", "pipul", "shut-eye")
#===================================================================
def sigmoid(x):
    return 1 / (1 + np.exp(-x))
def nms_boxes(boxes, scores):
    x = boxes[:, 0]
    y = boxes[:, 1]
    w = boxes[:, 2] - boxes[:, 0]
    h = boxes[:, 3] - boxes[:, 1]
    areas = w * h
    order = scores.argsort()[::-1]

    keep = []
    while order.size > 0:
        i = order[0]
        keep.append(i)
        xx1 = np.maximum(x[i], x[order[1:]])
        yy1 = np.maximum(y[i], y[order[1:]])
        xx2 = np.minimum(x[i] + w[i], x[order[1:]] + w[order[1:]])
        yy2 = np.minimum(y[i] + h[i], y[order[1:]] + h[order[1:]])
        w1 = np.maximum(0.0, xx2 - xx1 + 0.00001)
        h1 = np.maximum(0.0, yy2 - yy1 + 0.00001)
        inter = w1 * h1
        ovr = inter / (areas[i] + areas[order[1:]] - inter)
        inds = np.where(ovr <= nms_thresh)[0]
        order = order[inds + 1]
    keep = np.array(keep)
    return keep
def yolo_correct_boxes(box_xy, box_wh, input_shape, image_shape, letterbox_image):
    box_yx = box_xy[..., ::-1]
    box_hw = box_wh[..., ::-1]
    input_shape = np.array(input_shape)
    image_shape = np.array(image_shape)
    if letterbox_image:
        new_shape = np.round(image_shape * np.min(input_shape/image_shape))
        offset  = (input_shape - new_shape)/2./input_shape
        scale   = input_shape/new_shape
        box_yx  = (box_yx - offset) * scale
        box_hw *= scale
    box_mins    = box_yx - (box_hw / 2.)
    box_maxes   = box_yx + (box_hw / 2.)
    boxes  = np.concatenate([box_mins[..., 0:1], box_mins[..., 1:2], box_maxes[..., 0:1], box_maxes[..., 1:2]], axis=-1)
    boxes *= np.concatenate([image_shape, image_shape], axis=-1)
    return boxes
def decode_outputs(outputs, input_shape):
    # [1, 8, 52, 52]
    # [1, 8, 26, 26]
    # [1, 8, 13, 13]
    grids   = []
    strides  = []
    hw      = [x.shape[-2:] for x in outputs]  # [[52,52] ,[26,26], [13,13]]
    outputs = np.concatenate([x.reshape(1, 8,-1) for x in outputs],axis=2)
    outputs = np.transpose(outputs,(0,2,1))
    outputs[:, :, 4:] = sigmoid(outputs[:, :, 4:])
    for h, w in hw:
        # [[52,52] ,[26,26], [13,13]]
        grid_y, grid_x  = np.meshgrid([np.arange(0, h, 1.)], [np.arange(0, w, 1.)])
        grid            = np.transpose(np.stack((grid_x, grid_y), 2), (1, 0, 2)).reshape(1, -1, 2)
        shape           = grid.shape[:2]
        grids.append(grid)
        strides.append(np.full((shape[0], shape[1], 1), input_shape[0] / h))
    grids               = np.concatenate(grids, axis=1)
    strides             = np.concatenate(strides, axis=1)
    outputs[..., :2]    = (outputs[..., :2] + grids) * strides
    outputs[..., 2:4]   = np.exp(outputs[..., 2:4]) * strides
    outputs[..., [0,2]] = outputs[..., [0,2]] / input_shape[1]
    outputs[..., [1,3]] = outputs[..., [1,3]] / input_shape[0]
    return outputs
def non_max_suppression(prediction, num_classes, input_shape, image_shape, letterbox_image, conf_thres=0.5, nms_thres=0.4):
    #box_corner          = prediction.copy()
    box_corner          = np.copy(prediction)   # [xc,yc,w,h]
    box_corner[:, :, 0] = prediction[:, :, 0] - prediction[:, :, 2] / 2
    box_corner[:, :, 1] = prediction[:, :, 1] - prediction[:, :, 3] / 2
    box_corner[:, :, 2] = prediction[:, :, 0] + prediction[:, :, 2] / 2
    box_corner[:, :, 3] = prediction[:, :, 1] + prediction[:, :, 3] / 2
    prediction[:, :, :4] = box_corner[:, :, :4]   # [left,top,right,botton]
    output = [None for _ in range(len(prediction))]
    for i, image_pred in enumerate(prediction):
        class_conf = np.max(image_pred[:, 5:5 + num_classes], axis=1, keepdims=True)
        class_pred = np.expand_dims(np.argmax(image_pred[:, 5:5 + num_classes], axis=1), axis=1)
        conf_mask = (image_pred[:, 4] * class_conf[:, 0] >= conf_thres).squeeze()
        if not image_pred.shape[0]:
            continue
        detections = np.concatenate((image_pred[:, :5], class_conf, class_pred), axis=1)
        detections = detections[conf_mask]

        nms_out_index = nms_boxes(detections[:, :4], detections[:, 4] * detections[:, 5])

        if not nms_out_index.shape[0]:
            continue

        output[i]   = detections[nms_out_index]

        if output[i] is not None:   # [left,top,right,botton]
            box_xy, box_wh      = (output[i][:, 0:2] + output[i][:, 2:4])/2, output[i][:, 2:4] - output[i][:, 0:2]
            output[i][:, :4]    = yolo_correct_boxes(box_xy, box_wh, input_shape, image_shape, letterbox_image)
    return output

def detect(inputs, image_shape):
    # input: [1, 3 * h*w, 8]
    outputs = decode_outputs(inputs, input_shape)
    results = non_max_suppression(outputs, num_classes, input_shape,
                image_shape, letterbox_image, conf_thres = box_thresh, nms_thres = nms_thresh)

    if results[0] is None:
        return None, None, None
    label   = np.array(results[0][:, 6], dtype = 'int32')
    conf    = results[0][:, 4] * results[0][:, 5]
    boxes   = np.array(results[0][:, :4], dtype = 'int32')
    return label, conf, boxes

def draw(image, image_shape, label, conf, boxes):
    for i, c in list(enumerate(label)):
        predicted_class = class_names[int(c)]
        box             = boxes[i]
        score           = conf[i]
        top, left, bottom, right = box
        top     = max(0, np.floor(top).astype('int32'))
        left    = max(0, np.floor(left).astype('int32'))
        bottom  = min(image_shape[1], np.floor(bottom).astype('int32'))
        right   = min(image_shape[0], np.floor(right).astype('int32'))
        label = '{} {:.2f}'.format(predicted_class, score)
        for box, score, cl in zip(boxes, scores, classes):
            top, left, bottom, right = box
            top = int(top)
            left = int(left)
            right = int(right)
            bottom = int(bottom)

            center_coordinates = ((right+left)//2, (bottom+top)//2) # 椭圆中心
            axesLength = ((right-left)//2, (bottom-top)//2)                   #(长轴长度,短轴长度)
            cv2.ellipse(image,center_coordinates, axesLength, 0, 0, 360, (0,0,255), 2)
            #cv2.rectangle(image, (left, top), (right, bottom), (255, 0, 0), 2)
            cv2.putText(image, '{0} {1:.2f}'.format(class_names[cl], score),
                        (left, top - 6),
                        cv2.FONT_HERSHEY_SIMPLEX,
                        0.6, (255, 0, 0), 2)

def resize_image(image, letterbox_image, size = input_shape):
    ih, iw  = image.shape[0:2]    # 实际尺寸
    w, h    = size                # [416, 416]
    if letterbox_image:
        scale   = min(w/iw, h/ih)
        nw      = int(iw * scale)   # resize后的尺寸
        nh      = int(ih * scale)

        image   = cv2.resize(image,(nw,nh), interpolation=cv2.INTER_LINEAR)
        top, bottom = (h-nh)//2 , (h-nh)//2
        left, right = (w-nw)//2 , (w-nw)//2
        new_image = cv2.copyMakeBorder(image, top, bottom, left, right, cv2.BORDER_CONSTANT, value=(128,128,128))
    else:
        new_image = cv2.resize(image,(w,h), interpolation=cv2.INTER_LINEAR)
    return new_image

if __name__ == '__main__':
    # Create RKNN object
    rknn = RKNN(verbose=False)
    _force_builtin_perm = False
    ret = rknn.load_rknn(path=rknn_model)
    if ret!=0:
        print('Load RKNN model failed !')
        exit(ret)
    # init runtime environment
    print('--> Init runtime environment')
    ret = rknn.init_runtime()
    # ret = rknn.init_runtime('rv1109', device_id='1109')
    # ret = rknn.init_runtime('rk1808', device_id='1808')
    if ret != 0:
        print('Init runtime environmentfailed')
        exit(ret)
    print('done')

    if mode == 'video':
        # input video
        capture = cv2.VideoCapture(0 + cv2.CAP_DSHOW)
        fps = 0.0
        while(True):
            t1 = time.time()
            # 读取某一帧
            ref,frame=capture.read()
            image_shape = np.array(np.shape(frame)[0:2])
            # 格式转变,BGRtoRGB
            #frame = cv2.cvtColor(frame,cv2.COLOR_BGR2RGB)

            # Inference
            print('--> Running model')
            outputs = rknn.inference(inputs=[frame], inputs_pass_through=[0 if not _force_builtin_perm else 1])
            classes, scores, boxes = detect(outputs, image_shape)

            #frame = cv2.cvtColor(frame, cv2.COLOR_RGB2BGR)
            if boxes is not None:
                draw(frame, image_shape, classes, scores, boxes)

            fps  = ( fps + (1./(time.time()-t1)) ) / 2
            print("fps= %.2f"%(fps))
            frame = cv2.putText(frame, "fps= %.2f"%(fps), (0, 40), cv2.FONT_HERSHEY_SIMPLEX, 1, (0, 255, 0), 2)

            cv2.imshow("video",frame)
            c= cv2.waitKey(1) & 0xff
            if c==27:
                capture.release()
                break
        capture.release()
        cv2.destroyAllWindows()

    elif mode == 'image':

        # input images
        img         = cv2.imread(img_path)
        image_shape = np.array(np.shape(img)[0:2])
        img_1 = img
        #img         = cv2.cvtColor(img, cv2.COLOR_BGR2RGB)
        img_data    = resize_image(img, letterbox_image, input_shape)

        # Inference
        print('--> Running model')
        outputs = rknn.inference(inputs=[img_data], inputs_pass_through=[0 if not _force_builtin_perm else 1])
        # type : ndarray
        # print('outputs[0]:', outputs[0])
        # [1, 8, 52, 52]
        # [1, 8, 26, 26]
        # [1, 8, 13, 13]

        classes, scores, boxes = detect(outputs, image_shape)
        print('classes:', classes)
        print('scores:' , scores)
        print('boxes:'  , boxes)

        #img_1 = cv2.cvtColor(img,cv2.COLOR_RGB2BGR)
        if boxes is not None:
            draw(img_1, image_shape, classes, scores, boxes)
        cv2.imshow("post process result", img_1)
        cv2.waitKeyEx(0)

    exit(0)
    #rknn.release()
4.2 量化后检测不出目标或精度大幅下降
4.2.1 模型训练注意事项
1、卷积核设置
推荐在设计的时候尽量使用 3x3 的卷积核,这样可以实现最高的乘加运算单元(MAC)利用率,使得 NPU 的性能最佳。
NPU 也可以支持大尺寸的卷积核。支持的最小卷积核为[1],最大值为[11 * stride - 1]。同时 NPU 也支持非对称卷积核,不过会增加一些额外的计算开销。
2、结构融合设计
NPU 会对卷积后面的 ReLU 和 MAX Pooling 进行融合的优化操作,能在运行中减少计算和带宽开销。所以在搭建网络时,能针对这一特性,进行设计。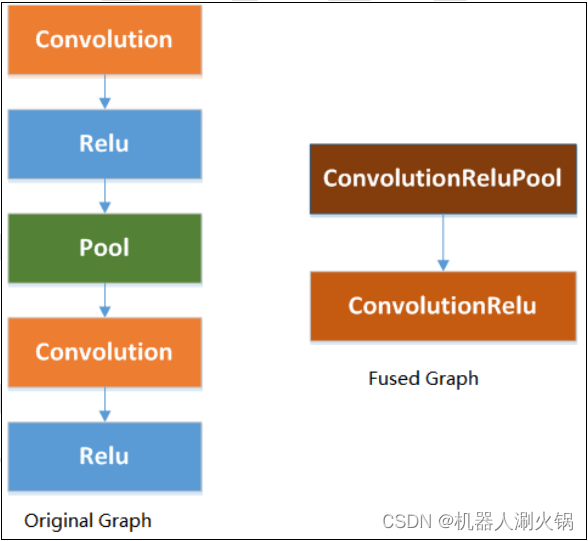
模型量化后,卷积算子与下一层的 ReLU 算子可以被合并。另外为了确保 Max Pooling算子也能被合并加速,请在设计网络时参考以下几点:
- pool size 必须是 2x2 或者 3x3,而步长 stride=2;
- 2x2 池化的输入图片尺寸必须是偶数,而且不能有填充;
- 3x3 池化的输入图片尺寸必须是非 1 的奇数,而且不能有填充;
- 如果是 3x3 的池化,则水平输入大小必须小于 64(8-bit 模型)或 32(16-bit 模型)。
3、2D卷积和Depthwise卷积
NPU 支持常规 2D 卷积和 Depthwise 卷积加速。由于 Depthiwise 卷积特定的结构,使得它对于量化(int8)模型不太友好,而 2D 卷积的优化效果更好。所以设计网络时建议尽量使用2D 卷积。如果必须使用 Depthwise 卷积,建议按照下面的规则进行修改,能提高量化后模型的精度: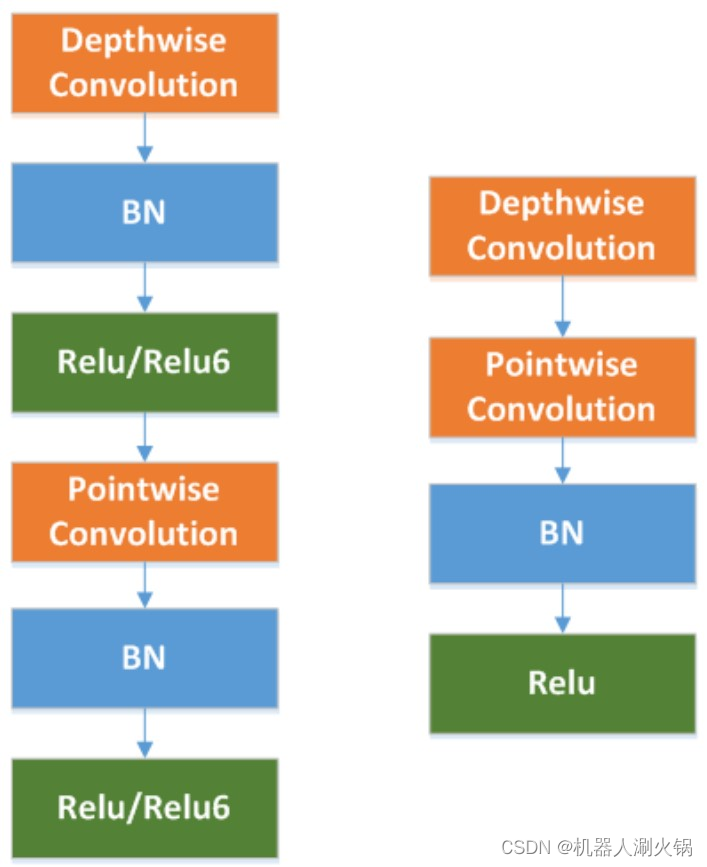
- 如果网络中的激活函数使用的是 Silu,建议将其都改为 ReLU;
- 在 Depthwise 卷积层的 BN 层和激活层,建议去除;
- 在训练时,针对 Depthwise 卷积层,对它的权重进行 L2 正则化。
4.2.2 RKNN量化过程使用的Dataset
RKNN Toolkit 量化过程中,需要根据数据的最大值、最小值,找到合适的量化参数。
此时需要使用 dataset 里的输入进行推理,获取每一层的输入、输出数据,再根据这些数据计算每一层输入、输出的量化参数。
基于这个原因,校准数据集里的数据最好是从训练集或验证集中取一个有代表性的子集,建议数量在 100~500 张之间。
4.2.3 RKNN量化过程的参数设置
1、使用 RKNN Toolkit 导入量化后的模型时使 rknn.build(do_quantization=False);
2、设置 mean_values/std_values 参数,确保其和训练模型时使用的参数相同;
3、务必确保测试时输入图像通道顺序为 R,G,B(不论训练时使用的图像通道顺序如何,使用 RKNN 做测试时都按 R,G,B 输入);
4、在rknn.config 函数里面设置 reorder_channel 参数,’0 1 2’代表 RGB, ’2 1 0’代表 BGR,务必和训练时候图像通道顺序一致;
5、使用多张图进行量化校准,确保量化精度稳定;
6、在 rknn.config 中设置 batch_size 参数 (建议设置 batch_size = 200) 并且在 dataset.txt 中给出大于 200 张图像路径用于量化;如果内存不够,可以设置 batch_size =10, epochs=20 代替 batch_size = 200 进行量化。
版权归原作者 机器人涮火锅 所有, 如有侵权,请联系我们删除。