
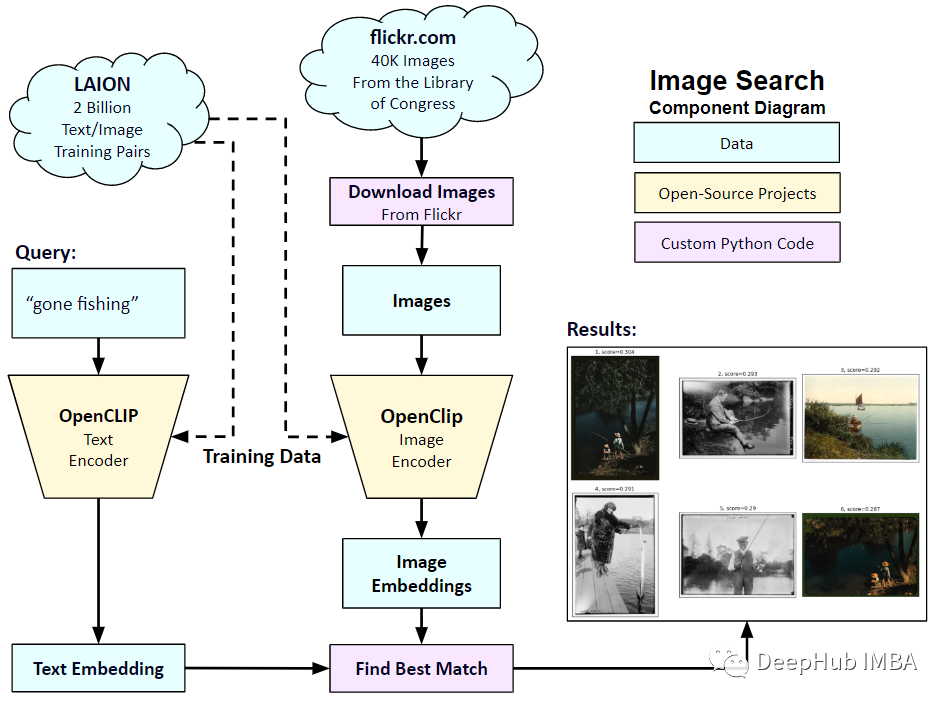
在2021年1月,OpenAI宣布了两个新模型:DALL-E和CLIP,它们都是以某种方式连接文本和图像的多模态模型。CLIP全称是Contrastive Language–Image Pre-training,一种基于对比文本-图像对的预训练方法。为什么要介绍CLIP呢?因为现在大火得Stable Diffusion 并不是单一模型,而是多个模型组成。其中会用到一个 Text encoder 将用户的文本输入进行编码,这个 text encoder 就是 CLIP 模型中 text encoder
CLIP模型在训练时,可以给它一个输入句子,并提取最相关的图像来配合它。CLIP学习了一个完整的句子和它所描述的图像之间的关系。也就是说它是在完整的句子上训练的,而不是像“汽车”、“狗”等离散的分类,这一点对于应用至关重要。当训练完整的短语时,模型可以学习更多的东西,并识别照片和文本之间的模式。他们还证明,当在相当大的照片和与之相对应的句子数据集上进行训练时,该模型是可以作为分类器的。CLIP在发布的时候能在无任何微调的情况下(zero-shot ),在 ImageNet 数据集上的分类表现超 ResNets-50 微调后的效果,也就是说他是非常有用的。
所以在本文中,我们将使用PyTorch中从头开始实现CLIP模型,以便我们对CLIP有一个更好的理解
这里就需要用到2个库:timm和transformers,我们先导入代码
 import os
 import cv2
 import gc
 import numpy as np
 import pandas as pd
 import itertools
 from tqdm.autonotebook import tqdm
 import albumentations as A
 import matplotlib.pyplot as plt

 import torch
 from torch import nn
 import torch.nn.functional as F
 import timm
 from transformers import DistilBertModel, DistilBertConfig, DistilBertTokenizer
下一步就是预处理数据和通用配置config。config是一个普通的python文件,我们将所有的超参数放在里面,如果使用Jupyter Notebook的情况下,它是一个在Notebook开头定义的类。
 class CFG:
     debug = False
     image_path = "../input/flickr-image-dataset/flickr30k_images/flickr30k_images"
     captions_path = "."
     batch_size = 32
     num_workers = 4
     head_lr = 1e-3
     image_encoder_lr = 1e-4
     text_encoder_lr = 1e-5
     weight_decay = 1e-3
     patience = 1
     factor = 0.8
     epochs = 2
     device = torch.device("cuda" if torch.cuda.is_available() else "cpu")

     model_name = 'resnet50'
     image_embedding = 2048
     text_encoder_model = "distilbert-base-uncased"
     text_embedding = 768
     text_tokenizer = "distilbert-base-uncased"
     max_length = 200

     pretrained = True # for both image encoder and text encoder
     trainable = True # for both image encoder and text encoder
     temperature = 1.0

     # image size
     size = 224

     # for projection head; used for both image and text encoders
     num_projection_layers = 1
     projection_dim = 256
     dropout = 0.1
还有一些我们自定义指标的辅助类
 class AvgMeter:
     def __init__(self, name="Metric"):
         self.name = name
         self.reset()

     def reset(self):
         self.avg, self.sum, self.count = [0] * 3

     def update(self, val, count=1):
         self.count += count
         self.sum += val * count
         self.avg = self.sum / self.count

     def __repr__(self):
         text = f"{self.name}: {self.avg:.4f}"
         return text

 def get_lr(optimizer):
     for param_group in optimizer.param_groups:
         return param_group["lr"]
我们的目标是描述图像和句子。所以数据集必须同时返回句子和图像。所以需要使用DistilBERT标记器对句子(标题)进行标记,然后将标记id (input_ids)和注意掩码提供给DistilBERT。DistilBERT比BERT 模型要小,但是模型的结果都差不多,所以我们选择使用它。
下一步就是使用HuggingFace tokenizer进行标记化。在__init__中获得的tokenizer对象,将在模型运行时加载。标题被填充并截断到预定的最大长度。在加载相关图像之前,我们将在**getitem**中加载一个编码的标题,这是一个带有键input_ids和attention_mask的字典,并对其进行转换和扩充(如果有的话)。然后把它变成一个张量,并以“image”作为键存储在字典中。最后我们将标题的原始文本与关键字“标题”一起输入字典。
 class CLIPDataset(torch.utils.data.Dataset):
     def __init__(self, image_filenames, captions, tokenizer, transforms):
         """
         image_filenames and cpations must have the same length; so, if there are
         multiple captions for each image, the image_filenames must have repetitive
         file names
         """

         self.image_filenames = image_filenames
         self.captions = list(captions)
         self.encoded_captions = tokenizer(
             list(captions), padding=True, truncation=True, max_length=CFG.max_length
         )
         self.transforms = transforms

     def __getitem__(self, idx):
         item = {
             key: torch.tensor(values[idx])
             for key, values in self.encoded_captions.items()
         }

         image = cv2.imread(f"{CFG.image_path}/{self.image_filenames[idx]}")
         image = cv2.cvtColor(image, cv2.COLOR_BGR2RGB)
         image = self.transforms(image=image)['image']
         item['image'] = torch.tensor(image).permute(2, 0, 1).float()
         item['caption'] = self.captions[idx]

         return item


     def __len__(self):
         return len(self.captions)


 def get_transforms(mode="train"):
     if mode == "train":
         return A.Compose(
             [
                 A.Resize(CFG.size, CFG.size, always_apply=True),
                 A.Normalize(max_pixel_value=255.0, always_apply=True),
             ]
         )
     else:
         return A.Compose(
             [
                 A.Resize(CFG.size, CFG.size, always_apply=True),
                 A.Normalize(max_pixel_value=255.0, always_apply=True),
             ]
         )
图像和文本编码器:我们将使用ResNet50作为图像编码器。
 class ImageEncoder(nn.Module):
     """
     Encode images to a fixed size vector
     """

     def __init__(
         self, model_name=CFG.model_name, pretrained=CFG.pretrained, trainable=CFG.trainable
     ):
         super().__init__()
         self.model = timm.create_model(
             model_name, pretrained, num_classes=0, global_pool="avg"
         )
         for p in self.model.parameters():
             p.requires_grad = trainable

     def forward(self, x):
         return self.model(x)
使用DistilBERT作为文本编码器。使用CLS令牌的最终表示来获得句子的整个表示。
 class TextEncoder(nn.Module):
     def __init__(self, model_name=CFG.text_encoder_model, pretrained=CFG.pretrained, trainable=CFG.trainable):
         super().__init__()
         if pretrained:
             self.model = DistilBertModel.from_pretrained(model_name)
         else:
             self.model = DistilBertModel(config=DistilBertConfig())

         for p in self.model.parameters():
             p.requires_grad = trainable

         # we are using the CLS token hidden representation as the sentence's embedding
         self.target_token_idx = 0

     def forward(self, input_ids, attention_mask):
         output = self.model(input_ids=input_ids, attention_mask=attention_mask)
         last_hidden_state = output.last_hidden_state
         return last_hidden_state[:, self.target_token_idx, :]
上面的代码已经将图像和文本编码为固定大小的向量(图像2048,文本768),我们需要图像和文本具有相似的尺寸,以便能够比较它们,所以我们把2048维和768维向量投影到256维(projection_dim),只有维度相同我们才能比较它们。
 class ProjectionHead(nn.Module):
     def __init__(
         self,
         embedding_dim,
         projection_dim=CFG.projection_dim,
         dropout=CFG.dropout
     ):
         super().__init__()
         self.projection = nn.Linear(embedding_dim, projection_dim)
         self.gelu = nn.GELU()
         self.fc = nn.Linear(projection_dim, projection_dim)
         self.dropout = nn.Dropout(dropout)
         self.layer_norm = nn.LayerNorm(projection_dim)

     def forward(self, x):
         projected = self.projection(x)
         x = self.gelu(projected)
         x = self.fc(x)
         x = self.dropout(x)
         x = x + projected
         x = self.layer_norm(x)
         return x
所以最后我们的CLIP模型就是这样:
 class CLIPModel(nn.Module):
     def __init__(
         self,
         temperature=CFG.temperature,
         image_embedding=CFG.image_embedding,
         text_embedding=CFG.text_embedding,
     ):
         super().__init__()
         self.image_encoder = ImageEncoder()
         self.text_encoder = TextEncoder()
         self.image_projection = ProjectionHead(embedding_dim=image_embedding)
         self.text_projection = ProjectionHead(embedding_dim=text_embedding)
         self.temperature = temperature

     def forward(self, batch):
         # Getting Image and Text Features
         image_features = self.image_encoder(batch["image"])
         text_features = self.text_encoder(
             input_ids=batch["input_ids"], attention_mask=batch["attention_mask"]
         )
         # Getting Image and Text Embeddings (with same dimension)
         image_embeddings = self.image_projection(image_features)
         text_embeddings = self.text_projection(text_features)

         # Calculating the Loss
         logits = (text_embeddings @ image_embeddings.T) / self.temperature
         images_similarity = image_embeddings @ image_embeddings.T
         texts_similarity = text_embeddings @ text_embeddings.T
         targets = F.softmax(
             (images_similarity + texts_similarity) / 2 * self.temperature, dim=-1
         )
         texts_loss = cross_entropy(logits, targets, reduction='none')
         images_loss = cross_entropy(logits.T, targets.T, reduction='none')
         loss =  (images_loss + texts_loss) / 2.0 # shape: (batch_size)
         return loss.mean()

 #这里还加了一个交叉熵函数
 def cross_entropy(preds, targets, reduction='none'):
     log_softmax = nn.LogSoftmax(dim=-1)
     loss = (-targets * log_softmax(preds)).sum(1)
     if reduction == "none":
         return loss
     elif reduction == "mean":
         return loss.mean()
这里需要说明下,CLIP使用 symmetric cross entropy 作为损失函数,可以降低噪音影响,提高模型鲁棒性,我们这里为了简单只是用cross entropy 。
我们可以进行测试:
 # A simple Example

 batch_size = 4
 dim = 256
 embeddings = torch.randn(batch_size, dim)
 out = embeddings @ embeddings.T
 print(F.softmax(out, dim=-1))
下一步就是训练了,有一些函数可以帮助我们加载训练和验证的dataloader
 def make_train_valid_dfs():
     dataframe = pd.read_csv(f"{CFG.captions_path}/captions.csv")
     max_id = dataframe["id"].max() + 1 if not CFG.debug else 100
     image_ids = np.arange(0, max_id)
     np.random.seed(42)
     valid_ids = np.random.choice(
         image_ids, size=int(0.2 * len(image_ids)), replace=False
     )
     train_ids = [id_ for id_ in image_ids if id_ not in valid_ids]
     train_dataframe = dataframe[dataframe["id"].isin(train_ids)].reset_index(drop=True)
     valid_dataframe = dataframe[dataframe["id"].isin(valid_ids)].reset_index(drop=True)
     return train_dataframe, valid_dataframe


 def build_loaders(dataframe, tokenizer, mode):
     transforms = get_transforms(mode=mode)
     dataset = CLIPDataset(
         dataframe["image"].values,
         dataframe["caption"].values,
         tokenizer=tokenizer,
         transforms=transforms,
     )
     dataloader = torch.utils.data.DataLoader(
         dataset,
         batch_size=CFG.batch_size,
         num_workers=CFG.num_workers,
         shuffle=True if mode == "train" else False,
     )
     return dataloader
然后就是训练和评估
 def train_epoch(model, train_loader, optimizer, lr_scheduler, step):
     loss_meter = AvgMeter()
     tqdm_object = tqdm(train_loader, total=len(train_loader))
     for batch in tqdm_object:
         batch = {k: v.to(CFG.device) for k, v in batch.items() if k != "caption"}
         loss = model(batch)
         optimizer.zero_grad()
         loss.backward()
         optimizer.step()
         if step == "batch":
             lr_scheduler.step()

         count = batch["image"].size(0)
         loss_meter.update(loss.item(), count)

         tqdm_object.set_postfix(train_loss=loss_meter.avg, lr=get_lr(optimizer))
     return loss_meter


 def valid_epoch(model, valid_loader):
     loss_meter = AvgMeter()

     tqdm_object = tqdm(valid_loader, total=len(valid_loader))
     for batch in tqdm_object:
         batch = {k: v.to(CFG.device) for k, v in batch.items() if k != "caption"}
         loss = model(batch)

         count = batch["image"].size(0)
         loss_meter.update(loss.item(), count)

         tqdm_object.set_postfix(valid_loss=loss_meter.avg)
     return loss_meter
最后整合起来就是全部流程
 def main():
     train_df, valid_df = make_train_valid_dfs()
     tokenizer = DistilBertTokenizer.from_pretrained(CFG.text_tokenizer)
     train_loader = build_loaders(train_df, tokenizer, mode="train")
     valid_loader = build_loaders(valid_df, tokenizer, mode="valid")


     model = CLIPModel().to(CFG.device)
     params = [
         {"params": model.image_encoder.parameters(), "lr": CFG.image_encoder_lr},
         {"params": model.text_encoder.parameters(), "lr": CFG.text_encoder_lr},
         {"params": itertools.chain(
             model.image_projection.parameters(), model.text_projection.parameters()
         ), "lr": CFG.head_lr, "weight_decay": CFG.weight_decay}
     ]
     optimizer = torch.optim.AdamW(params, weight_decay=0.)
     lr_scheduler = torch.optim.lr_scheduler.ReduceLROnPlateau(
         optimizer, mode="min", patience=CFG.patience, factor=CFG.factor
     )
     step = "epoch"

     best_loss = float('inf')
     for epoch in range(CFG.epochs):
         print(f"Epoch: {epoch + 1}")
         model.train()
         train_loss = train_epoch(model, train_loader, optimizer, lr_scheduler, step)
         model.eval()
         with torch.no_grad():
             valid_loss = valid_epoch(model, valid_loader)

         if valid_loss.avg < best_loss:
             best_loss = valid_loss.avg
             torch.save(model.state_dict(), "best.pt")
             print("Saved Best Model!")

         lr_scheduler.step(valid_loss.avg)
应用:获取图像嵌入并找到匹配。
我们训练完成后如何实际应用呢?我们需要编写一个函数加载训练后的模型,为其提供验证集中的图像,并返回形状(valid_set_size, 256)和模型本身的image_embeddings。
 def get_image_embeddings(valid_df, model_path):
     tokenizer = DistilBertTokenizer.from_pretrained(CFG.text_tokenizer)
     valid_loader = build_loaders(valid_df, tokenizer, mode="valid")

     model = CLIPModel().to(CFG.device)
     model.load_state_dict(torch.load(model_path, map_location=CFG.device))
     model.eval()

     valid_image_embeddings = []
     with torch.no_grad():
         for batch in tqdm(valid_loader):
             image_features = model.image_encoder(batch["image"].to(CFG.device))
             image_embeddings = model.image_projection(image_features)
             valid_image_embeddings.append(image_embeddings)
     return model, torch.cat(valid_image_embeddings)
 _, valid_df = make_train_valid_dfs()
 model, image_embeddings = get_image_embeddings(valid_df, "best.pt")

 def find_matches(model, image_embeddings, query, image_filenames, n=9):
     tokenizer = DistilBertTokenizer.from_pretrained(CFG.text_tokenizer)
     encoded_query = tokenizer([query])
     batch = {
         key: torch.tensor(values).to(CFG.device)
         for key, values in encoded_query.items()
     }
     with torch.no_grad():
         text_features = model.text_encoder(
             input_ids=batch["input_ids"], attention_mask=batch["attention_mask"]
         )
         text_embeddings = model.text_projection(text_features)

     image_embeddings_n = F.normalize(image_embeddings, p=2, dim=-1)
     text_embeddings_n = F.normalize(text_embeddings, p=2, dim=-1)
     dot_similarity = text_embeddings_n @ image_embeddings_n.T

     values, indices = torch.topk(dot_similarity.squeeze(0), n * 5)
     matches = [image_filenames[idx] for idx in indices[::5]]

     _, axes = plt.subplots(3, 3, figsize=(10, 10))
     for match, ax in zip(matches, axes.flatten()):
         image = cv2.imread(f"{CFG.image_path}/{match}")
         image = cv2.cvtColor(image, cv2.COLOR_BGR2RGB)
         ax.imshow(image)
         ax.axis("off")

     plt.show()
调用方法如下:
 find_matches(model,
              image_embeddings,
              query="one dog sitting on the grass",
              image_filenames=valid_df['image'].values,
              n=9)
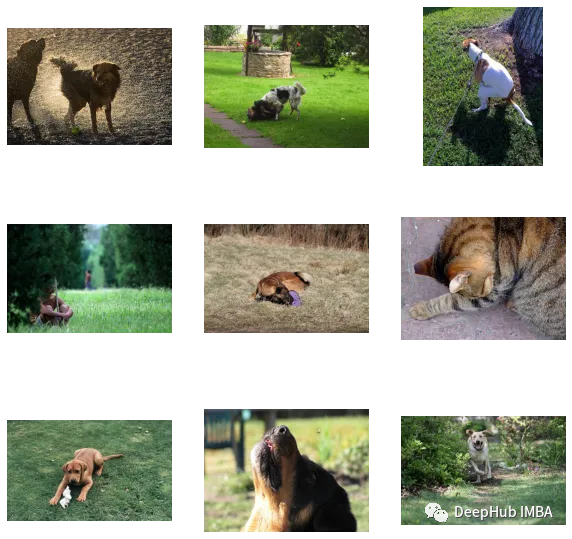
可以看到我们自定义效果还是不错的(但是图里面有个猫,哈)。也就是说CLIP这种方法在小数据集上自定义也是可行的。
以下是本文的代码和数据集:
https://www.kaggle.com/code/jyotidabas/simple-openai-clip-implementation
作者:Jyoti Dabass, Ph.D